Andy in the Cloud

From BBC Basic to Force.com and beyond…


24 Comments

Image Recognition with the Salesforce Einstein API and an Amazon Echo

AI services are becoming more and more accessible to developers than ever before. Salesforce acquired Metamind last year and made some big announcements at Dreamforce 2016. Like many developers, i was keen to find out about its API. The answer at the time was “check back with us next year!”.

pipaWith Spring’17 that question has been answered. At least thus far as regards to image recognition, with the availability of Salesforce Einstein Predictive Vision Service (Pilot). The pilot is open to the public and is free to signup.

True AI consists of recognition, be that visual or spoken, performing actions and the final most critical peace, learning. This blog explores the spoken and visual recognition peace further, with the added help of Flow for performing practically any action you can envision!

You may recall a blog from last year relating to integrating Salesforce with Amazon Echo. To explore the new Einstein API, I decided to leverage that work further. In order to trigger recognition of my pictures from Alexa. Also the Salesforce Flow usage enabled easy extensibility via custom Apex Actions. Thus the Einstein Apex Action was born! After a small bit of code and some configuration i had a working voice activated image recognition demo up and running.

The following diagram breaks down what just happened in the video above. Followed by a deeper walk through of the Predictive Vision Service and how to call it.

amazonechoandeinstein

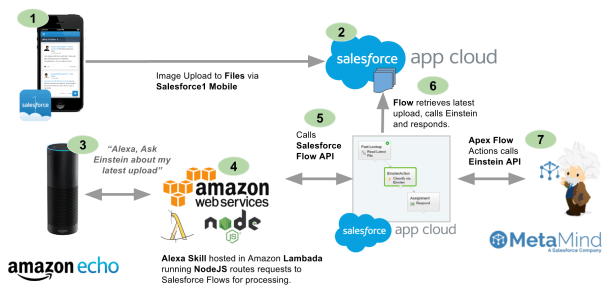
  1. Using Salesforce1 Mobile app I uploaded an image using the Files feature.
  2. Salesforce stores this in the ContentVersion object for later querying (step 6).
  3. Using the Alexa skill, called Einstein, i was able to “Ask Einstein about my photo”
  4. This  NodeJS skill runs on Amazon and simply routes requests to Salesforce Flow
  5. Spoken terms are passed through to a named Flow via the Flow API.
  6. The Flow is simple in this case, it queries the ContentVersion for the latest upload.
  7. The Flow then calls the Einstein Apex Action which in turn calls the Einstein REST API via Apex (more on this later). Finally a Flow assignment takes the resulting prediction of what the images is actually of, and uses it to build a spoken response.
    einstenandflow

Standard Example: The above example is exposing the Einstein API in an Apex Action, this is purely to integrate with the Amazon Echo use case. The pilot documentation walks you through an standalone Apex and Visualforce example to get you started.

How does theEinstein Predictive Vision Service API work?

revaflintsilver
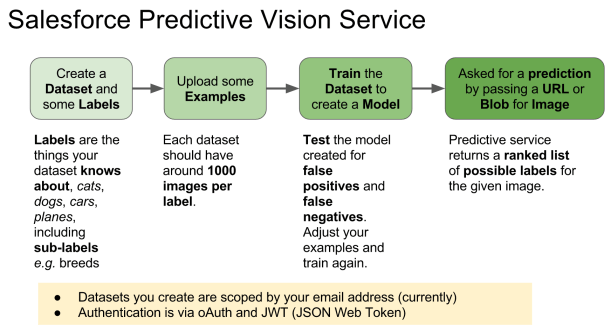
The service introduces a few new terms to get your head round. Firstly a dataset is a named container for the types of images (labels) you want to recognise. The demo above uses a predefined dataset and model. A model is the output from the process of taking examples of each of your data sets labels and processing them (training). Initiating this process is pretty easy, you just make a REST API call with your dataset ID. All the recognition magic is behind the scenes, you just poll for when its done. All you have to do is test the model with other images. The service returns ranked predictions (using the datasets labels) on what it thinks your picture is of. When i ran the pictures above of my family dogs, for the first time i was pretty impressed that it detected the breeds.

EinsteinPredictiveVisionAPI.png

While quite fiddly at times, it is also well worth the walking through how to setup your own image datasets and training to get a hands on example of the above.

How do i call the Einstein API from Apex?

Salesforce saved me the trouble of wrapping the REST API in Apex and have started an Apex wrapper here in this GitHub repo. When you signup you get private key file you have to upload into Salesforce to authenticate the calls. Currently the private key file the pilot gives you seems to be scoped by your org users associated email address.

public with sharing class EinsteinAction {

    public class Prediction {
        @InvocableVariable
        public String label;
        @InvocableVariable
        public Double probability;
    }

    @InvocableMethod(label='Classify the given files' description='Calls the Einsten API to classify the given ContentVersion files.')
    public static List<EinsteinAction.Prediction> classifyFiles(List<ID> contentVersionIds) {
        String access_token = new VisionController().getAccessToken();
        ContentVersion content = [SELECT Title,VersionData FROM ContentVersion where Id in :contentVersionIds LIMIT 1];
        List<EinsteinAction.Prediction> predictions = new List<EinsteinAction.Prediction>();
        for(Vision.Prediction vp : Vision.predictBlob(content.VersionData, access_token, 'GeneralImageClassifier')) {
            EinsteinAction.Prediction p = new EinsteinAction.Prediction();
            p.label = vp.label;
            p.probability = vp.probability;
            predictions.add(p);
            break; // Just take the most probable
        }
        return predictions;
    }
}

NOTE: The above method is only handling the first file passed in the parameter list, the minimum needed for this demo. To bulkify you can remove the limit in the SOQL and ideally put the file ID back in the response. It might also be useful to expose the other predictions and not just the first one.

The VisionController and Vision Apex classes from the GitHub repo are used in the above code. It looks like the repo is still very much WIP so i would expect the API to change a bit. They also assume that you have followed the standalone example tutorial here.

Summary

This initial API has made it pretty easy to access a key part of AI with what is essentially only a handful of simple REST API calls. I’m looking forward to seeing where this goes and where Salesforce goes next with future AI services.


21 Comments

Building an Amazon Echo Skill with the Flow API

Screen Shot 2016-09-25 at 19.31.25.png
The Amazon Echo device sits in your living room or office and listens to your verbal instructions, much like Siri. It performs various activities. Such as fetching and relaying information and/or performing actions on your behalf. It also serves as a large bluetooth speaker. Now, after a run in the US, it has finally been released in the UK!

Why am i writing about it here? Well it has an API of course! So lets roll up our sleeves with an example i built recently with my FinancialForce colleague and partner in crime for all things gadget and platform, Kevin Roberts.

Kevin reached out to me when he noticed that Amazon had built this device with a means to teach it to respond to new phrases. Developers can extend its phrases by creating new Skills.You can read and hear more about the results over on FinancialForce blog site.

The sample code and instructions to reproduce this demo yourself are here. Also don’t worry if you do not have an Amazon Echo, you can test by speaking into your computer by using the EchoSim.io.

Custom Skill Architecture

To create a Skill you need to be a developer, capable of implementing a REST API endpoint that Amazon calls out to when the Echo recognizes a phrase you have trained it with. You can do this in practically any programming language you like of course, providing you comply with the documented JSON definition and host it securely.

lambda.pngOne thing that simplifies the process is hosting your skill code through the Amazon Lambda service. Lambda supports Java, Python and NodeJS, as well as setting up the security stack for you. Leaving all you have to do is provide the code! You can even just type your code in directly to developer console provided by Amazon.

Training your Skill

You cannot just say anything to Amazon Echo and expect it to understand, its clever but not that clever (yet!). Every Skill developer has to provide a set of phrases / sample utterances. From these Amazon does some clever stuff behind the scenes to compile these into a form its speech recognition algorithms can match a users spoken words to.

You are advised to provide as many utterances as you can, up 50,000 of them in fact! To cover as many varied ways in which we can say things differently but mean the same thing.  The sample utterances must all start with an identifier, known as the Intent. You can see various sample utterances for the CreateLead and GetLatestLeads intents below.

CreateLead Lets create a new Lead
CreateLead Create me a new lead
CreateLead New lead
CreateLead Help me create a lead
GetLatestLeads Latest top leads?
GetLatestLeads What are our top leads?

Skills have names, which users can search for in the Skills Marketplace, much like an App does on your phone. For Skill called “Lead Helper” users would speak the following phrases to invoke any of its intents.

  • “Lead Helper, Create me a new lead”
  • “Lead Helper, Lets create a new lead”
  • “Lead Helper, Help me create a lead”
  • “Lead Helper, What are our top leads?”

Your sample utterances can also include parameters / slots.

DueTasks What tasks are due for {Date}?
DueTasks Any tasks that are due for {Date}?

Slots are essentially parameters to your Intents, Amazon supports various slot types. The date slot type is quite flexible in terms of how it handles relative dates.

  • “Task Helper, What tasks are due next thursday?”
  • “Task Helper, Any tasks that are due for today?”

Along with your sample utterances you need to provide an intent schema, this lists the names of your intents (as referenced in your sample utterances) and the slot names and types. Further information can be found in Defining the Voice Interface.

{
  'intents': [
    {
      'intent': 'DueTasks',
      'slots': [
        {
          'name': 'Date',
          'type': 'AMAZON.DATE';
        }
      ]
    }
  ]
}

Mapping Skill Intents and Slots to Flows and Variables

As i mentioned above, Skill developers implement a REST API end point. Instead of receiving the spoken words as raw text, it receives the Intent name and name/value pair of Slot names and values. That method can then invoke the appropriate database query or action and generate a response (as a string) to response back to the user.

To map this to Salesforce Flows, we can consider the Intent name as the Flow Name and the Slot name/values as Flow Input Parameters. Flow Output Parameters can be used to generate the spoken response to the user. For the example above you would define a Flow called DueTasks with the following named input and output Flow parameters.

  • Flow Name: DueTasks
  • Flow Input Parameter Name:  Alexa_Slot_Date
  • Flow Output Parameter Name:  Alexa_Tell

You can then basically use the Flow Assignment element to adjust the variable values. As well as other elements to query and update records accordingly. By using an output variable named Alexa_Tell  before your Flow ends, you end the conversation with a single response contained with the text variable.

For another example see the Echo sample here, this one simply repeats “echo’s” the name given by the user when they speak a phrase with their name in it.

EchoFlow.png

The sample utterances and intent schema are shown below. These utterances also use a literal slot type, which is a kind of picklist with variable possibilities. Meaning that Andrew, Sarah, Kevin and Bob are just sample values, users can use other words in the Name slot, it is up to the developer to validate them if its important.

Echo My name is {Andrew|Name}
Echo My name is {Sarah|Name}
Echo My name is {Kevin|Name}
Echo My name is {Bob|Name}
{
  'intents': [
    {
      'intent': 'Echo',
      'slots': [
        {
          'name': 'Name',
          'type': 'LITERAL'
        }
      ]
    }
  ]
}

Alternatively if create and assign the Alexa_Ask variable in your Flow, this starts a conversation with your user. In this case any Input/Output Flow Parameters are retained between Flow calls. Finally if you suffix any slot name with Number, for example a slot named AmountNumber would be Alexa_Slot_AmountNumber, this will ensure that the value gets converted correctly to pass to a Flow Variable of type Number.

The design for managing conversations with Flow Input/Output variables was inspired by an excellent article on defining conversations in Alexa Skills here.

The following phrases are for the Conversation Flow included in the samples repository.

Conversation About favourite things
Conversation My favourite color is {Red|Color}
Conversation My favourite color is {Green|Color}
Conversation My favourite color is {Blue|Color}
Conversation My favourite number is {Number}

Screen Shot 2016-09-25 at 21.39.09.png

NodeJS Custom Skill

nodejs-new-pantone-black.pngTo code my Skill I went with NodeJS, as i had not done a lot of coding in it and wanted to challenge myself. The other challenge i set myself was to integrate in a generic and extensible way with Salesforce. Thus i wanted to incorporate my old friend Flow!

With its numerous elements for conditional logic, reading and updating the database. Flow is the perfect solution to integrating with Salesforce in the only way we know how on the Salesforce platform, with clicks not code! Now of course Amazon does not talk Flow natively, so we need some glue!

Amazon provide NodeJS developers a useful base class to get things going. In NodeJS this is imported with the require function (interesting “how it works” article). In my case i also leveraged the most excellent nforce library from Kevin O’Hara.

var AlexaSkill = require('./AlexaSkill');
var nforce = require('nforce');

/**
* SalesforceFlowSkill is a child of AlexaSkill.
* To read more about inheritance in JavaScript, see the link below.
*
* @see https://developer.mozilla.org/en-US/docs/Web/JavaScript/Introduction_to_Object-Oriented_JavaScript#Inheritance
*/
var SalesforceFlowSkill = function () {
    AlexaSkill.call(this, APP_ID);
};

The AlexaSkill base class exposes four methods you can override, onSessionStartedonLaunchonSessionEnded and onIntent. As you can see from the method names, requests to your skill code can be scoped in a session. This allows you to manage conversations users can have with the device. Asking questions and gathering answers within the session that build up to perform a specific action.

I implemented the onIntent method to call the Flow API.

SalesforceFlowSkill.prototype.eventHandlers.onIntent =
   function (intentRequest, session, response) {
       // Handle the spoken intent from the user
       // ...
   }

Calling the Salesforce Flow API from NodeJS

Within the onIntent method I used the nforce library to perform oAuth user name and password authentication for simplicity. Though Alexa Skills do support the oAuth web flow by linking accounts. The following code performs the authentication with Salesforce.

SalesforceFlowSkill.prototype.eventHandlers.onIntent =
    // Configure a connection
    var org = nforce.createConnection({
        clientId: 'yourclientid',
        clientSecret: 'yoursecret',
        redirectUri: 'http://localhost:3000/oauth/_callback',
        mode: 'single'
    });
    // Call a Flow!
    org.authenticate({ username: USER_NAME, password: PASSWORD}).
        then(function() {

The following code, calls the Flow API, again via nforce. It maps the slot name/values to parameters and returning any Flow output variables back in the response. A session will be kept open when the response.ask method is called. In this case any Input/Output Flow Parameters are retained in the Session and passed back into the Flow again.

// Build Flow input parameters
var params = {};
// From Session...
for(var sessionAttr in session.attributes) {
    params[sessionAttr] = session.attributes[sessionAttr];
}
// From Slots...
for(var slot in intent.slots) {
    if(intent.slots[slot].value != null) {
        if(slot.endsWith('Number')) {
            params['Alexa_Slot_' + slot] = Number(intent.slots[slot].value);
        } else {
            params['Alexa_Slot_' + slot] = intent.slots[slot].value;
        }
    }
}
// Call the Flow API
var opts = org._getOpts(null, null);
opts.resource = '/actions/custom/flow/'+intentName;
opts.method = 'POST';
var flowRunBody = {};
flowRunBody.inputs  = [];
flowRunBody.inputs[0] = params;
opts.body = JSON.stringify(flowRunBody);
org._apiRequest(opts).then(function(resp) {
    // Ask or Tell?
    var ask = resp[0].outputValues['Alexa_Ask'];
    var tell = resp[0].outputValues['Alexa_Tell'];
    if(tell!=null) {
        // Tell the user something (closes the session)
        response.tell(tell);
    } else if (ask!=null) {
       // Store output variables in Session
       for(var outputVarName in resp[0].outputValues) {
           if(outputVarName == 'Alexa_Ask')
               continue;
           if(outputVarName == 'Alexa_Tell')
               continue;
           if(outputVarName == 'Flow__InterviewStatus')
               continue;
            session.attributes[outputVarName] =
               resp[0].outputValues[outputVarName];
       }
       // Ask another question (keeps session open)
       response.ask(ask, ask);

Summary

I had lot of fun putting this together, even more so seeing what Kevin did with it with his Flow skills (pun intended). If you have someone like Kevin in your company or want to have a go yourself, you can follow the setup and configuration instructions here.

I would also like to call out that past Salesforce MVP, now Trailhead Developer Advocate Jeff Douglass started the ball rolling with his Salesforce CRM examples. Which is also worth checking out if you prefer to build something more explicitly in NodeJS.