Andy in the Cloud

From BBC Basic to Force.com and beyond…


9 Comments

Salesforce DX Integration Strategies

This blog will cover three ways by which you can interact programmatically with Salesforce DX. DX provides a number of time-saving utilities and commands, sometimes though you want to either combine those together or choose to write your own that fit better with your way of working. Fortunately, DX is very open and in fact, goes beyond just interacting with CLI.

If you are familiar with DX you will likely already be writing or have used shell scripts around the CLI, those scripts are code and the CLI commands and their outputs (especially in JSON mode) is the API in this case. The goal of this blog is to highlight this approach further and also other programming options via REST API or Node.js.

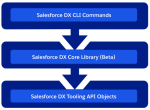
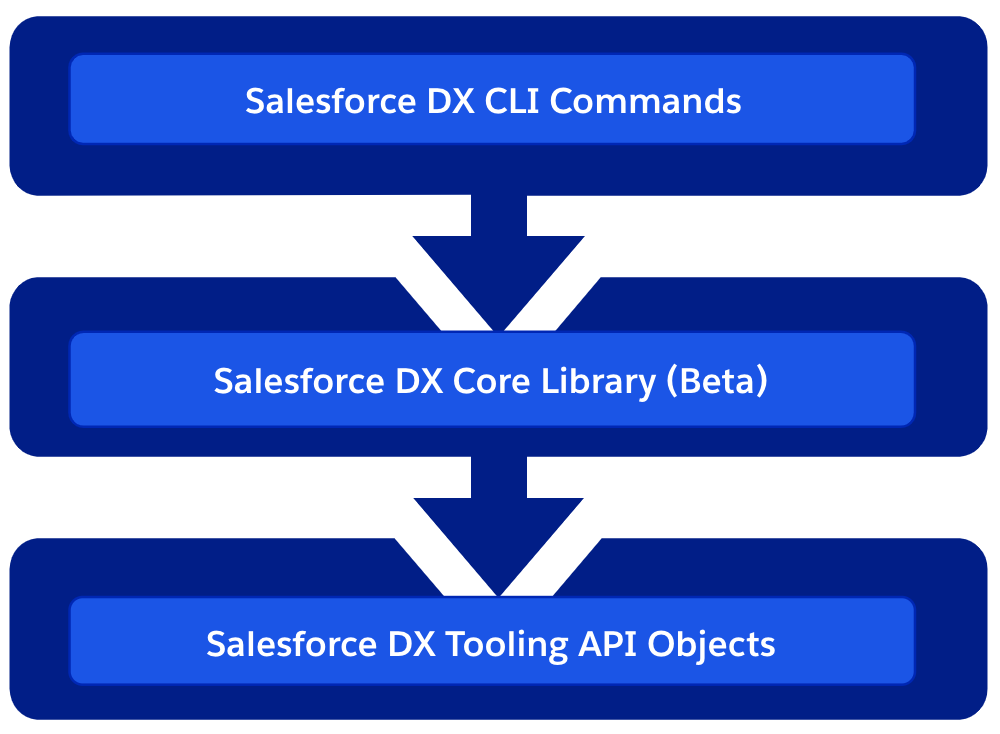
Broadly speaking DX is composed of layers, from client side services to those at the backend. Each of these layers is actually supported and available to you as a developer to consume as well. The diagram shown here shows these layers and the following sections highlight some examples and further use cases for each.

DX CLI

Programming via shell scripts is very common and there is a huge wealth of content and help on the internet regardless of your platform. You can perform condition operations, use variables and even perform loops. The one downside is they are platform specific. So if supporting users on multiple platforms is important to you, and you have skills in other more platform neutral languages you may want to consider automating the CLI that way.

Regardless of how you invoke the CLI, parsing human-readable text from CLI commands is not a great experience and leads to fragility (as it can and should be allowed to change between releases). Thus all Salesforce DX commands support the –json parameter. First, let’s consider the default output of the following command.

sfdx force:org:display
=== Org Description
KEY              VALUE
───────────────  ──────────────────────────────────────────────────────────────────────
Access Token     00DR00.....O1012
Alias            demo
Client Id        SalesforceDevelopmentExperience
Created By       admin@sf-fx.org
Created Date     2019-02-09T23:38:10.000+0000
Dev Hub Id       admin@sf-fx.org
Edition          Developer
Expiration Date  2019-02-16
Id               00DR000000093TsMAI
Instance Url     https://customization-java-9422-dev-ed....salesforce.com/
Org Name         afawcett Company
Status           Active
Username         test....a@example.com

Now let’s contrast the output of this command with the –json parameter.

sfdx force:org:display --json
{"status":0,"result":{"username":"test...a@example.com","devHubId":"admin@sf-fx.org","id":"00DR000000093TsMAI","createdBy":"admin@sf-fx.org","createdDate":"2019-02-09T23:38:10.000+0000","expirationDate":"2019-02-16","status":"Active","edition":"Developer","orgName":"afawcett Company","accessToken":"00DR000...yijdqPlO1012","instanceUrl":"https://customization-java-9422-dev-ed.mobile02.blitz.salesforce.com/","clientId":"SalesforceDevelopmentExperience","alias":"demo"}}}

If you are using a programming language with support for interpreting JSON you can now start to parse the response to obtain the information you need. However, if you are using shell scripts you need a little extract assistance. Thankfully there is an awesome open source utility called jq to the rescue. Just simply piping the JSON output through the jq command allows you to get a better look at things…

sfdx force:org:display --json | jq
{
  "status": 0,
  "result": {
    "username": "test-hm83yjxhunoa@example.com",
    "devHubId": "admin@sf-fx.org",
    "id": "00DR000000093TsMAI",
    "createdBy": "admin@sf-fx.org",
    "createdDate": "2019-02-09T23:38:10.000+0000",
    "expirationDate": "2019-02-16",
    "status": "Active",
    "edition": "Developer",
    "orgName": "afawcett Company",
    "accessToken": "00DR000....O1012",
    "instanceUrl": "https://customization-java-9422-dev-ed.....salesforce.com/",
    "clientId": "SalesforceDevelopmentExperience",
    "alias": "demo"
  }
}

You can then get a bit more specific in terms of the information you want.

sfdx force:org:display --json | jq .result.id -r
00DR000000093TsMAI

You can combine this into a shell script to set variables as follows.

ORG_INFO=$(sfdx force:org:display --json)
ORG_ID=$(echo $ORG_INFO | jq .result.id -r)
ORG_DOMAIN=$(echo $ORG_INFO | jq .result.instanceUrl -r)
ORG_SESSION=$(echo $ORG_INFO | jq .result.accessToken -r)

All the DX commands support JSON output, including the query commands…

sfdx force:data:soql:query -q "select Name from Account" --json | jq .result.records[0].Name -r
GenePoint

The Sample Script for Installing Packages with Dependencies has a great example of using JSON output from the query commands to auto-discover package dependencies. This approach can be adapted however to any object, it also shows another useful approach of combining Python within a Shell script.

DX Core Library and DX Plugins

This is a Node.js library contains core DX functionality such as authentication, org management, project management and the ability to invoke REST API’s against scratch orgs vis JSForce. This library is actually used most commonly when you are authoring a DX plugin, however, it can be used standalone. If you have an existing Node.js based tool or existing CLI library you want to embed DX in.

The samples folder here contains some great examples. This example shows how to use the library to access the alias information and provide a means for the user to edit the alias names.

  // Enter a new alias
  const { newAlias } = await inquirer.prompt([
    { name: 'newAlias', message: 'Enter a new alias (empty to remove):' }
  ]);

  if (alias !== 'N/A') {
    // Remove the old one
    aliases.unset(alias);
    console.log(`Unset alias ${chalk.red(alias)}`);
  }

  if (newAlias) {
    aliases.set(newAlias, username);
    console.log(
      `Set alias ${chalk.green(newAlias)} to username ${chalk.green(username)}`
    );
  }

Tooling API Objects

Finally, there is a host of Tooling API objects that support the above features and some added extra features. These are fully documented and accessible via the Salesforce Tooling API for use in your own plugins or applications capable of making REST API calls.  Keep in mind you can do more than just query these objects, some also represent processes, meaning when you insert into them they do stuff! Here is a brief summary of the most interesting objects.

  • PackageUploadRequest, MetadataPackage, MetadataPackageVersion represent objects you can use as a developer to automate the uploading of first generation packages.
  • Package2, Package2Version, Package2VersionCreateRequest and Package2VersionCreateRequestError represent objects you can use as a developer to automate the uploading of second generation packages.
  • PackageInstallRequest SubscriberPackage SubscriberPackageVersion and Package2Member (second generation only) represent objects that allow you to automate the installation of a package and also allow you to discover the contents of packages installed within an org.
  • SandboxProcess and SandboxInfo represent objects that allow you to automate the creation and refresh of Sandboxes, as well as query for existing ones. For more information see the summary at the bottom of this help topic.
  • SourceMember represents changes you make when using the Setup menu within a Scratch org. It is used by the push and pull commands to track changes. The documentation claims you can create and update records in this object, however, I would recommend that you only use it for informationally purposes. For example, you could write your own poller tool to drive code generation based on custom object changes.

IMPORTANT NOTE: Be sure to consider what CLI commands exist to accomplish your need. As you’ve read above its easy to automate those commands and they manage a lot of the complexity in interacting with these objects directly. This is especially true for packaging objects.

Summary

The above options represent a rich set of abilities to integrate and extend DX. Keep in mind the deeper you go the more flexibility you get, but you are also taking on more complexity. So choose wisely and/or use a mix of approaches. Finally worthy of mention is the future of SFDX CLI and Oclif. Salesforce is busy updating the internals of the DX CLI to use this library and once complete will open up new cool possibilities such as CLI hooks which will allow you to extend the existing commands.


46 Comments

Going Native with the Apex UML Tool and Tooling API!

Screen Shot 2013-10-14 at 22.16.58 Over the last month or so, John M DanielsJames Loghry (a fellow MVP) and myself have been collaborating together in order to accomplish two things; firstly remove the need to utilise a Heroku backend for the Apex UML tool (i first launched for Dreamforce 2013). Secondly and importantly for the first objective, create an Apex wrapper around the Tooling API.

John and I first chatted about collaborating at Dreamforce 2013 to work on the Apex UML tool and move it forward. He later put forward the suggestion that we should consider utilising the Tooling API directly from Apex and do away with the Heroku code. We quickly spun up a branch to try this out, and quite quickly re-architected it to use Visualforce Remoting and started on the plumbing!

Meanwhile James and I had also started thinking about a Apex wrapper around the Tooling API, initially independently, but ultimately decided to join forces! The combination between these two initiatives and the three of us has thus far born excellent fruit, with an initial release of the Apex UML tool running totally native, powered by an early version of the Apex Tooling API…

Apex UML Tool

As before there is a managed package version of the tool for you to install, you can actually upgrade from v1.2 (the Heroku Canvas app based version) directly. Unfortunately if you have v1.2 installed, you will have to upgrade at this stage, as i inadvertently deleted the Connected App from my development org.

  1. Install the package from the install links section here.
  2. Ensure your Apex classes are compiled
  3. Assign the Apex UML permission set
  4. Go to Apex Classes page and click the Compile all classes link
  5. Navigate to the Apex UML page
  6. You will see a Remote Site setting message, follow it and then reload the page.
  7. From this point on the functionality and usage is currently, as per the introduction given here.

UPDATE: Step 6 is not required if you have My Domain enabled (since v1.7).

NativeApexUML

If your interested in ideas we have for future versions of the tool take a look here, ideas always welcome!

Powered by the Apex Tooling API

Initially both James and I had the same thought on building out an Apex wrapper around the Tooling API’s SOAP variant, using the WSDL2Apex tool. However while this approach works quite well for the Metadata API, the Tooling API’s makes extensive use of xsd:extension aka polymorphic XML, for example in the querying of its SObject’s and Symbol Table.

Unfortunately the fact is that the XML deserialiser does not know how to deserialise into different types or how to access base class members. So we reached for the more flexible JSON deserializer. James discovered a cunning combination of manual JSON parsing and typed de-serialisation to get things moving! I’ll leave him to go into more detail on this. You can also read a little more about the strategy decision on the GitHub repository here and current discussions here.

Please note the API is still work in progress,  while the Apex UML tool has given it quite a good shake down so far, keep in mind the API design is still forming. Here are a few examples, starting with code to create an Apex Class

// Create an Apex class in 5 lines!
ToolingAPI toolingAPI = new ToolingAPI();
ToolingAPI.ApexCLass newClass = new ToolingAPI.ApexClass();
newClass.Name = 'HelloWorld';
newClass.Body = 'public class HelloWorld { }';
toolingAPI.createSObject(newClass);

This code queries the Symbol Table for a class and dumps the methods to the debug log…

		ToolingApi toolingAPI = new ToolingApi();
		List apexClasses = (List)
			toolingAPI.query(
				'Select Name, SymbolTable ' +
				'From ApexClass ' +
				'Where Name = \'UmlService\'').records;
		ToolingApi.SymbolTable symbolTable = apexClasses[0].symbolTable;
        for(ToolingApi.Method method : symbolTable.methods)
            System.debug(method.name);

The following is an updated version of a very early version of the API, retrieving a list of Custom Objects and Fields.

		// Constructs the Tooling API wrapper (default constructor uses user session Id)
		ToolingAPI toolingAPI = new ToolingAPI();

		// Query CustomObject object by DeveloperName (note no __c suffix required)
		List customObjects = (List)
			toolingAPI.query('Select Id, DeveloperName, NamespacePrefix From CustomObject Where DeveloperName = \'Test\'').records;

		// Query CustomField object by TableEnumOrId (use CustomObject Id not name for Custom Objects)
		ToolingAPI.CustomObject customObject = customObjects[0];
		Id customObjectId = customObject.Id;
		List customFields = (List)
			toolingAPI.query('Select Id, DeveloperName, NamespacePrefix, TableEnumOrId From CustomField Where TableEnumOrId = \'' + customObjectId + '\'').records;

		// Dump field names (reapply the __c suffix) and their Id's
		System.debug(customObject.DeveloperName + '__c : ' + customObject.Id);
		for(ToolingAPI.CustomField customField : customFields)
			System.debug(
				customObject.DeveloperName + '__c.' +
				customField.DeveloperName + '__c : ' +
				customField.Id);

This code from the Apex UML tool starts a compilation of a given Apex class to later access external references from the ApexClassMember objects SymbolTable.

		// Delete any existing MetadataContainer?
		ToolingApi tooling = new ToolingApi();
		List containers = (List)
			tooling.query(
				'SELECT Id, Name FROM MetadataContainer WHERE Name = \'ApexNavigator\'').records;
		if(containers!=null &&  containers.size()>0)
			tooling.deleteSObject(ToolingAPI.SObjectType.MetadataContainer, containers[0].Id);

		// Create MetadataContainer
		ToolingAPI.MetadataContainer container = new ToolingAPI.MetadataContainer();
		container.name = 'ApexNavigator';
		ToolingAPI.SaveResult containerSaveResult = tooling.createSObject(container);
		if(!containerSaveResult.success)
			throw makeException(containerSaveResult);
		Id containerId = containerSaveResult.id;

		// Create ApexClassMember and associate them with the MetadataContainer
		ToolingAPI.ApexClassMember apexClassMember = new ToolingAPI.ApexClassMember();
		apexClassMember.Body = classes.get(className).Body;
		apexClassMember.ContentEntityId = classes.get(className).id;
		apexClassMember.MetadataContainerId = containerId;
		ToolingAPI.SaveResult apexClassMemberSaveResult = tooling.createSObject(apexClassMember);
		if(!apexClassMemberSaveResult.success)
			throw makeException(apexClassMemberSaveResult);

		// Create ContainerAysncRequest to deploy (check only) the Apex Classes and thus obtain the SymbolTable's
		ToolingAPI.ContainerAsyncRequest asyncRequest = new ToolingAPI.ContainerAsyncRequest();
		asyncRequest.metadataContainerId = containerId;
		asyncRequest.IsCheckOnly = true;
		ToolingAPI.SaveResult asyncRequestSaveResult = tooling.createSObject(asyncRequest);
		if(!asyncRequestSaveResult.success)
			throw makeException(asyncRequestSaveResult);
		asyncRequest = ((List)
			tooling.query(
				'SELECT Id, State, MetadataContainerId, CompilerErrors ' +
				'FROM ContainerAsyncRequest ' +
				'WHERE Id = \'' + asyncRequestSaveResult.Id + '\'').records)[0];

In later blogs between us, we will be extending the demo code and more cool stuff!

Next Steps

I’m looking forward to what happens next! Both initiatives have got off to a great start and we will keep incrementing. Certainly, its good to have the Apex UML tool to help drive the development and testing of the Apex Tooling API. Follow my fellow collaborators here @JohnDTheMaven and @dancinllama.


87 Comments

Querying Custom Object and Field IDs via Tooling API

There are quite a few blogs describing a means to build Salesforce URL’s to standard pages for creating records, that can be applied to Custom Buttons in order to pre-populate field values when a user clicks a button. For example replacing the New button on a Related list.

IMPORTANT NOTE: The URL format Salesforce uses for the standard UI is not a supported API and thus subject to change. Though it has become quite common practice in order to improve the usability of the standard UI.

Making things a little more Robust

Other than URL format assumption, there is an area of further fragility shared amongst the solutions I’ve seen to-date. Which is how to obtain and manage the custom field Id’s needed on the URL’s (since they don’t take field API names). Either via discovering these manually or dynamically via using REGEX parsing of the HTML source code of the Salesforce standard pages. Although there is a Salesforce IdeaExchange submission to have Salesforce expose these Id’s via Apex Describe, it apparently has not been addressed… or so it would seem that is….

Tooling API support for Custom Object and Custom Fields

Probably the least obvious aspect of the Tooling API is its ability to actually query (via REST or SOAP) the CustomObject and CustomField objects (which are not accessible via Apex SOQL). As we know every object in Salesforce has an ID, this got me wondering if in this case its the same ID’s needed by the approaches used above. And thus if so, would serve as a more supported and less risky means to obtain the custom field Id’s. I have also wanted to start building out a Apex wrapper for the Tooling API for a while now. The following Apex code shows the library in action…

UPDATE: Please use the Apex code that wraps the REST version of the API in order to be compatible with the statements in this blog.

// Constructs the Tooling API wrapper (default constructor uses user session Id)
ToolingAPI toolingAPI = new ToolingAPI();

// Query CustomObject object by DeveloperName (note no __c suffix required)
List<ToolingAPI.CustomObject> customObjects = (List<ToolingAPI.CustomObject>)
     toolingAPI.query('Select Id, DeveloperName, NamespacePrefix From CustomObject Where DeveloperName = \'Test\'').records;

// Query CustomField object by TableEnumOrId (use CustomObject Id not name for Custom Objects)
ToolingAPI.CustomObject customObject = customObjects[0];
Id customObjectId = customObject.Id;
List<ToolingAPI.CustomField> customFields = (List<ToolingAPI.CustomField>)
     toolingAPI.query('Select Id, DeveloperName, NamespacePrefix, TableEnumOrId From CustomField Where TableEnumOrId = \'' + customObjectId + '\'').records;

// Dump field names (reapply the __c suffix) and their Id's
System.debug(customObject.DeveloperName + '__c : ' + customObject.Id);
for(ToolingAPI.CustomField customField : customFields)
     System.debug(
          customObject.DeveloperName + '__c.' +
          customField.DeveloperName + '__c : ' +
          customField.Id);

This results in the following list of fields and Id’s against my test custom object…

00:27:38.845 (845882069)|USER_DEBUG|[45]|DEBUG|Test__c : 01IG00000021cXoMAI
00:27:38.846 (846249350)|USER_DEBUG|[47]|DEBUG|Test__c.A_Number__c : 00NG0000009Y0I9MAK
00:27:38.846 (846305290)|USER_DEBUG|[47]|DEBUG|Test__c.Colours__c : 00NG0000009prwyMAA
00:27:38.846 (846328856)|USER_DEBUG|[47]|DEBUG|Test__c.Date__c : 00NG0000009BrnxMAC
00:27:38.846 (846513094)|USER_DEBUG|[47]|DEBUG|Test__c.Message__c : 00NG0000009Y0IOMA0
00:27:38.846 (846535746)|USER_DEBUG|[47]|DEBUG|Test__c.MultiPick__c : 00NG000000AcULrMAN
00:27:38.846 (846558753)|USER_DEBUG|[47]|DEBUG|Test__c.MyCheckbox__c : 00NG0000009Y5C8MAK
00:27:38.846 (846741056)|USER_DEBUG|[47]|DEBUG|Test__c.RichText__c : 00NG0000009XaRJMA0
00:27:38.846 (846816183)|USER_DEBUG|[47]|DEBUG|Test__c.Text__c : 00NG0000009prxwMAA

Summary

This blog serves as a means to demonstrate an initial starting point for a Apex wrapper around the Tooling API (the GitHub repo has the full code with tests to deploy direct via the usual link). Be sure to setup the appropriate Remote Site setting for the Tooling API end point (easiest way is to run the code and note the URL given in the exception). Finally a means for for the various authors of the solutions above to update their code. Enjoy!


6 Comments

Apex UML Canvas Tool : Dreamforce Release!

Screen Shot 2013-10-14 at 22.16.58

Update: Dreamforce is over for another year! Thanks to everyone who supported me and came along to the session. Salesforce have now uploaded a recording of the session here and can find the slides here.

As those following my blog will know one of the sessions I’ll be running at this years Dreamforce event is around the Tooling API and Canvas technologies. If you’ve not read about what I’m doing check out my previous blog here. I’ve now uploaded the code to the tool I’ve developed that will be show casing these technologies. I’ll be walking through key parts of it in the session, please do feel free to take a look and give me your thoughts ahead or at the session if your attending!

Installing the Tool

You now also install the tool as a managed package into your development org by following these steps.

  1. Install the package using the package install link from the GitHub repo README file.
  2. Installed is a tab which shows a Visualforce page which hosts the externally hosted (on Heroku) Canvas application.
  3. You need to configure access to the Canvas application post installation, you can follow the Salesforce guidelines on screen and/or the ones here.Screen Shot 2013-11-12 at 17.52.55
  4. Click the link to configure and edit the “Admin approved users are pre-authorised” option and save.Screen Shot 2013-11-12 at 17.53.54
  5. Finally edit your Profile and enable the Connected App (and Tab if needed)Screen Shot 2013-11-12 at 17.57.08

Using the Tool

Screen Shot 2013-11-12 at 17.41.16

  • The tool displays a list of the Apex classes (unmanaged) in your org on the left hand side, tick a class to show it in the canvas.
  • Move the Apex class UML representation around with your mouse, if it or other classes reference each other lines will be drawn automatically.
  • There is some issues with dragging, if you get mixed up, just click the canvas to deselect everything then click what you want.

It is quite basic still, only showing methods, properties and ‘usage’ relationships and really needs some further community push behind it to progress a long line of cool features that could be added. Take a look at the comments and discussion on my last post for some more ideas on this. Look forward to see you all at Dreamforce 2013!


15 Comments

Preview: Apex UML Canvas with Tooling API

Regular readers of my blog will recall my last post charting my exploits with the Salesforce Tooling API for a session I’m running at Dreamforce 2013…

Dreamforce 2013 Session: Apex Code Analysis using the Tooling API and Canvas

The Tooling API provides powerful new ways to manage your code and get further insight into how its structured. This session will teach you how to use the Tooling API and its Symbol Table to analyse your code using an application integrated via Force.com Canvas directly into your Salesforce org — no command line or desktop install required! Join us and take your knowledge of how your Apex code is really structured to the next level!

Screen Shot 2013-10-14 at 22.16.58As I hinted at in the last blog I was not 100% happy with the Mind Map visualisation I initially used. It was fun to play with, but I wanted to illustrate the use of the Tooling API with something more functional. So I went searching for a new library. I wanted something that was HML5 based, that would dynamically render as the user selected Apex classes.

Inspired by the ObjectAid tool, as well as some feedback comments describing a very cool PlantUML based Apex tool, impressively written currently without the Tooling API called PlantUML4Force. While PlantUML is a great library, it was not dynamic enough and ultimately I wanted to be able to better illustrate the separation of concerns in the diagrams by having more granular control over the final diagram. I eventually found a bit of hidden gem called UMLCanvas

I’ll eventually share this as a package once I’ve had a chance to work on it a bit more (it’s currently showing only UML Dependency relationships). In the meantime please take a look at the new video below and join me in my Dreamforce Session to hear about how I built it!

Technologies involved so far…


8 Comments

Preview: Demo of Apex Code Analysis using the Tooling API and Canvas

This weekend I’ve been fleshing out the code for my second Dreamforce 2013 session. I’ve been having a lot of fun with various technologies to create the following demo which I’ve shared a short work in progress video below. The JQuery plugin doing the rendering is js-mindmap, it’s got some quirks I’ve discovered so far, but I’m sticky with it for now!

The session highlights the Tooling API via this tool which can be installed directly into your Salesforce environment via the wonderful Salesforce Canvas technology! This is proposed session abstract …

Dreamforce 2013 Session: Apex Code Analysis using the Tooling API and Canvas

The Tooling API provides powerful new ways to manage your code and get further insight into how its structured. This session will teach you how to use the Tooling API and its Symbol Table to analyse your code using an application integrated via Force.com Canvas directly into your Salesforce org — no command line or desktop install required! Join us and take your knowledge of how your Apex code is really structured to the next level!

Technologies involved so far…

I’ve also found the excellent ObjectAid Eclipse plugin (which is sadly a Java source code only tool) to explore the Tooling API data structures in much more detail than the Salesforce documentation currently offers, especially in respect to the SymbolTable structure. I’ll be sharing full code and discussing the following diagram in more detail in my session! In the meantime I’d love to know your thoughts and other ideas around the Tooling API!

Tooling API


38 Comments

Spring Cleaning Apex Code with the Tooling API

I love API’s! How do I know I really love an API? When I sit down on an evening and the next thing I know the birds start singing, thats how!

So when Salesforce first announced the Tooling API I’ve been following it closely and I am really pleased with the first version and what I’ve been able to achieve thus far with it. In the Spring’13 release it will be GA! Unsurprisingly like the Metadata API it provides CRUD  (Create, Cread, Update and Delete) access to some of the key component types such as ApexClass,  ApexTrigger and ApexPage. This list will grow in time. So whats the big deal you say? Well….

KEY FEATURES

The real magic is what this API brings in terms of the tasks and information around authoring and executing Apex and Visualforce. Such as Debug logs, Heap dumps and my personal favourite Symbol Tables!

A Symbol Table breaks down the code you write and gives you a kind of analytics over your code. Listing all the properties  methods defined and also references elsewhere being made. This information is useful for all kinds of analysis, such as code refactoring and code complexity such as Cyclomatic complexity.

APEX CODE ANALYSIS TOOL

This blog presents the beginnings of a Apex Code Analysis Tool. While also showing via Force.com Canvas thats its now possible to add such a tool directly into your DE environment, no software download required!

When refactoring code, its import to know what dependencies exist between your classes, methods and properties. So that you can decide on where to trim or  consolidate code accordingly. I started with the requirement of wanting to know what methods are now no longer being referenced at all, and thus could be removed. This would also improve test code coverage as well. After achieving this analysis, the tool would have the data to be easily extended.

apexanalysis

Installing

Before we get into the nitty gritty, I do want to say that I do plan once Spring’13 is out and the API is fully GA. To provide the usual Canvas app install link to make it a little easier for those of you that just want to try it out directly and not have to worry about compiling and deploying it, watch “this” space!

THE NUTS AND BOLTS

The code is written in Java and is essentially invoked via a JSP binding on the page shown above to list the methods. The tool itself uses the Force.com Canvas SDK running on Heroku to host the logic.  The Canvas SDK provides access to the oAuth token to authenticate the Tooling API calls. The Canvas Developers Guide is an excellent place to learning more about this. The SDK itself is quite light and easy to use, only a few Java classes are needed, good job guys!

The next thing I needed, as Java is type safe language, was to download the Tooling API WSDL (there is also a REST interface for the Tooling API). This can be downloaded via [Your Name] > Setup > Develop > API. As this is Canvas app from the SDK, it uses Maven to build the code. I found WSDL2Java tool that would plugin into my pom.xml file in the form of JAX-WS xsimport. Armed with my client stubs I could access the Tooling API natively in Java. I’ve given more details on this on the github repo associated with this blog.

THE CODE

This first part of the code shows the Canvas SDK in action providing the oAuth token (line 6) from the information Canvas POST’s to the page. We need to create the usual SessionHeader (standard Salesforce API approach for authentication) and populate it with the token. We also create our client service  (line 10) to call the Tooling API on. These classes have been created earlier by integrating the Tooling API WSDL via the WSDL2Java tool via the pom.xml file.

public class ToolingAPI {

	public static String getUnusedApexMethods(String input, String secret)
	{
		// Get oAuth token
		CanvasRequest request =
			SignedRequest.verifyAndDecode(input, secret);
		String oAuthToken = request.getClient().getOAuthToken();

		// Connect to Tooling API
		SforceServiceService service = new SforceServiceService();
		SforceServicePortType port = service.getSforceService();
		SessionHeader sessionHeader = new SessionHeader();
		sessionHeader.setSessionId(oAuthToken);

Next we need to understand a little about the Tooling API and how to get things done with it. The Tooling API Developers Guide is a good read to get you started. Its is essentially a matter using CRUD operations on a set of new SObject’s it exposes. To setup whats described as a MetadataContainer, which I suspect relates to a Workspace if your used to using the Developer Console (which is now widely known to have been using the Tooling API for a while now).

  • ApexClass, if your familiar with the Metadata API you will know about this object. Also if you have poked around with Schema tools will also know it as a means to query the Apex classes in an org. 
  • MetadataContainer. This is in a sense a parent object to the ApexClassMember object described below and is kind of your working environment in which you add other components to. It is pretty simple to create, it just needs a unique name.
  • ApexClassMember. Not to be confused with a ‘member’ variable of an Apex class btw! This object is associated with the MetadataContainer via the MetadataContainerId field. It must also be associated with the related ApexClass, via its ContentEntityId field. After that you simply provide it a Body of the code you want the Tooling API to deal with. In this use case I’ve read that directly from the ApexClass object. This object also exposes an important child object, the SymbolTable. But only after we have asked the Tooling API to process it.
  • ContainerAsyncRequest. So far the above objects have helped you set out your stall in respect to the code you want the Tooling API to deal with. Records inserted into this object will actually get it to do some processing. Again those familiar with the Metadata API will see some old favourites on here field wise. The key one for this use case, is the IsCheckOnly field. Setting this to True ensures we don’t actually update anything, all we need is the calculated SymbolTable!

The following code queries the ApexClass‘s we want to obtain the SymbolTable‘s for. Creates/recreates the MetadataContainer. Then creates and associates with it a number ApexClassMember’s for each of the ApexClass’s queried. After this stage we are ready for the magic!

		// Query visible Apex classes (this query does not support querying in packaging orgs)
		ApexClass[] apexClasses =
			port.query("select Id, Name, Body from ApexClass where NamespacePrefix = null", sessionHeader)
				.getRecords().toArray(new ApexClass[0]);

		// Delete existing MetadataContainer?
		MetadataContainer[] containers =
			port.query("select Id, Name from MetadataContainer where Name = 'UnusedApexMethods'", sessionHeader)
				.getRecords().toArray(new MetadataContainer[0]);
		if(containers.length>0)
			port.delete(Arrays.asList(containers[0].getId()), sessionHeader);

		// Create new MetadataContainer
		MetadataContainer container = new MetadataContainer();
		container.setName("UnusedApexMethods");
		List saveResults = port.create(new ArrayList(Arrays.asList(container)), sessionHeader);
		String containerId = saveResults.get(0).getId();

		// Create ApexClassMember's and associate them with the MetadataContainer
		List apexClassMembers = new ArrayList();
		for(ApexClass apexClass : apexClasses)
		{
			ApexClassMember apexClassMember = new ApexClassMember();
			apexClassMember.setBody(apexClass.getBody());
			apexClassMember.setContentEntityId(apexClass.getId());
			apexClassMember.setMetadataContainerId(containerId);
			apexClassMembers.add(apexClassMember);
		}
		saveResults = port.create(new ArrayList(apexClassMembers), sessionHeader);
		List apexClassMemberIds = new ArrayList();
		for(SaveResult saveResult : saveResults)
			apexClassMemberIds.add(saveResult.getId());

The following code creates a ContainerAysncRequest record, which has the effect of kicking off a background process in the Salesforce servers to begin to process the members of the MetadataContainer provided to it. Note that we set the CheckOnly field to True here, as we don’t want to actual update anything. In this sample code we simply ask Java to wait for this operation to complete.

		// Create ContainerAysncRequest to deploy the (check only) the Apex Classes and thus obtain the SymbolTable's
		ContainerAsyncRequest ayncRequest = new ContainerAsyncRequest();
		ayncRequest.setMetadataContainerId(containerId);
		ayncRequest.setIsCheckOnly(true);
		saveResults = port.create(new ArrayList(Arrays.asList(ayncRequest)), sessionHeader);
		String containerAsyncRequestId = saveResults.get(0).getId();
		ayncRequest = (ContainerAsyncRequest)
			port.retrieve("State", "ContainerAsyncRequest", Arrays.asList(containerAsyncRequestId), sessionHeader).get(0);
		while(ayncRequest.getState().equals("Queued"))
		{
			try {
				Thread.sleep(1 * 1000); // Wait for a second
			} catch (InterruptedException ex) {
				Thread.currentThread().interrupt();
			}
			ayncRequest = (ContainerAsyncRequest)
				port.retrieve("State", "ContainerAsyncRequest", Arrays.asList(containerAsyncRequestId), sessionHeader).get(0);
		}

Next we requery the ApexClassMember‘s, requesting the SymbolTable information in the query. The code then scans through the SymbolTable information for each ApexClassMember looking for methods declared and methods referenced. Adding the resulting qualified method names in one of two Java Set’s accordingly for later processing.

		// Query again the ApexClassMember's to retrieve the SymbolTable's
		ApexClassMember[] apexClassMembersWithSymbols =
			port.retrieve("Body, ContentEntityId, SymbolTable", "ApexClassMember", apexClassMemberIds, sessionHeader)
				.toArray(new ApexClassMember[0]);

		// Map declared methods and external method references from SymbolTable's
		Set declaredMethods = new HashSet();
		Set methodReferences = new HashSet();
		for(ApexClassMember apexClassMember : apexClassMembersWithSymbols)
		{
			// List class methods defined and referenced
			SymbolTable symbolTable = apexClassMember.getSymbolTable();
			if(symbolTable==null) // No symbol table, then class likely is invalid
				continue;
			for(Method method : symbolTable.getMethods())
			{
				// Annotations are not exposed currently, following attempts to detect test methods to avoid giving false positives
				if(method.getName().toLowerCase().contains("test") &&
				   method.getVisibility() == SymbolVisibility.PRIVATE &&
				   (method.getReferences()==null || method.getReferences().size()==0))
					continue;
				// Skip Global methods as implicitly these are referenced
				if( method.getVisibility() == SymbolVisibility.GLOBAL)
					continue;
				// Bug? (public method from System.Test?)
				if( method.getName().equals("aot"))
					continue;
				// Add the qualified method name to the list
				declaredMethods.add(symbolTable.getName() + "." + method.getName());
				// Any local references to this method?
				if(method.getReferences()!=null && method.getReferences().size()>0)
					methodReferences.add(symbolTable.getName() + "." + method.getName());
			}
			// Add any method references this class makes to other class methods
			for(ExternalReference externalRef : symbolTable.getExternalReferences())
				for(ExternalMethod externalMethodRef : externalRef.getMethods())
					methodReferences.add(externalRef.getName() + "." + externalMethodRef.getName());
		}

There is some filtering applied to the methods processed. To filter out test methods (sadly for now at least annotations are not visible, so some assumptions are made here). Also methods marked as Global will not likely be referenced but of course are logically referenced by code outside of the org, so these methods are also skipped. Finally on occasion in my Sandbox I did get my SymbolTable populated with methods from System.Test, I’ve raised this with Salesforce.

Finally its a matter of looping over the declared methods and checking if they are present in the referenced methods set. Then outputting our list of unreferenced methods back through the JSP page binding.

		// List declaredMethods with no external references
		TreeSet unusedMethods = new TreeSet();
		for(String delcaredMethodName : declaredMethods)
			if(!methodReferences.contains(delcaredMethodName))
				unusedMethods.add(delcaredMethodName);

		// Render HTML table to display results
		StringBuilder sb = new StringBuilder();
		sb.append("<table>");
		for(String methodName : unusedMethods)
			sb.append("<tr><td>" + methodName + "</td></tr>");
		sb.append("</table>");
		return sb.toString();
	}

You can view the latest version of the code above in the Github repo here. In this screenshot I’ve enhanced the above a little to provide hyper links to the classes. You can view the Apex code used to test this here.

unusedapex

SUMMARY

It should be noted that the Tooling API does also appear to support Visualforce ‘components’ ( I am assuming this to mean in a general sense, so thus VF pages). The principles appear the same in terms of how you interact with it, see the ApexComponentMember object in the docs. As such currently the above code does not consider references to methods on VF pages, a topic for another blog and/or fellow contributor to the Github repo perhaps…

So there you have it! The possibilities are now finally open for the tools we’ve all been waiting for. As our Apex code bases grow along with the demands of our apps and our customers. I for one am looking forward to see what happens next from tools vendors with this API.

Links