As covered in my last blog, from Summer’26, user mode by default is now with us in Apex, and that’s a good thing—well, depending on how much you’ve been historically paying attention to security in your code. If your wondering what I mean by that check out my last blog first. User mode is enabled by default from API 67.0, this also applies to test code – which is likely to start throw failures you’ve not seen before – and thats also a good thing!
This blog covers both new and old considerations for how to best test a vital part of your Apex and Permission Sets using Apex tests. Instead of a sample app attached to this blog, I have included an agent skill that goes into a little more detail for you and your coding AI buddy to pour over!
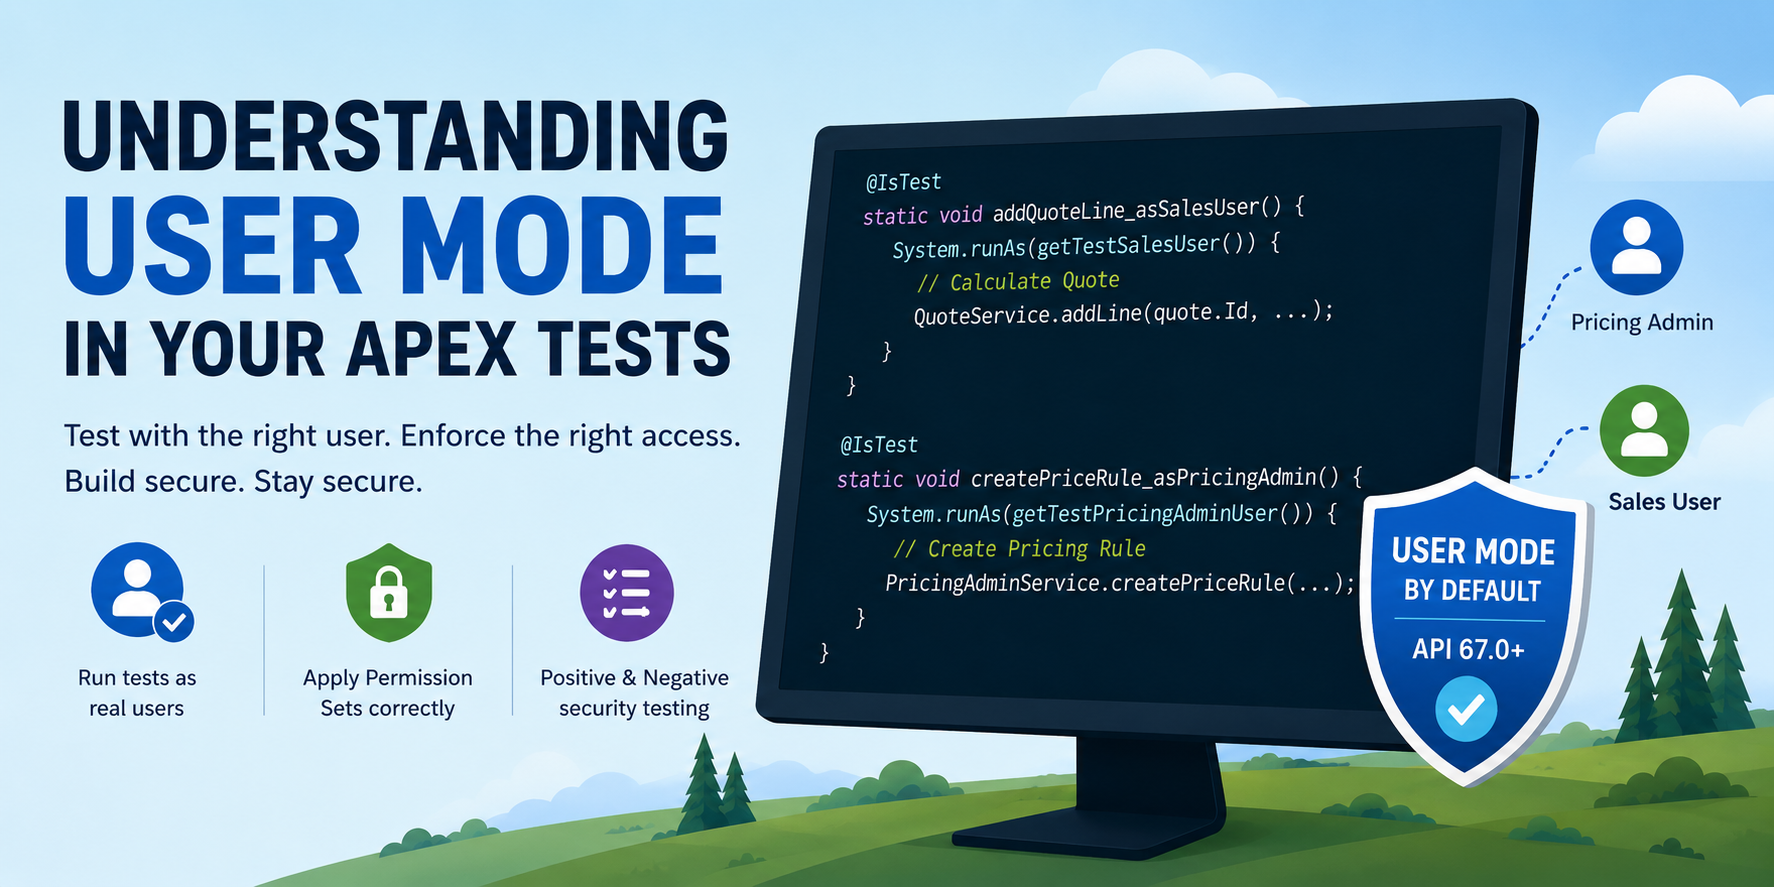
By default, your tests will run as the user executing them, and this time in user mode, that user’s accessible objects, fields, and records will be applied to the code being tested. This is not ideal for isolation or testing different security aspects of your code. As such, it is even more important to ensure that you understand what System.runAs is and how to use it in your tests to test and apply your Permission Sets correctly. As an alternative, you can also address this by adding more permissions to whatever user runs your tests until things return to normal—but you’re really hitting a significant security testing anti-pattern if you do!
As mentioned in my earlier blog, before you worry about how and where you enforce security in your Apex code, and even before considering what your Apex tests are and are not testing with security, you need to think about how you define what security looks like to your admins. Specifically, what type of user (persona/role) is expected to manage X and Y, but not Z data?
As an example, if you had a quote calculation engine, you might have users that manage pricing data and quote discount rules who can create and edit such information, in contrast to users who simply consume that information when generating quotes. This would amount to two separate permission sets: “Pricing Admin” and “Pricing Consumer.” In your Apex code, you enforce security, but in your test code, you want to test your two permission sets as well. You can do this by creating a user in your test setup that is dynamically assigned the appropriate permission set, then using System.runAs to wrap your test data creation (accordingly) and your test execution.
Here is a sudo code example of such as test:
@testSetup
static void setup() {

    createStandardUserWithPermissionSet(
            'QuoteApp_PricingAdmin', PRICING_ADMIN_LASTNAME, PRICING_ADMIN_EMAIL);
    createStandardUserWithPermissionSet(
            'QuoteApp_SalesUser', SALES_USER_LASTNAME, SALES_USER_EMAIL);

    System.runAs(getTestPricingAdminUser()) {
        // Central pricing data only the admin persona can maintain
        insert new PriceConfig__c(/* required fields */);
        insert new PriceRule__c(/* required fields */);
    }

    System.runAs(getTestSalesUser()) {
        // Transactional records the sales user creates (can read price config/rules, not edit them)
        insert new Quote__c(OwnerId = salesUser.Id, /* ... */);
        insert new QuoteLine__c(/* ... */);
    }
}

@IsTest
static void addQuoteLine_asSalesUser() {
    System.runAs(getTestSalesUser()) {
        // Given : Query Quote created by Sales User
        Quote__c quote = [SELECT Id FROM Quote__c WHERE OwnerId = :salesUser.Id LIMIT 1];
        // When: Calculate Quote
        Test.startTest();
        QuoteService.addLine(quote.Id, /* product, qty, etc. */);
        Test.stopTest();
        // Then: Query Quote line calculated
        QuoteLine__c line =
            [SELECT Id, UnitPrice__c FROM QuoteLine__c WHERE Quote__c = :quote.Id LIMIT 1];
        System.assertNotEquals(null, line.UnitPrice__c, 'Line should be priced using readable config/rules');
    }
}

@IsTest
static void createPriceRule_asPricingAdmin() {
    System.runAs(getTestPricingAdminUser()) {
        // When : Creating a pricing rule
        Test.startTest();
        Id ruleId = PricingAdminService.createPriceRule(new PriceRule__c(/* ... */));
        Test.stopTest();
        // Then: Pricing rule successfully created
        System.assertNotEquals(null, ruleId);
    }
}
One important aspect that can often be overlooked is negative security testing, which is crucial for ensuring that your permission sets remain lean and focused. In this case, the following test verifies that the Sales User permission set does not grant access to creating pricing rules:
@IsTest
static void createPriceRule_deniedForSalesUser() {
    User salesUser = getTestSalesUser();
    // Given: Sales user
    System.runAs(salesUser) {
        Test.startTest();
        try {
            // When: Attempting to create pricing rule
            PricingAdminService.createPriceRule(new PriceRule__c(/* ... */));
            System.assert(false, 'Expected a security or access failure');
        } catch (Exception e) {
            // Then: Security enforced / also see DMLException methods
            System.assert(
                e.getMessage().toLowerCase().contains('insufficient')
                || e.getMessage().toLowerCase().contains('access'),
                'Unexpected: ' + e.getMessage()
            );
        }
        Test.stopTest();
    }
}
The above example present a scenario where you have enough functional variety and types/roles/personas of users in your solution that it warrants you breaking things up in a more granular way into several permission sets. If this is not the case you will still want to cover access to your code through a permission set and apply the same patterns. Finally, you might also want to consider writing some tests that assert no general user access is possible to objects/fields accessed by use of system mode – e.g. confirming neither permission set allows writes to a log objects.
If you are interested in exploring this further yourself – rather than a sample application this time I thought I would share an agent skill that covers this blog and goes a bit deeper into the utility methods shown above. Have fun!
Since I started with Salesforce some 15+ years ago, as part of a team building the first account app on AppExchange, security has always been an important consideration. Coming from other platforms, the principle of least privilege was also instilled in me. While Salesforce has always had a flexible set of security controls, they weren’t enforced “by default” in Apex code – giving it access to everything. This has now changed with these two Summer’26 / API 67.0 changes for CRUD security and sharing security, marking one of the biggest design shifts for Apex since its inception! The trouble with this of course – is literally millions and millions of lines of Apex code has been written against the exact opposite assumption.
So what’s going to happen once you upgrade to Summer’26 / API 67.0?
Firstly you don’t have to upgrade to API 67.0 straight away and quite often I have seem teams lag a little bit to take on the work in planned way or just wait to see if its stable. But once you do make the move, to be realistic, despite explicit Apex trigger code being exempt (by design they remain in system mode), you cannot assume the rest of your Apex code is not going to break. When it does, you will probably find yourself having a number of painful but “good” security design reflections. The good news is that, depending on how recent your codebase is, you might already be partway on the journey! There is a lot more to be written, reflected, tooled up etc on this topic. For now in this blog, I want to discuss what paths you might find yourself on and what to be thinking about.
How much Apex breaks depends on whether you’ve been using either the new declarative-based Apex user and system modes or sticking with the old method of manually performing CRUD checks. If you’ve applied either, you should also have started using Permission Set in your solution. Permission Sets are key to this adoption. By applying both these approaches in deployments and during test execution (via System.runAs), you’re not only enforcing security but also providing admins with ready-to-use permission configurations that match your entire codes needs or, if desired, a more granular breakdown by module or groups of actions users are permitted to perform. Below, we will first explore this optimistic adoption path and then discuss the more challenging one.
Before we dive in here is a short summary table of paths that you might fall into:
Path A:
Fully applied: – Apex User Mode – System Mode – “without sharing”
Path B:
Partially applied: – Apex User Mode fully – Or Apex Describe Checks – Or “with sharing”, some “without sharing”
Path C:
No Security Checks: – Possibly no Permission Sets
If this is exclusively the case across your code base – well done! This falls into the best happy path of all – and aligns with Salesforce guidance on system mode. Don’t assume all is well though, plan accordingly, use this as an opportunity to review your Permission Set strategy (see over-permissioning below) and double check without sharing usage with System Mode. *
You are in a good starting position, and should have some created some Permission Sets to support your code, but still might need to check those and also check any system mode scenarios. Then apply system mode and/or without sharing annotations. See further guidance below.
Depending on the size of your codebase this could be a significant bit of work depending on your approach to permission sets and use of state flags, calc fields and hidden/app only objects. Resist diving into this by simply creating a quick fix huge permission set for all fields, objects required. See further guidance below.
* The requirement to also use “without sharing” with System Mode did catch me out – its not parity with User Mode, it does not require “with sharing” per documentation and in fact overrides class level sharing.
Ok, so I have already been embracing Apex User Mode now what?(Path B)
In short, if this is the case, your journey has already started, and you’re either already done (unlikely tbh) or have some work left to do. If you have been using user mode in your DML or SOQL code, you will have noticed that the Apex runtime (by design) throws errors when fields or DML operations are not accessible—because the users profile (or ideally, permission set) has not granted such access. This can occur not only when end users run your code but also during Apex tests.
Security exceptions in Apex tests are as valid as they are for end users without permissions. They are designed to prompt you to create dynamic test users in your Apex code, assign your permission sets, and leverage System.runAs to ensure the tests run successfully from a permissions perspective – failure is a bug in your code or permission set. This setup is effective, and code paths using it will function “as is” under the new user mode default.
However, in places you may have opted not to use user mode because the code needs to act on a flag, computed field or object need by your code but not the user. In these cases, simply not using user mode did used to default to the Apex system mode, which can lead to failures with the new user mode default. First, do not add such fields/objects to permission sets unless the rationale has changed; they are still system mode access scenarios. Instead, elevate permissions to system mode explicitly by using the explicit SYTEM_MODE flag/clause in Apex/SOQL. The same applies to classes where you have also not specified without sharing. In short, be as explicit about system mode now as you have been about user mode and you will heading in a good direction.
What is user mode? I have not been adding security enforcement in my code…(Path C)
Firstly, you might have historically thought that your code runs in user mode simply because the user executes it, which is true. However, unlike the Lightning UI, which removes fields, makes them read-only, or hides records, Apex has not followed suit to date. It does not generate errors, atomically clear variables, or block inserts. This means your custom UIs may display information to which they should not have access, and they could also allow updates or deletions that should not be permitted. It’s possible that you are reading this and thinking that it’s just a small team in a small organization, and you don’t really care. While that may have been a pragmatic approach in the past, in today’s world of increasing security exploits, it’s not a strategy you can continue to embrace – on any platform. Salesforce, although challenging here, is providing you with a necessary wake-up call.
So, what should you do to prepare? A simple but not holistic step is to repeatedly run your Apex code and tests against API 67.0 to identify any issues as you update assigned profiles/permission sets. However, keep in mind that this may not provide complete coverage, so performing end-user UX testing is also likely going to be important. This is a basic approach will help you pinpoint which objects and fields users need access to. But what is also crucial, is to ask what types (or roles) of users you are supporting and what actions they perform. Without this understanding, you might fall into the trap of over-permissioning, which involves creating and assigning a permission set with access to every object and field in your object model and others.
Over-permissioning is a trap because, unless your solution is very simple, the data a user type needs access to (for a specific subset of features) will likely differ from the entire data set or the data your code requires to function properly. For instance, users can then inadvertently edit calculated fields or related objects (like logs, rollups, and state flags) outside of your code if given access. Therefore, it’s important to delineate user types (roles/personas), their actions, and how those actions relate to the essential objects and fields for business functionality versus those necessary solely for managing the application, often termed system-level. The same principle applies to sharing rules: if code requires visibility over all rows but users do not, this must be acknowledged as well.
For a more holistic view I do recommend using various org dependency inspection tools alongside running tests to map out which objects and fields are utilized by specific Apex classes, as well as the code paths of those classes, and how those relate to each user type’s required actions. Note this will not help with dynamically referenced fields and objects. Overall though this will help you design a solid Permission Set strategy that is effectively a manifestation of your apps features and security design.
Closing thoughts… for now
If you have a sizable codebase that’s fairly old, you’re certainly reading this with your head in your hands, wondering where to get started. While you can defer upgrading to API 67.0, it cannot be done indefinitely. I know it’s a lot to manage, but please try to avoid the trap of over-permissioning. It’s an easy fix, but keep in mind that you will also expose all those objects and fields through standard Salesforce interfaces, Lightning Experience, List Views, Dashboards, Reports, etc. Even if such fields and objects are not on layouts, they can still be accessed by end users.
There is certainly some tooling that will help with all of this by combining dependency data among classes, objects and fields to help uncover the super set of objects/fields in scope, this at least would be a good start. Such tooling is something I might explore but likely best served by others building such tools already to expand into. For sure Salesforce Security Scanner / PMD rules will also need to be updated – which I assume is in the pipeline. I will likely follow up with further thoughts on this topic – so let me know your thoughts. Also if you want to connect with me meanwhile to discuss your situation feel free to find me on LinkedIn.
Over the past year or so, I have been attending various community conferences, and now as an independent consultant I have more time to keep a pulse on many things across the ecosystem — past, present, and future. I’m often asked about FFLib and/or DLRS.
When discussions turn to FFLib, two topics regularly come up: the role of the Application class pattern and questions about recent updates. In this post, I’ll cover both, along with what’s next and highlight some recent community contributions.
Before jumping in, I also want to express my gratitude to FFLib’s core team, who are the official curators of the project and with whom I’ve been enjoying more opportunities to reconnect. In addition to the questions answered in this blog we are keen to here more from you!
John M. Daniel – Senior Director of Digital Platforms, Steampunk, Inc.
There have been a number of updates recently, which I cover in full in the summary at the end of this blog. Here though, I want to highlight an enhancement to one of my favourite features of FFLIb, the Unit of Work. Thanks to a community contribution, we now have support for upsert! So you can now wrap all your DML and, in fact, email or custom operations in a single unit of work. It’s used much like other register methods on the Unit of Work. The following is a basic example but showcases the new method well:
// Sync invoices from external system - insert new, update existing by External ID
public static void syncFromExternal(List<InvoiceSyncPayload> payloads) {
    fflib_ISObjectUnitOfWork uow = Application.UnitOfWork.newInstance();
    for (InvoiceSyncPayload p : payloads) {
        Invoice__c inv = new Invoice__c(
            Reference__c = p.externalRef,  // External ID - matches existing or creates new
            Description__c = p.description,
            InvoiceDate__c = p.invoiceDate,
            Account__c = p.accountId,
            Amount__c = p.amount
        );
        uow.registerUpsert(inv, Invoice__c.Reference__c);
    }
    uow.commitWork();
}
Do I need the Application class and Apex Interfaces? Are there other options?
In short, having an Application class is not a requirement to use FFLib; it depends on your needs, particularly regarding dependency injection. The Application class and its methods became common a few years after the library began to support mocking in tests. As a factory pattern, it also aids in handling dynamic business logic, like invoicing that determines target objects at runtime. For those unaware, the Application class is a code-based metadata defining the dependency order of your app’s object schema, services, and logic. Here’s the classic example:
public class Application
{
	// Configure and create the UnitOfWorkFactory for this Application
	public static final fflib_Application.UnitOfWorkFactory UnitOfWork =
		new fflib_Application.UnitOfWorkFactory(
				new List<SObjectType> {
					Account.SObjectType,
					Invoice__c.SObjectType,
					InvoiceLine__c.SObjectType });

	// Configure and create the ServiceFactory for this Application
	public static final fflib_Application.ServiceFactory Service =
		new fflib_Application.ServiceFactory(
			new Map<Type, Type> {
					IAccountsService.class => AccountsServiceImpl.class,
					IOpportunitiesService.class => OpportunitiesServiceImpl.class,
					IInvoicingService.class => InvoicingServiceImpl.class });

	// Configure and create the SelectorFactory for this Application
	public static final fflib_Application.SelectorFactory Selector =
		new fflib_Application.SelectorFactory(
			new Map<SObjectType, Type> {
					Account.SObjectType => AccountsSelector.class,
					Opportunity.SObjectType => OpportunitiesSelector.class });

	// Configure and create the DomainFactory for this Application
	public static final fflib_Application.DomainFactory Domain =
		new fflib_Application.DomainFactory(
			Application.Selector,
			new Map<SObjectType, Type> {
					Opportunity.SObjectType => Opportunities.Constructor.class,
					OpportunityLineItem.SObjectType => OpportunityLineItems.Constructor.class });
}

// --- UnitOfWorkFactory usage and mocking support ---
Application.UnitOfWork.newInstance();
Application.UnitOfWork.newInstance(new fflib_SObjectUnitOfWork.UserModeDML());
Application.UnitOfWork.newInstance(new List<SObjectType>{ Account.SObjectType });
Application.UnitOfWork.setMock(uowMock);

// --- SelectorFactory usage and mocking support ---
Application.Selector.newInstance(Account.SObjectType);
Application.Selector.selectById(new Set<Id>(sourceRecordIds));
Application.Selector.selectByRelationship(opps, Opportunity.AccountId);
Application.Selector.setMock(selectorMock);

// --- DomainFactory usage and mocking support ---
Application.Domain.newInstance(new Set<Id>{ oppId });
Application.Domain.newInstance(records);
Application.Domain.newInstance(records, Opportunity.SObjectType);
Application.Domain.setMock(domainMock);

// --- ServiceFactory usage and mocking support ---
Application.Service.newInstance(IOpportunitiesService.class);
Application.Service.setMock(IOpportunitiesService.class, serviceMock);
The above example shows the classic way to configure the Application class to provide various factories. Each instance is accessed via helper methods that offer mocking and more advanced factory access patterns. It’s easy to use with a code-driven configuration, but has downsides, specifically when it comes to deployments and compilation errors. Alternatively, it can also be configured through metadata. Finally, if you’re only interested in mocking features, the Application class is as I mentioned above, optional. This table explores this further and introduces two new type descriptors for the Application class:
+ Simple to configure + Built in mocking injection + Polymorphic instantiation – Deployment challenges – Does not span packages
+ Unit Test Mocking + Factories + Dependency Injection + Package Dependency Injection
Type II: Metadata Configured
+ Same as Type I + Flexible DI configuration + No Deployment challenges + Spans multiple packages – More complex to manage
In the rest of this blog, we will dive deeper into simple unit test mocking without requiring an Application class (row one above). Before that, though, let’s quickly discuss how the use of Apex Interfaces has evolved in respect to unit test mocking and take a brief look at how you can implement a metadata-configured application class.
Do I have to use Apex Interfaces?
For Type II: Metadata Configured usage, dependency injection clearly requires interfaces as a contract for the different implementations needing runtime resolution. However, when using the Salesforce’s Apex Stub feature (directly or indirectly through a mocking library), interfaces are optional for Type I: Application class usage. If interfaces are used for purposes outside of mocking, it’s a different case; otherwise, the Service factory needs only to list available concrete services for mocking injection to function as shown below:
	// Type I: Application class, configure and create the ServiceFactory for this Application
	public static final fflib_Application.ServiceFactory Service =
		new fflib_Application.ServiceFactory(
			new Map<Type, Type> {
					AccountsService.class => AccountsService.class,
					OpportunitiesService.class => OpportunitiesService.class,
					InvoicingService.class => InvoicingService.class });

// --- ServiceFactory usage and mocking (without interfaces) ---
Application.Service.newInstance(OpportunitiesService.class);
Application.Service.setMock(OpportunitiesService.class, serviceMock);
Note: This approach also requires service methods as instance methods – since Apex Stubs cannot mock static methods.
What does Metadata Configuration look like?
For more advanced Type II: Application class usage, FFLib includes the factory implementations for you, but not the metadata types for the configuration. Inclusion of objects like this has always been seen as outside of scope by the authors – open to feedback on this. So since FFLib does not include custom metadata types a custom Application class must be created that seeds the factories dynamically from CMT you create. Here is a very basic example:
public class Application {
	public static final fflib_Application.SelectorFactory Selector;
	public static final fflib_Application.DomainFactory Domain;
	public static final fflib_Application.UnitOfWorkFactory UnitOfWork;
	public static final fflib_Application.ServiceFactory Service;

	static {
		Map<SObjectType, Type> selectorTypeBySObject = new Map<SObjectType, Type>();
		Map<SObjectType, Type> constructorTypeBySObject = new Map<SObjectType, Type>();
		List<SObjectType> unitOfWorkTypes = new List<SObjectType>();
		Map<Type, Type> implByInterface = new Map<Type, Type>();
		for (Application__mdt m : [
			SELECT FactoryType__c, SObjectType__c, KeyClass__c, ValueClass__c, Order__c
			FROM Application__mdt
			WITH SYSTEM_MODE
			ORDER BY FactoryType__c, Order__c ASC NULLS LAST
		]) {
			SObjectType sType = Schema.getGlobalDescribe().get(m.SObjectType__c);
			Type keyType = Type.forName(m.KeyClass__c);
			Type valueType = Type.forName(m.ValueClass__c);
			switch on m.FactoryType__c {
				when 'Selector' {
					selectorTypeBySObject.put(sType, keyType);
				}
				when 'Domain' {
					constructorTypeBySObject.put(sType, keyType);
				}
				when 'UnitOfWork' {
					unitOfWorkTypes.add(sType);
				}
				when 'Service' {
					implByInterface.put(keyType, valueType);
				}
			}
		}
		Selector = new fflib_Application.SelectorFactory(selectorTypeBySObject);
		Domain = new fflib_Application.DomainFactory(Selector, constructorTypeBySObject);
		UnitOfWork = new fflib_Application.UnitOfWorkFactory(unitOfWorkTypes);
		Service = new fflib_Application.ServiceFactory(implByInterface);
	}
}
The above design is simple to help illustrate the point. You can check out the AT4DX library, which is built on FFLib to manage dependency injection in Apex, including across different Salesforce packages. AT4DX also maintains the Application helper methods but dynamic binding at runtime using custom metadata, eliminating the class dependency complexity of Type I: Application class usage. It also implements caching to improve performance when loading the configuration. If your interested in a more general purpose DI framework, check out Force-DI.
Unit Test Mocking without an Application class?
If you’re only interested in mocking your unit of work, service, domain, and/or selector implementations—and don’t need the additional features provided by Application Type I or Type II—one option you can use is basic method-based dependency injection approach to roll your own mocking injection, along with simple class factories.
Without the Application class, there is no built-in factory or mock dependency injection; as such. You can also reflect on commonly established dependency injection patterns such as the factory pattern, as well as constructor- or method-based injection techniques. The following example uses a straightforward method/property-driven approach for simplicity and ease of illustration:
// --- UnitOfWork mocking and class factory ---
UnitOfWork.mock = uowMock;
UnitOfWork.newInstance();

// --- Selectors mocking and class factory ---
AccountsSelector.mock = selectorMock;
AccountsSelector.newInstance().selectById(accountIds);

// --- Domains mocking and class factory ---
Opportunities.mock = domainMock;
Opportunities.newInstance(records);

// --- Services mocking and class factory ---
OpportunitiesService.mock = serviceMock;
OpportunitiesService.newInstance();
Here is the template for a very basic injection approach used in each class, along with a means to replace the Application.UnitOfWork factory with single class configuration approach if that suites your needs:
public class MyService ...
{
	@TestVisible
	private static MyService mock;
	public static MyService newInstance()
	{
		if (mock != null) { return mock; }
		return new MyService();
	}
    ...
}

public with sharing class UnitOfWork
{
	@TestVisible
	private static fflib_ISObjectUnitOfWork mock;
	public static fflib_ISObjectUnitOfWork newInstance()
	{
		if (mock != null) { return mock; }
		return new fflib_SObjectUnitOfWork(new List<SObjectType> {
			Account.SObjectType,
			Invoice__c.SObjectType,
			InvoiceLine__c.SObjectType
		}, new fflib_SObjectUnitOfWork.UserModeDML());
	}
}
The Apex test code below conducts a unit test of the service class’s logic by mocking its key dependencies and checking both the service’s output and behavior. Since FFLib depends on the FFLib Apex Mocks framework, this library is used in the example, but is basically highlighting the use of the factory and mocking methods mentioned above.
// Create mocks (interfaces and concrete classes)
fflib_ApexMocks mocks = new fflib_ApexMocks();
fflib_ISObjectUnitOfWork uowMock = (fflib_ISObjectUnitOfWork) mocks.mock(fflib_ISObjectUnitOfWork.class);
Opportunities domainMock = (Opportunities) mocks.mock(Opportunities.class);
OpportunitiesSelector selectorMock = (OpportunitiesSelector) mocks.mock(OpportunitiesSelector.class);

// Stub return values
mocks.startStubbing();
// ... set mock method responses, query data etc
mocks.stopStubbing();

// Given - Configured mocks
UnitOfWork.mock = uowMock;
OpportunitiesSelector.mock = selectorMock;
Opportunities.mock = domainMock;

// When – Calling service
OpportunitiesService.newInstance().applyDiscounts(testOppsSet, 10);

// Then – Correct selector method invoked and work committed
((OpportunitiesSelector) mocks.verify(selectorMock)).selectByIdWithProducts(testOppsSet);
((Opportunities) mocks.verify(domainMock)).applyDiscount(10, uowMock);
((fflib_ISObjectUnitOfWork) mocks.verify(uowMock, 1)).commitWork();
The code above uses no interfaces for services, domains or selectors and each class handles its on dependency injection via mock. In the app logic type instantiation is handled via newInstance static methods on the classes to act as an alternative to the Apex new operator. In the next section dependency injection comes up again and I also highlight the use of DI frameworks.
Custom Metadata Factories WITHOUT an Application class
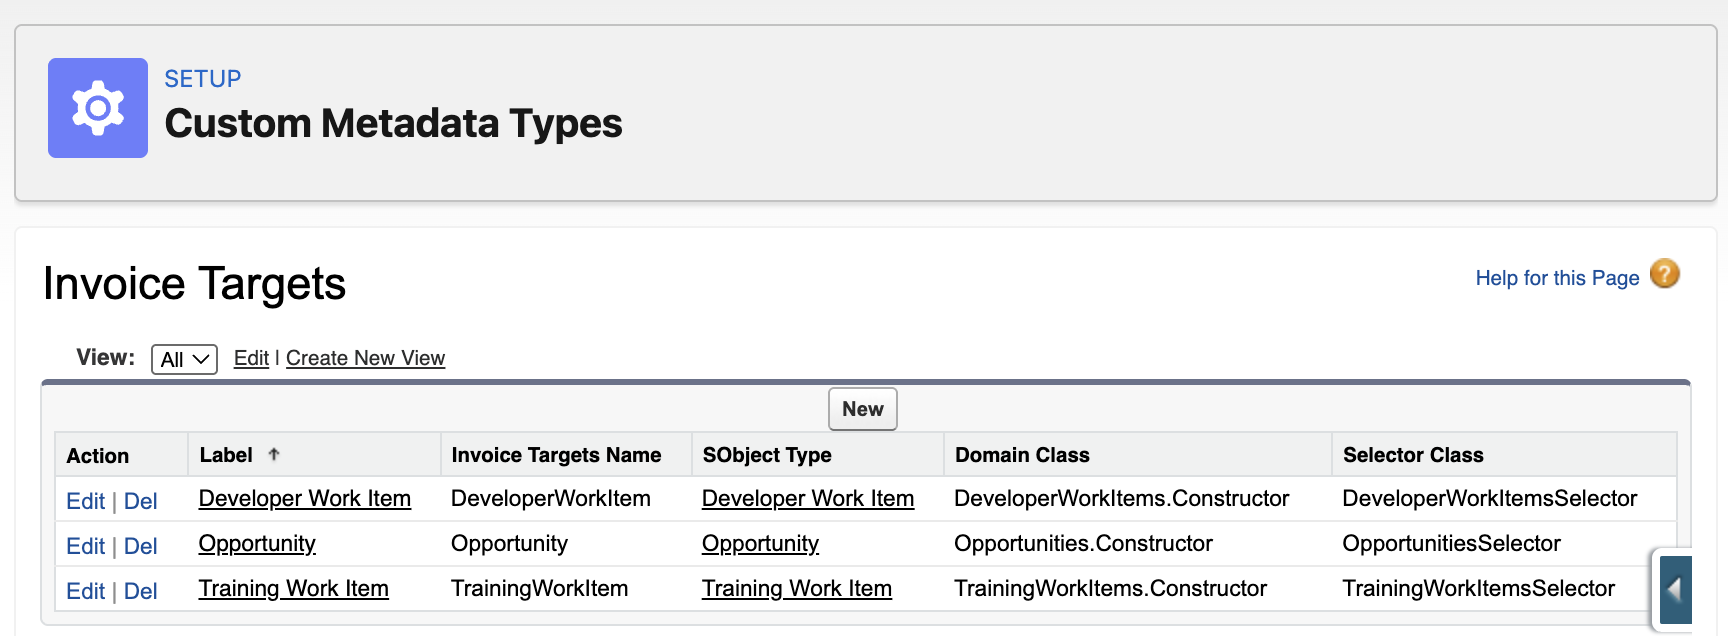
Using a factory pattern, you can also resolve dynamically different implementations based on a runtime only context. For example, a general invoicing engine can have various objects capable of storing billable activities – each with their own differ invoicing calculations. In this case, we want to dynamically resolve the specific domain classes and selector implementations associated with the SObjectType of the records passed to our service.
The code below demonstrates a custom factory called InvoicingTargetsRegistry that is simple config-based factory using custom metadata. The InvoicingTargetsRegistry class actually uses utility classes from FFLib that support the Application class pattern – but in this case they are late bound (no compiler refs) and initialised on demand. The full source code for the InvoicingTargetsRegistry is here – and its usage and config is shown below:
public with sharing class InvoicingService {

    public List<Id> generate(List<Id> sourceRecordIds)
    {
        fflib_ISObjectUnitOfWork uow = UnitOfWork.newInstance();
        InvoiceFactory invoiceFactory = new InvoiceFactory(uow);
        List<SObject> records = InvoicingTargetsRegistry.selectById(new Set<Id>(sourceRecordIds));
        fflib_IDomain domain = InvoicingTargetsRegistry.newDomain(records);
        if (domain instanceof ISupportInvoicing)
        {
            ((ISupportInvoicing) domain).generate(invoiceFactory);
            uow.commitWork();
            List<Id> invoiceIds = new List<Id>();
            for (Invoice__c inv : invoiceFactory.Invoices) { invoiceIds.add(inv.Id); }
            return invoiceIds;
        }
        throw new InvoicingException('Invalid source object for generating invoices.');
    }
}
We have explored the Application class and whether it is necessary, along with other options. This includes examining the reasons for using it, its features, and how it can enhance dependency injection and configuration beyond simple mocking.
Whats next and community contributions
As to what’s next – we have been discussing doubling down on older PRs, refreshing and consolidating documentation and of course continue to track applicable features in Salesforce platform as they arrive. One such feature I have my eye on, that I think would go well with the existingUser Mode support in Unit of Work is thisAccessLevel.User_Mode.withPermissionSetId. Though currently in Developer Preview, according to an Apex PM, it is presently under active discussion at high levels in the platform. This feature is significant for closing the gap in being able to implement targeted permission elevation in Apex.
Finally, FFLib has not got to PR number 525 and nearly 1000 GitHub stars without a strong community! So I want to close by giving a huge thanks for your support and contributions!
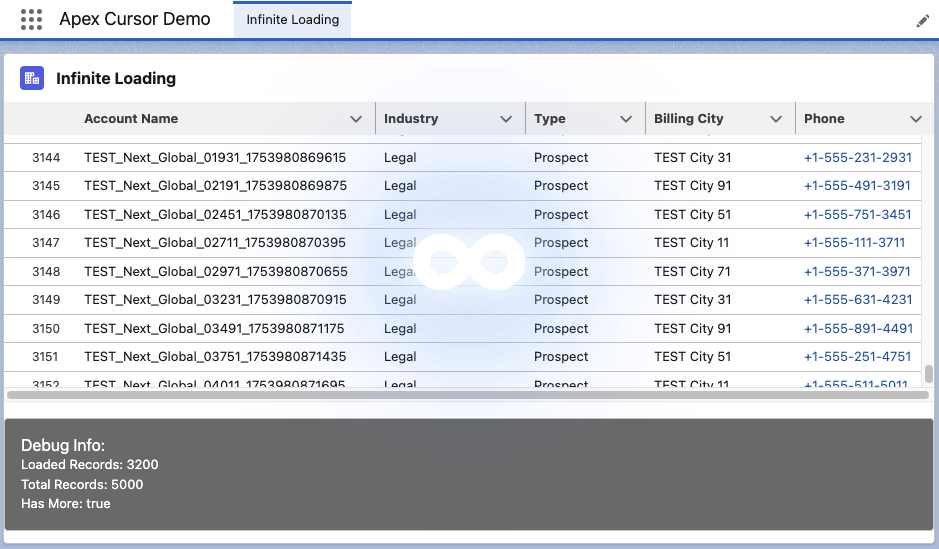
Last year, Salesforce launched the Beta of Apex Cursors, allowing you to traverse up to 50M records using SOQL-derived datasets – fast forward to the upcoming Spring ’26 release and it’s now GA! Since Beta, Salesforce has been busy introducing a whole new cursor type dedicated to UI use cases. In this blog, I will cover the new UI pagination cursor type and its differences from the standard cursors; included is an updated version of the sample I provided in last year’s blog – that allows you to use LWCs infinite scrolling component to explore both modes and try them out for yourself.
Why add a new pagination cursor type?
The beta experience was simple and effective but had some limitations and buried within it a corner case of additional complexity that was not great for UI use cases – there are three key differences:
More Cursors per 24hrs. Standard cursors have a limit of 100k active cursors per 24-hour period; this is now 200k to cater to more active users. If this is not enough, see my further thoughts below.
Deleted Record Handling. Perhaps more subtly, some UI helper logic that the standard cursor would otherwise leave to you is handled for you. This means that it would not always retrieve a full page of results in cases when records had been deleted after the cursor was created. If your logic was not paying attention to this, it could skip records unintentionally.
Reduction in Total Records. Lastly, there is now a new row limit on pagination cursors of 100k records (down from 50m of standard cursors).
Overall Total Records per 24hr Remains. Regardless of individual cursor row limits, both types of cursors share the same 100m 24hr limit. Read more about the limits and Apex limits methods here.
At first, it may seem like Salesforce has given with one hand and taken away with the other here… but it’s sometimes easy to forget we are also entrusting them to manage a shared service for us as well – it’s a balance. This statement from the docs is quite well framed:
"This higher instance limit supports many users accessing records lists that rely on smaller pagination cursors."
Are standard cursor types now not allowed for use in an UI?
I was also pleased to see that Salesforce has not blocked us from using ‘standard’ cursors in the UI – even making a GA fix to allow the Database.Cursor type to be serialized in LWC. So we do get to choose depending on the use case and cursor sharing strategy. As an architect, I appreciate the flexibility here from Salesforce; thank you!
Which should I use for my UIs?
I would recommend using pagination cursors for your UIs unless you have a good reason to go beyond the record limit of 100k. Also applicable to both types is the ability to consider if cursors can be shared between sessions/users via platform cache – thus helping to work within the 100k/200k active cursor limit if that applies to the size of your target users. On this last point, please pay attention to record-sharing requirements if you go down this path – I covered this a little further in my prior blog as well.
Using the new Pagination Cursor API
My previous blog covered the now ‘standard’ cursors API quite well and made a few tweaks in that blog as well to update it for GA – as such, I will not repeat further here. Instead, let’s dive into the pagination API – firstly, this is what the Apex Controller for the above LWC looks like:
    @AuraEnabled(cacheable=false)
    public static LoadMoreRecordsResult loadMoreRecordsWithPagination(Database.PaginationCursor paginationCursor, Integer start, Integer pageSize) {
        try {
            if(paginationCursor == null) {
                paginationCursor = Database.getPaginationCursor('SELECT Id, Name, Industry, Type, BillingCity, Phone FROM Account WHERE Name LIKE \'TEST%\' ORDER BY Name', AccessLevel.USER_MODE);
            }

            LoadMoreRecordsResult result = new LoadMoreRecordsResult();
            Database.CursorFetchResult fetchResult =
                paginationCursor.fetchPage(start, Math.min(pageSize, paginationCursor.getNumRecords() - start));
            result.paginationCursor = paginationCursor;
            result.records = fetchResult.getRecords();
            result.offset = fetchResult.getNextIndex();
            result.totalRecords = paginationCursor.getNumRecords();
            result.hasMore = result.offset < result.totalRecords;
            result.deletedRows = fetchResult.getNumDeletedRecords();
            return result;
        } catch (Exception e) {
            throw new AuraHandledException('Error loading records with pagination: ' + e.getMessage());
        }
    }

    public class LoadMoreRecordsResult {
        @AuraEnabled public Database.PaginationCursor paginationCursor;
        @AuraEnabled public List<Account> records;
        @AuraEnabled public Integer offset;
        @AuraEnabled public Boolean hasMore;
        @AuraEnabled public Integer totalRecords;
        @AuraEnabled public Integer deletedRows;
    }
The API design approach mostly follows parallel with standard cursors Apex API, but with the introduction of ‘Pagination‘ or ‘P‘ to distinguish new limits. There is, however, an additional type Database.CursorFetchResult (link); despite its name, it is only used by the pagination fetchPage method. This additional class helps encapsulate the logic that skips deleted records and thus ensures (albeit for the last page potentially) you always get a page full of data – nice!
If you’re curious or want to warn the user that records have been deleted since then, you have the ability to call the getNumDeletedRecords. Finally, watch out for the isDone method – I initially mapped this to the isDone of my client, and it stopped loading records. This is because the scope of the CursorFetchResult.isDone method is at the page level, not the overall cursor level – hence, this method is not used in the Apex code above – I just used the offset < total records calculation instead.
Here is what the corresponding LWC client controller looks like:
The controller above shows the above Apex controller method in use when the LWC lightning-datatable component reaches out for more records to load. As you can see, Database.PaginationCursor (and now Database.Cursor) is serializable via Aura serialization and thus permits the LWC to manage the scope and state of the cursor:
Summary
In summary, I am glad to have such an architectural primitive supported on the Salesforce Platform and appreciative of the design here that supports two different modalities, indicating a good understanding of the general use cases. Yes, it has its limits, but then, as I mentioned above, we trust Salesforce to give us innovation and manage the shared resources—often both don’t balance out in what we think is to our favor at times—and in those times, we can respond with new ideas, feedback supported by those ideas—those are the most powerful ways to make change. Certainly in this case, given the Trailblazer group community feedback, I see that happening between Beta and GA for this offering—so well done product and engineering team! Thank you!
In my other blogs, I have focused on how Heroku’s elastic services can add additional powerful and scalable features to your Salesforce applications, seamlessly extending existing Flow and Apex investments in doing so. This blog, however, focuses on another use case that Salesforce developers can also find themselves involved in—and that is building integrations with Salesforce data.
Heroku’s fully managed services also make a great choice to keep focused on the task of building your integration apps and services, such as ingesting data transformations, filtering, aggregations, as well as supporting you in building user experiences you might need to deploy for other systems or users outside of Salesforce. One critical aspect of such endeavors is how you are managing the authentication and access to your precious Salesforce data!
Unless you have been under a rock of late, you’ll likely be aware of the now increased focus on managing Connected Apps in your orgs; these are the traditional way in which access to Salesforce is gated and typically require you to create, set up, and manage. While Heroku AppLink also leverages Connected Apps, the setup and configuration is, as you would expect for Heroku DX, fully managed for you.
This blog is going to delve into the more practical side of things, so after a little framing, we’ll start to get deeper into technical details than usual, and as a result, it is a bit longer than typical. As always, there is accompanying source code to explore as well. We will explore integration use cases and how Heroku AppLink is configured to manage access to your org data. Finally, I want to thank Heroku for sponsoring this blog and assure readers, as always, that the words and opinions are my own.
In this blog, we will review what Heroku AppLink is doing and see how it allows you to configure three types of authentication: user, user-plus, and authorized-user. Each of the integration examples below leverages one of these three modes. Simply put, though, user modes are designed for Salesforce to Heroku, and authorized user mode is designed for Heroku to Salesforce, where the Salesforce user is not known – and thus authentication is configured upfront. The following diagram helps illustrate this:
User mode simply requires assigning a permission set to gate access to the Heroku service, and that’s it, the logged-in user within Salesforce is the same user used when performing operations within Heroku-deployed code – the authorization context is seamlessly but securely exchanged.
This is actually the first major plus in my view, as before it was tempting to pass the UI session token (not good practice) or have to resort to re-authentication as some general-purpose user and thus breaking auditability, and typically resulting in over-permissioning around such an “integration user”. Heroku AppLink user mode only works because an authentication context has already been established. However, when the flow of control originates outside of Salesforce, there still has to be an authentication process required, no escaping that. Heroku AppLink does allow you to define one or more pre-authenticated users that you set up beforehand and reference in your code via an alias – more on this later.
Heroku DX provides a full CLI and UI dashboard for admins to see what connections have been connected to specific orgs. There is also a bunch of permissions and controls within Salesforce as well – that we will get into a little later! Meanwhile, here are a couple of examples of the AppLink dashboard.
Exploring Integration Types
Integrations come in various forms; at a high level, there are those that are triggered by an action within Salesforce by an authenticated, logged-in user or those that occur as a result of an external system or user that is not a Salesforce user. These integration types fit perfectly with the Heroku AppLink authentication modes, as the table below explains.
Public or gated websites/mobile applications that wish to leverage Salesforce data in some direct or indirect form. Calculations, summary info, validations etc. May also have their own authentication, but is not linked to a Salesforce user.
Public or gated APs that leverage as part of their implementation access to Salesforce, for example APIs that are tailored to a certain type or structure of data that requires some form of coded transformation before data can be inserted into one or more Salesforce object.
Integrations that flow from actions or events within a Salesforce org as a result of an authenticated users action or asynchronous process, such as a button press or platform event. Here Heroku deployed code can be used as a middleware to perform additional compute , query additional org data, orchestrate callouts and transform data from Salesforce format to that of the external API.
As an extension to integrations that flow from within Salesforce, as in the above use case, additional object and field access maybe required beyond that of the invoking user – without having permanently grant that user such permissions.
Integration operations that exceed HTTP callout limits can leverage async HTTP callbacks to the Salesforce org once they have completed their processing. Such callbacks directly invoke Apex code handlers running with the authority of the invoking user.
User Mode / User Mode Plus
In the following sections, we start to get deeper into the weeds of the above use cases and how to configure Heroku AppLink, along with exactly what Heroku AppLink is setting up for you.
Web Site Data Integration
Imagine you are a product marketing team and want to engage influencers on your latest campaigns managed within Salesforce. Influencers will not have Salesforce logins. In the past, you might have built such a site and stored those in a related database or even updated the web pages manually as new campaigns launched and completed.
With a data integration to Salesforce, the website can extract approved information from the Campaign object dynamically, ensuring it’s always up to date. You could even extend this further by allowing influencers to show an interest and have that updated within a related object in Salesforce, triggering internal workflows for review and approval. Here is what our example looks like:
The above page is updated by an endpoint that dynamically fetches the records using the AppLink SDK. It uses the AppLink Node.js SDK to retrieve a pre-authorization; this is effectively the authorized user mode we discussed earlier, and that’s it, you can then go on to make SOQL or DML requests:
The important thing here is that in the code above there is no need for Connected App OAuth secrets, token management, JWT certs, or other logic; the SDK is basically calling the AppLink API to obtain a token for you. To break this down further, let’s replicate the getAuthorization SDK call via curl using the /authorizations AppLink API.
The above curl command uses the jq command to parse AppLink env vars and display the API result in a friendly format where we can see the typical domain, user, and token values required to call Salesforce APIs:
You can also run the command heroku applink:authorizations:info, which also uses the same API. You may have noticed that the above example uses some HEROKU_APPLINK_ env variables to gain access to the AppLink API. These are only supplied to your Heroku application as part of adding the Heroku AppLink addon. Only the Heroku app owners can download these environment variable values—and thus, how we can also run such apps and tests locally per the instructions in the README files.
Note: The HEROKU_APP_ID environment is something you can pretty much ignore once set (see below). Without getting into details, it is more of an implementation detail being surfaced at this point and will hopefully be removed from the user-facing experience in the future.
You may also be wondering about the connectionName / developer_name variables used in the above code and CURL example. This is effectively an alias used to reference a prior authentication of a given user to a given org; in this case, ours is influencerPortal (named after its usage in this case). The CLI and API can be used to make these authorizations, both in interactive and headless modes (useful for your DevOps pipelines).
Finally, to set all this up, below are the CLI commands used by the sample code included here to create a Heroku app, install the Heroku AppLink addon, and then authorize a user with our influencerPortal alias. Finally, the code is deployed to Heroku (steps are also provided in the README for local development). This alias is then configured via the CONNECTION_MARKETING env var above in the code.
# Create a Heroku app and install the AppLink add-on
heroku create
heroku addons:create heroku-applink --wait

# Authorize the org (popups up Salesforce login page)
heroku salesforce:authorizations:add influencerPortal -l https://test.salesforce.com

# Expose the connection name and app ID to the dyno
heroku config:set CONNECTION_MARKETING=influencerPortal
heroku config:set HEROKU_APP_ID="$(heroku apps:info --json | jq -r '.app.id')"

# Deploy the API to Heroku
git push heroku main
In order to configure AppLink in an org, your user will need the Manage Heroku AppLink permission; otherwise, any authentication attempt will fail. The salesforce:authorizations:add CLI command prompts you in the browser during the login (headless JWT auth is also available) to accept a number of confirmations – these confirm the permissions Heroku AppLink is being given in your org – so be sure to review these carefully:
If you review your Connected App OAuth Usage page will see the Heroku Credentials Service:
Since you name these authenticated connections, you can, of course, use as many as you like – connecting many orgs to your service or app. Perhaps you do want to designate different users for different purposes, or even have the code read from different orgs! That’s right, the AppLink add-on supports multiple orgs. There is a great example of this in the standard documentation samples here.
As final note, although the AppLink SDK was used here, you can call the AppLink API directly as well, and once you have the domain and session Id you can of course use Salesforce APIs directly. Especially useful if your not using Node.js or Python, since the SDK is currently only availble in these languages. The Heroku AppLink API is fully documented here.
Data Ingest APIs
Heroku can also be a great place to host coded custom APIs that simplify data ingestion from one format into that which the Salesforce APIs and your data model expect. In this example, imagine we are a consumer-facing business, and every month we want to ingest product updates from our suppliers. This API will create or update product information accordingly, using the productCode as an external reference.
The following curl will exercise the API from the locally running web server:
Once again, in reality, it’s expected that this API would also have its own authentication schema suppliers use, but this is not based on Salesforce users. Before we move on from this point, it’s worth pointing out that building your own authentication for web or API endpoints is generally not a good idea; instead, seek out support from frameworks such as Spring Boot, .NET or API gateways such as Mulesoft.
Once more, the AppLink authorized user mode is used to integrate with Salesforce data to upsert the transformed records. I originally hoped to use the AppLink SDK’s Unit of Work feature for this, a handy wrapper around the composite API; however, it does not support upsert operations presently. This, however, gave me a new opportunity to highlight a great fallback feature of the AppLink SDK, the org.request method. This method allows you to directly call Salesforce APIs, as shown below, but still take advantage of AppLink adding the authentication details for you—nice!
It’s worth also noting that languages such as Node.js support easy ways to make parallel Salesforce API invocations, which are of course possible, allowing you to reduce ingest execution time dramatically (see this example here for more). Be careful to profile and test such approaches though to check for deadlines and conflicts. You can review the full implementation of the API here.
Finally, worthy of reference here is Heroku Connect; this addon uses a Heroku Postgres database that syncs with your Salesforce org data. In this case, you’re using SQL to write to Postgres, so performance is improved over Salesforce APIs, at the trade-off of maintaining a copy of your data in Postgres. This option really needs to justify itself accordingly.
Third Party API Callouts initiated from within Salesforce
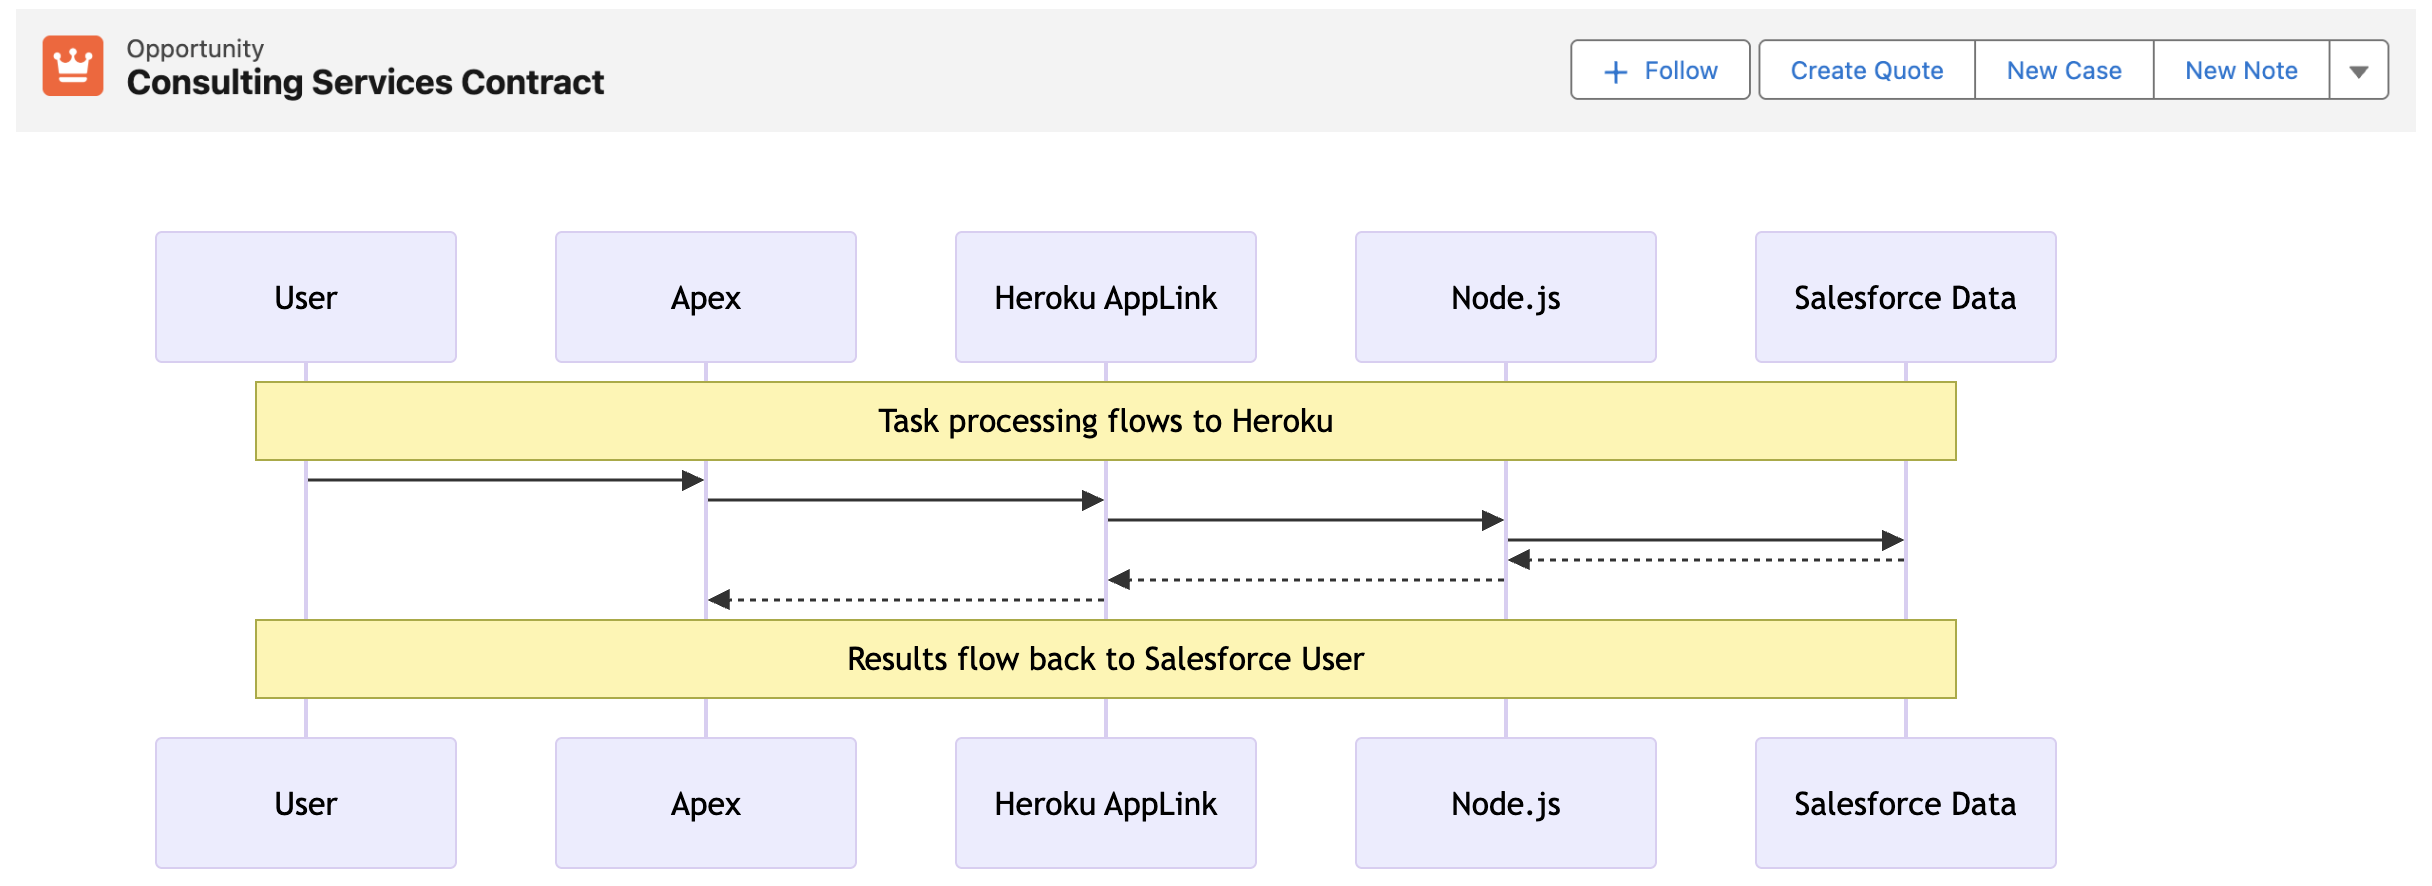
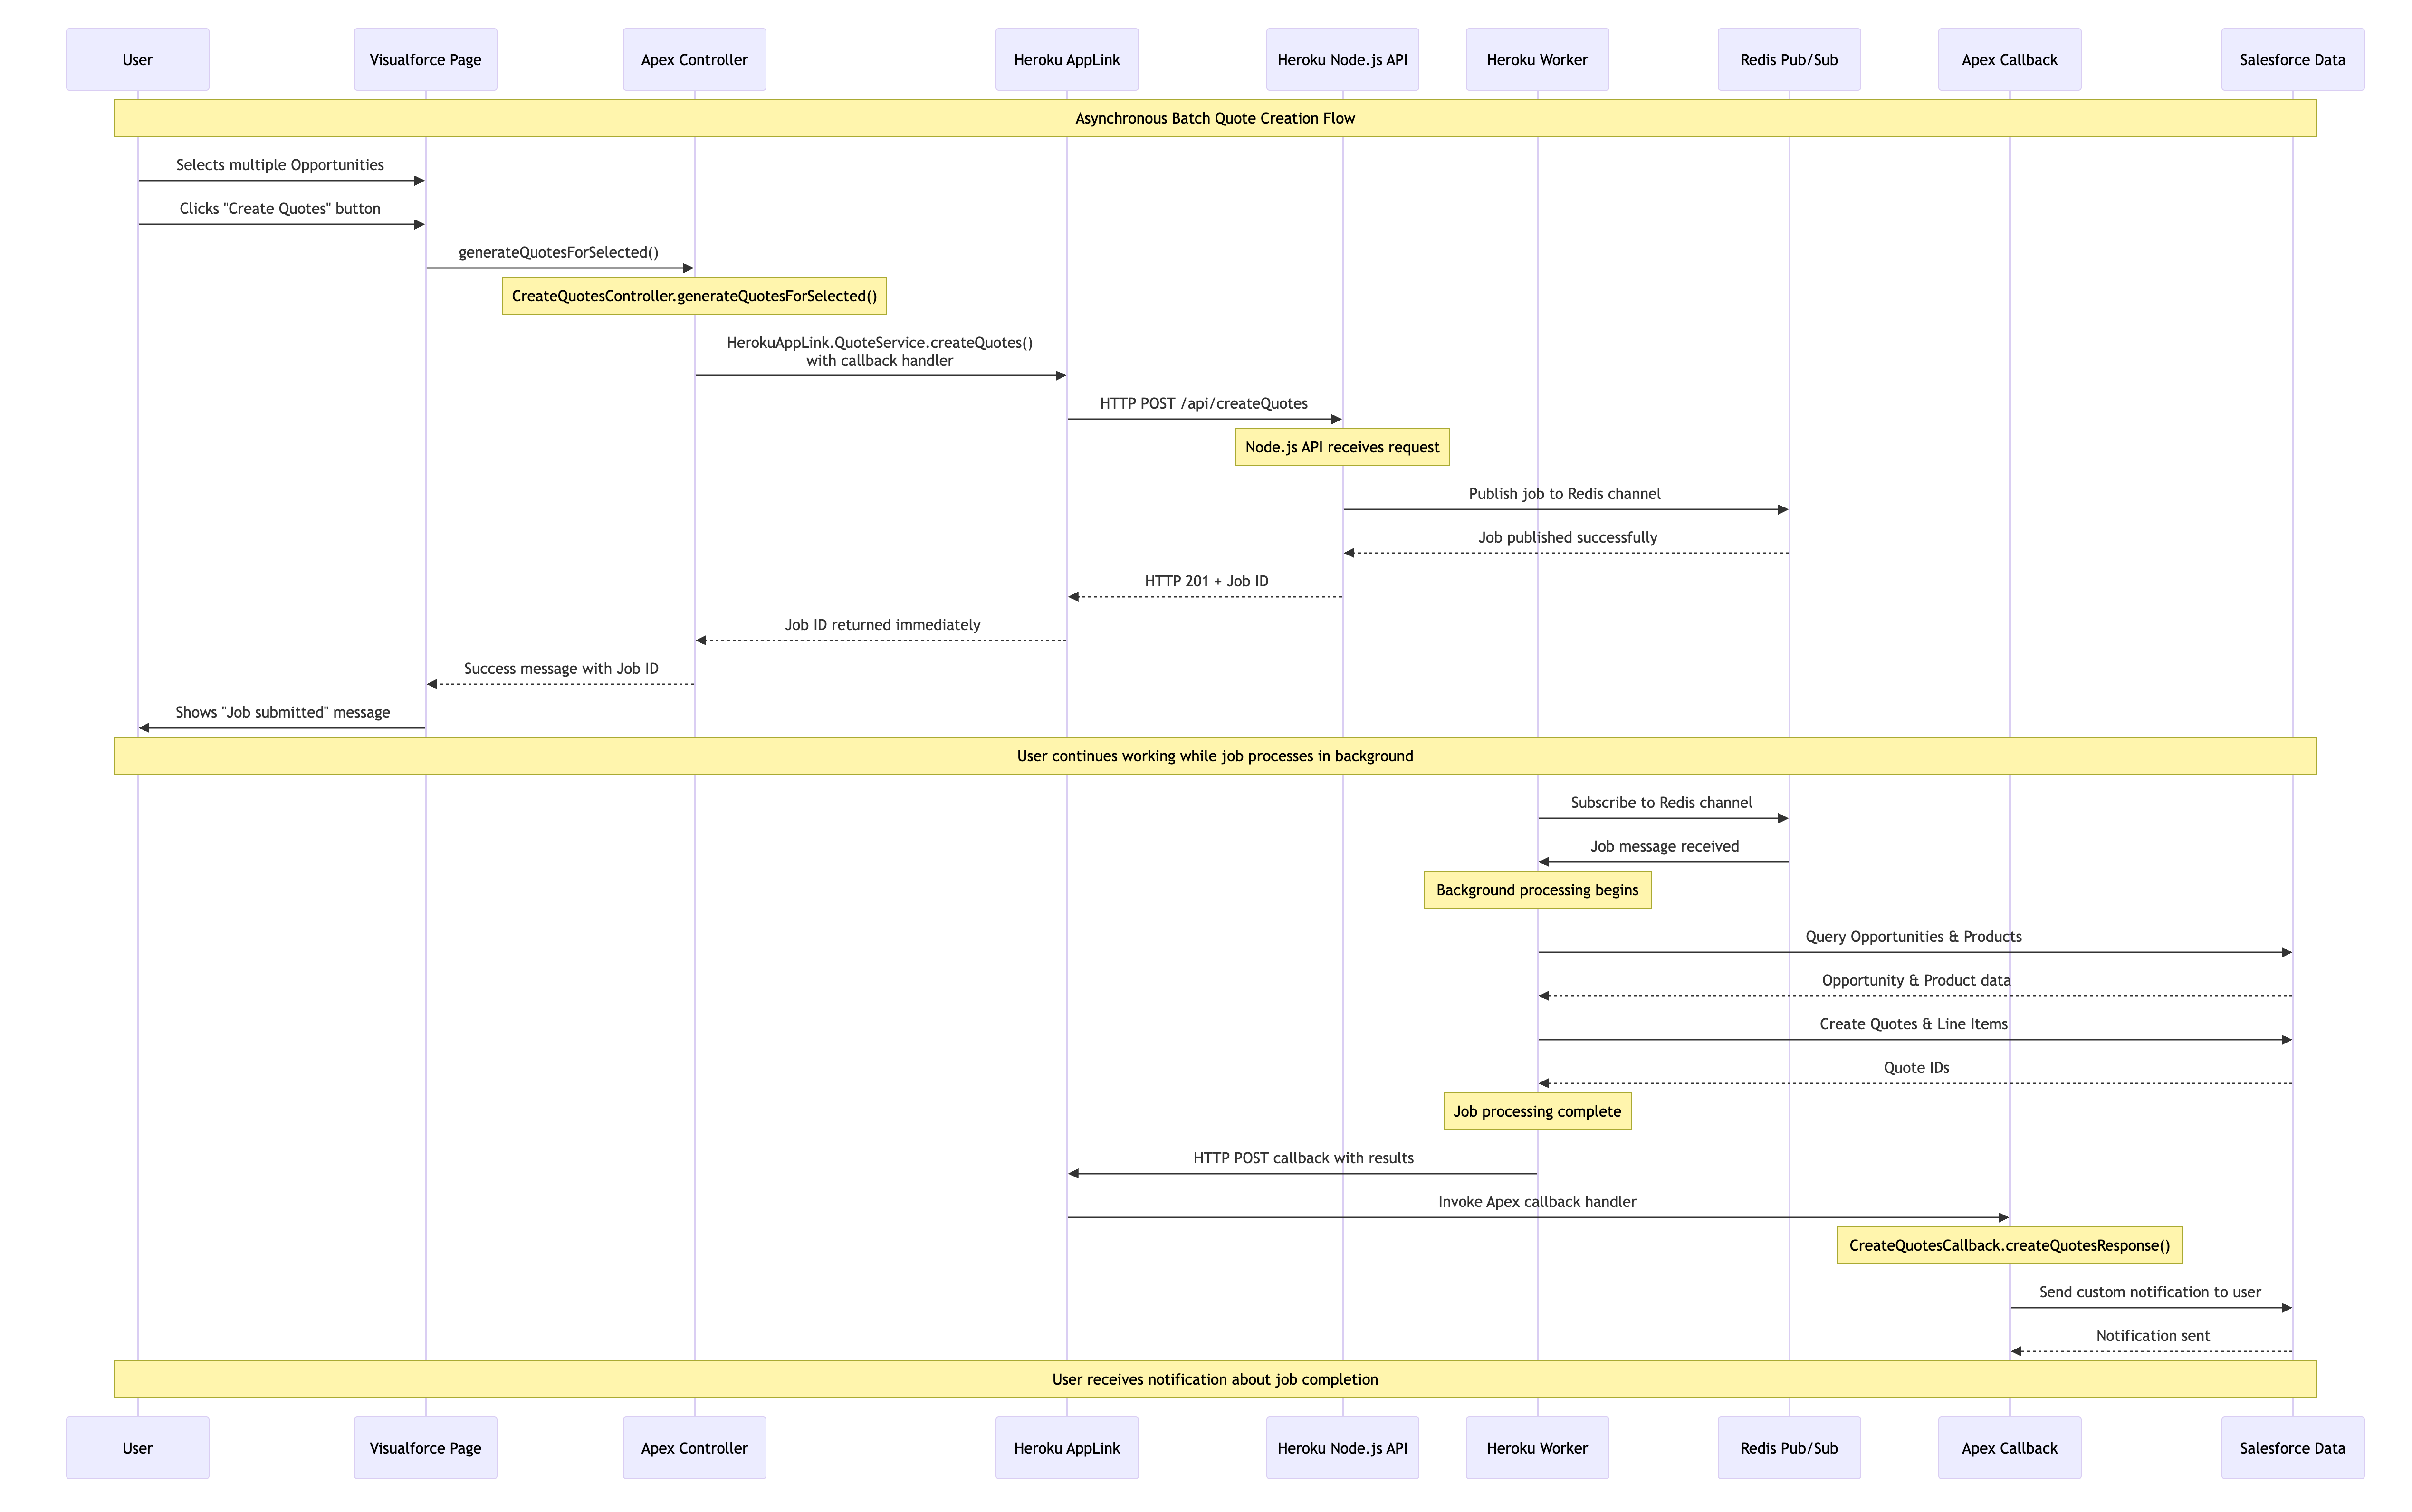
In cases where Salesforce is not the system of record, it is common to initiate integrations from within Salesforce to trigger processes elsewhere. Imagine we are selling cloud infrastructure services, and each time an opportunity is closed, we want to automate the provisioning of those services. We are using Heroku-deployed code to integrate with Salesforce data and transform it into a format required by the third-party provisioning APIs. Provisioning can take some time, so processing returns back to Salesforce via callbacks that trigger Apex, which can send notifications to the user, for example.
Apex (or Flow or AgentForce for that matter) can be used to call the Heroku-deployed code that is managing and orchestrating third-party API calls. Here we have an Apex code fragment that invokes Heroku-deployed code and provides an Apex class, offering a callback (more on this later):
// Provisioning orchestration service request
HerokuAppLink.ProvisioningService service = new HerokuAppLink.ProvisioningService();
HerokuAppLink.ProvisioningService.provisionServices_Request request =
       new HerokuAppLink.ProvisioningService.provisionServices_Request();
request.body = new HerokuAppLink.ProvisioningService_ProvisionServicesRequest();
request.body.opportunityIds = opportunityIds;

// Create callback handler for notifications
ProvisioningCallback callbackHandler = new ProvisioningCallback();

// Set callback timeout to 60 minutes from now
DateTime callbackTimeout = DateTime.now().addMinutes(60);

// Call the service with callback
HerokuAppLink.ProvisioningService.provisionServices_Response response =
        service.provisionServices(request, callbackHandler, callbackTimeout);
The above Apex is, of course, already running as an authenticated Salesforce user, and due to AppLink user mode, the following Node.js code that performs additional SOQL queries is also operating as that user as well. As such, the same profile, permission set, and sharing rules apply – ensuring that provisioning only occurs with opportunities that the user has access to! Users also need an additional permission to invoke the Heroku service.
In the code deployed to Heroku, we are using Node.js Fastify to implement the API. In its route handler, we can see request.salesforce is a reference to the Heroku AppLink SDK being used once again to obtain a secure authentication to Salesforce. Additionally, notice that Salesforce passes in a callback URL:
The above relies on a Fastify HTTP processing middleware hook (not shown but included in the sample code as /src/server/middleware/salesforce.js) that calls the Heroku AppLink SDK to parse a unique HTTP header. This header is passed from Salesforce that works together with the addons environment variables to retrieve a secure connection using the invoking user’s authority. Further code is able to query the opportunities to orchestrate calling the actual underlying provisioning APIs (not shown) and eventually uses the AppLink SDK again to callback to Salesforce:
// Query opportunities and line items
const opportunityIdList = opportunityIds.map(id => sanitizeSalesforceId(id)).filter(Boolean).map(id => `'${id}'`).join(',');
const oppQuery = `
  SELECT Id, Name, AccountId, CloseDate, StageName, Amount,
         (SELECT Id, Product2Id, Product2.Name, Quantity, UnitPrice, PricebookEntryId FROM OpportunityLineItems)
  FROM Opportunity
  WHERE Id IN (${opportunityIdList})
const opportunities = await queryAll(oppQuery, { context: { org } }, logger);

// Process opportunity lines items to provision services ...
// ...

// Callback to Salesforce Apex handler to notify user
const callbackResults = {
  jobId,
  opportunityIds,
  services,
  summary,
  status: 'completed',
};
const requestOptions = {
  method: 'POST',
  headers: { 'Content-Type': 'application/json' },
  body: JSON.stringify(callbackResults)
};
await org.request(callbackUrl, requestOptions);
We will explore the Apex callback code later; for now, we have seen the code. Let’s take a look at how Heroku AppLink was configured to allow this use of user mode to work. Unlike the above examples, we are not authenticating a specific user; we are granting users permission to call the Heroku service. To do this, we must publish that service into one or more orgs. The following AppLink CLI commands are used:
# Connect to Salesforce org
heroku salesforce:connect my-org -l https://test.salesforce.com

# Publish API to Salesforce using the OpenAPI schema defined in api-docs.yaml
heroku salesforce:publish api-docs.yaml --client-name ProvisioningService --connection-name my-org

# Assign Permission Sets to allow your user to invoke the Heroku code
sf org assign permset --name ProvisioningService
sf org assign permset --name ProvisioningServicePermissions
As we experience in the previous use case, the browser-based interactive login is used; however, this user is not the user used to invoke the Heroku service. That’s still the user logged in at the time the service is called since we are in user mode here. The permission sets are generated by AppLink and are required to be assigned to any user invoking the service. The second permission set, ProvisioningServicePermissions, allows you to add additional permissions required by the service (more on this later). Here is what the service looks like once published, under the Setup menu:
Heroku AppLink has gone ahead and created Connected Apps and External Services for you. Note that the External Services show a source of Heroku, indicating these are managed by Heroku, not the org admin. In normal practice, you do not need to interact with these, but it is important to know they exist, especially as you should now become aware of all Connected Apps used in your org—right!
Managing Additional Integration Permissions
In some cases, integrations require information that the invoking user does not have access to. Rather than adding that permission to the user and just not telling them about it—which is bad, of course, right?! Instead, we can add additional object and field permissions to a permission set created by AppLink. Imagine that we have provisioning parameters stored in a ProvisioningParameters__mdt custom metadata type object. By adding permissions to the ProvisioningServicePermissions permission set, the code can now query this object—but the sales person otherwise cannot:
The ProvisioningServicePermissions permission set is created as a Session Based permission set, which means it does need to be assigned to users but it will not be activated until the system assigns it to them. In this case the system is Heroku AppLink, which is automatically activating it during Heroku code execution and deactivating it after. This is what AppLink refers to as user plus mode.
You can also find another example of this elevation pattern here.
Aysnc Integration Callbacks to Salesforce
Some integrations are long-running; for example, in our provisioning case, it might take several minutes to provision all services sold—well beyond the synchronous HTTP callout limit of Apex. In this case, Heroku AppLink supports secure callbacks to Salesforce that invoke Apex code. In fact, it can support multiple callbacks, allowing for progressive updates to be made back to Salesforce if required.
The Apex code from the previous example showed a callback handler being provided to send notifications to the salesperson once the provisioning was complete – this could also perform updates to the Opportunity record itself:
public class ProvisioningCallback
    extends HerokuAppLink.ProvisioningService.provisionServices_Callback {

    // Static variable to store the notification type ID
    private static Id notificationTypeId;

    // Static constructor to query the CustomNotificationType once when class is loaded
    // ...

    /**
     * Handles the callback response from the Heroku application
     * Sends a custom notification to the user with the results
     */
    public override void provisioningStatus(List<HerokuAppLink.ProvisioningService.provisionServices_provisioningStatus_Callback> callbacks) {
        // Send custom notification to the user
        for (herokuapplink.ProvisioningService.provisionServices_provisioningStatus_Callback callback : callbacks) {
            List<herokuapplink.ProvisioningService_provisioningStatusCallback_IN_body_services> services = callback.response.body.services;
            if (services != null && !services.isEmpty()) {
                for (herokuapplink.ProvisioningService_provisioningStatusCallback_IN_body_services serviceResult : services) {
                    Messaging.CustomNotification notification = new Messaging.CustomNotification();
                    notification.setTitle('Service Provisioning Update');
                    notification.setNotificationTypeId(notificationTypeId);
                    notification.setBody(serviceResult.message);
                    notification.setTargetId(UserInfo.getUserId());
                    notification.send(new Set<String>{ UserInfo.getUserId() });
                }
            }
        }
    }
}
The Apex callbacks run as the original user also, so once again maintaining a security flow of permissions that are bounded by the user’s permissions. Finally, if you want to know more about this pattern, I covered it more in depth in my previous blog here – in terms of the required changes to the OpenAPI specification provided when publishing the service.
Summary
As the world continues to build more services and generate more data, the more humans and now AIs become users of them – the need for ensuring those integrations are built securely increases. While I have been around long enough to know some of what it takes, including a pretty good understanding of OAuth – it’s simply an area I do not focus on – I build apps and services, not infrastructure.
Heroku and Salesforce engineers are, however, focusing on this. Heroku AppLink, Connected Apps (or External Client Apps more recently) are all technologies we should be learning vs. the more DIY approaches of the past. Complete working examples accompany this blog, integration-applink-api, integration-applink-web and integraiton-applink-callout. Associated README files include full instructions on how to deploy these samples yourself and additional technical notes not covered here. Here are some additional resources:
Extensibility is a means for others to extend, for customisation purposes, your application operations in a clear and defined way – it’s a key consideration for supporting unique customisation use cases both known and unknown. It’s an approach many Salesforce products leverage, an Apex Trigger being the most obvious – though limited to data manipulation use cases – but what about your UIs and processes?
This blog will take a look at two approaches to providing extensibility points within application logic, including automatically discovering compatible integrations – allowing you to make it easier and less error-prone for admins when configuring your application. For ease our use case is inspired by the calculator app on the Mac that allows you to pick modes suitable for different user types – imagine you have built a basic Salesforce calculator app – how do you ensure it can be extended further after you deliver it?
The first approach is via Apex interfaces, the second approach helps Admins extend your code with no code tools via Actions (created via Flow). There are many places and ways in which configuration is performed, here we will explore customising Lightning App builder to render dynamic drop down lists vs the traditional input fields when configuring your Calculators Lightning Web Component properties. Finally I created a small helper class that encapsulates the discovery logic – should you wish to take this further it might helpful – it comes complete with test coverage as well.
Apex Interfaces and Discovery
The principle here is straight forward, firstly identify places where you want to allow extensibility, for example calculation, validation or display logic and then define the information exchange required via an Apex Interface. Depending on where your calculator is being used you might use Custom Metadata Types or other configuration means such as configuration data stored in Flows and Lightning Page metadata. In the later two cases Salesforce tools also offer extensibility points to allow custom UIs to be rendered. Take the following Apex Interface and implementation:
// A means to add new buttons to a web calculator
public interface ICalculatorFunctions {

    // Declare the buttons
    List<CalculatorButton> getButtons();

    // Do the relevant calculations
    Object calculate(CalculatorButton button, CalculatorState stage);
}

// A customisation to add scientific calculations to the calculator
public class ScientificCalculator implements ICalculatorFunctions {

    // Additional buttons to display
    public List<CalculatorButton> getButtons() {
        List<CalculatorButton> buttons = new List<CalculatorButton>();
        // Row 1: Memory functions, AC, +/-, %, Division
        buttons.add(new CalculatorButton('(', 'function', 'btn-function'));
        buttons.add(new CalculatorButton(')', 'function', 'btn-function'));
        buttons.add(new CalculatorButton('mc', 'memory', 'btn-memory'));
        buttons.add(new CalculatorButton('m+', 'memory', 'btn-memory'));
        buttons.add(new CalculatorButton('m-', 'memory', 'btn-memory'));
        // ...
    }

    // ...
}

// A customisation to add developer calculations to the calculator
public class DeveloperCalculator implements ICalculatorFunctions {

    public List<CalculatorButton> getButtons() {
        // ...
    }

    // ...
}
Putting aside how additional implementations are configured for the moment then this is a basic way to loosely create an instance of a known implementation of the ICalculatorFunctions interface.
Of course in reality ScientificCalculator is not hard coded as shown above, as mentioned above, some form of configuration storage is used to let Admins configure the specific class name. This is typically a string field that stores the class name. In the the example in this blog our Calculator Lightning Web Component property configuration is stored within the Lightning page the component is placed on.
Using a simple text field for the property is basically asking Admins to remember or search for class names is not the best of experiences, and so custom configuration UIs can be built to perform the searching and discovery for them. Key to this in the case of an Apex interface is using the ApexTypeImplementor object, which allows you to dynamically query for implementations of ICalculatorFunctions. The following SOQL query will return the names of the above two class names, ScientificCalculator and DeveloperCalculator.
            SELECT Id, ClassName, ClassNamespacePrefix, InterfaceName, InterfaceNamespacePrefix, IsConcrete, ApexClass.IsValid, ApexClass.Status
            FROM ApexTypeImplementor
            WHERE InterfaceName = 'ICalculatorFunctions'
              AND IsConcrete = true
              AND ApexClass.IsValid = true
              AND ApexClass.Status = 'Active'
            WITH USER_MODE
            ORDER BY ClassName
You can read more about ApexTypeImplementor and various usage considerations here. In your application, you can choose where to place your configuration UIs, your own custom UI, or one already provided by the platform. In this latter case, we are providing a Calculate LWC component to administrators and wish to offer a means to extend it with additional Apex code using Apex Interfaces. Here, we expose a text property to allow the administrator to specify which implementing Apex class name to use based on their needs. Fortunately, we can do better than this and annotate the LWC property with another Apex class that dynamically retrieves a list of only Apex classes implementing that interface, as shown below.
The following shows the LWC component metadata configuration and the Apex class using the ApexTypeImplementor object we used above to only show Apex classes implementing the ICalculatorFunctions interface. The source code for this component is included in the GitHub repository linked below. By using the datasource attribute on the targetConfig property element Salesforce will render a drop down list instead of simple text box.
<?xml version="1.0" encoding="UTF-8"?>
<LightningComponentBundle xmlns="http://soap.sforce.com/2006/04/metadata">
    <apiVersion>64.0</apiVersion>
    <isExposed>true</isExposed>
    <targets>
        <target>lightning__RecordPage</target>
        <target>lightning__AppPage</target>
        <target>lightning__HomePage</target>
        <target>lightning__UtilityBar</target>
    </targets>
    <targetConfigs>
        <targetConfig targets="lightning__RecordPage,lightning__AppPage,lightning__HomePage,lightning__UtilityBar">
            <property
                name="usage"
                type="String"
                label="Calculator Usage"
                description="Select the calculator type to determine available buttons"
                datasource="apex://CalculatorUsagePickList"
                default=""
            />
        </targetConfig>
    </targetConfigs>
</LightningComponentBundle>
The following code implements the CalculatorUsagePickList class referenced above by extending the VisualEditor.DynamicPickList base class to dynamically discover and render the available implementations of the interface. It uses small library class, Extensions, I built for this blog that wraps the SOQL shown above for the ApexTypeImplementor object. It also allows for a richer more type safe way to specify the interface and format the results in way that helps make the class names more readable.
public class CalculatorUsagePickList extends VisualEditor.DynamicPickList {

    public override VisualEditor.DataRow getDefaultValue() {
        VisualEditor.DataRow defaultValue = new VisualEditor.DataRow('', 'Basic Calculator');
        return defaultValue;
    }

    public override VisualEditor.DynamicPickListRows getValues() {
        VisualEditor.DynamicPickListRows picklistValues = new VisualEditor.DynamicPickListRows();

        // Use Extensions.find to get all ICalculatorFunctions implementations
        Extensions extensions = new Extensions();
        Extensions.ApexExtensionsFindResults results =
                 extensions.find(ICalculatorFunctions.class);

        // Add basic calculator option (no additional buttons) and any dynamicly discovered implementations
        VisualEditor.DataRow basicOption = new VisualEditor.DataRow('Basic Calculator', '');
        picklistValues.addRow(basicOption);
        List<Extensions.ApexExtensionsFindResult> names = results.toNames();
        for (Extensions.ApexExtensionsFindResult name : names) {
            VisualEditor.DataRow value =
                  new VisualEditor.DataRow(name.label, name.name);
            picklistValues.addRow(value);
        }

        return picklistValues;
    }
}
Of course Apex is not the only way to implement logic on the Salesforce platform, we can also use Flow and although slightly different in approach the above principles can also be applied to allow users to customise your application logic with Flow as well – just like other platform features offer.
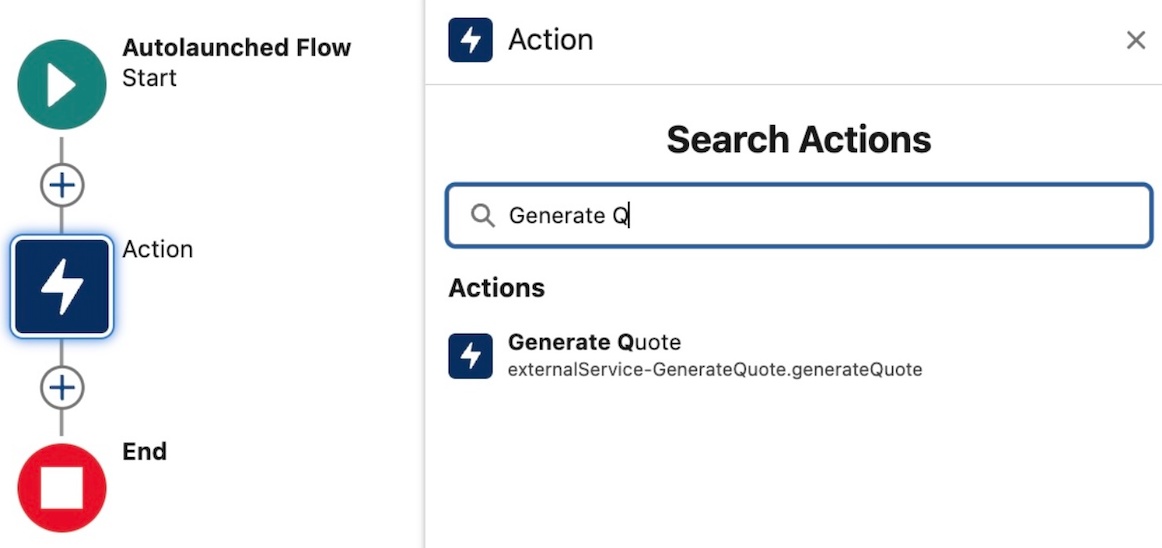
Actions and Discovery
Actions are now a standard means of defining reusable tasks for many platform tools – with Salesforce providing many standard actions to access data, send emails, perform approvals and more. The ability for Admins to create custom actions via Flow is the key means for using no-code to extend other Flows, Lightning UIs and Agentforce. It is also possible to have your Salesforce applications offer Flow extensibility by using the Apex Invocable API. The following Apex code shows how to invoke a Flow action from Apex – once again though hard coded here imagine the Flow name comes from a configuration store, a Custom Metadata Type or property configuration as shown above.
If you have used platform tools like Flow, Lightning App Builder, Buttons, Agent Builder, and more, you will notice that they allow Admins to search for actions – there is no need to remember action names. This can be achieved in your own configuration UIs by using the Standard and Custom Actions list APIs. The snag here is this API is not directly available to Apex; you have to call the Salesforce REST API from Apex.
        String orgDomainUrl = URL.getOrgDomainUrl().toExternalForm(); // Org Domain scoped callouts do not require named credentials
        String sessionId = UserInfo.getSessionId();
        HttpRequest req = new HttpRequest();
        req.setEndpoint(actionType == 'standard'
            ? orgDomainUrl + '/services/data/v64.0/actions/standard'
            : orgDomainUrl + '/services/data/v64.0/actions/custom/' + actionType);
        req.setMethod('GET');
        req.setHeader('Authorization', 'Bearer ' + sessionId);
        req.setHeader('Content-Type', 'application/json');
        Http http = new Http();
        HttpResponse res = http.send(req);
Both of these approaches allow you to invoke logic written in either code or no-code from within your Apex code – but which one should you use? Certainly, performance considerations are a key factor, especially if the code you’re adding extensibility to is deep in your core logic and/or tied to processes that operate in bulk or in the background against large volumes of data. Another factor is the information being exchanged: is it simple native values (numbers, strings) or lists, or more complex nested structures? Basically the extensibility context does play a role in your choice – as does use case.
In general, if you’re concerned about performance (trigger context included here) and/or the use case may involve more than moderate calculations/if/then/else logic, I would go with Apex interfaces. Actions (typically implemented in Flow) can offer an easy way for admins to customize your UI logic, search results, add new button handling, or inject additional content on your page/component. Also worth keeping mind, Actions do come in other forms such as those from Salesforce; even Agents are Actions – so simply allowing Admins to reuse Standard Actions within your logic is a potential value to consider – and might be more optimal than them attaching to record changes for example.
Types of Extensibility, Motivations and Value
Carefully consider and validate extensibility use cases before embedding them in your Apex code; in some cases, an admin may find it more natural to use Flow and/or Lightning App Builder to orchestrate a brand-new alternative UI/process to the one you provide rather than extend it from within. By reusing existing objects and/or Apex Invocable actions, you are effectively building around your application logic vs. extending it from within, as per the patterns above. Both patterns are valid, though.
You might also wonder how important providing extensibility is to your users – especially if you have not been asked to include it. I once worked on an API enablement initiative with a Product Manager who had a strong affinity for providing integration facilities as standard. In a prior software purchasing role, they recognized the value as a form of insurance, as they could always build around or extend the application logic if they later found a feature gap.
My experience has also given me an appreciation that strong ecosystems thrive on customization abilities, and strong ecosystems strengthen the value of an offering—allowing influencers, customers, and partners to innovate further. And in case you’re wondering, is this just of interest for ISVs building AppExchange packages, the answer is no; it’s as important when building internal solutions; internal ecosystems and ease of customization are still important here, especially in larger businesses.
In my new role, I am enjoying getting back into a favorite pastime of trawling through the release notes and Metadata API for the latest new features and changes. That’s right – I really do compare the Metadata API as it often uncovers smaller changes or draws attention to something I might have missed in clicking through the documentation. This blog is not exhaustive – it’s simply a quick list of things that caught my eye (thus far) from a more developer, architect, and general architecture perspective. Rest assured, a number of these have gone on the future blogs list for a deeper dive!
Integration Features and API Updates
External Services continues to impress me with how easy it makes integrating well-documented (aka via OpenAPI schema) external APIs into Apex and Flow. It’s no longer just robotically generating stubs but adding actual platform integration value as well. With async APIs, it does a great job at integrating with platform callbacks. With Winter, it now sets its sights on binary information being passed around in APIs. Something that would easily blow heap limits today – per the documentation, it now appears that it will marshal binary content between ContentVersion records automatically. I literally had to write API code this week to manually write to this object myself to avoid a heap issue – now all I have to do is declare a binary type – nice!
Make use of your Lightning Web Component investments outside of Salesforce with the return of a tech I explored a lot in the past, Lightning Out! Now we have Lightning Out v2.0 based on LWR (Lightning Web Runtime) which appears to have had a big refit and UX shake-up with a fancy new page under Setup that allows you to set up and list your external apps (websites) that want to access your LWC and provides a nice tool to provide the code needed to integrate.
Make more use of industry web development innovation inside your Lightning Web Components with the ability to elevate third-party scripts to fully trusted mode. Having been around the block a number of times getting excited about a new widget or library to use in my Salesforce UIs only to find it’s blocked – this is a welcome option! It is behind, wisely a number of permissionsto enable in the org – but at least we now have the option to make this decision ourselves – wonderful!
Being more efficient with your LWC API requests is always a good thing! Sticking with LWC again, it’s great to see Salesforce investing in making native integrations with their APIs, such as the new GraphQL module lightning/graphql – which replaces the now deprecated lightning/uiGraphQLApi. This new version exposes access to optional fields and dynamic query construction. This is an area I have not really poked around in much – but I intend to now!
Now you can use Flow to more easily automate around changes in external systems – albeit if you have a Mulesoft license that is. Still this is a welcome addition showing that Salesforce is getting more serious about giving us a single pane of glass when it comes to their offerings and not forcing us to build glue integrations. This facility immediately, of course, leverages many existing Mulesoft connectors – allowing you, for example, to make a Flow that responds to Asana task completions or Calendly invites being accepted. Of course, we do have full Salesforce API support for invoking Flows as I have covered in the past – so you still have the DIY option to connect your Flows.
Developer Experience
You can now access your Apex Controllers and Data from Local LWC (Beta). Local development still alas eludes Apex but less so LWC over the years. Salesforce is certainly ensuring web development on the platform is less jarring when coming from other platforms and frameworks here – with the ability to run your LWC locally and yet still have it access (deployed) Apex and data in the attached org. I do a reasonable amount of LWC development, and deploying (and refreshing) gets very tedious (even when AI-assisted) – so I think it’s about time with this new feature I took a deeper look at this.
Logic is logic, no matter if it’s expressed as a Flow and/or Apex, and both need a good test solution. Thankfully, in later years, we have seen an uplift in recognizing this for Flow. And this release now brings together what I suspect has been scripted up until now – a more unified way of seeing Apex and Flow test results also see here.
Standardizing documentation for Apex code has historically been a case of borrowing what largely JavaDocs has done – with the Winter release, Salesforce has now officially defined annotations for documenting Apex code – allowing tools to generate better docs and IDEs and AIs to better respond to the insights captured within them. I was not able to find more information other than release note topic at the time of writing – I am sure others will be eager to dive further into this for sure!
A modern feature uplift for Salesforce packaging in the form of automatic dependency discovery. In the past, you had to list and manage the full dependency tree – now you can – much like other dependency managers elsewhere – define the immediate dependencies and have child dependencies automatically discovered. I suspect there will be a lot of attention to the details of how this one works once folks get their hands further on it – including myself.
Other Notables
This is already a long post – so my 10th area of interest is more of a catch all – so here are a few other things that also caught my attention:
New Metadata Type – BatchProcessJobDefinition. This was observed only through comparing the Metadata APIs, I cannot find another reference to it other than here. Alas it appears to be less general purpose than its name implies – relating I believe to a feature in Loyalty cloud.
p.s if you are interested in the output from my Metadata API compare – I uploaded it here. Maybe you can spot something cool or useful thats yet to be documented!
An app is often judged by its features, but equally important is its durability, confidence, and predictability in the tasks it performs – especially as a business grows; without these, you risk frustrating users with unpredictable response times or worse random timeouts. As Apex developers we can reach out to Queuables and Batch Apex for more power – though usage of these can also be required purely to work around the lower interactive governor limits – making programming interactive code more complex. I believe you should still include Apex in your Salesforce architecture considerations – however now we have an additional option to consider! This blog revisits Heroku AppLink and how it can help and withouthaving to move wholesale away from Apex as your primary language!
In my prior blog I covered Five ways Heroku AppLink Enhances Salesforce Development Capabilities – if you have not read that and need a primer please check it out. Heroku AppLink has a flexible points of integration with Salesforce, among those is a way to stay within a flow of control driven by Apex code (or Flow for that matter), yet seamlessly offload certain code execution to Heroku, once complete revert back to Apex control. In contrast to Apex async workloads, this allows code to run immediately and uninterrupted until complete. In this mode there is nocompeting with Apex CPU, heap, or batch chunking constraints. As a result the overall flow of execution can be simpler to design and completion times are faster, largely only impacted by org data access times (no escaping slow Trigger logic). For the end user and overall business the application scales better, is more predictable and timely – and critically, grows more smoothly in relation to business data volumes.
Staying within Apex flow of control, allows you to leverage existing investments and skills in Apex, while when needed hooking into additional skills and Heroku’s more performant compute layer. All while maintaining the correct flow of the user identity (including their permissions) and critically without leaving the Salesforce (inclusive of Heroku) DX tool chains and overall fully managed services. The following presents two examples, one expanding what can be done in an interactive (synchronous) use case and the second moving to a full background (asynchronous) use case.
In this interactive (synchronous) example we are converting an Opportunity to a Quote – a task that can, depending on discount rules, size of the opportunity and additional regional tweaks, become quite compute heavy – sometimes in Apex hitting CPU or Heap limits. The sequence diagram below illustrates the flow of control from the User, through Apex, Heroku and back again. As always full code is supplied, but for now lets dig into the key code snippets below.
We start out with an Apex Controller that is attached to the “Create Quote” LWC button on the Opportunity page. This Apex Controller calls the Heroku AppLink exposed conversion logic (in this case written in Node.js – more on this later) – and waits for a response before returning control back to Lighting Experience to redirect the user to the newly created Quote. As you can see the HerokuAppLink namespace contains dynamically generated types for the service.
    @AuraEnabled(cacheable=false)
    public static QuoteResponse createQuote(String opportunityId) {
        try {
            // Create the Heroku service instance
            HerokuAppLink.QuoteService service = new HerokuAppLink.QuoteService();
            // Create the request
            HerokuAppLink.QuoteService.createQuote_Request request =
               new HerokuAppLink.QuoteService.createQuote_Request();
            request.body = new HerokuAppLink.QuoteService_CreateQuoteRequest();
            request.body.opportunityId = opportunityId;
            // Call the Heroku service
            HerokuAppLink.QuoteService.createQuote_Response response =
               service.createQuote(request);
            if (response != null && response.Code200 != null) {
                QuoteResponse quoteResponse = new QuoteResponse();
                quoteResponse.opportunityId = opportunityId;
                quoteResponse.quoteId = response.Code200.quoteId;
                quoteResponse.success = true;
                quoteResponse.message = 'Quote generated successfully';
                return quoteResponse;
            } else {
                throw new AuraHandledException('No response received from quote service');
            }
        } catch (HerokuAppLink.QuoteService.createQuote_ResponseException e) {
            // Handle specific Heroku service errors
            // ...
        } catch (Exception e) {
            // Handle any other exceptions
            throw new AuraHandledException('Error generating quote: ' + e.getMessage());
        }
    }
The Node.js logic (show below) to convert the quote uses the Fastify library to expose the code via a HTTP endpoint (secure by Heroku AppLink). In the generateQuote method the Heroku AppLink SDK is used to access the Opportunity records and create the Quote records – notably in one transaction via its Unit Of Work interface. Again it is important to note that none of this requires handling authentication thats all done for you – just like Apex – and just like Apex (when you apply USER _MODE) – the SOQL and DML has permissions applied.
//
// Generate a quote for a given opportunity
// @param {Object} request - The quote generation request
// @param {string} request.opportunityId - The opportunity ID
// @param {import('@heroku/applink').AppLinkClient} client - The Salesforce client
// @returns {Promise<Object>} The generated quote response
//
export async function generateQuote (request, client) {
  try {
    const { context } = client;
    const org = context.org;
    const dataApi = org.dataApi;
    // Query Opportunity to get CloseDate for ExpirationDate calculation
    const oppQuery = `SELECT Id, Name, CloseDate FROM Opportunity WHERE Id = '${request.opportunityId}'`;
    const oppResult = await dataApi.query(oppQuery);
    if (!oppResult.records || oppResult.records.length === 0) {
      const error = new Error(`Opportunity not found for ID: ${request.opportunityId}`);
      error.statusCode = 404;
      throw error;
    }
    const opportunity = oppResult.records[0].fields;
    const closeDate = opportunity.CloseDate;
    // Query opportunity line items
    const soql = `SELECT Id, Product2Id, Quantity, UnitPrice, PricebookEntryId FROM OpportunityLineItem WHERE OpportunityId = '${request.opportunityId}'`;
    const queryResult = await dataApi.query(soql);
    if (!queryResult.records.length) {
      const error = new Error(`No OpportunityLineItems found for Opportunity ID: ${request.opportunityId}`);
      error.statusCode = 404;
      throw error;
    }
    // Calculate discount based on hardcoded region (matching createQuotes.js logic)
    const discount = getDiscountForRegion('NAMER'); // Use hardcoded region 'NAMER'
    // Create Quote using Unit of Work
    const unitOfWork = dataApi.newUnitOfWork();
    // Add Quote
    const quoteName = 'New Quote';
    const expirationDate = new Date(closeDate);
    expirationDate.setDate(expirationDate.getDate() + 30); // Quote expires 30 days after CloseDate
    const quoteRef = unitOfWork.registerCreate({
      type: 'Quote',
      fields: {
        Name: quoteName,
        OpportunityId: request.opportunityId,
        Pricebook2Id: standardPricebookId,
        ExpirationDate: expirationDate.toISOString().split('T')[0],
        Status: 'Draft'
      }
    });
    // Add QuoteLineItems
    queryResult.records.forEach(record => {
      const quantity = parseFloat(record.fields.Quantity);
      const unitPrice = parseFloat(record.fields.UnitPrice);
      // Apply discount to QuoteLineItem UnitPrice (matching createQuotes.js exactly)
      const originalUnitPrice = unitPrice;
      const calculatedDiscountedPrice = originalUnitPrice != null
                                        ? originalUnitPrice * (1 - discount)
                                        : originalUnitPrice; // Default to original if calculation fails
      unitOfWork.registerCreate({
        type: 'QuoteLineItem',
        fields: {
          QuoteId: quoteRef.toApiString(),
          PricebookEntryId: record.fields.PricebookEntryId,
          Quantity: quantity,
          UnitPrice: calculatedDiscountedPrice
        }
      });
    });
    // Commit all records in one transaction
    try {
      const results = await dataApi.commitUnitOfWork(unitOfWork);
      // Get the Quote result using the reference
      const quoteResult = results.get(quoteRef);
      if (!quoteResult) {
        throw new Error('Quote creation result not found in response');
      }
      return { quoteId: quoteResult.id };
    } catch (commitError) {
      // Salesforce API errors will be formatted as "ERROR_CODE: Error message"
      const error = new Error(`Failed to create quote: ${commitError.message}`);
      error.statusCode = 400; // Bad Request for validation/data errors
      throw error;
    }
  } catch (error) {
    // ...
  }
}
This is a secure way to move from Apex to Node.js and back. Note certain limits still apply: callout timeout is 120 seconds max (applicable when calling Heroku per above) – additionally, the Node.js code is leveraging the Salesforce API, so API limits still apply. Despite the 120 seconds timeout, you get practically unlimited CPU, heap, and the speed of the latest industry language runtimes – in the case of Java – compilation to the machine code level if needed!
The decision to use AppLink here really depends on identifying the correct bottle neck; if some Apex logic is bounded (constrained to grow) by CPU, memory, execution time, or even language, then this is a good approach consider – without going off doing integration plumbing and risking security. For example, if you’re doing so much processing in memory you’re hitting Apex CPU limits – then even with the 120-second callout limit to Heroku – the alternative Node.js (or other lang) code will likely run much faster – keeping you in the simpler synchronous mode for longer as your compute and data requirements grow.
Improving Background Jobs – Asynchronous Invocation
When processing needs to operate over a number of records (user selected or filtered) we can apply the same expansion of the Apex control flow – by having Node.js do the heavy lifting in the middle and then once complete passing control back to Apex to complete user notifications, logging, or even further non-compute heavy work. The diagram shows two processes; the first is the user interaction, in this case, selecting the records that Apex passes over to Heroku to enqueue a job to handle the processing. Heroku compute is your org’s own compute, so will begin execution immediately and run until it’s done. Thus, in the second flow, we see the worker taking over, completing the task, and then using an AppLink Apex callback, sending control back to the org where a user notification is sent.
In this example we have the Create Quotes button that allows the user to select which Opportunities to be converted to Quotes. The Apex Controller shown below takes the record Ids and passes those over to Node.js code for processing in Heroku – however in this scenario it also passes an Apex class that implements a callback interface – more on this later. Note you can also invoke via Apex Scheduled jobs or other means such as Change Data Capture.
    public PageReference generateQuotesForSelected() {
        try {
            // Get the selected opportunities
            List<Opportunity> selectedOpps = (List<Opportunity>) this.stdController.getSelected();
            // Extract opportunity IDs
            List<String> opportunityIds = new List<String>(selectedOpps.keySet());
            // Call the Quotes service with an Apex callback
            try {
                HerokuAppLink.QuoteService service = new HerokuAppLink.QuoteService();
                HerokuAppLink.QuoteService.createQuotes_Request request = new HerokuAppLink.QuoteService.createQuotes_Request();
                request.body = new HerokuAppLink.QuoteService_CreateQuotesRequest();
                request.body.opportunityIds = opportunityIds;
                // Create callback handler for notifications
                CreateQuotesCallback callbackHandler = new CreateQuotesCallback();
                // Set callback timeout to 10 minutes from now (max 24hrs)
                DateTime callbackTimeout = DateTime.now().addMinutes(10);
                // Call the service with callback
                HerokuAppLink.QuoteService.createQuotes_Response response =
                   service.createQuotes(request, callbackHandler, callbackTimeout);
                if (response != null && response.Code201 != null) {
                    // Show success message
                    // ....
            } catch (HerokuAppLink.QuoteService.createQuotes_ResponseException e) {
                // Handle specific service errors
                // ...
            }
        } catch (Exception e) {
            // Show error message
            //  ...
        }
        return null;
    }
Note: You may have noticed the above Apex Controller is that of a Visualforce page controller and not LWC! Surprisingly it seems (as far as I can see) this is still the only way to implement List View buttons with selection. Please do let me know of other native alternatives. Meanwhile the previous button is a modern LWC based button, but this is only supported on detail pages.
As before you can see Fastify used to expose the Node.js code invoked from the Apex controller – except that it is returning immediately to the caller (your Apex code) rather than waiting for the work to complete. This is because the work has been spun off in this case into another Heroku process known as a Worker. This pattern means that control returns to the Apex Controller and to the user immediately while the process continues in the background. Note that the callbackURL is automatically supplied by AppLink you just need to retain it for later.
// Asynchronous batch quote creation
  fastify.post('/createQuotes', {
    schema: createQuotesSchema,
    handler: async (request, reply) => {
      const { opportunityIds, callbackUrl } = request.body;
      const jobId = crypto.randomUUID();
      const jobPayload = JSON.stringify({
        jobId,
        jobType: 'quote',
        opportunityIds,
        callbackUrl
      });
      try {
        // Pass the work to the worker and respond with HTTP 201 to indicate the job has been accepted
        const receivers = await redisClient.publish(JOBS_CHANNEL, jobPayload);
        request.log.info({ jobId, channel: JOBS_CHANNEL, payload: { jobType: 'quote', opportunityIds, callbackUrl }, receivers }, `Job published to Redis channel ${JOBS_CHANNEL}. Receivers: ${receivers}`);
        return reply.code(201).send({ jobId }); // Return 201 Created with Job ID
      } catch (error) {
        request.log.error({ err: error, jobId, channel: JOBS_CHANNEL }, 'Failed to publish job to Redis channel');
        return reply.code(500).send({ error: 'Failed to publish job.' });
      }
    }
  });
The following Node.js is running in the Heroku Worker and performs the same work as the example above, querying Opportunities and using the Unit Of Work to create the Quotes. However in this case when it completes it calls the Apex Callback handler. Note that you can support different types of callbacks – such as an error state callback.
/**
 * Handles quote generation jobs.
 * @param {object} jobData - The job data object from Redis.
 * @param {object} logger - A logger instance.
 */
async function handleQuoteMessage (jobData, logger) {
  const { jobId, opportunityIds, callbackUrl } = jobData;
    try {
    // Get named connection from AppLink SDK
    logger.info(`Getting 'worker' connection from AppLink SDK for job ${jobId}`);
    const sfContext = await sdk.addons.applink.getAuthorization('worker');
    // Query Opportunities
    const opportunityIdList = opportunityIds.map(id => `'${id}'`).join(',');
    const oppQuery = `
      SELECT Id, Name, AccountId, CloseDate, StageName, Amount,
             (SELECT Id, Product2Id, Quantity, UnitPrice, PricebookEntryId FROM OpportunityLineItems)
      FROM Opportunity
      WHERE Id IN (${opportunityIdList})
    // ...
    logger.info(`Processing ${opportunities.length} Opportunities`);
    const unitOfWork = dataApi.newUnitOfWork();
    // Create the Quotes and commit Unit Of Work
    // ...
    const commitResult = await dataApi.commitUnitOfWork(unitOfWork);
    // Callback to Apex Callback class
    if (callbackUrl) {
      try {
        const callbackResults = {
          jobId,
          opportunityIds,
          quoteIds: Array.from(quoteRefs.values()).map(ref => {
            const result = commitResult.get(ref);
            return result?.id || null;
          }).filter(id => id !== null),
          status: failureCount === 0 ? 'completed' : 'completed_with_errors',
          errors: failureCount > 0 ? [`${failureCount} quotes failed to create`] : []
        };
        const requestOptions = {
          method: 'POST',
          body: JSON.stringify(callbackResults),
          headers: { 'Content-Type': 'application/json' }
        };
        const response = await sfContext.request(callbackUrl, requestOptions);
        logger.info(`Callback executed successfully for Job ID: ${jobId}`);
      } catch (callbackError) {
        logger.error({ err: callbackError, jobId }, `Failed to execute callback for Job ID: ${jobId}`);
      }
    }
  } catch (error) {
    logger.error({ err: error }, `Error executing batch for Job ID: ${jobId}`);
  }
}
Finally the following code shows us what the CreateQuotesCallback Apex Callback (provided in the Apex controller logic) is doing. For this example its using the custom notifications to notify the user via UserInfo.getUserId(). It can do this because it is running as the original user that started the work. Also meaning that if it needed to do any further SOQL or DML these run in context of the correct user. Also worth noting that handler is bulkified – indicating that Salesforce will likely batch up callbacks if they arrive in close timing.
/**
 * Apex Callback handler for createQuotes asynchronous operations
 * Extends the generated AppLink callback interface to handle responses
 */
public class CreateQuotesCallback
      extends HerokuAppLink.QuoteService.createQuotes_Callback {

    /**
     * Handles the callback response from the Heroku worker
     * Sends a custom notification to the user with the results
     */
    public override void createQuotesResponse(List<HerokuAppLink.QuoteService.createQuotes_createQuotesResponse_Callback> callbacks) {
        // Send custom notification to the user
        for (herokuapplink.QuoteService.createQuotes_createQuotesResponse_Callback callback : callbacks) {
            if (callback.response != null && callback.response.body != null) {
                Messaging.CustomNotification notification = new Messaging.CustomNotification();
                notification.setTitle('Quote Generation Complete');
                notification.setNotificationTypeId(notificationTypeId);
                String message = 'Job ' + callback.response.body.jobId + ' completed with status: ' + callback.response.body.status;
                if (callback.response.body.quoteIds != null && !callback.response.body.quoteIds.isEmpty()) {
                    message += '. Created ' + callback.response.body.quoteIds.size() + ' quotes.';
                }
                if (callback.response.body.errors != null && !callback.response.body.errors.isEmpty()) {
                    message += ' Errors: ' + String.join(callback.response.body.errors, ', ');
                }
                notification.setBody(message);
                notification.setTargetId(UserInfo.getUserId());
                notification.send(new Set<String>{ UserInfo.getUserId() });
            }
        }
    }
}
Configuration and Monitoring
Ingeneral the Node.js code runs as the user invoking the actions – which is very Apex like and gives you confidence your code only does what the user is permitted. There is also an elevation mode thats out the scope of this blog – but is covered in the resources listed below. The technical notes section in the README covers an exception to running as the user – whereby the asynchronous Heroku worker logic is running as a named user. Note that the immediate Node.js logic and Apex Callbacks both still run as the invoking user so if needed you can do “user mode” work in those contexts. You can read more about the rational for this this in the README for this project.
Additionally there are subsections in the README that cover the technical implementation of Heroku AppLink asynchronous callbacks. Configuration for Heroku App Async Callbacks provides the OpenAPI YAML structure required for callback definitions, including dynamic callback URLs and response schemas that Salesforce uses to generate the callback interface. Monitoring and Other Considerations explains AppLink’s External Services integration architecture, monitoring through the BackgroundOperation object, and the 24-hour callback validity constraint with Platform Event alternatives for extended processing times or in progress updates.
Summary
As always I have shared the code, along with a more detailed README file on how to set the above demos up for yourself. This is just one of many ways to use Heroku AppLink, others are covered in the sample patterns here – including using Platform Events to trigger Heroku workers and transition control back to Apex or indeed Flow. This Apex Callback pattern is unique to using Heroku AppLink with Apex and is not yet that deeply covered in the official docs and samples – you can also find more information about this feature by studying the general External Services callback documentation.
Finally, the most important thing here is that this is not a DIY integration like you may have experienced in the past – though I omitted here the CLI commands (you can see them in the README) – Salesforce and Heorku are taking on a lot more management now. And overall this is getting more and more “Apex” like with user mode context explicitly available to your Heroku code. This blog was inspired by feedback on my last blog, so please keep it coming! There is much more to explore still – I plan to get more into the DevOps integration side of things and explore ways to automate the setup using the AppLink API.
The infinite scrolling feature of the Lightning Datatable component allows practically an unlimited amount of data to be loaded incrementally as the user scrolls. This is a common web UI approach to load pages faster and without consuming unnecessary amounts of database and compute resources retrieving records some users may not even view. The current recommended approach to retrieve records is to use SOQL OFFSET and LIMIT – however, ironically, this approach is limited to 2,000 max records. Substituting this with the new Apex Cursors feature, as you can see in the screenshot below, we have already gone past this limit! Actually, the limit for Apex Cursors is 50 million records – that said, I would seriously question the sanity of a requirement to load this many! This blog gives an overview of the Apex Cursor feature and how it can be adapted to work with LWC components.
If you want to go ahead and deploy this demo checkout the GitHub repo here. Also please keep in mind that as this is a Beta release – Salesforce does not recommend use in production at this time.
What are Apex Cursors?
If you’re not familiar, the Apex Cursors feature (currently in Beta), it enables you to provide a SOQL statement to the platform and for it to return a means for you to incrementally fetch chunks of records from the result set – this feels similar to the way Batch Apex works – except that it’s much more flexible as you decide when to retrieve the records and, in fact, in any order or chunk size. The standard documentation and much of what you’ll read elsewhere online focuses on using it to drive your own custom Apex async workloads using Apex Queueable as an alternative to Batch Apex – however, because it’s just an Apex API, it can be used for other use cases such as the one featured in this blog.
Usage is simple; first, you create a cursor with Database.getCursor (or getCursorWithBinds) giving your desired SOQL. Then, with the returned Cursor object, call the fetch method with the desired position and count. Unlike Batch Apex, you can actually go back and forth using the position parameter, as this is not an iterator interface. You can also determine the total record size via getNumRecords. Before we dive into the full demo code, let’s use some basic Apex to explore the feature to query 5000 accounts.
The following code gives us the following debug output:
DEBUG|***** BEFORE FETCH *****
DEBUG|Total Records: 5000
DEBUG|Limit Queries: 100
DEBUG|Limit Query Rows: 50000
DEBUG|Limit Aggregate Queries: 300
DEBUG|Limit Apex Cursor Rows: 50000000
DEBUG|Limit Fetch Calls On Apex Cursor: 10
DEBUG|***** AFTER FETCH *****
DEBUG|Accounts Read: 500
DEBUG|Limit Queries: 100
DEBUG|Limit Query Rows: 50000
DEBUG|Limit Aggregate Queries: 300
DEBUG|Limit Apex Cursor Rows: 50000000
DEBUG|Limit Fetch Calls On Apex Cursor: 10
The findings, at least for Beta, show that retrieving or counting records does not count against the traditional limits for SOQL; all the common ones are still untouched. However, before you get excited, this is not an alternative – it has its own limits! Some of which you can see above, which for the Beta do not seem to be getting updated, see further discussion here. The most important one, however, is not exposed via the Limits class but is documented here, which states you can only create 10,000 cursors per org per day. The other important aspect is that cursors can also span multiple requests, so long as you can find a way to persist them; however, they will get deleted after 48 hours. This is also stated to align with the sister feature Salesforce REST API Cursors.
Using Cursors with LWC Components
Cursors when used in the context of Queueable are persisted in the class state – for LWC components while they don’t give an error – are at time of this Beta not serialisable between the LWC client and the Apex Controller – I suspect for security reasons, so I posted here to confirm. This however is not the end of the story, as we do have other forms of statement management between Apex and LWC, specifically Apex Session cache – as the Apex Controller code below demonstrates.
Update: Since GA, Cursors are now serialisable so can be used directly in LWC without the Cache workaround below. See the main repo attached to this blog for an updated sample. Using Cache meanwhile can still be good solution for sharing Cursor results between users.
public with sharing class ApexCursorDemoController {

    @AuraEnabled(cacheable=false)
    public static LoadMoreRecordsResult loadMoreRecords(Integer offset, Integer batchSize) {
        try {
            Database.Cursor cursor = (Database.Cursor) Cache.Session.get('testaccounts');
            if(cursor == null) {
                cursor = Database.getCursor(
                         'SELECT Id, Name, Industry, Type, BillingCity, Phone FROM Account
                          WHERE Name LIKE \'TEST%\' ORDER BY Name', AccessLevel.USER_MODE);
                Cache.Session.put('testaccounts', cursor);
            }
            LoadMoreRecordsResult result = new LoadMoreRecordsResult();
            result.records = cursor.fetch(offset, Math.min(batchSize, cursor.getNumRecords() - offset));
            result.offset = offset + batchSize;
            result.totalRecords = cursor.getNumRecords();
            result.hasMore = result.offset < result.totalRecords;
            return result;
        } catch (Exception e) {
            Cache.Session.remove('allaccounts');
            throw new AuraHandledException('Error loading records: ' + e.getMessage());
        }
    }

    public class LoadMoreRecordsResult {
        @AuraEnabled public List<Account> records;
        @AuraEnabled public Integer offset;
        @AuraEnabled public Boolean hasMore;
        @AuraEnabled public Integer totalRecords;
    }
}
Because the use of Apex Cursors is purely contained within the Apex Controller the LWC component HTML and JavaScript controller are as per traditional implementation of the DataTable component using the infinite scrolling feature – you can click here to see the code.
Thoughts and Community Findings
This feature is a welcome, modern addition to Apex and I look forward to the full GA that allows us to use this confidently in a production scenario. Here is a short summary of some usage guidelines to be aware and some very good points already raised by the community in the Apex Previews and Betas group.
Cursor Sharing and Security Considerations As you can see in the above, user mode is not the default, but is enabled per best practice via use of AccessLevel.USER_MODE. As it is possible (at least for Beta) to share cursors it is important to make sure you consider who/where else you share the cursor as the user and sharing rules could be different. In this case the above code uses the users session cache so its explicitly scoped to the current user only. I suspect (see below) sharing, CRUD and FLS maybe getting re-evaluated anyway on fetch – but just in case (or you explicitly used the system mode, or the default) – this is something to keep in mind. On the flip side, another use case to explore might indeed by that in some cases it might be optimal to have a shared record set evaluated and maintain across a set of users.
Partial Cached Results The result set appears to be cached when the cursor is created, but I suspect only the Ids since when changing the record field values – changes are seen in the results on refresh. When a record is deleted however it is not returned from the corresponding fetch call – so worth noting the count you ask for when calling fetch may not be what you get back – though the position indexing and total records remains the same. Likewise if you create a record, even if its matches the original criteria it is not returned. These nuances and others are further discussed here – hopefully the GA documentation can formally confirm the behaviours.
Ability to Tidy up Given the 10k daily limit, while seemingly generous it would be useful to be able to explicitly delete cursors as well. Suggestion posted here.
Just because you can show more data – does not mean you should What I mean by this – is just because you can now expose more data does not always mean you should – always consider accordingly the fields and rows your users really need as you would any list / data table view your building – in most cases not having any filter is likely to be an anti-pattern. Additionally don’t forget Salesforce has a number of analytical tools that can help users further when moving through large amounts of data.
Over the years through this blog I have enjoyed covering various advancements in Salesforce APIs, Apex, Flow, and more recently, Agentforce. While I have featured Heroku quite a bit – despite it being a Salesforce offering, the reality has been that access to Heroku for a Salesforce developer has felt like plugging in another platform – not just because on the surface its DX is different from SFDX, but because in a more material sense, it has not been integrated with the rest of the platform and its existing tools – in the same way Apex and Flow are. Requiring you to do the integration plumbing before you can access its value.
Now with a new “free” Heroku AppLink add-on, Heroku has now been tangibly integrated by Salesforce into the Salesforce platform – it and code deployed to it even sits under the Setup menu. So now it is finally time to reflect on what Heroku brings to the party!
This blog starts a series on what this new capability means for Salesforce development. Choosing the best tool for the job is crucial for maximizing the holistic development approach the Salesforce platform offers. Apex, Flow, LWC, etc., are still important tools in your toolkit. In my next blog in this series, I’ll share hands-on content, but for now, let’s explore five reasons to be aware of what Heroku and Heroku AppLink can do for Salesforce development:
1. Seamlessly and Securely Attach Unlimited Compute to your Orgs
At times, certain automations or user interactions demand improved response times and/or abiility handle increasing data volumes. While Apex and Flow have a number of options here, they are inherently always constrained by the multi-tenant nature of the core platform that runs their respective logic. The core platform’s first priority is a stable environment for all – thus, largely we see the continued realities of the infamous governor limits. Going beyond some, though not all, of the governor limits that either stop or at least slow things down is now possible – and without leaving the Salesforce family of services.
You can deploy code to Heroku with git push heroku main, which works in much the same way as sf project deploy to upload your code and run it, then you declaratively assign your compute needs, and attach (using the publish command) access to it for use within your Flow, Apex, LWC or Agentforce implementations – across as many orgs as you like using the connect command.
Heroku supports both credit card (pay as you go) and contract billing for compute usage – with the smallest plan at $5 a month already able to run complex and lengthy compute tasks easily – though milage of course varies on usecase.
2. Tap into the worlds most popular languages and frameworks within Salesforce
Salesforce has some history of embracing industry languages such as Node.js for Lightning Web Components and, with that, taps into wider skill set pools, and also commercial and open-source web component libraries. With Heroku AppLink, this is now true for backend logic – and in fact, it extends language support to Python, .NET, Ruby, Java, and many more languages, all with their own rich communities, libraries, and frameworks. Does this mean I am suggesting you port all your Apex code to other languages? No – remember this is a best tool for the job mindset – so if what you need can be better served with existing skills, code, or libraries available in such languages, then with AppLink you can now tap into these while staying within the Salesforce services.
Note: Heroku AppLink provides additional SDK support presently only for Node.js and Python. That said its API is available to any language – and is fully documented. Java samples included with AppLink illustrate how to access the API directly – along with existing Salesforce API libraries.
$ git push heroku main
You may also think that with this flexibility comes more complexity; well, like the rest of Salesforce, Heroku keeps things powerful yet simple. Its buildpacks and simple CLI command git push heroku main remove the heavy lifting of building, deploying, and scaling your code that would otherwise require skills in AWS, GCP, or other platforms – what’s more, Heroku also curates the latest operating system versions, and build tools for you.
3. More power to existing Apex, Flow and Agentforce investments
As we are practicing choosing the best tool for the job – for complex solutions it’s typically not a case of one size fits all – that’s why we have a spectrum of tools to choose from – while one solution, for example, might be mostly delivered through Flow, the most complex parts of it might depend on some code – and thus having interoperability between each approach is important.
Heroku AppLink draws on the use of platform actions – which has over the years become the de facto means to decompose logic/automations – allow reusable logic to be built in code via Apex or declaratively in Flow. Now with Heroku AppLink, you can also effectively write actions in any of the aforementioned languages and also if needed scale that code beyond traditional limits such as CPU timeout and heap – while benefiting from increased execution times.
What is also critical to such code, is user context, so that data access honors the current user, both in terms of their object, field, sharing permissions but also audit information retaining a trail of who did what and when to the data. Thus, Heroku AppLink has the ability to run code in Salesforce “user mode” – much like Apex and Flow – this means the same – your SOQL and DML all operate in this mode – in fact, that’s the default – no need to qualify it as with Apex. This approach follows the industry pattern of thePrinciple of Least Privilege – there is also a way to selectively elevate permissions as needed using permission sets.
4. Make External Integrations more Secure
Heroku is also known to the wider world as a Paas (Platform-as-a-Service) providing easy to use compute, data and more recently AI services without the infrastructure hassle. This leads to Heroku customers building practically any application or service they desire – again in any language they desire. For example, a web/mobile experience can be hosted along with required data storage – both able to scale to global event needs. Heroku AppLink, joins Heroku Connect to start a family of add-ons that also help such consumer facing or even internal experiences tap into Salesforce org or even Data Cloud data – by effectively managing the connection details securely in one place – elevating the complexity of managing oAuth, JWT, certifications etc.
5. Leverage additional data and AI services
If all your data resides within a Salesforce org or Data Cloud, Heroku AppLink provides an easy to use SDK to make using the most popular APIs easy and even provides a long time favorite of mine, Martin Fowlers, Unit of Work over the relatively complex composite Salesforce APIs to manage multi-object updates within a single transaction.
Beyond this, you can also take advantage of Heroku Postgres to store additional data that does not need to be in the org but needs to be close at hand to your code – likewise attach to data services elsewhere in AWS, DynamoDB for example. Heroku also provides new AI services that provide a set of simple to use AI tooling primitives on top of the latest industry LLM’s. All these Heroku services exist with the same trust and governance as other Salesforce services and thus leveraging them means you don’t have to move data or compute outside of Salesforce if thats something your business is particularly sensitive to.
Summary
Salesforce continues to bring new innovations to its no-code and code tools that are exciting but yet broaden the burden of choice and making the right choice. With Heroku AppLink, this has indeed added to the mix – and expands the classic vs. question – to – when to use Flow vs. Apex vs. Heroku?
I’ve noticed that the Flow vs. Apex debate is still strong at community events this year. When it comes to “code,” whether it’s Apex, Python, Java, or .NET—excluding Triggers, which AppLink doesn’t support—my opinion on no-code versus code remains the same – consider wisely use of one or both accordingly. In respect to coded needs, I still would still generally recommend Apex first, that is unless your project needs align with the points above – then it’s worth further discussion. Ultimately, it’s about finding a suitable mix instead with all three supporting actions, it’s easier to blend and evolve as needed.
As I hinted at the start of this blog, I plan to get into more hands-on blogs on Heroku AppLink and some reflections on ISV usage. Between these, I also have other Apex-related topics I want to explore—such as the new Apex Cursors feature. In the meantime, here below are some useful links about Heroku AppLink available as of the time of this blog.