Andy in the Cloud

From BBC Basic to Force.com and beyond…


Leave a comment

Exploring DigitalOcean as a Managed AI Path for Salesforce

Choice fuels innovation—but it can also tip into analysis paralysis. On Salesforce, the native and often default AI path is Einstein and associated tools such as Prompt Builder and Agent Builder. That works well for many teams, yet cost, usage patterns, the weight of an Einstein dependency or broader strategic preferences can push app developers elsewhere—especially when you want close access and control over the models, data, and processing yourself. So: as a Salesforce developer, can you choose an alternative AI stack without going bare-metal and managing your own AI infrastructure?

In this blog I am use-case driven to help ground (pardon the pun) the exploration of alternatives to Salesforce’s own flavour of AI. The compute use case does not arguably need to be part of this—but it often comes hand in hand with building more complex AI solutions—so I wanted to include it. For this blog, I’ve partnered with DigitalOcean to explore their platform as an alternative to consider—through its own managed AI capabilities, and its FaaS serverless compute offering. Before we dive in—as always, please rest assured, my views are my own!
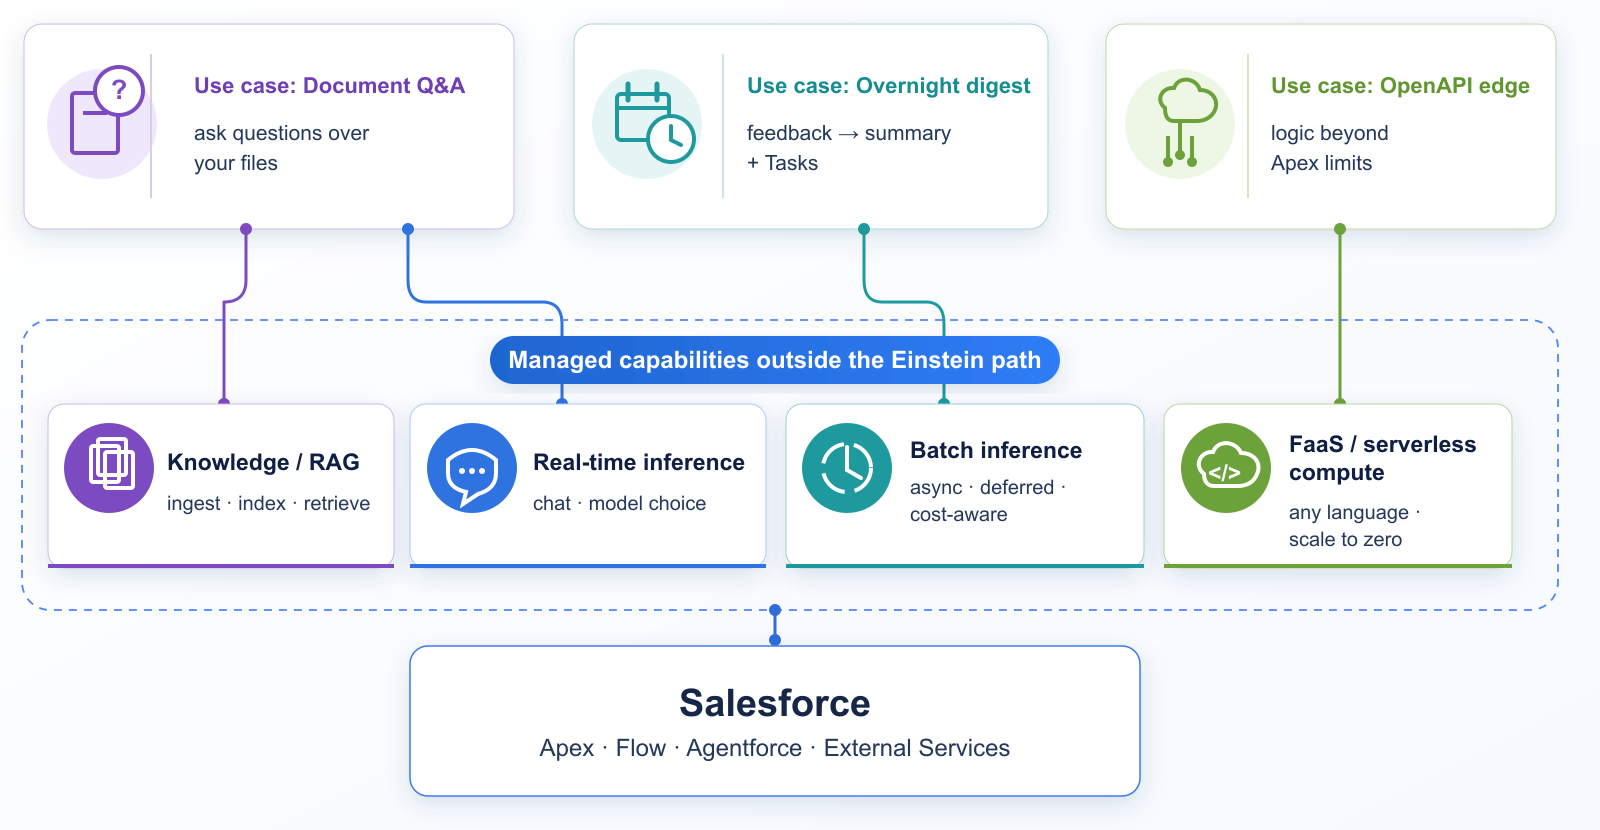
Until recently, Heroku was a good way to go beyond the Einstein based offerings, as Salesforce owned powerful PaaS for developers, with any-language support, scale, and a strong set of AI addons delivered in true Heroku style: fully managed DX and APIs. And even more recently the new AppLink feature that extended Salesforce org computational tasks beyond Apex and its limits to other languages. Alas with Heroku effectively moving to maintenance mode, we are still looking for alternatives.

We’ll explore DigitalOcean’s FaaS and managed inference features and how they can be integrated into Salesforce. What I found is that while the DX is different, the commitment to keep things simple is still present and helps keep us focused on the logic. There is even support for build packs and the recently graduated Cloud Native Buildpack standard. If you want to try the demos yourself, the sample code and deploy steps are in digitalocean-salesforce-demos. Prefer to skip the technical bits? Feel free to jump to the summary at the end.

Functions as a Service

Let’s start with FaaS. This is closer to Heroku apps, but serverless by design and scales to zero. As a result you need far less code and plumbing—no web server in your app or dependencies—just write the code and deploy it. And to ease Salesforce integration, as with Heroku AppLink, the Functions I created also support an OpenAPI schema.
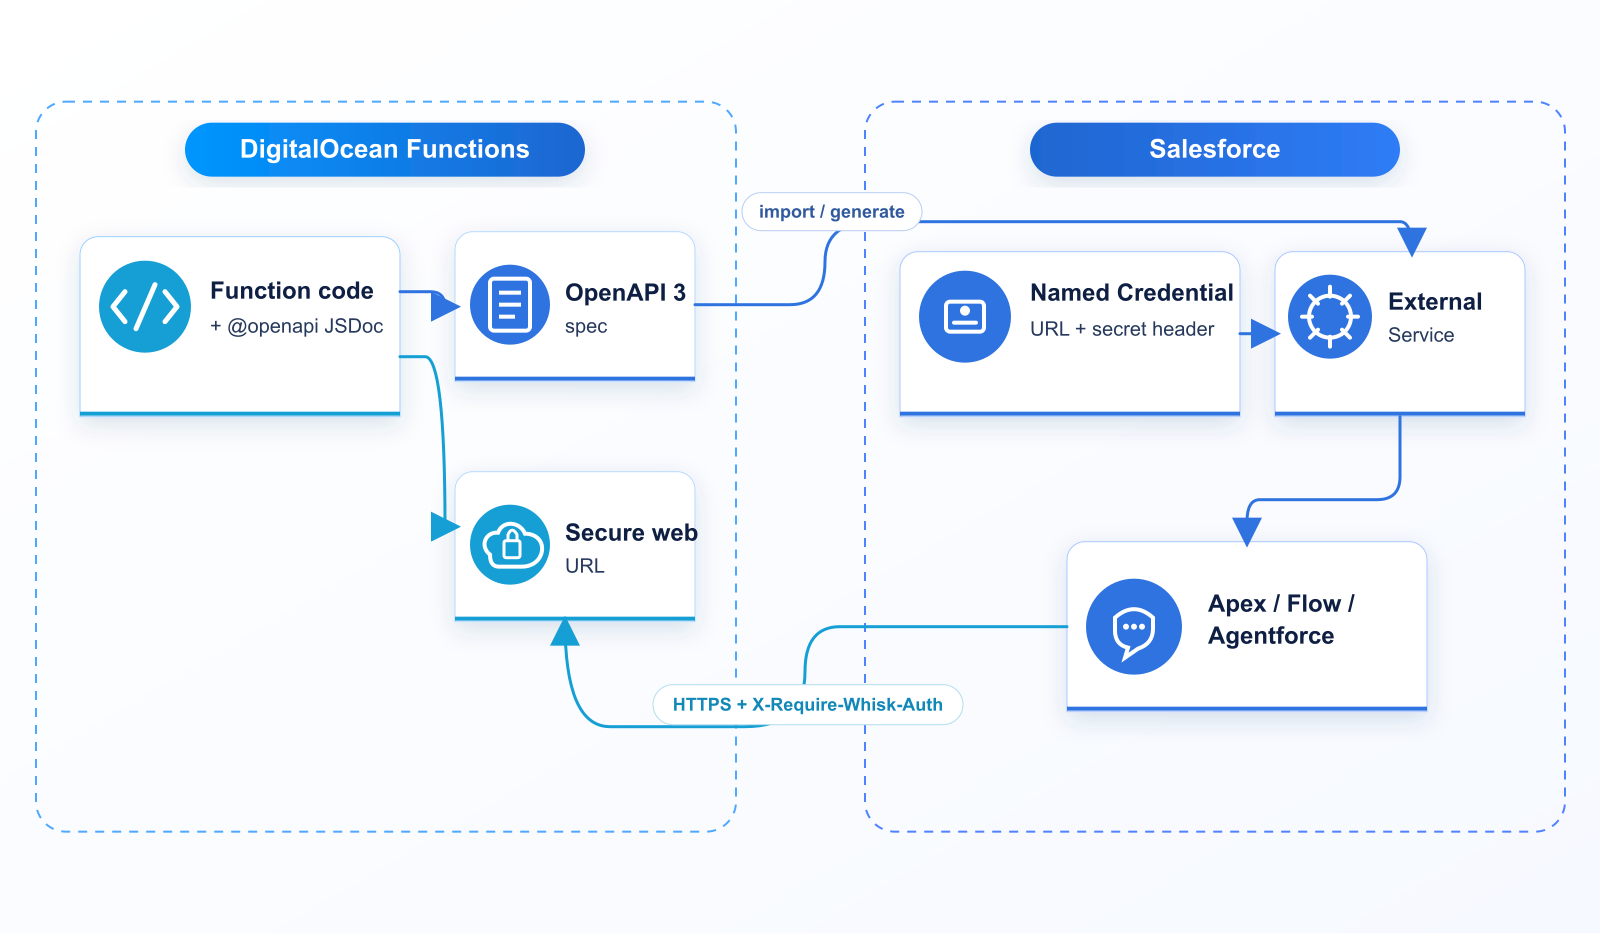
I’m a big fan of contract-driven APIs—and of keeping that contract close to the implementation. So I used Swagger tooling to inline OpenAPI annotations in the function code, then post-process them into the OpenAPI spec External Services needs.

/**
 * @openapi
 * /hello:
 *   get:
 *     operationId: hello
 *     summary: Hello from DigitalOcean
 *     parameters:
 *       - name: name
 *         in: query
 *         schema: { type: string }
 *     responses:
 *       '200':
 *         description: Greeting
 *         content:
 *           application/json:
 *             schema:
 *               $ref: '#/components/schemas/HelloResponse'
 *   post:
 *     operationId: helloPost
 *     # …same greeting via JSON body { "name": "…" }
 */
/**
 * @openapi
 * components:
 *   schemas:
 *     HelloResponse:
 *       type: object
 *       properties:
 *         message: { type: string }
 *         name: { type: string }
 *         source: { type: string }
 */
// Build the greeting payload returned to the caller
function greet(name) {
  const who = (name && String(name).trim()) || 'world'
  return {
    message: `Hello from DigitalOcean, ${who}!`,
    name: who,
    source: 'DigitalOcean Functions',
  }
}
// DigitalOcean Functions entry point
function main(event = {}) {
  return {
    statusCode: 200,
    headers: { 'Content-Type': 'application/json' },
    body: greet(event.name),
  }
}
module.exports.main = main

The required files are incredibly minimal: a single .js file and a project.yml that describes the function(s) in the deployment. At a basic level, our Function looks like this:

packages/sfdemo/
└── hello/
    └── hello.js    # Function + @openapi JSDoc
project.yml         # package/function config for doctl

In our project.yml we declare that it’s a public web Function and requires Secure Web authentication—with the secret stored in an environment variable.

packages:
  - name: sfdemo
    functions:
      - name: hello
        runtime: nodejs:22
        web: true
        # Secure Web Function — callers send X-Require-Whisk-Auth
        webSecure: ${DO_FUNCTIONS_WEB_SECRET}

After that, the following doctl commands stand up an environment and deploy the Functions. Once they’re deployed—and you include the secret—you’re good to start calling your Function.

# Authenticate doctl and install the serverless plugin
doctl auth init
doctl serverless install
doctl serverless namespaces create --label sfdemo --region nyc1

# Project root + Secure Web Function secret
cd blog/playgrounds/functions
echo "DO_FUNCTIONS_WEB_SECRET=$(openssl rand -hex 32)" >> .env

# Build & deploy the Functions package
doctl serverless deploy . --remote-build

# Call with the Secure Web Function secret
SECRET=$(grep '^DO_FUNCTIONS_WEB_SECRET=' .env | cut -d= -f2-)
URL=$(doctl serverless functions get sfdemo/hello --url)
curl -sS -H "X-Require-Whisk-Auth: ${SECRET}" \
  -G "${URL}" --data-urlencode "name=Salesforce" | jq .

# Function response
{
  "message": "Hello from DigitalOcean, Salesforce!",
  "name": "Salesforce",
  "source": "DigitalOcean Functions"
}

Out of the box authentication options are limited. For public Functions you can use a secret-based token, roll your own auth, or you can make Functions private and invokable only via the DigitalOcean Functions APIs. The samples here are public and use secret-based auth—and when they call back into Salesforce, authentication is via admin-approved users.

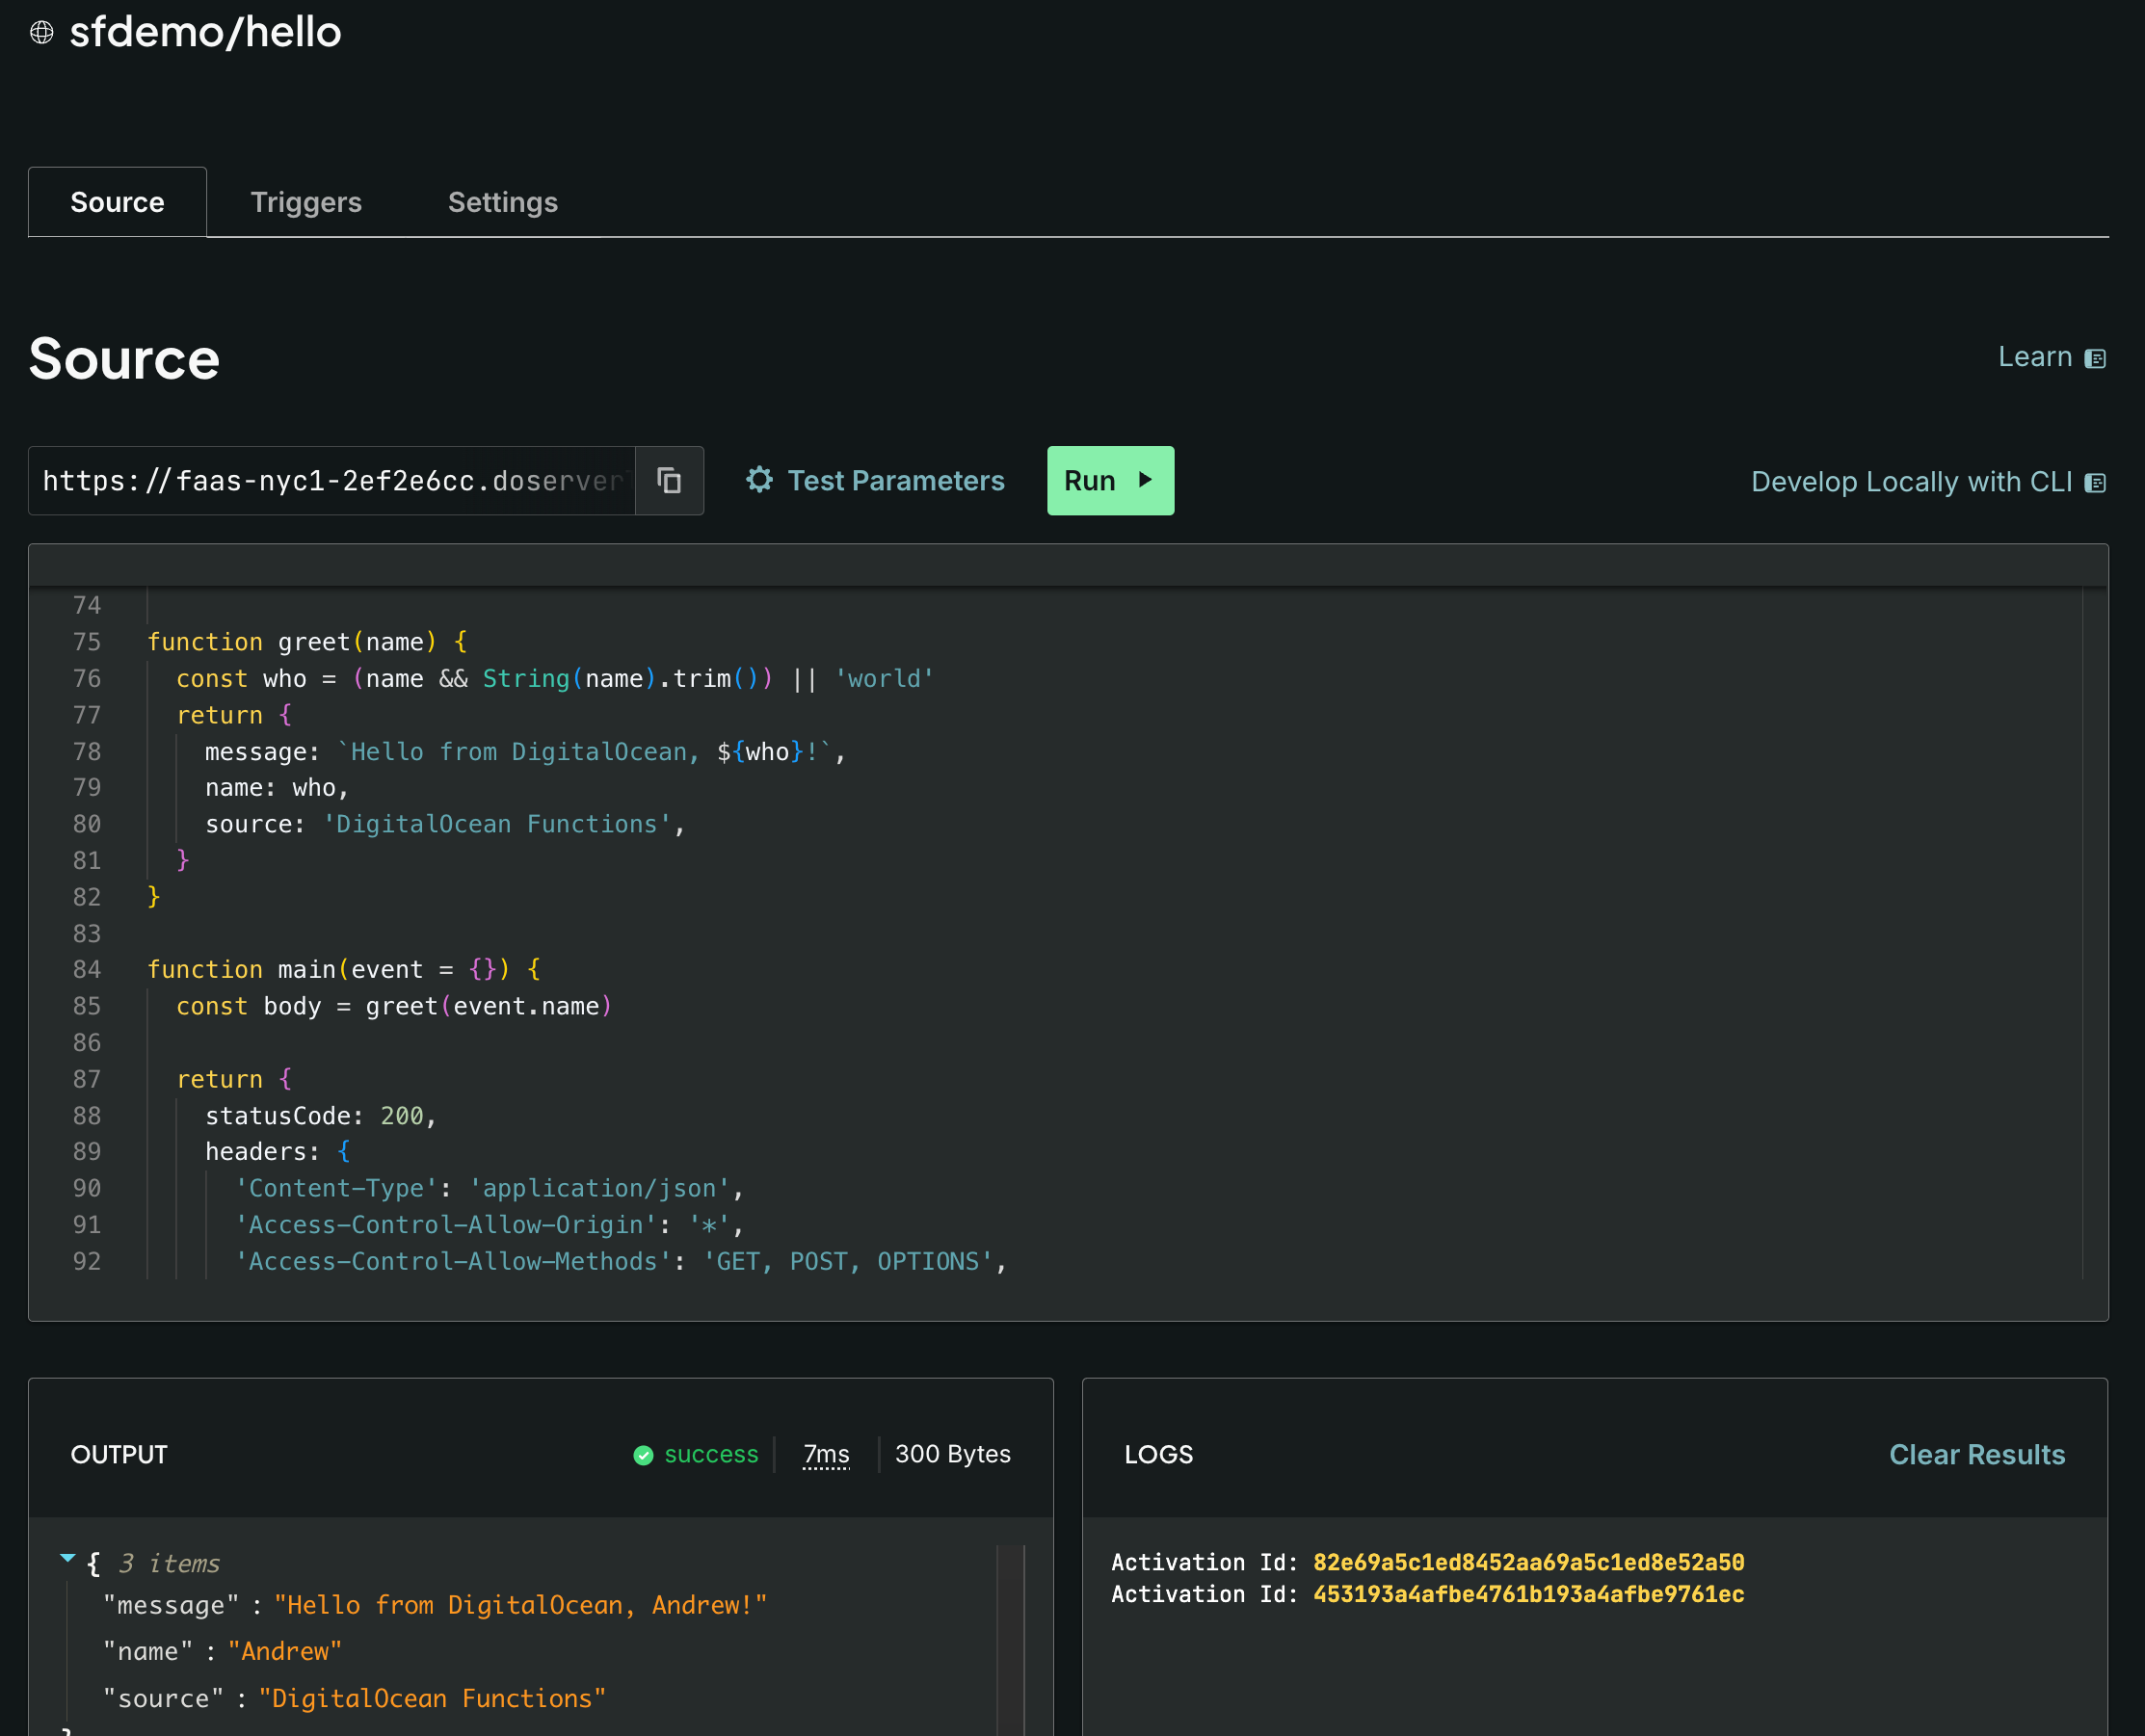
DigitialOcean Dashboard provides a good overview of Functions deployed and allows you to see the code and test them out all within the dashboard – i personally prefer curl and CLI’s but this is a good feature for quick tests for sure:
To invoke this from within Salesforce via an External Service, you need a Named Credential that provides the URL and secret for authentication. I used Swagger tooling to generate an OpenAPI schema. You can click through the Setup pages to wire it all up—but since this is me, and to somewhat replicate what the Heroku AppLink CLI did for us, I automated it.

# Build OpenAPI from the @openapi JSDoc in each Function
npm run generate-openapi

# Sync Named Credential URL from doctl, generate External Service metadata,
# deploy EC/NC/ES, and push DO_FUNCTIONS_WEB_SECRET into the EC principal
./bin/functions-apex.sh setup

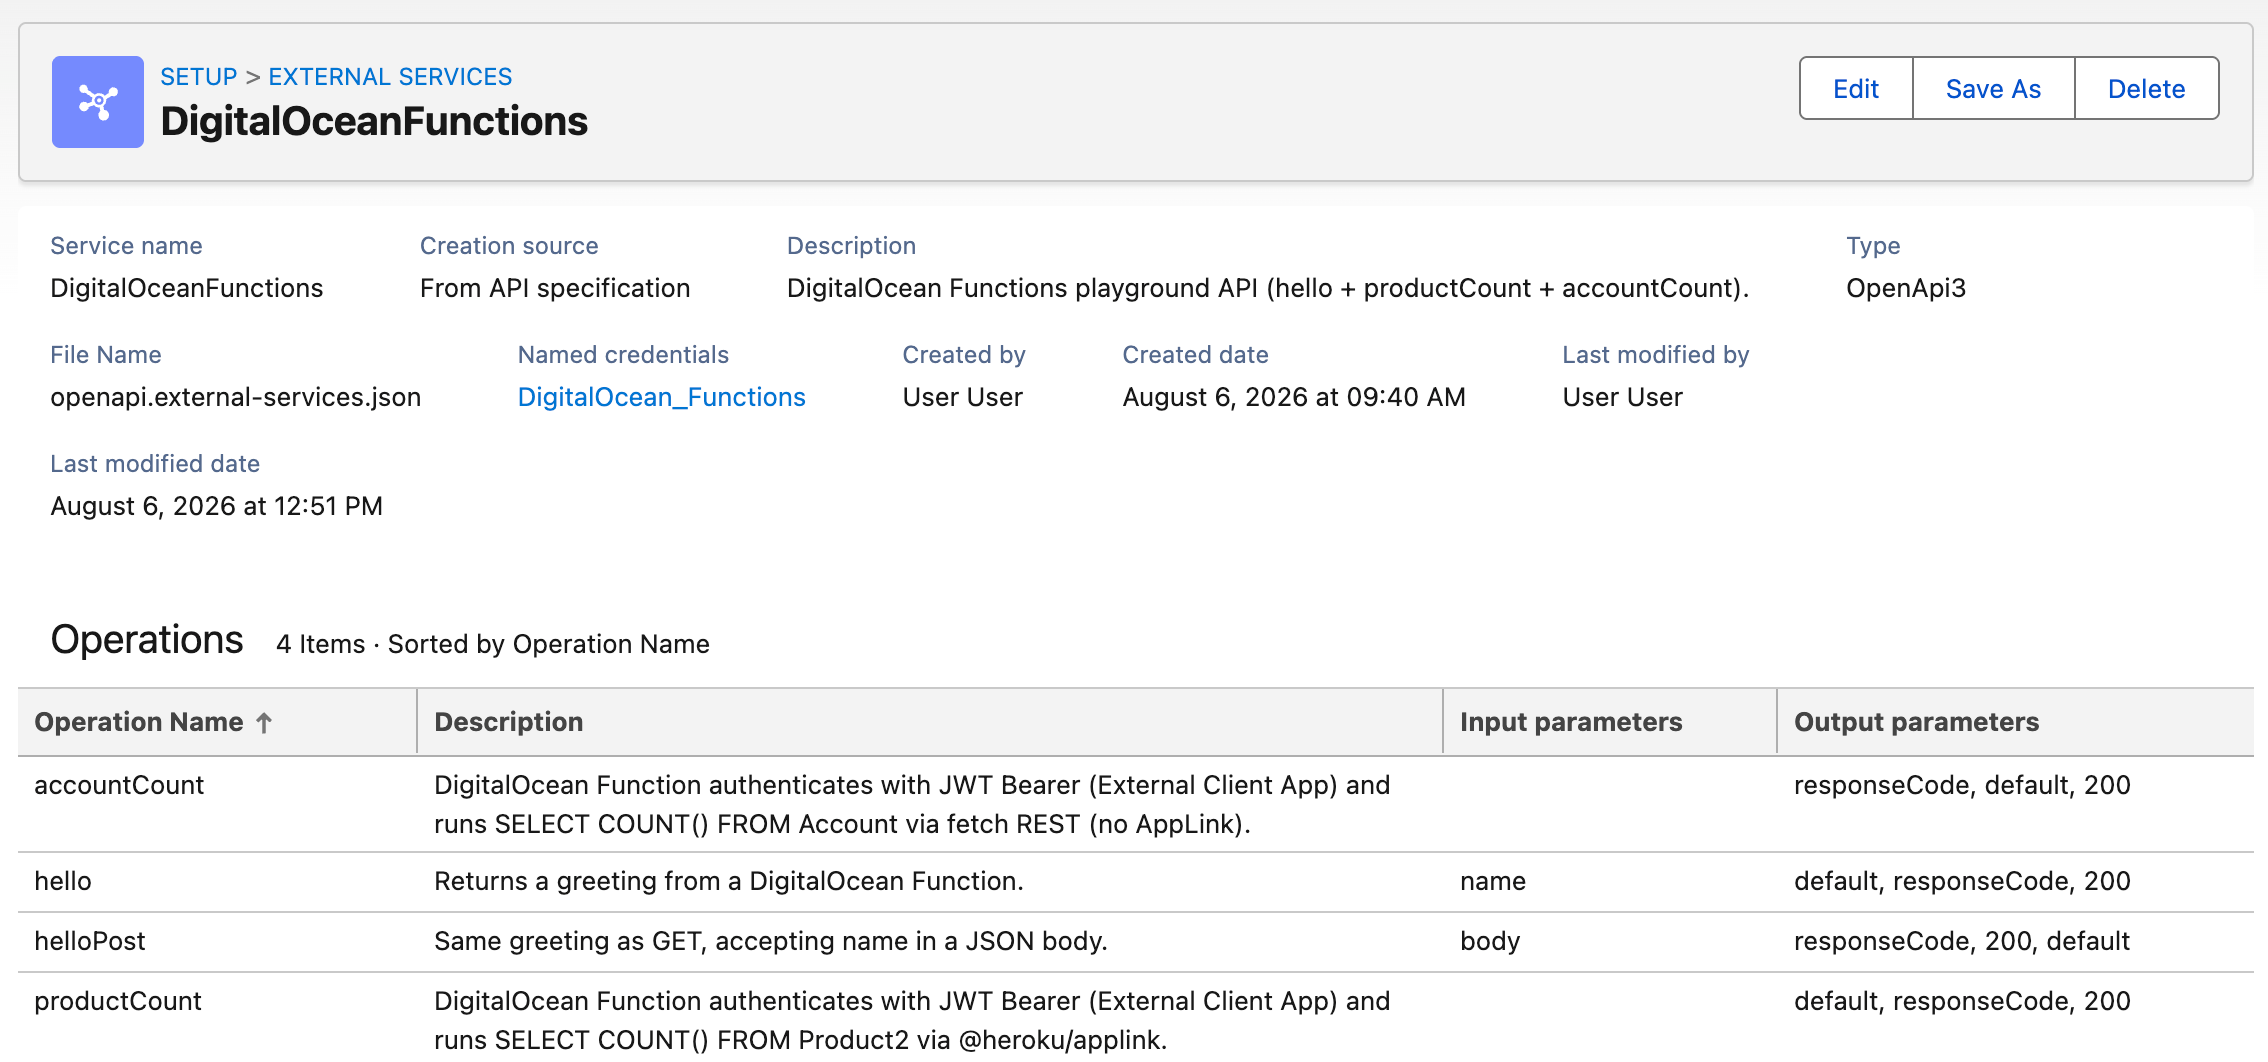
This resulted in an External Service that looks like this—the screenshot also shows the other sample operations wired from the same OpenAPI (helloPostaccountCount, and productCount). The accountCount Function is discussed below:
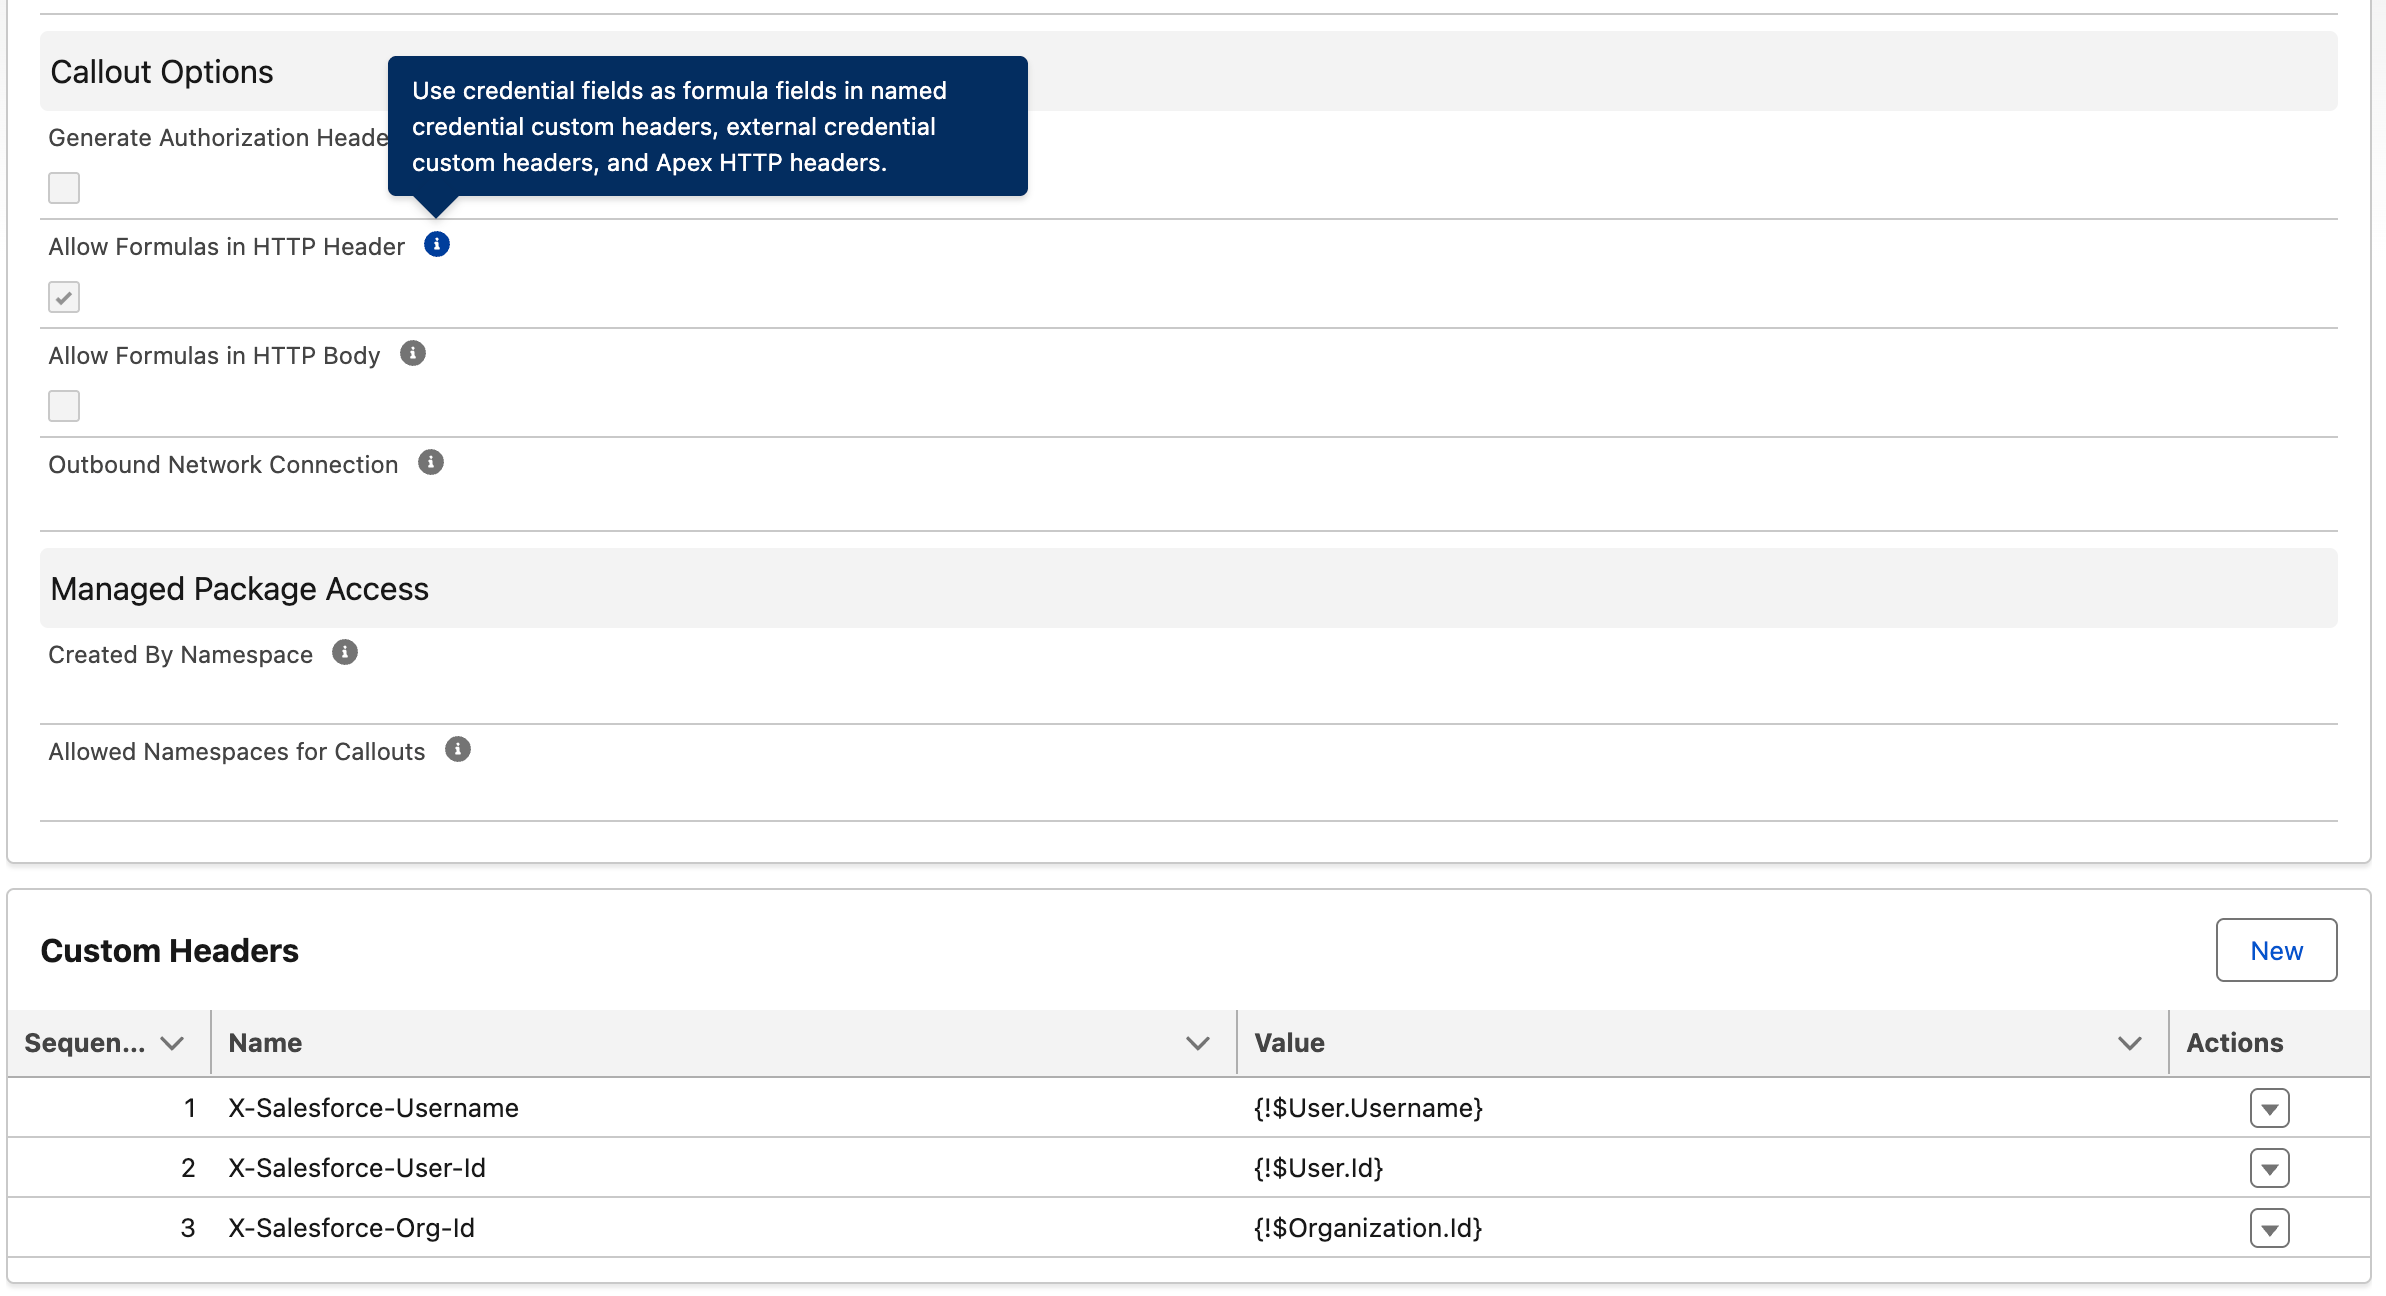
And under the Named Credential / External Credential, the Secure Web Function secret is passed as a custom header. Salesforce stores the actual credential value elsewhere in the External Credential configuration:

That then lets you call it from Apex like this:

// Generated External Service client for DigitalOceanFunctions
ExternalService.DigitalOceanFunctions svc =
    new ExternalService.DigitalOceanFunctions();

// Build the hello operation request
ExternalService.DigitalOceanFunctions.hello_Request req =
    new ExternalService.DigitalOceanFunctions.hello_Request();
req.name = 'Salesforce';

// Invoke the Function via Named Credential + External Service
ExternalService.DigitalOceanFunctions.hello_Response res = svc.hello(req);
System.debug(res.Code200.message);
// Hello from DigitalOcean, Salesforce!

If you’re not familiar with External Services, you might not know that they don’t just expose your Function to Apex. They also expose it to Flow—and even Agentforce—as actions for declarative builders in your org.

By leveraging External Client Apps (successors to Connected Apps) and OAuth JWT authentication, we can also give Function code callback access into the org—so Function logic can query and update Salesforce data (albeit limited by the current user’s permissions). Here’s a basic example that runs some SOQL to count Account records.

// JWT Bearer + REST helpers (username comes from Named Credential headers)
const sf = require('./salesforce')

// Authenticate as the calling user, then COUNT Accounts
async function countAccounts(event = {}) {
  const username = sf.usernameFromEvent(event)
  const token = await sf.getAccessToken(event, username)
  const result = await sf.query(
    token.access_token,
    token.instance_url,
    'SELECT COUNT() FROM Account',
    event
  )
  return {
    objectName: 'Account',
    count: result.totalSize,
    source: 'DigitalOcean Functions → Salesforce SOQL (JWT Bearer + fetch)',
  }
}

// DigitalOcean Functions entry point
async function main(event = {}) {
  try {
    return {
      statusCode: 200,
      headers: { 'Content-Type': 'application/json' },
      body: await countAccounts(event),
    }
  } catch (err) {
    return {
      statusCode: 500,
      headers: { 'Content-Type': 'application/json' },
      body: { error: err.message || String(err) },
    }
  }
}
module.exports.main = main

Not shown above is a set of helper routines that authenticate with Salesforce based on the calling user. We pass that user via another Named Credential feature—dynamic header values:
Fun Fact: I got the Heroku AppLink Node.js library working with this setup. That makes it easier to port existing AppLink code—and you get Unit of Work for transactional data access. Salesforce will likely keep shipping security fixes for paying customers, but not new features. To see it in action, check out the productCount Function in the sample repo.

Knowledge Bases – Retrieval Augmented Generation

These days it’s commonplace to have managed databases such as PostgreSQL that support vector similarity search (for example with pgvector). That often becomes the bedrock of pipelines that ingest documents, generate embeddings, and search them. DigitalOcean goes further with Knowledge Bases: an API to provision a knowledge base, upload files as data sources, and have the platform index them for later retrieval and semantic search. That managed path means less plumbing code on your side—so you can spend more time on the actual scenario: answering users’ real inquiries with the right context.

In keeping with the Salesforce integration theme, I wanted to build a native Salesforce experience on top of this—where users can drag and drop files, then ask questions against what was indexed—backed by DigitalOcean Serverless Inference from Apex. I’m aware Salesforce Data 360 can ingest files in a similar way for unstructured data and search indexing—here I’m exploring the DigitalOcean Knowledge Base path instead. Inference also has an interesting Inference Router feature that can route requests across models of your choosing, which can help manage cost if you put the effort into the routing configuration.

Key to my goal here was that DigitalOcean is very API-first in its design. Where I found a feature in the dashboard or CLI, I found an API—and what’s more, those APIs are described with the OpenAPI standard, which makes them ideal for agents and Salesforce to consume. Here’s a simple drag-and-drop experience with a chat box so you can ask questions once the file has been ingested. It again uses External Services—but this time to call DigitalOcean’s native platform APIs directl
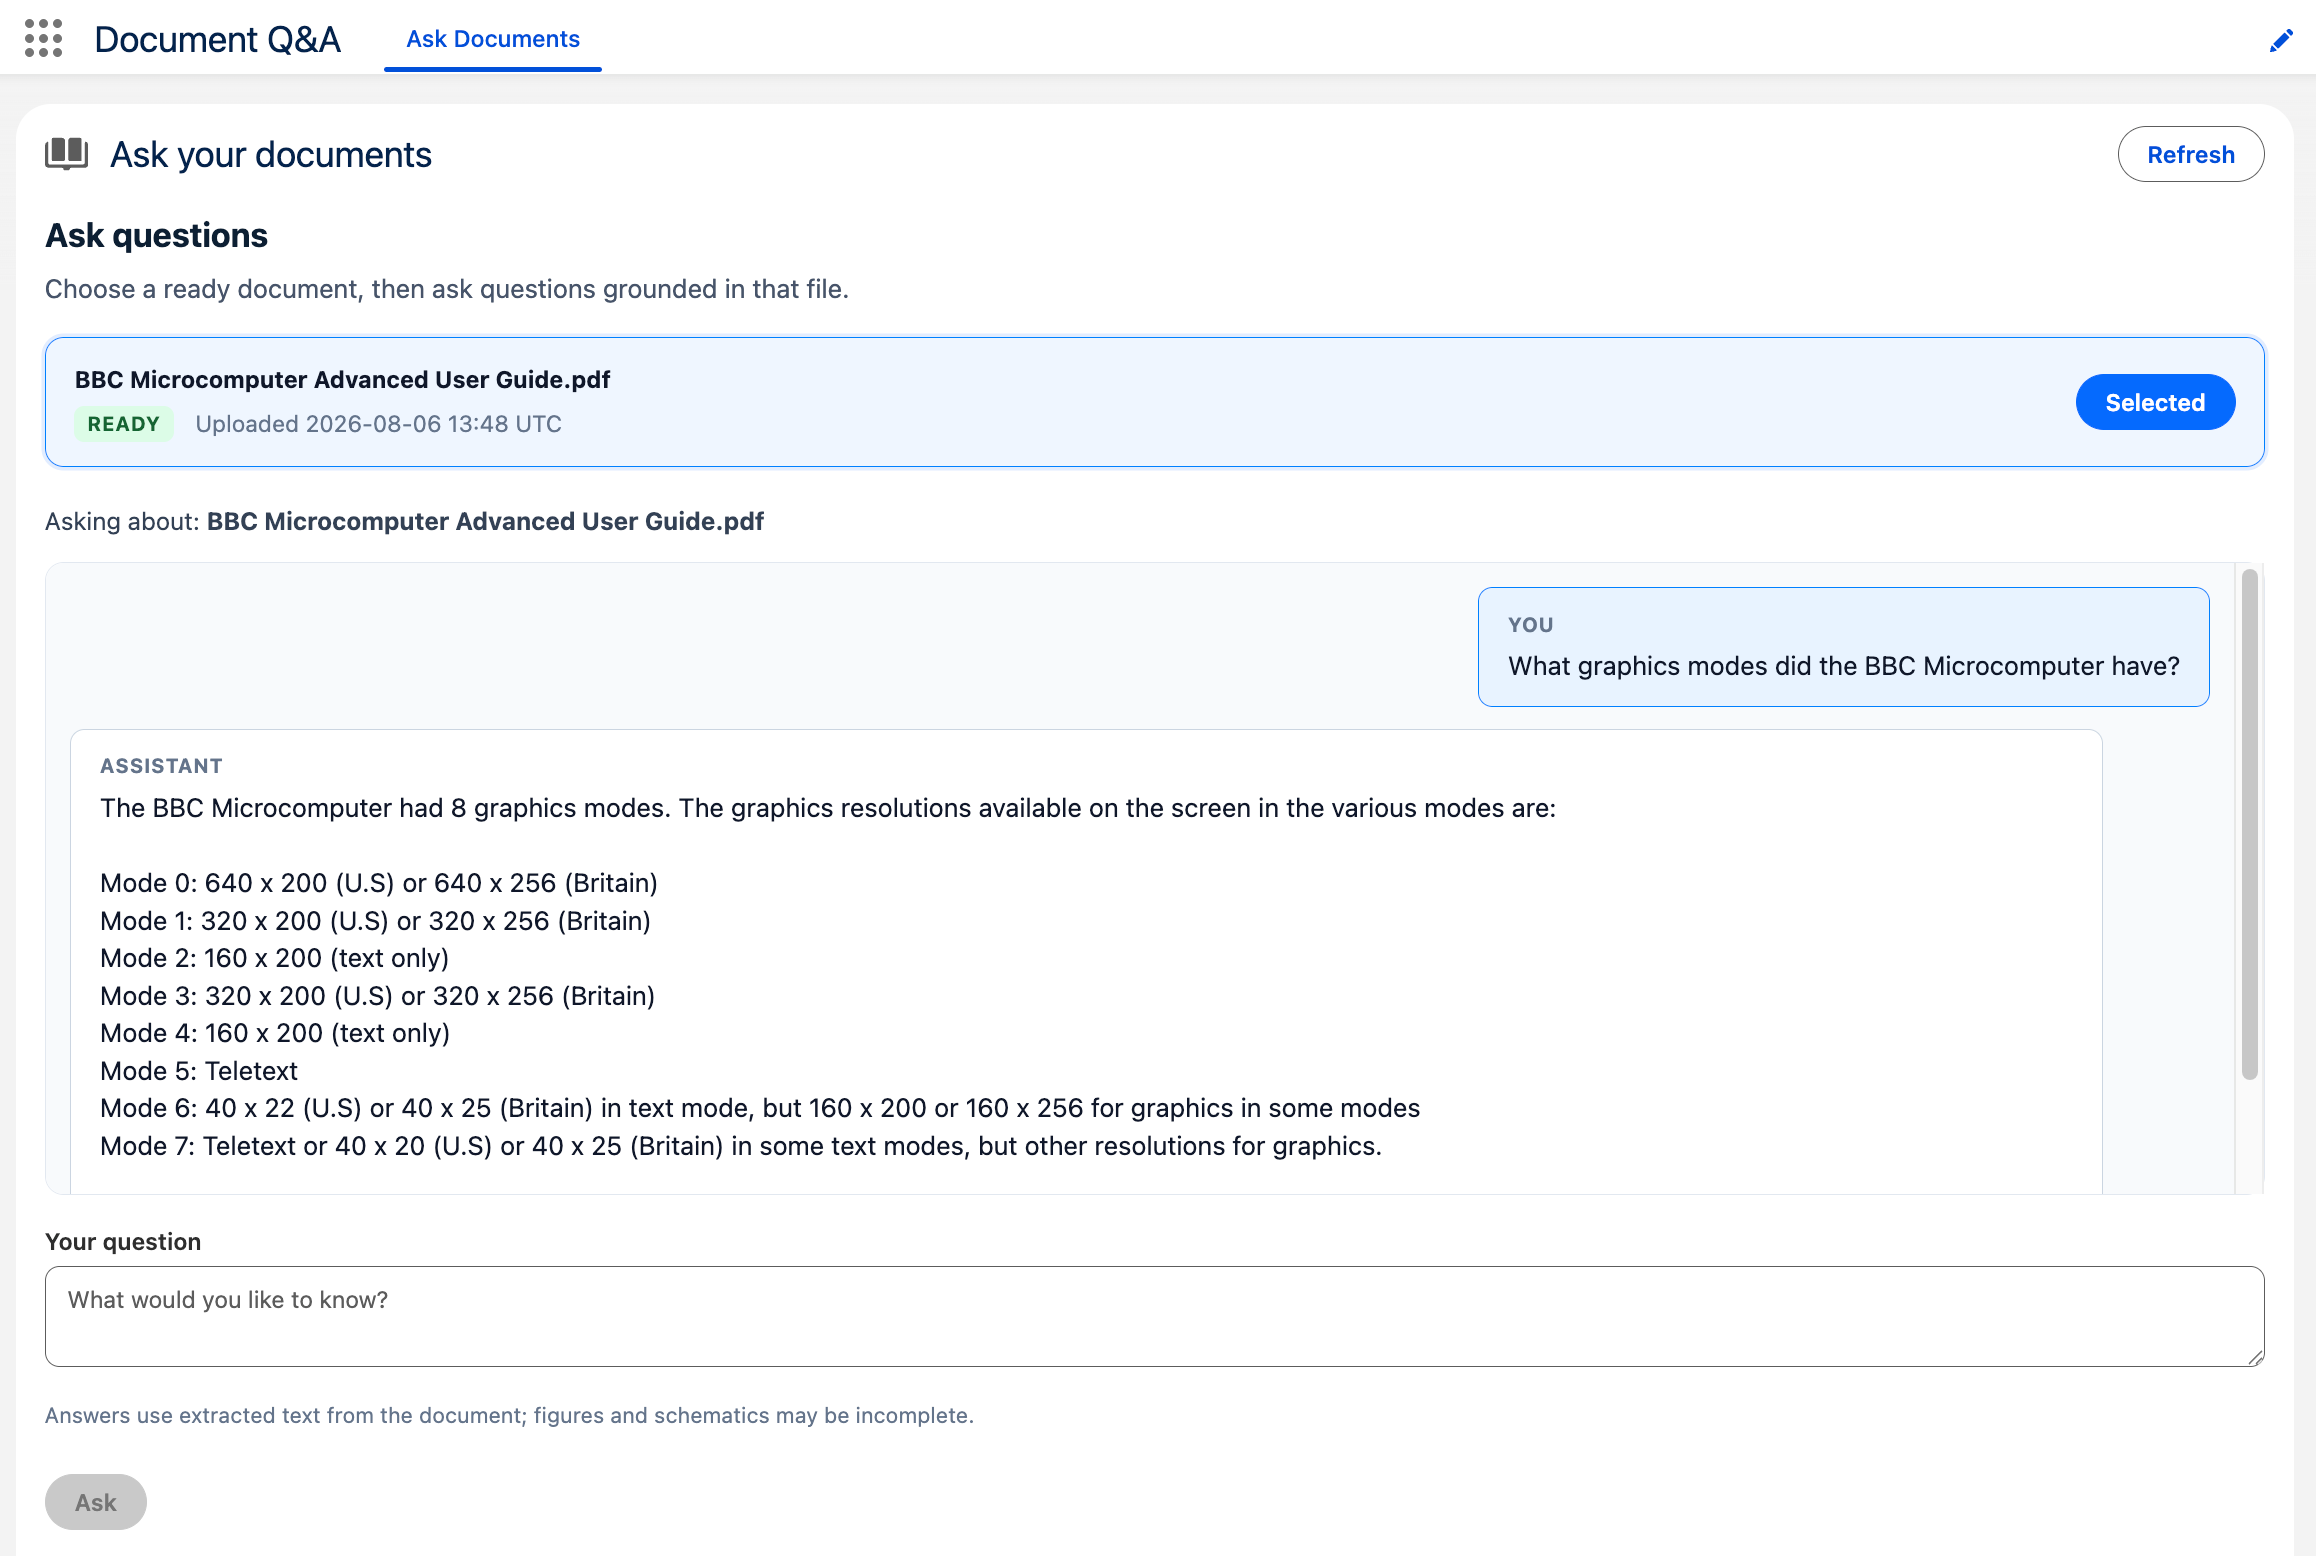
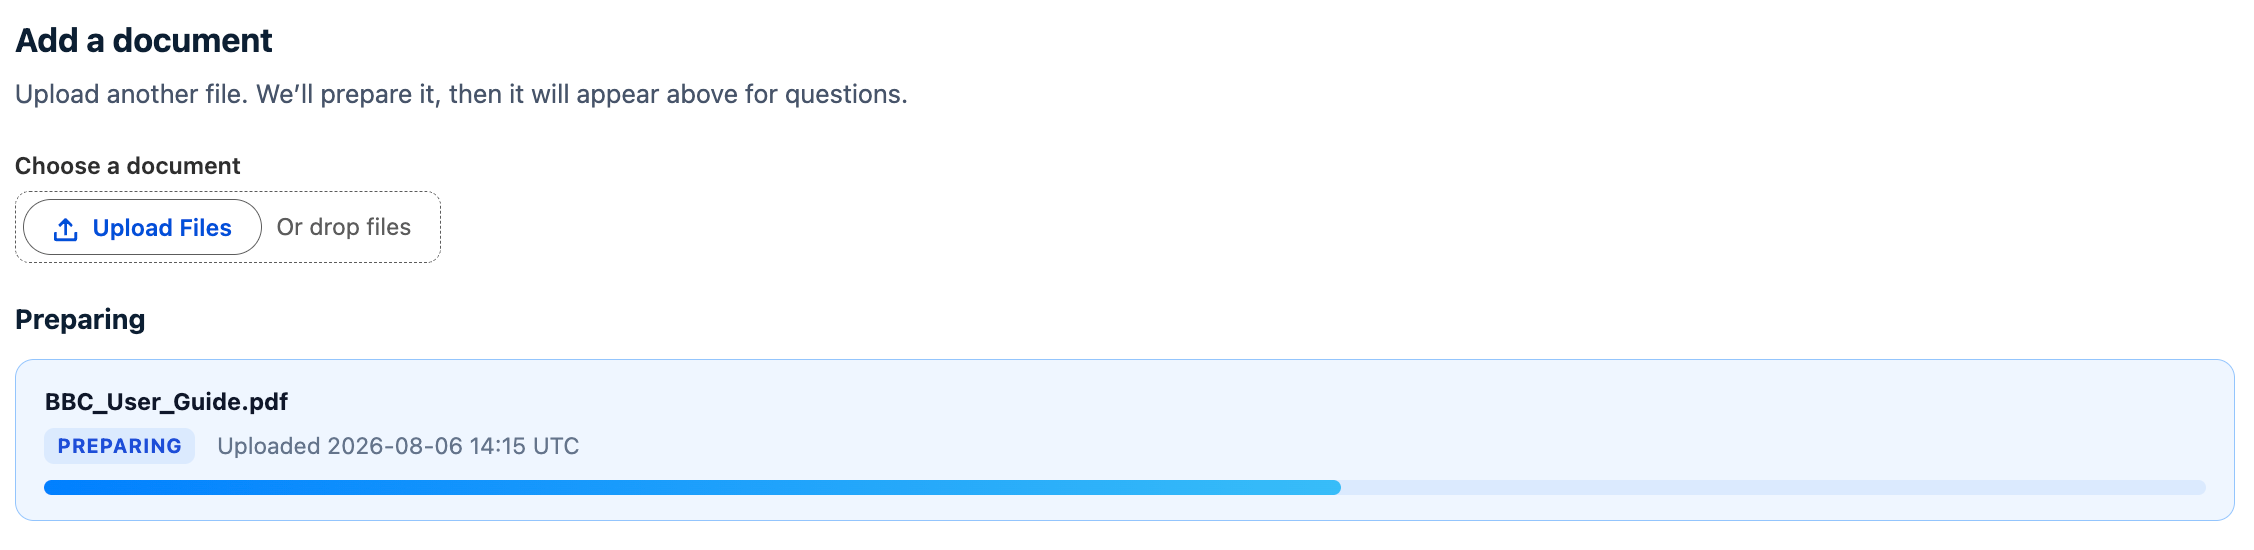
Uploading another file shows preparation status in the same UI while DigitalOcean indexes it:
DigitalOcean’s dashboard also lets you review the uploaded data sources and indexing status—and it includes a RAG Playground tab where you can try retrieve-and-answer prompts against the knowledge base without leaving the console:

What is impressive about this is we didn’t have to provision our own datastore or set up our own ingest pipeline—we just uploaded our files and started querying against them to drive our chat experience. All of this didn’t require any code deploy off platform; it’s all been done with Apex and LWC. This to me is the closest I get to using Einstein AI and Data 360—I get to use existing managed services and stay within the Salesforce tooling I am familiar with. The architecture looks like this:
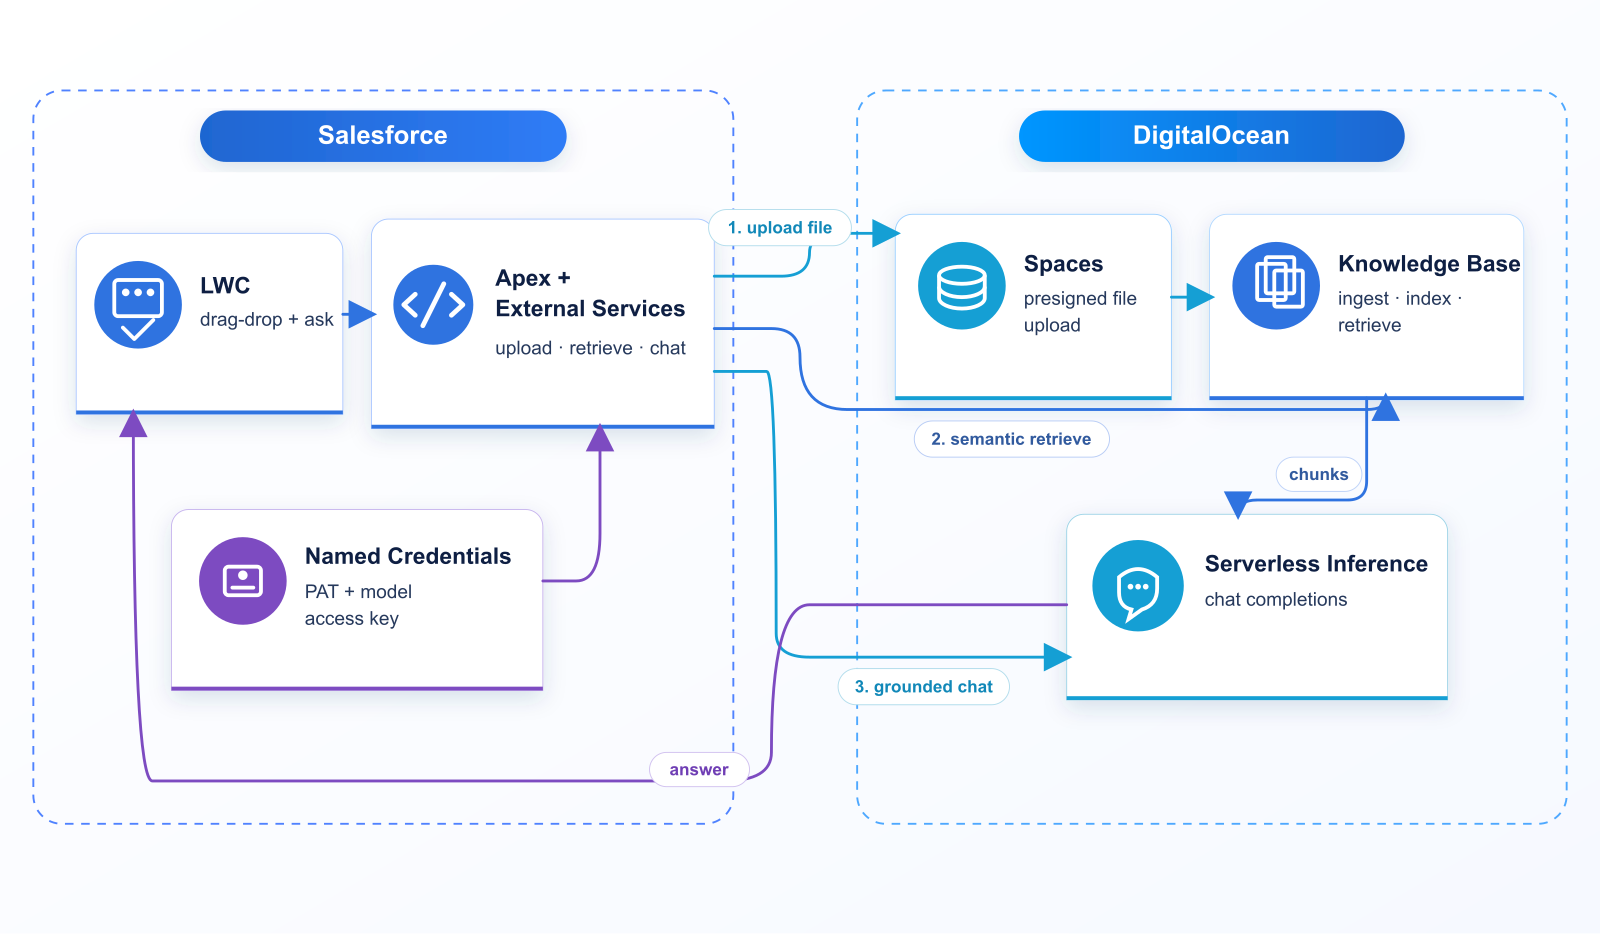
To import the DigitalOcean API into External Services I reduced the shipped OpenAPI to the operations this demo needs—after that, those operations show up like this:

There’s a second External Service for the file upload URL, because that PUT targets a different domain (Spaces) than the Platform API. In my case that host stayed static; if it ever varies, you’d be better off proxying the upload through a Function so Salesforce only talks to a stable endpoint.

Here are some snippets of Apex that call those External Services—list a Knowledge Base, run semantic retrieve against it, then pass that text into Serverless Inference. The Document Q&A UI uses a small helper class (DigitalOceanKnowledgeBaseService) that wraps this retrieve-then-answer path end to end.

// List Knowledge Bases (DigitalOceanPlatform → DigitalOcean_API)
ExternalService.DigitalOceanPlatform platform =
    new ExternalService.DigitalOceanPlatform();
ExternalService.DigitalOceanPlatform.listKnowledgeBases_Request listReq =
    new ExternalService.DigitalOceanPlatform.listKnowledgeBases_Request();
listReq.perx5fpage = 100; // OpenAPI per_page → Apex perx5fpage
ExternalService.DigitalOceanPlatform.listKnowledgeBases_Response listRes =
    platform.listKnowledgeBases(listReq);
System.debug(listRes.Code200.properties);

Semantic search is a separate External Service on the Knowledge Base retrieve host (kbaas.do-ai.run). The results from this call are the document excerpts you stuff into the model prompt:

// Retrieve / semantic search (DigitalOceanKBRetrieve → DigitalOcean_KB)
String kbUuid = '3f064852-91a1-11f1-aee4-4e013e2ddde4';
String question = 'What graphics modes are supported?';
ExternalService.DigitalOceanKBRetrieve.retrieveChunks_Request retrieveReq =
    new ExternalService.DigitalOceanKBRetrieve.retrieveChunks_Request();
retrieveReq.knowledgex5fbasex5fuuid = kbUuid;
ExternalService.DigitalOceanKBRetrieve_retrieveChunks_IN_body retrieveBody =
    new ExternalService.DigitalOceanKBRetrieve_retrieveChunks_IN_body();
retrieveBody.query = question;
retrieveBody.numx5fresults = 6;
retrieveBody.alpha = 0.35;
retrieveReq.body = retrieveBody;
ExternalService.DigitalOceanKBRetrieve.retrieveChunks_Response retrieveRes =
    new ExternalService.DigitalOceanKBRetrieve().retrieveChunks(retrieveReq);
// properties.results = matching text snippets (plus metadata such as page numbers)
List<Object> hits = (List<Object>) retrieveRes.Code200.properties.get('results');
String documentText = ''; // join text_content from each hit for the prompt

And here’s the Inference side—chat completions grounded on that retrieved document text:

// Chat completion (DigitalOceanInference → DigitalOcean_Inference)
ExternalService.DigitalOceanInference inference =
    new ExternalService.DigitalOceanInference();
ExternalService.DigitalOceanInference_createChatCompletion_IN_body chatBody =
    new ExternalService.DigitalOceanInference_createChatCompletion_IN_body();
chatBody.properties = new Map<String, Object>{
    'model' => 'llama3.3-70b-instruct',
    'temperature' => 0.2,
    'max_tokens' => 2000,
    'messages' => new List<Object>{
        new Map<String, Object>{
            'role' => 'system',
            'content' => 'Answer using only the document text provided by the user.'
        },
        new Map<String, Object>{
            'role' => 'user',
            'content' => 'Question:\n' + question + '\n\nDocument text:\n' + documentText
        }
    }
};
ExternalService.DigitalOceanInference.createChatCompletion_Request chatReq =
    new ExternalService.DigitalOceanInference.createChatCompletion_Request();
chatReq.body = chatBody;
ExternalService.DigitalOceanInference.createChatCompletion_Response chatRes =
    inference.createChatCompletion(chatReq);
System.debug(chatRes.Code200.properties);
// Helper used by the UI (retrieve + prompt + chat in one call):
// DigitalOceanKnowledgeBaseService.answerFromKnowledgeBase(kbUuid, question, null, null);

For authentication we store two DigitalOcean secrets on separate External Credential principals (same pattern as the Functions scenario—custom auth attributes sent as Bearer headers): a personal access token for the Platform and Knowledge Base APIs, and a model access key for Serverless Inference. Additionally, managing large files has never been a strength of Salesforce, given the heap limits in Apex—however I was able to leverage the latest External Services enhancements for binary uploads (OpenAPI Example 13), which stream a Salesforce File (ContentDocument Id) up to about 16MB without loading the bytes onto the Apex heap. The UI above temporarily creates a File record for that call, then deletes it once the DigitalOcean upload completes.

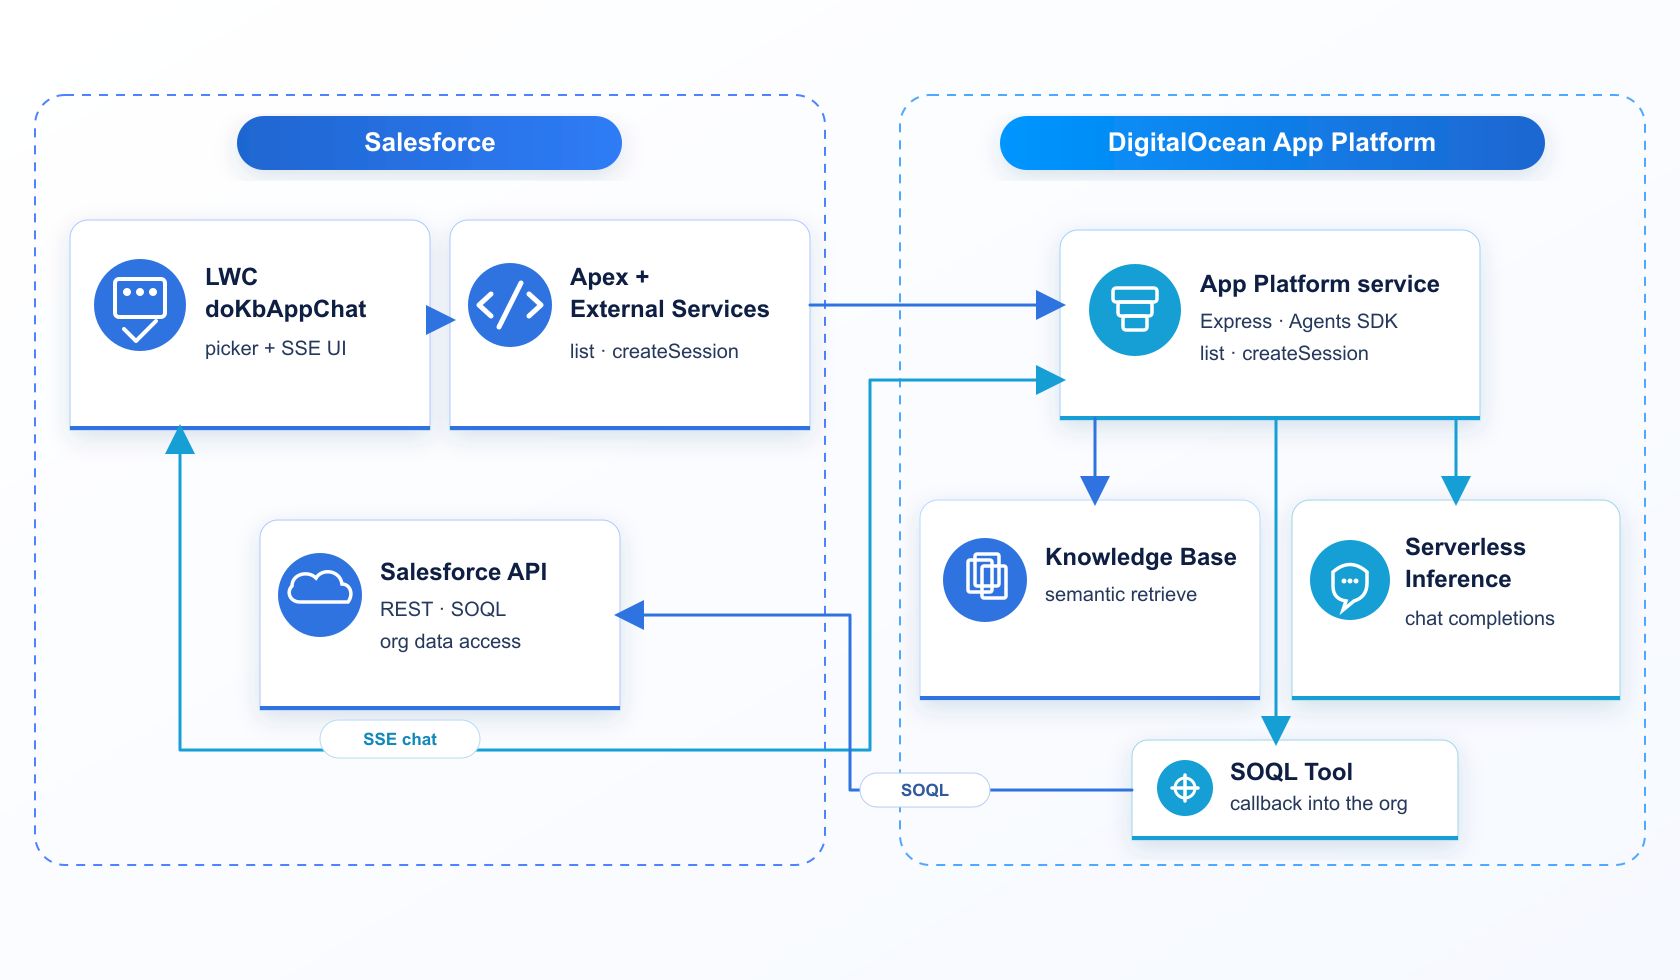
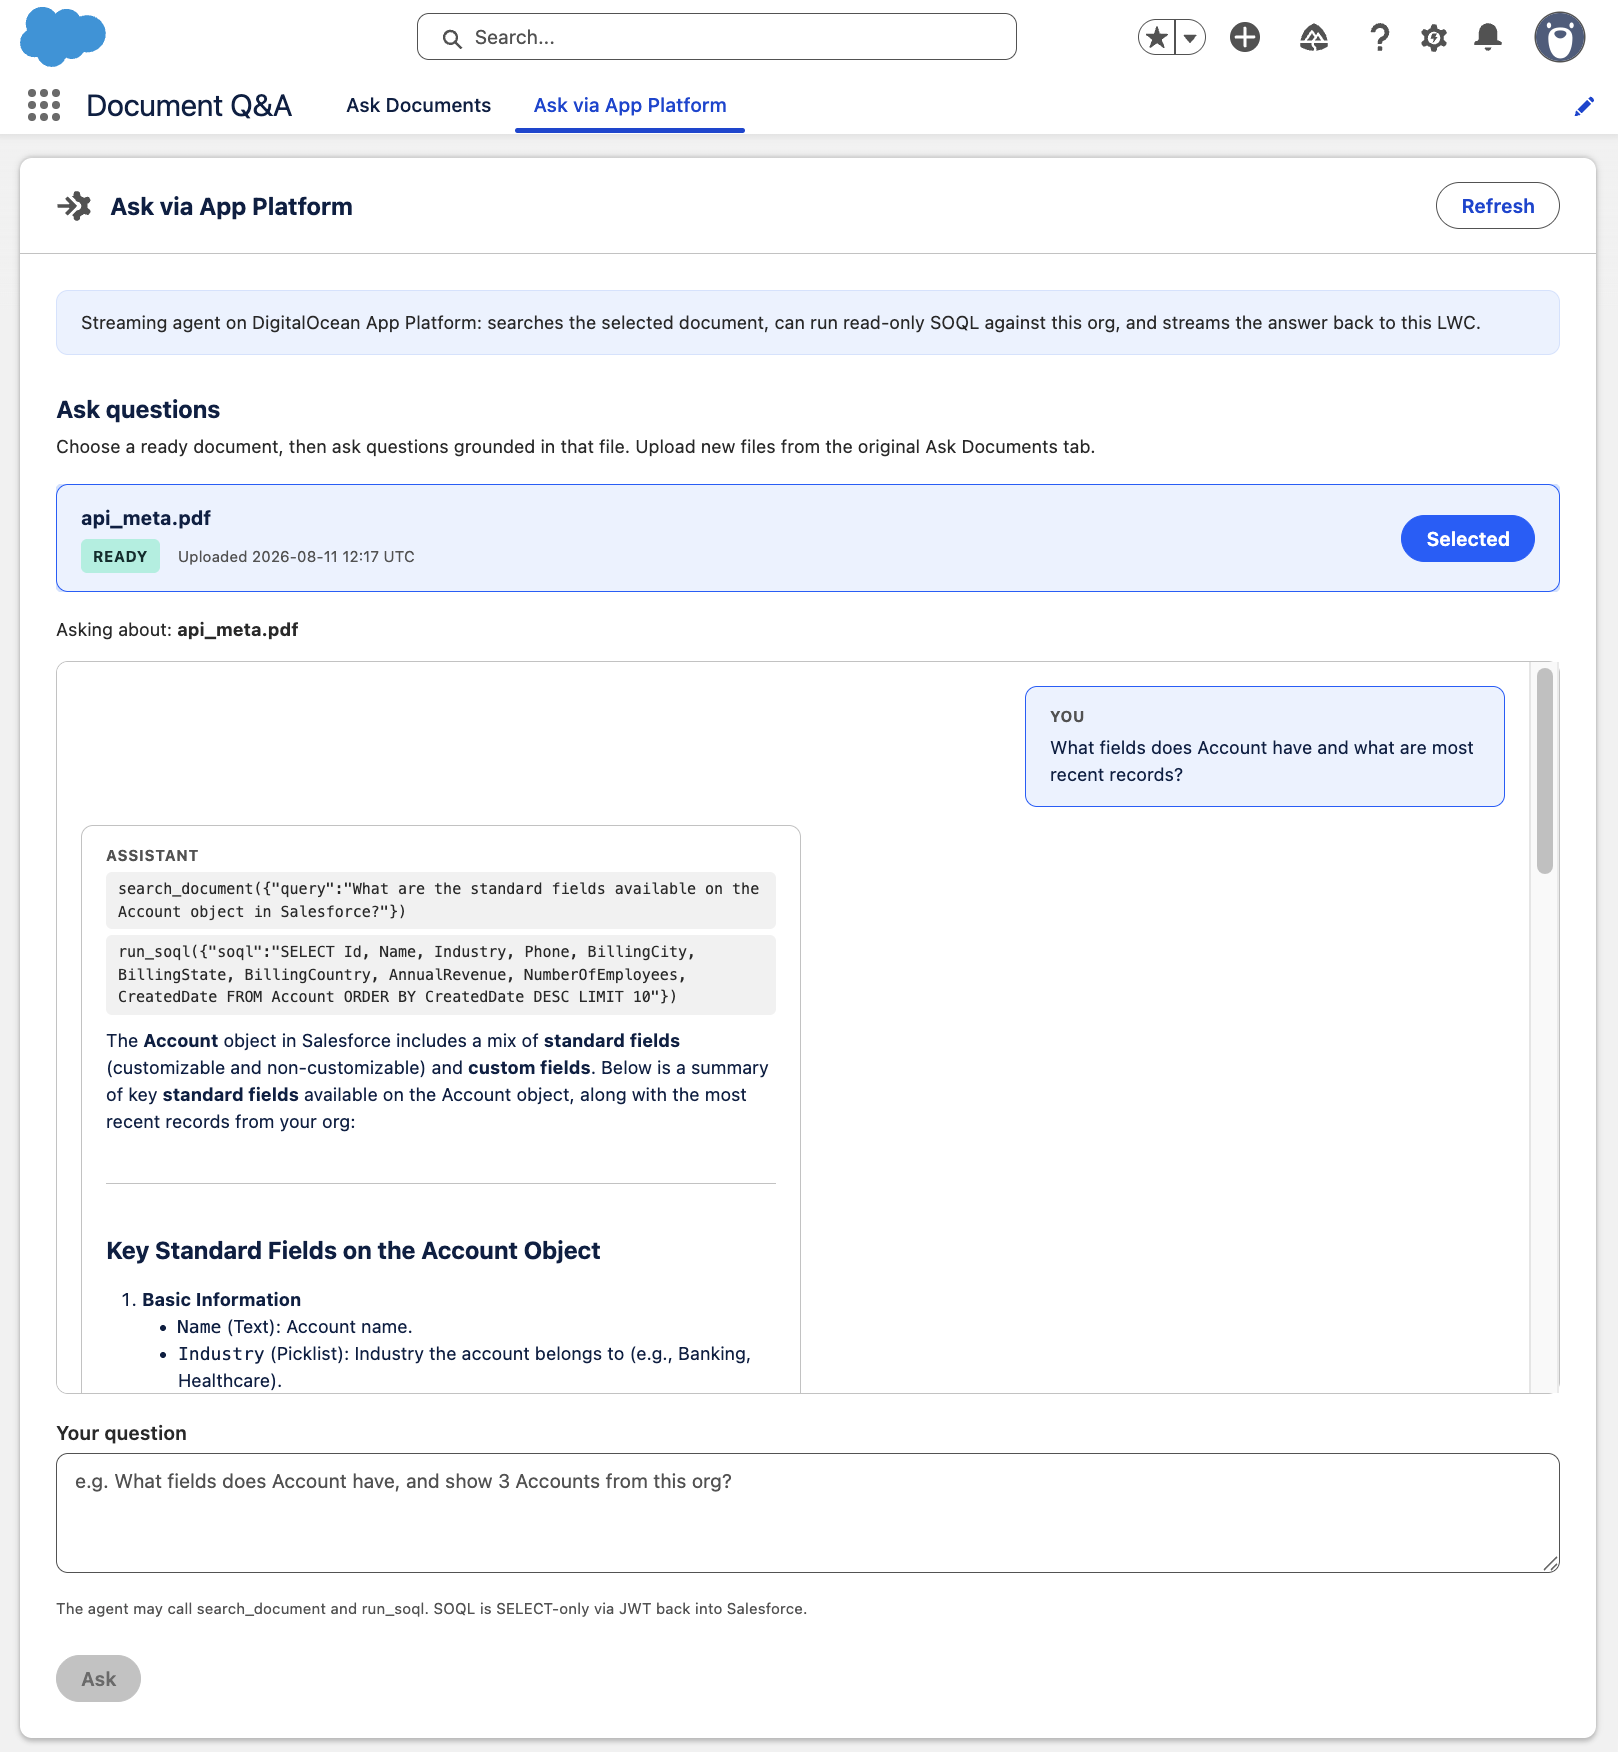
The above scenario is a simple one-off LLM call and requires no code deployed off-platform – but what if you wanted to build your own agent? This was a question asked when I first published this blog – so as a bonus update, you can find in the sample repository steps and code on how to build a small agent that is hosted on DigitalOcean’s App Platform. Below is a brief look at the resulting experience and what the architecture looks like – complete with the ability to stream agent responses back to LWC. Also, notice that even still, it is Apex/LWC code that managing the UI and agent session creation:
Batch Inference – managed costs with overnight work

Not every LLM call needs to happen while someone waits. Some AI work loads can be deferred and as a result this can result in reduced costs. Take for example, summarizing a day’s customer feedback and proposing follow-ups is a good fit—Product Owners don’t need a live chat for that; they need a digest and a short list of actions by morning. This is the use case I have explored with DigitalOcean Batch Inference. In Salesforce I seeded products with Customer_Feedback__c comments:
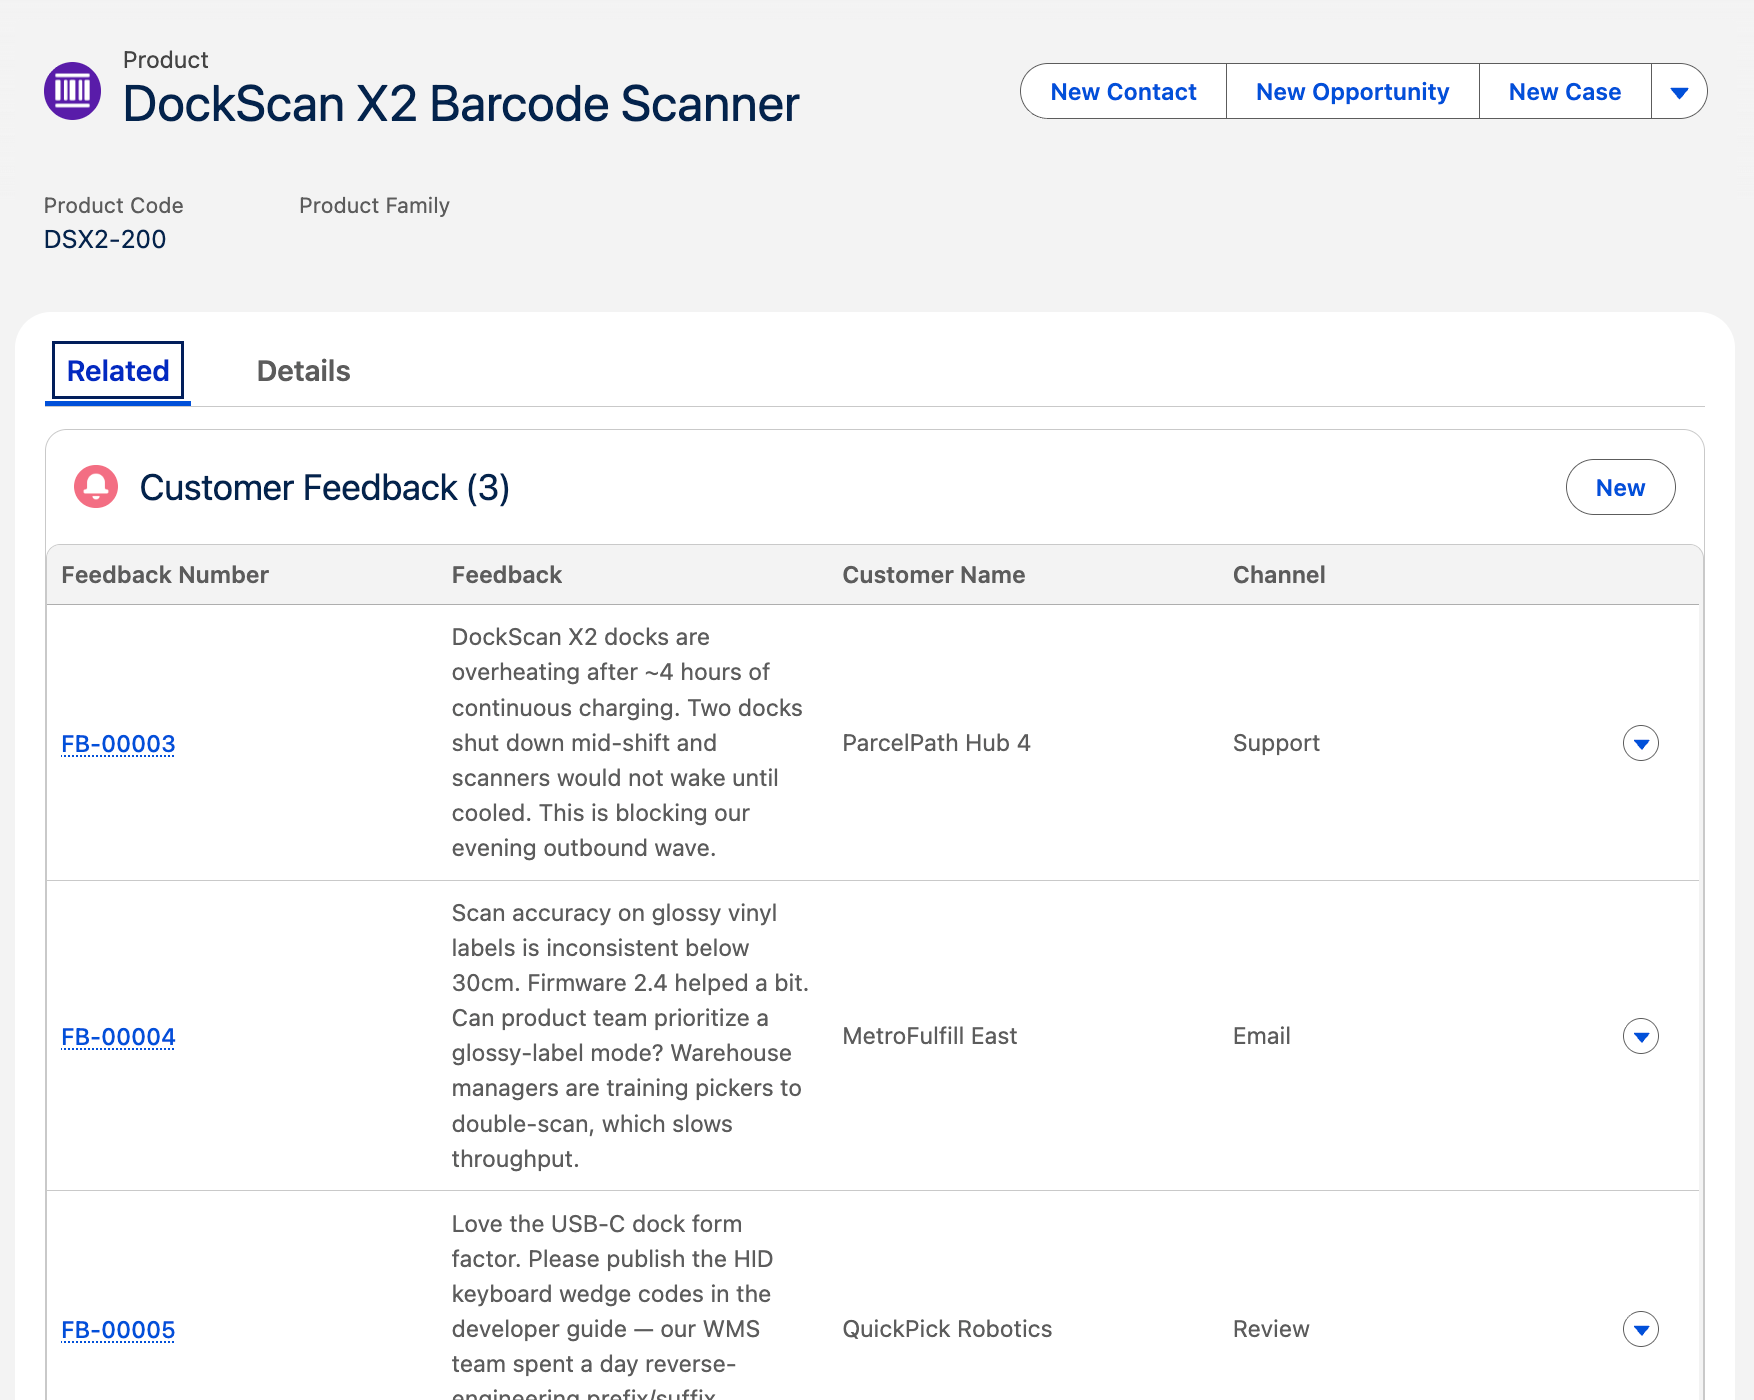
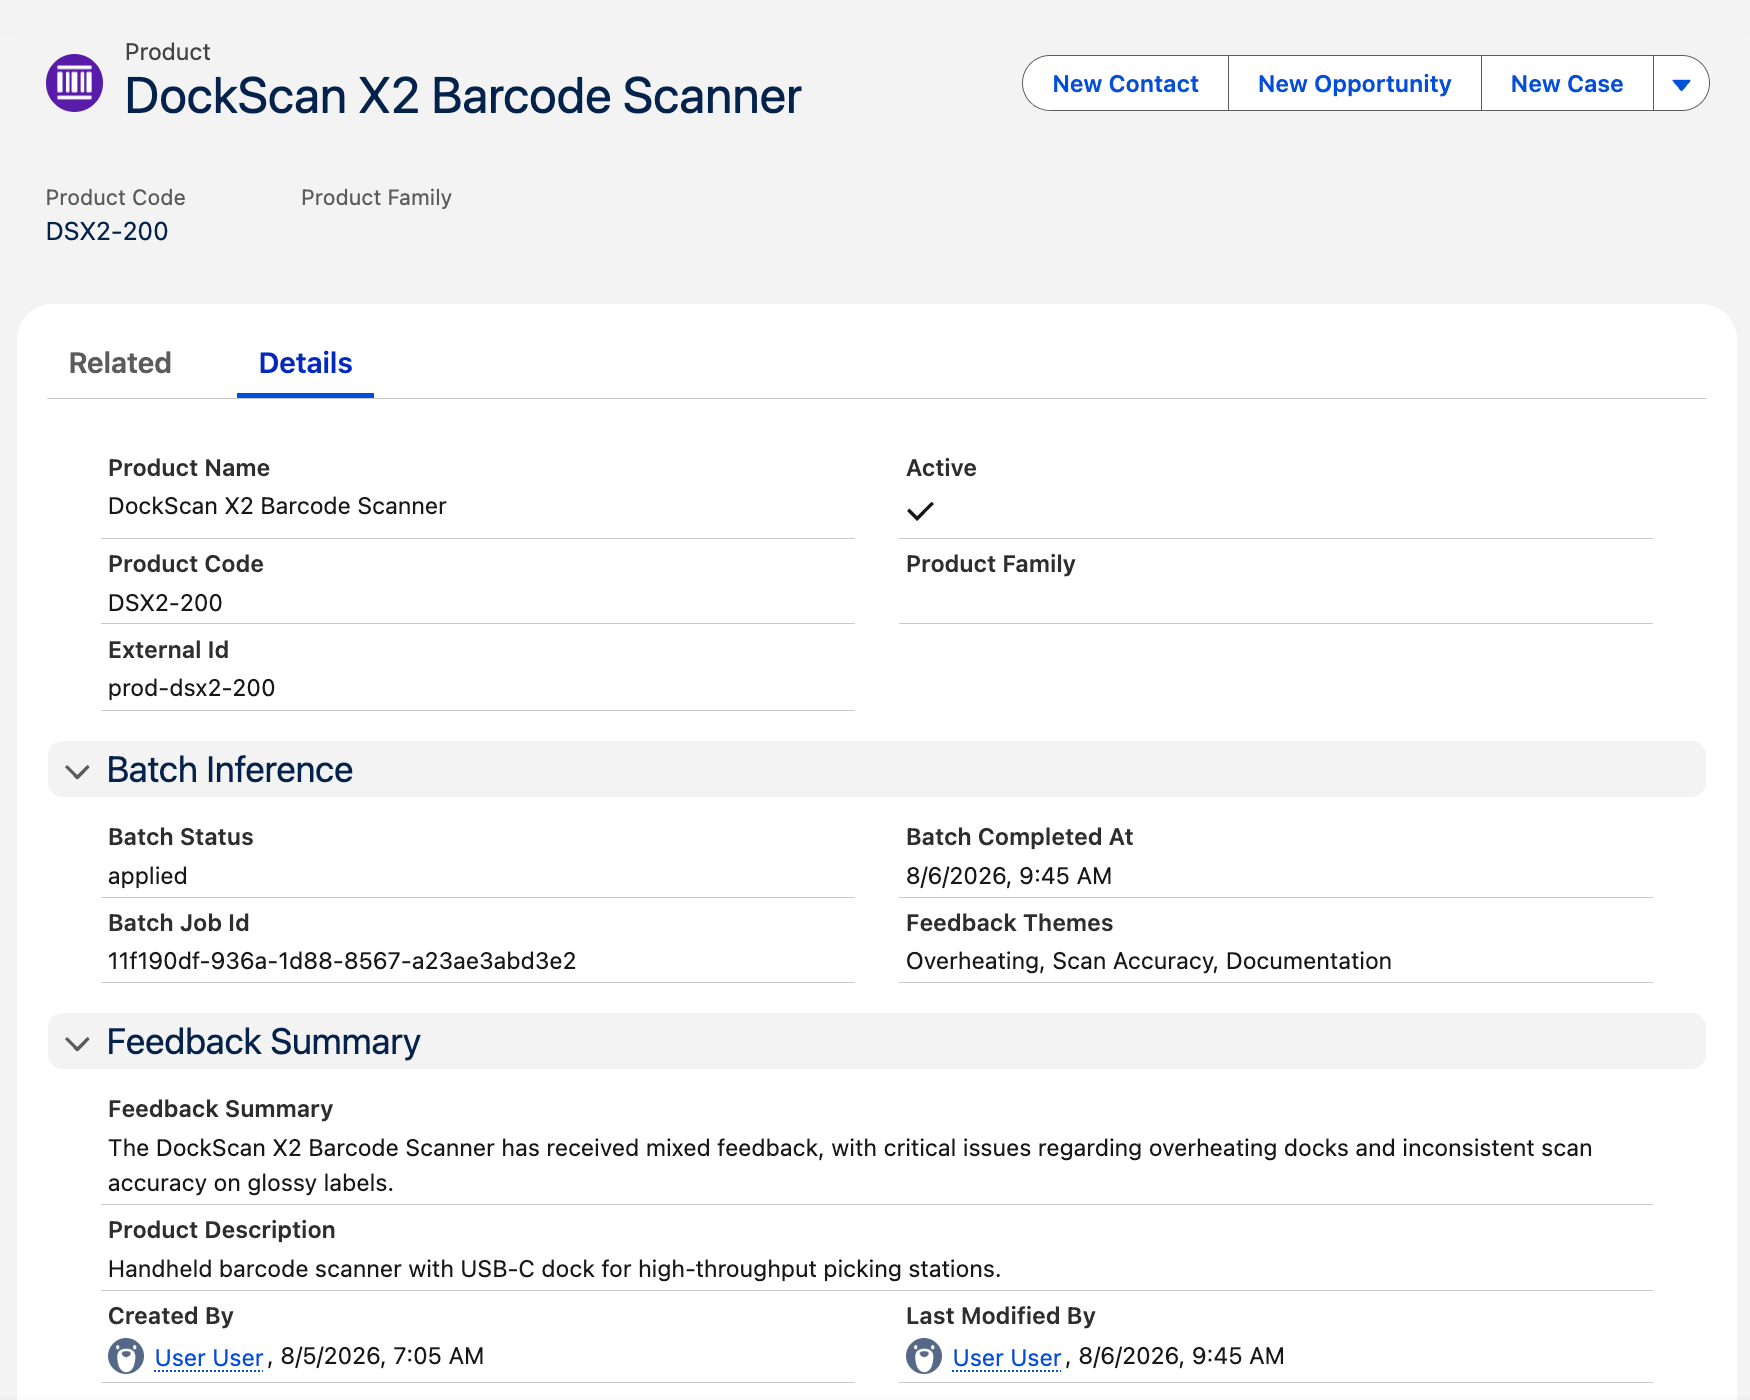
…then asked the model—in batch—to write a summary — which ends up back on the product record:

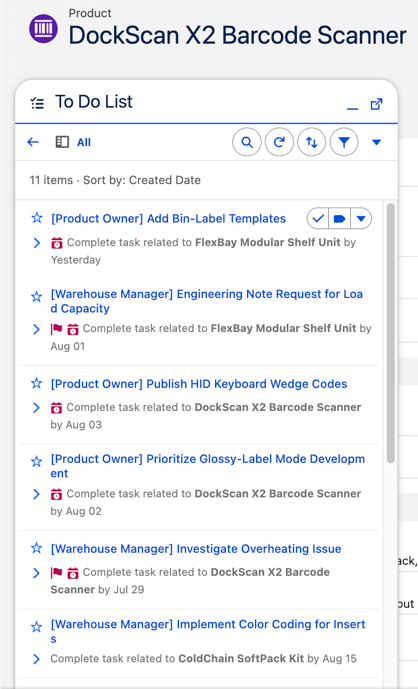
The same apply step also inserts Salesforce Tasks (routed to Product Owner or Warehouse Manager from the model’s JSON), so the overnight digest lands as a real to-do list by morning:
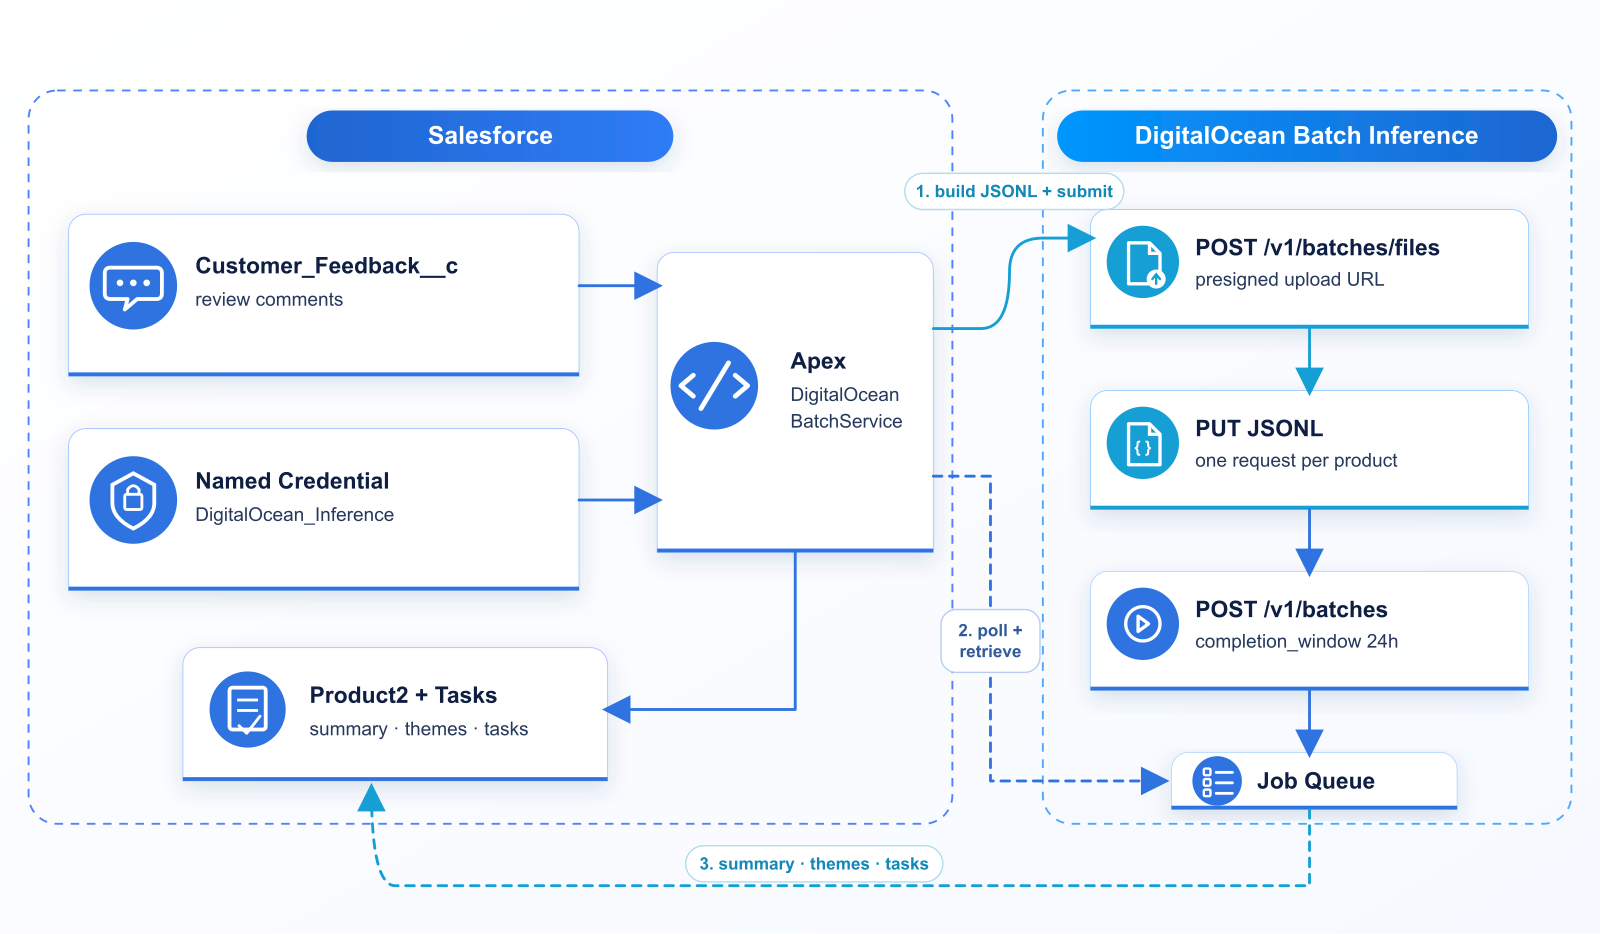
The Batch Inference API is deliberately simple: you don’t call chat completions one product at a time. Apex builds a JSONL file—one JSON object per line, each line a deferred inference request (custom_idmethodurlbody)—then:

  1. POST /v1/batches/files to get a short-lived presigned upload URL
  2. PUT the JSONL bytes to that URL
  3. POST /v1/batches with the file_id, provider, endpoint, and a completion_window (here 24h)
  4. Poll GET /v1/batches/{batch_id} until the job completes
  5. GET /v1/batches/{batch_id}/results for a download link, parse the output JSONL, and write summaries/Tasks back to Salesforce

Auth is the same model access key pattern as Serverless Inference (Named Credential DigitalOcean_Inference). Each JSONL line is essentially a packaged chat-completions call; for this demo Apex groups unprocessed Customer_Feedback__c by product and asks for structured JSON back (summarythemestasks). A DockScan line looks like this (system prompt shortened):

{
  "custom_id": "product-prod-dsx2-200",
  "method": "POST",
  "url": "/v1/chat/completions",
  "body": {
    "model": "gpt-4o-mini",
    "temperature": 0.2,
    "response_format": { "type": "json_object" },
    "messages": [
      {
        "role": "system",
        "content": "Respond with ONLY valid JSON: summary, themes[], tasks[] with OwnerRole Product Owner|Warehouse Manager..."
      },
      {
        "role": "user",
        "content": "{\"product\":{\"external_id\":\"prod-dsx2-200\",\"name\":\"DockScan X2 Barcode Scanner\",\"product_code\":\"DSX2-200\"},\"feedback\":[{\"customer\":\"ParcelPath Hub 4\",\"channel\":\"Support\",\"rating\":1,\"feedback\":\"DockScan X2 docks are overheating after ~4 hours...\"},{\"customer\":\"MetroFulfill East\",\"channel\":\"Email\",\"rating\":3,\"feedback\":\"Scan accuracy on glossy vinyl labels...\"},{\"customer\":\"QuickPick Robotics\",\"channel\":\"Review\",\"rating\":4,\"feedback\":\"Love the USB-C dock form factor...\"}]}"
      }
    ]
  }
}

DigitalOcean’s Control Panel also exposes a Job Queue so you can watch those jobs move from queued to completed:
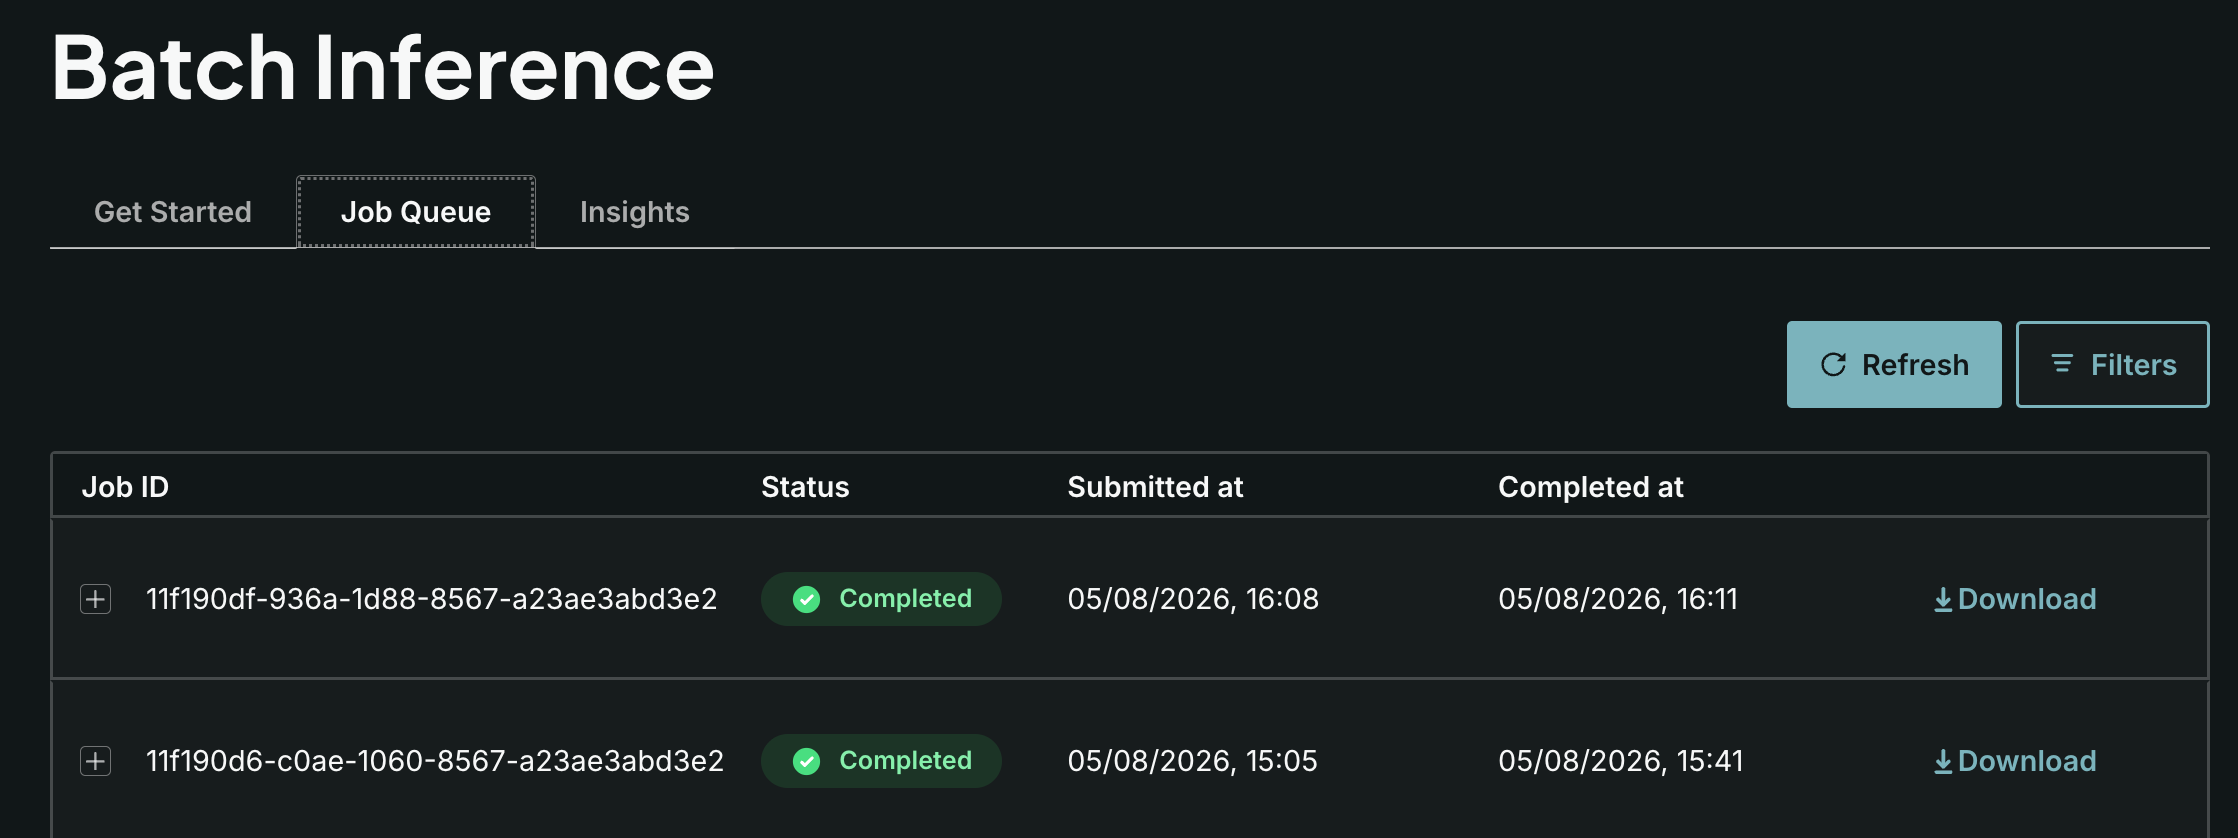
The sample included with this post is Apex-only: submit, poll, and apply are anonymous Apex scripts (or a thin sf apex run wrapper) that call a helper class—SOQL for unprocessed feedback, build/upload the JSONL, create the job, then poll and write summaries and Tasks back onto the products. Those are the building blocks for a Scheduled Apex job and a small UI to monitor batch status. The API is poll-based today; DigitalOcean has signaled webhook notifications are coming, but they’re not in the reference yet. End to end, the architecture looks like this:
Summary

Looking back across these explorations, what I valued most wasn’t any single API call—it was that DigitalOcean kept delivering the same kind of fully managed experience I rely on from Salesforce. I spent my time focusing on the Salesforce use cases, External Services, Named Credentials, Apex, and a bit of LWC—not on standing up servers, vector databases, or GPU fleets.

  • Functions — Scale-to-zero compute with almost no ceremony: write the function, doctl serverless deploy, call it. For Salesforce that meant an OpenAPI-shaped edge I could import into External Services, then call back into the org with JWT when I needed SOQL. I did appreciate not having to scafold middleware such as a web server and scaling to zero so I only pay for what I use. One thing I’d like more of out of the box is orchestration—easy async hand-off from one Function to another without me wiring the glue. You can do that today by calling the Functions API from inside a Function; I’d just like first-class primitives for that pattern. Product extras I’d reach for next include scheduled Functions for light off-platform cron, and App Platform packaging when a function needs to sit beside a small web app.
  • Knowledge Bases + Serverless Inference — This was the closest “Einstein+D360-shaped” path and I enjoyed not having to own the pipeline coding and infrastructure. I simply uploaded a file, the platform indexes it (Spaces + OpenSearch under the hood), retrieve chunks, then chat-complete—all from Apex. In the Control Panel, RAG Playground and retrieval testing let me validate answers before I wired the LWC. Features I didn’t need for the demo but that keep the stack managed as you grow: auto-indexing on a schedule, optional reranking for tougher corpora, and more data-source types (URLs, Spaces, S3) without redesigning ingest.
  • Batch Inference — I appreciated a dedicated set of services for deferred LLM work that was simple to use: JSONL in, Job Queue in the console, structured JSON out onto Product2 and Tasks. It felt a little like Batch Apex without me provisioning workers. Alongside it, the broader Inference control plane (Model Catalog, Inference Router, model access keys) is how I’d keep choosing models and cost tiers while Salesforce stays the system of engagement.

The experience across all three explorations: DigitalOcean owns the AI operational surface; Salesforce owns the business surface. That’s the alternative I was looking for when Heroku’s new strategic path narrowed—choice of AI and compute, without giving up the managed DX that lets me keep focused on building! And if you want to run through the demos yourself, the sample code and deploy steps are in digitalocean-salesforce-demos.

Additional Resources


3 Comments

Improving User Response Time with Heroku AppLink

An app is often judged by its features, but equally important is its durability, confidence, and predictability in the tasks it performs – especially as a business grows; without these, you risk frustrating users with unpredictable response times or worse random timeouts. As Apex developers we can reach out to Queuables and Batch Apex for more power – though usage of these can also be required purely to work around the lower interactive governor limits – making programming interactive code more complex. I believe you should still include Apex in your Salesforce architecture considerations – however now we have an additional option to consider! This blog revisits Heroku AppLink and how it can help and without having to move wholesale away from Apex as your primary language!

This blog comes with full source code and setup instructions here.

Why Heroku AppLink?

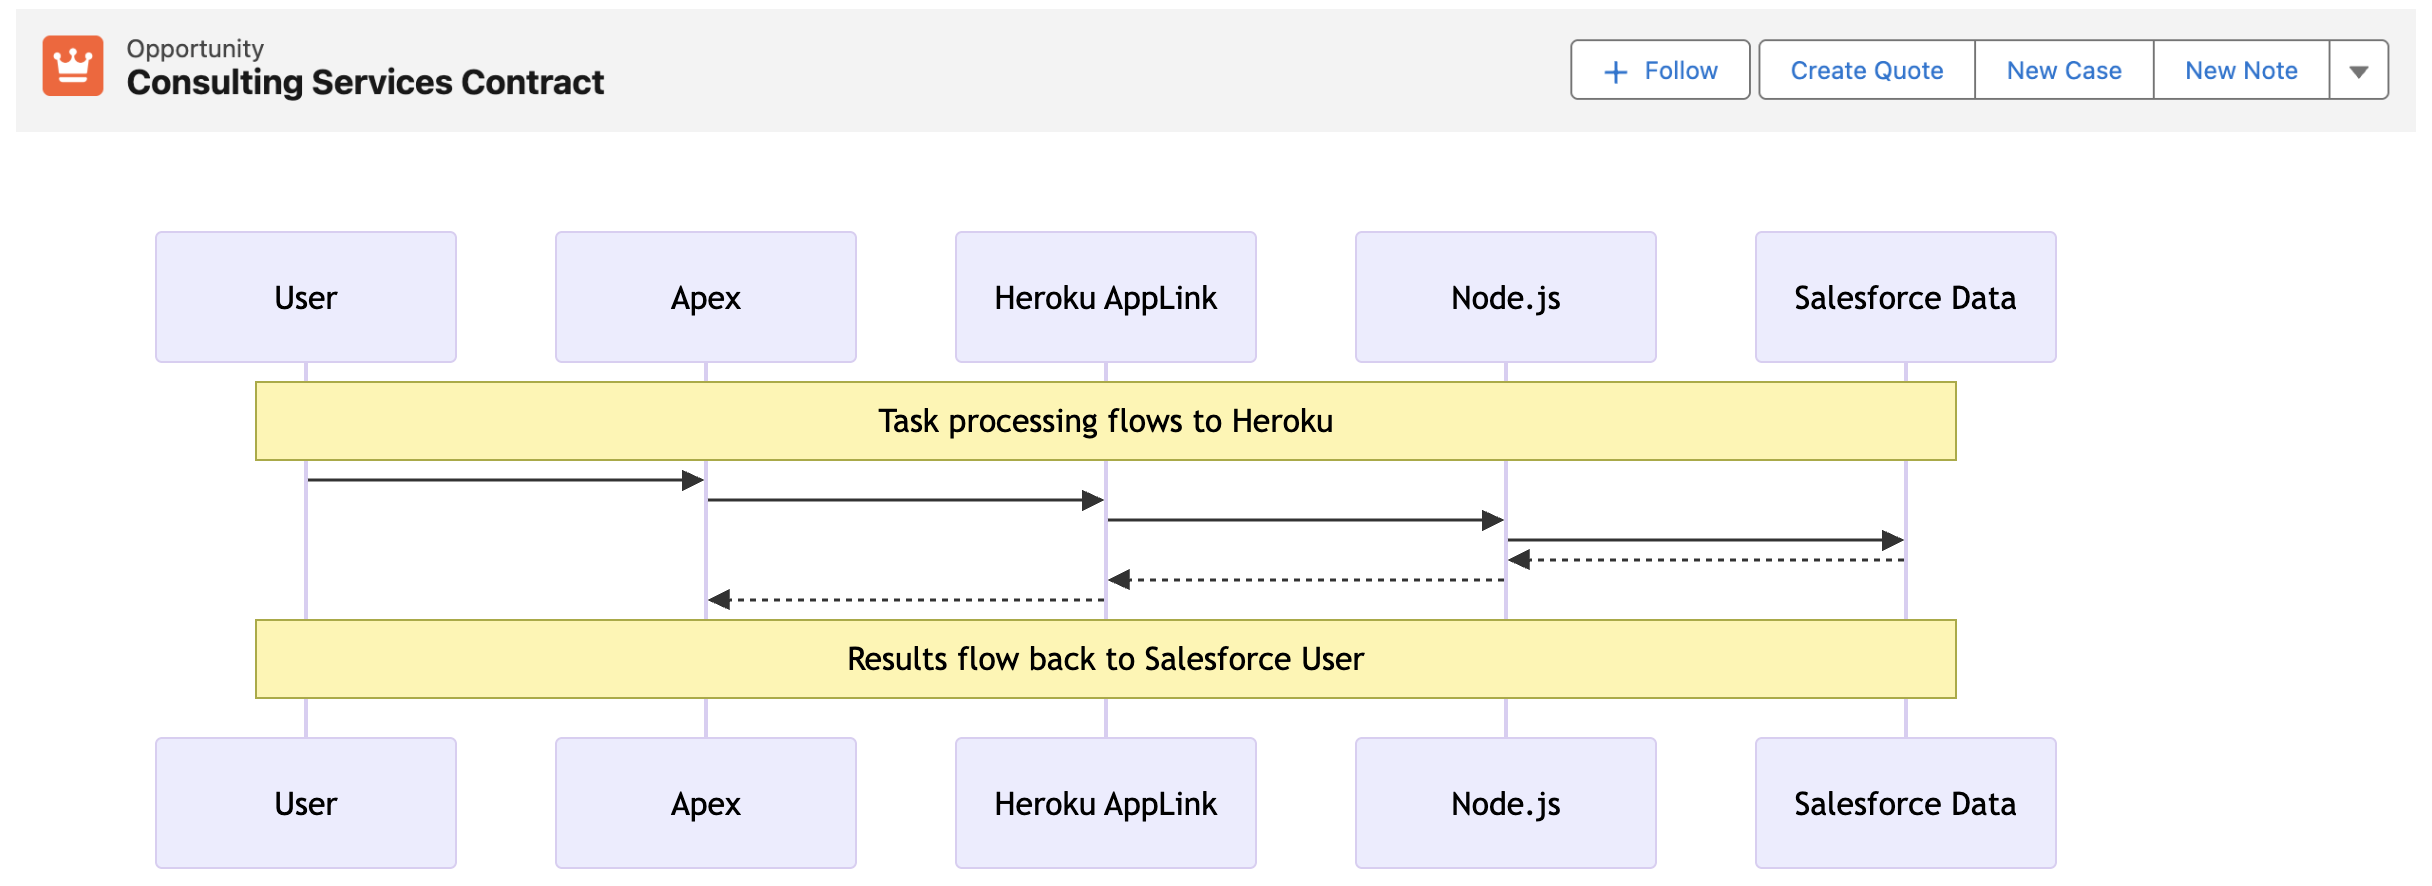
In my prior blog I covered Five ways Heroku AppLink Enhances Salesforce Development Capabilities – if you have not read that and need a primer please check it out. Heroku AppLink has a flexible points of integration with Salesforce, among those is a way to stay within a flow of control driven by Apex code (or Flow for that matter), yet seamlessly offload certain code execution to Heroku, once complete revert back to Apex control. In contrast to Apex async workloads, this allows code to run immediately and uninterrupted until complete. In this mode there is no competing with Apex CPU, heap, or batch chunking constraints. As a result the overall flow of execution can be simpler to design and completion times are faster, largely only impacted by org data access times (no escaping slow Trigger logic). For the end user and overall business the application scales better, is more predictable and timely – and critically, grows more smoothly in relation to business data volumes.

Staying within Apex flow of control, allows you to leverage existing investments and skills in Apex, while when needed hooking into additional skills and Heroku’s more performant compute layer. All while maintaining the correct flow of the user identity (including their permissions) and critically without leaving the Salesforce (inclusive of Heroku) DX tool chains and overall fully managed services. The following presents two examples, one expanding what can be done in an interactive (synchronous) use case and the second moving to a full background (asynchronous) use case.

Improving Interactive Tasks – Synchronous Invocation

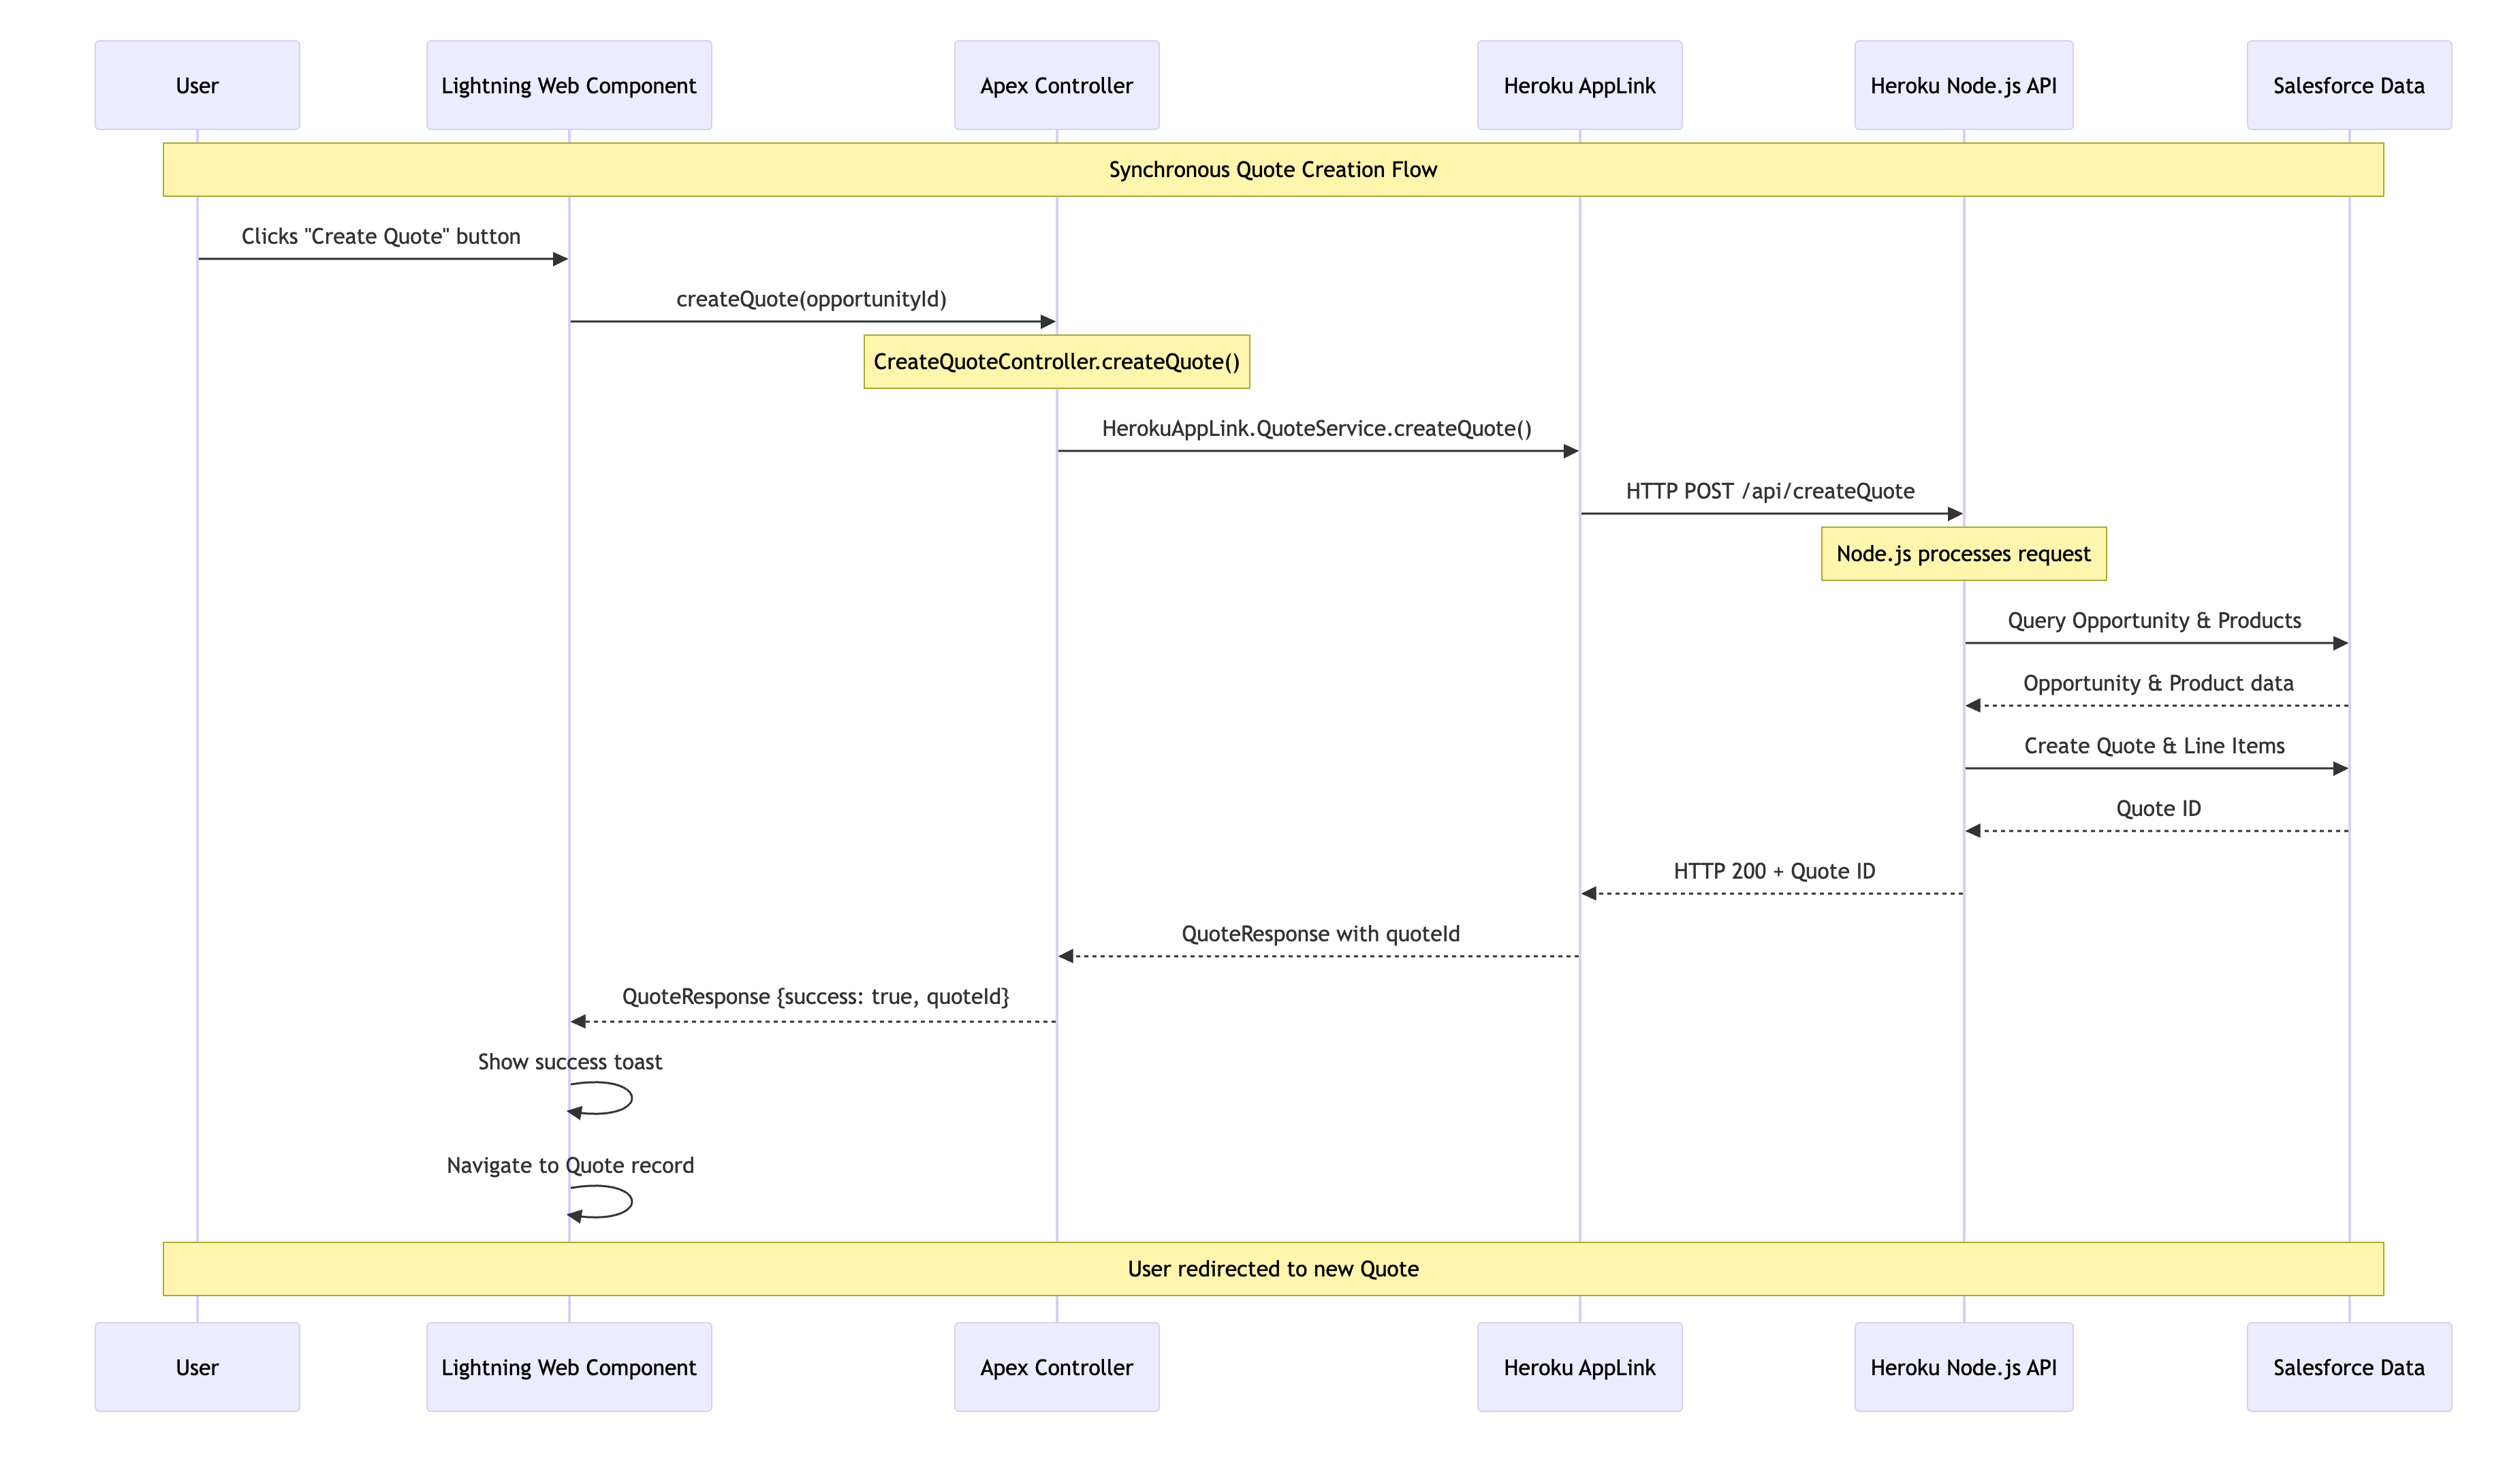
In this interactive (synchronous) example we are converting an Opportunity to a Quote – a task that can, depending on discount rules, size of the opportunity and additional regional tweaks, become quite compute heavy – sometimes in Apex hitting CPU or Heap limits. The sequence diagram below illustrates the flow of control from the User, through Apex, Heroku and back again. As always full code is supplied, but for now lets dig into the key code snippets below.

We start out with an Apex Controller that is attached to the “Create Quote” LWC button on the Opportunity page. This Apex Controller calls the Heroku AppLink exposed conversion logic (in this case written in Node.js – more on this later) – and waits for a response before returning control back to Lighting Experience to redirect the user to the newly created Quote. As you can see the HerokuAppLink namespace contains dynamically generated types for the service.

    @AuraEnabled(cacheable=false)
    public static QuoteResponse createQuote(String opportunityId) {
        try {
            // Create the Heroku service instance
            HerokuAppLink.QuoteService service = new HerokuAppLink.QuoteService();            
            // Create the request
            HerokuAppLink.QuoteService.createQuote_Request request = 
               new HerokuAppLink.QuoteService.createQuote_Request();
            request.body = new HerokuAppLink.QuoteService_CreateQuoteRequest();
            request.body.opportunityId = opportunityId;    
            // Call the Heroku service
            HerokuAppLink.QuoteService.createQuote_Response response = 
               service.createQuote(request);            
            if (response != null && response.Code200 != null) {
                QuoteResponse quoteResponse = new QuoteResponse();
                quoteResponse.opportunityId = opportunityId;
                quoteResponse.quoteId = response.Code200.quoteId;
                quoteResponse.success = true;
                quoteResponse.message = 'Quote generated successfully';                
                return quoteResponse;
            } else {
                throw new AuraHandledException('No response received from quote service');
            }            
        } catch (HerokuAppLink.QuoteService.createQuote_ResponseException e) {
            // Handle specific Heroku service errors
            // ...
        } catch (Exception e) {
            // Handle any other exceptions
            throw new AuraHandledException('Error generating quote: ' + e.getMessage());
        }
    }

The Node.js logic (show below) to convert the quote uses the Fastify library to expose the code via a HTTP endpoint (secure by Heroku AppLink). In the generateQuote method the Heroku AppLink SDK is used to access the Opportunity records and create the Quote records – notably in one transaction via its Unit Of Work interface. Again it is important to note that none of this requires handling authentication thats all done for you – just like Apex – and just like Apex (when you apply USER _MODE) – the SOQL and DML has permissions applied.

// Synchronous quote creation
  fastify.post('/createQuote', {
    schema: createQuoteSchema,
    handler: async (request, reply) => {
      const { opportunityId } = request.body;
      try {
        const result = await generateQuote({ opportunityId }, request.salesforce);
        return result;
      } catch (error) {
        reply.code(error.statusCode || 500).send({
          error: true,
          message: error.message
        });
      }
    }
  });
//
// Generate a quote for a given opportunity
// @param {Object} request - The quote generation request
// @param {string} request.opportunityId - The opportunity ID
// @param {import('@heroku/applink').AppLinkClient} client - The Salesforce client
// @returns {Promise<Object>} The generated quote response
//
export async function generateQuote (request, client) {
  try {
    const { context } = client;
    const org = context.org;
    const dataApi = org.dataApi;
    // Query Opportunity to get CloseDate for ExpirationDate calculation
    const oppQuery = `SELECT Id, Name, CloseDate FROM Opportunity WHERE Id = '${request.opportunityId}'`;
    const oppResult = await dataApi.query(oppQuery);
    if (!oppResult.records || oppResult.records.length === 0) {
      const error = new Error(`Opportunity not found for ID: ${request.opportunityId}`);
      error.statusCode = 404;
      throw error;
    }    
    const opportunity = oppResult.records[0].fields;
    const closeDate = opportunity.CloseDate;
    // Query opportunity line items
    const soql = `SELECT Id, Product2Id, Quantity, UnitPrice, PricebookEntryId FROM OpportunityLineItem WHERE OpportunityId = '${request.opportunityId}'`;
    const queryResult = await dataApi.query(soql);
    if (!queryResult.records.length) {
      const error = new Error(`No OpportunityLineItems found for Opportunity ID: ${request.opportunityId}`);
      error.statusCode = 404;
      throw error;
    }
    // Calculate discount based on hardcoded region (matching createQuotes.js logic)
    const discount = getDiscountForRegion('NAMER'); // Use hardcoded region 'NAMER'
    // Create Quote using Unit of Work
    const unitOfWork = dataApi.newUnitOfWork();
    // Add Quote
    const quoteName = 'New Quote';
    const expirationDate = new Date(closeDate);
    expirationDate.setDate(expirationDate.getDate() + 30); // Quote expires 30 days after CloseDate
    const quoteRef = unitOfWork.registerCreate({
      type: 'Quote',
      fields: {
        Name: quoteName, 
        OpportunityId: request.opportunityId,
        Pricebook2Id: standardPricebookId,
        ExpirationDate: expirationDate.toISOString().split('T')[0],
        Status: 'Draft'
      }
    });
    // Add QuoteLineItems
    queryResult.records.forEach(record => {
      const quantity = parseFloat(record.fields.Quantity);
      const unitPrice = parseFloat(record.fields.UnitPrice);
      // Apply discount to QuoteLineItem UnitPrice (matching createQuotes.js exactly)
      const originalUnitPrice = unitPrice;
      const calculatedDiscountedPrice = originalUnitPrice != null 
                                        ? originalUnitPrice * (1 - discount)
                                        : originalUnitPrice; // Default to original if calculation fails
      unitOfWork.registerCreate({
        type: 'QuoteLineItem',
        fields: {
          QuoteId: quoteRef.toApiString(),
          PricebookEntryId: record.fields.PricebookEntryId,
          Quantity: quantity,
          UnitPrice: calculatedDiscountedPrice
        }
      });
    });
    // Commit all records in one transaction
    try {
      const results = await dataApi.commitUnitOfWork(unitOfWork);
      // Get the Quote result using the reference
      const quoteResult = results.get(quoteRef);
      if (!quoteResult) {
        throw new Error('Quote creation result not found in response');
      }
      return { quoteId: quoteResult.id };
    } catch (commitError) {
      // Salesforce API errors will be formatted as "ERROR_CODE: Error message"
      const error = new Error(`Failed to create quote: ${commitError.message}`);
      error.statusCode = 400; // Bad Request for validation/data errors
      throw error;
    }
  } catch (error) {
    // ...
  }
}

This is a secure way to move from Apex to Node.js and back. Note certain limits still apply: callout timeout is 120 seconds max (applicable when calling Heroku per above) – additionally, the Node.js code is leveraging the Salesforce API, so API limits still apply. Despite the 120 seconds timeout, you get practically unlimited CPU, heap, and the speed of the latest industry language runtimes – in the case of Java – compilation to the machine code level if needed!

The decision to use AppLink here really depends on identifying the correct bottle neck; if some Apex logic is bounded (constrained to grow) by CPU, memory, execution time, or even language, then this is a good approach consider – without going off doing integration plumbing and risking security. For example, if you’re doing so much processing in memory you’re hitting Apex CPU limits – then even with the 120-second callout limit to Heroku – the alternative Node.js (or other lang) code will likely run much faster – keeping you in the simpler synchronous mode for longer as your compute and data requirements grow.

Improving Background Jobs – Asynchronous Invocation

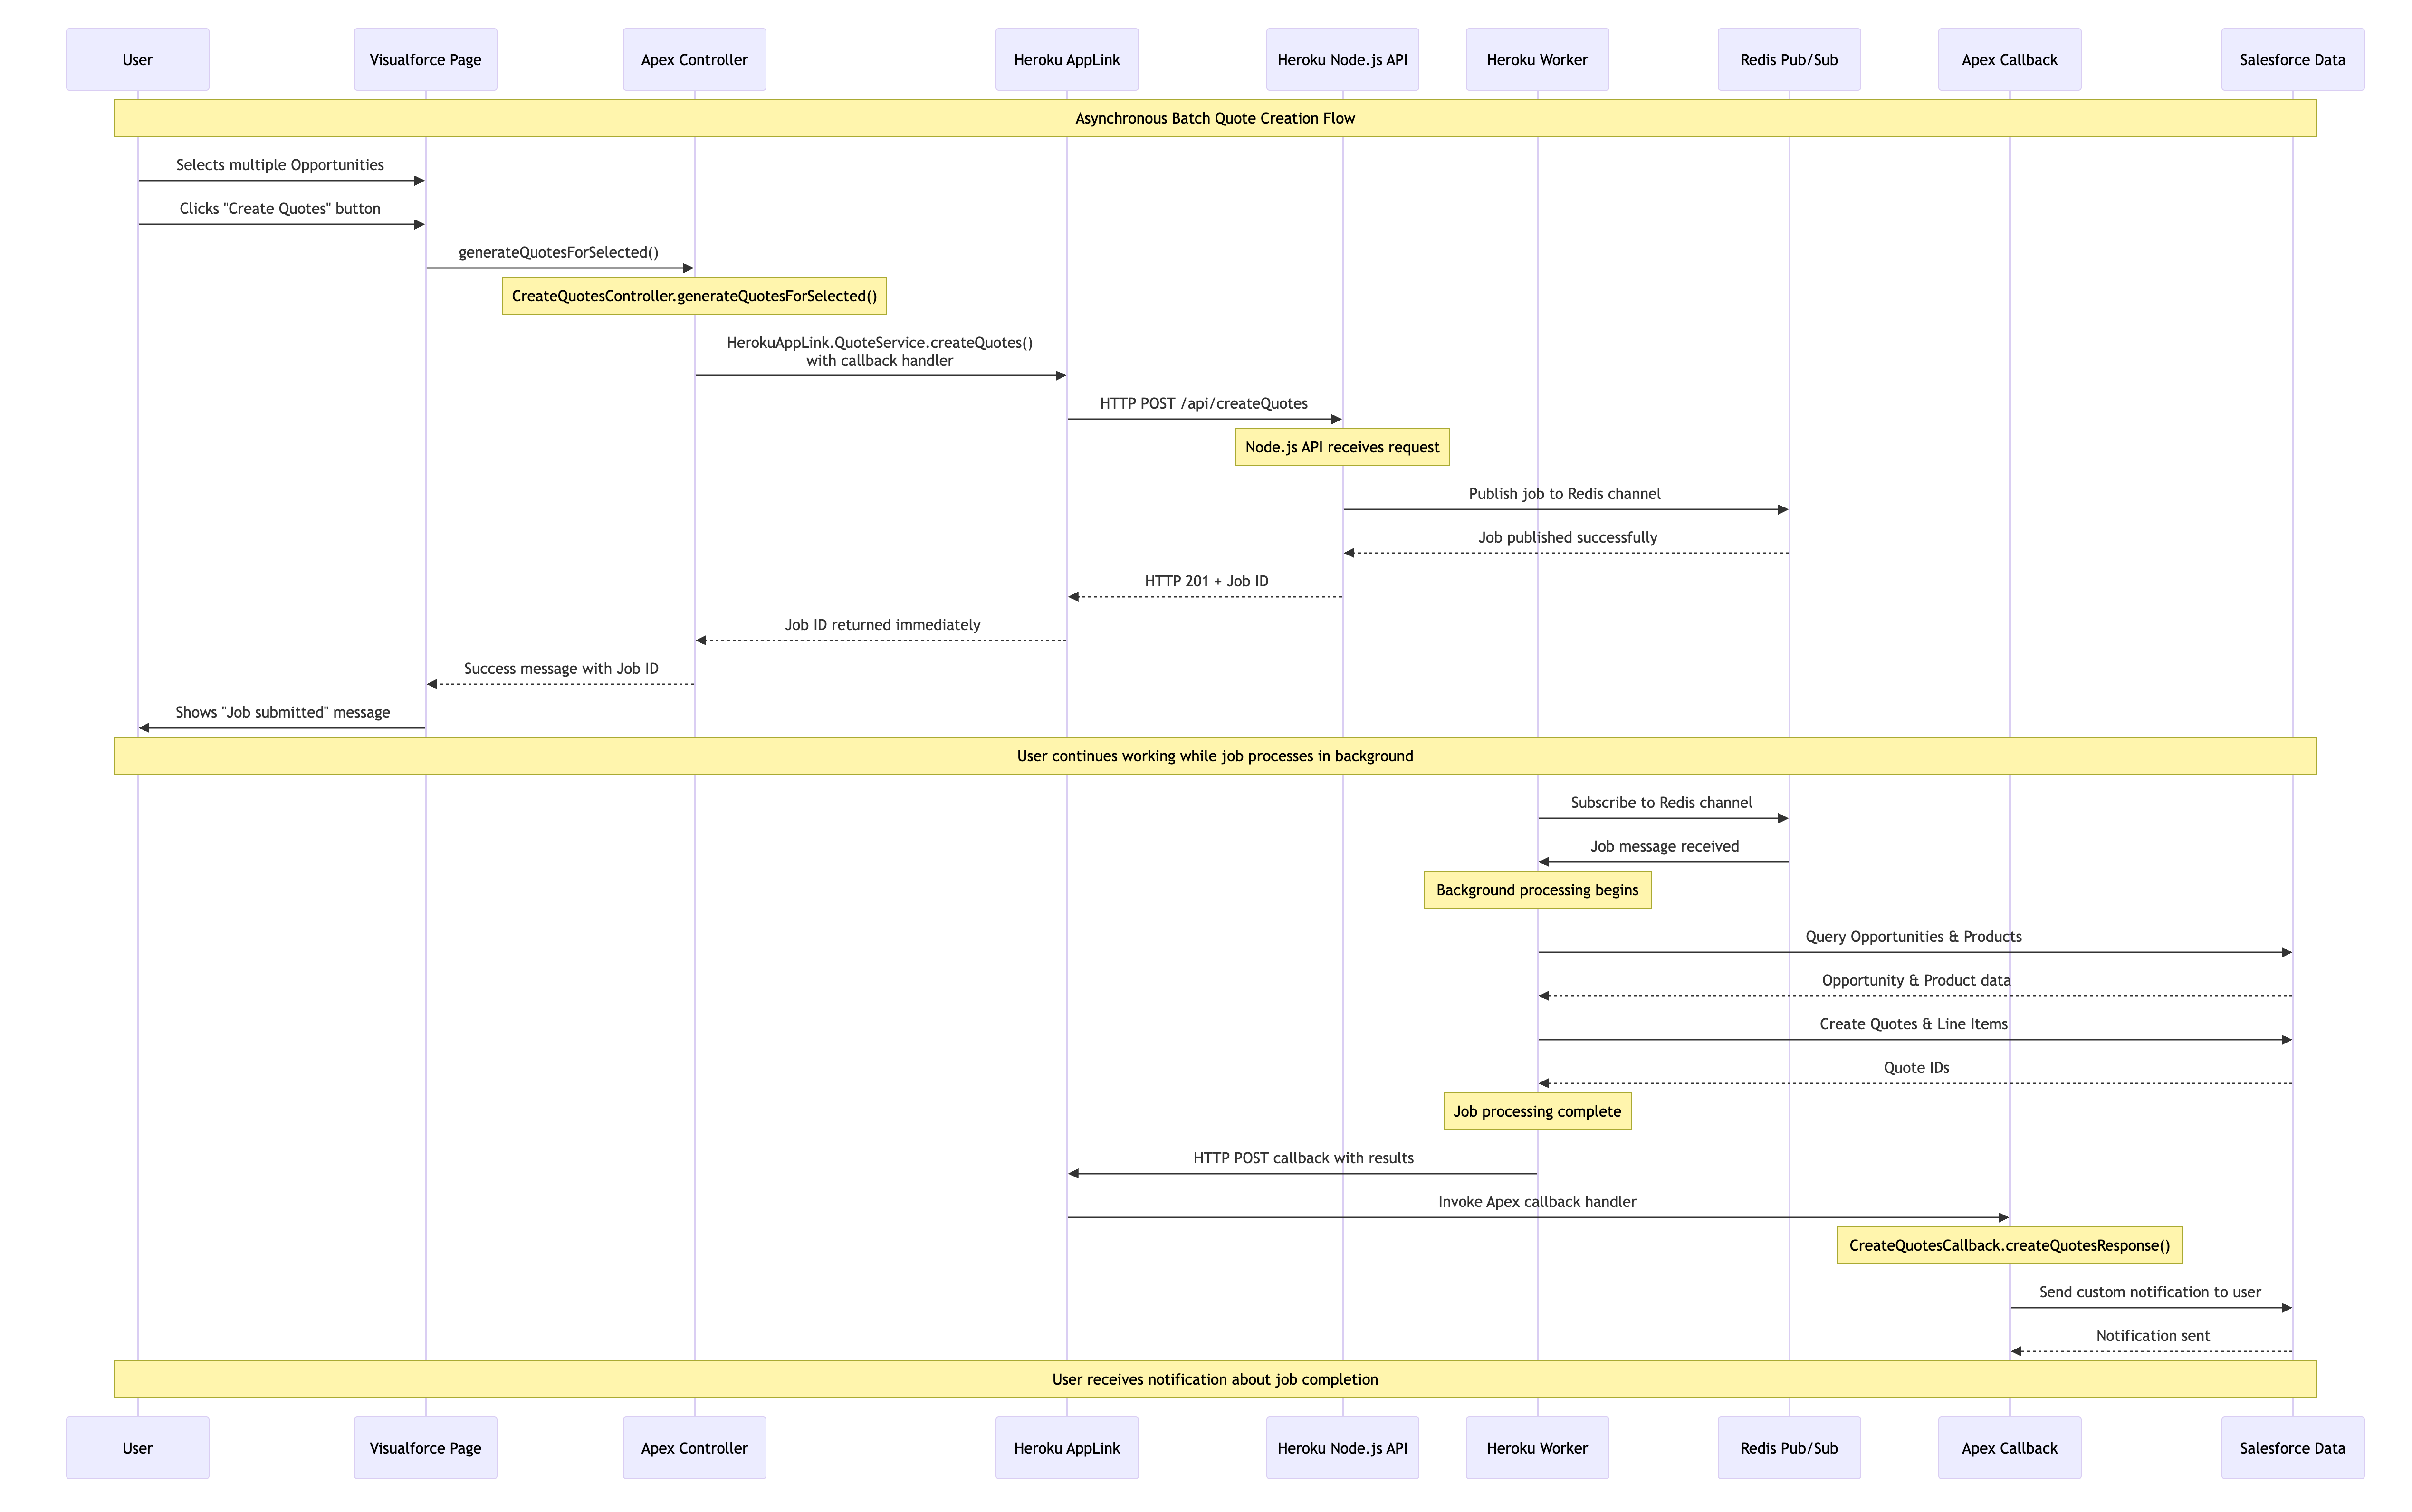
When processing needs to operate over a number of records (user selected or filtered) we can apply the same expansion of the Apex control flow – by having Node.js do the heavy lifting in the middle and then once complete passing control back to Apex to complete user notifications, logging, or even further non-compute heavy work. The diagram shows two processes; the first is the user interaction, in this case, selecting the records that Apex passes over to Heroku to enqueue a job to handle the processing. Heroku compute is your org’s own compute, so will begin execution immediately and run until it’s done. Thus, in the second flow, we see the worker taking over, completing the task, and then using an AppLink Apex callback, sending control back to the org where a user notification is sent.

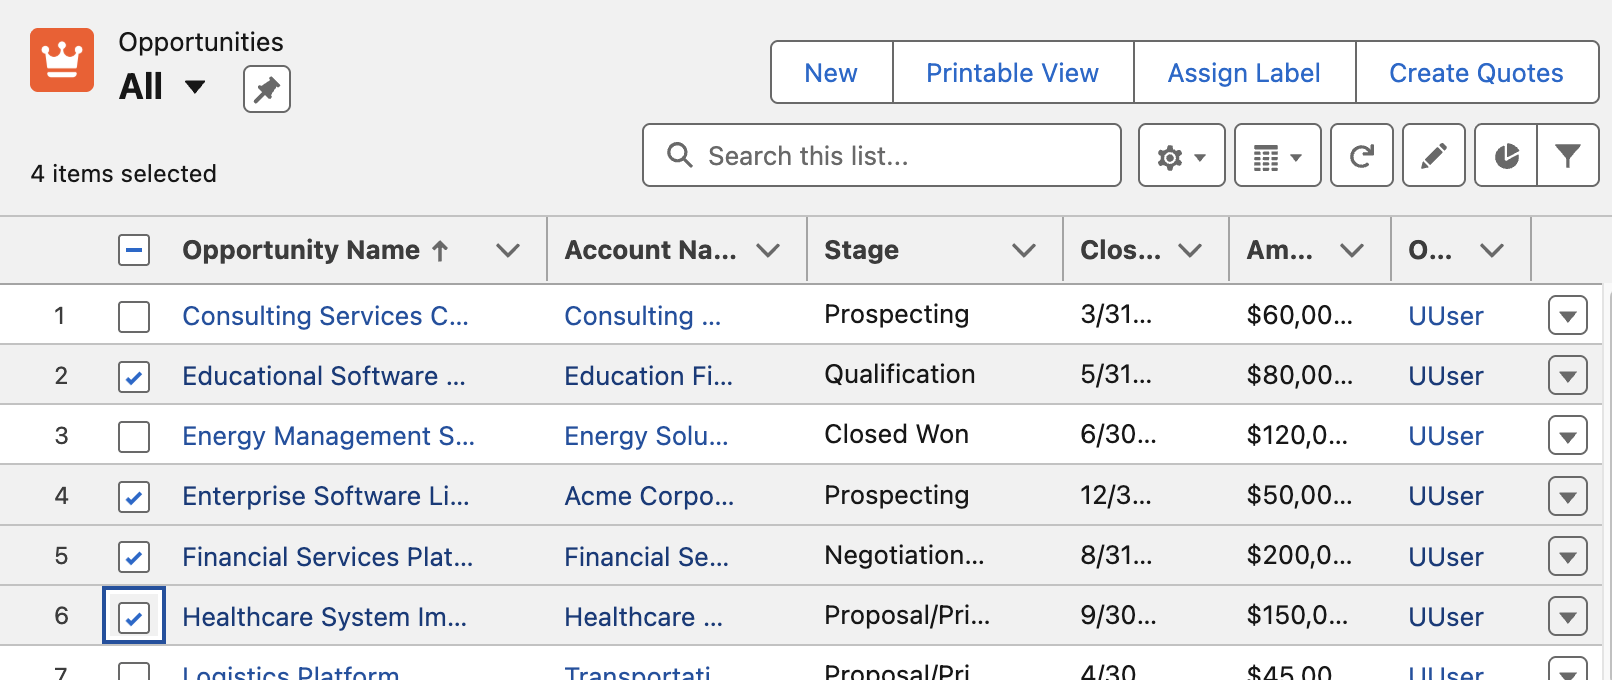
In this example we have the Create Quotes button that allows the user to select which Opportunities to be converted to Quotes. The Apex Controller shown below takes the record Ids and passes those over to Node.js code for processing in Heroku – however in this scenario it also passes an Apex class that implements a callback interface – more on this later. Note you can also invoke via Apex Scheduled jobs or other means such as Change Data Capture.

    public PageReference generateQuotesForSelected() {
        try {
            // Get the selected opportunities
            List<Opportunity> selectedOpps = (List<Opportunity>) this.stdController.getSelected();
            // Extract opportunity IDs
            List<String> opportunityIds = new List<String>(selectedOpps.keySet());
            // Call the Quotes service with an Apex callback
            try {
                HerokuAppLink.QuoteService service = new HerokuAppLink.QuoteService();
                HerokuAppLink.QuoteService.createQuotes_Request request = new HerokuAppLink.QuoteService.createQuotes_Request();
                request.body = new HerokuAppLink.QuoteService_CreateQuotesRequest();
                request.body.opportunityIds = opportunityIds;                
                // Create callback handler for notifications
                CreateQuotesCallback callbackHandler = new CreateQuotesCallback();                
                // Set callback timeout to 10 minutes from now (max 24hrs)
                DateTime callbackTimeout = DateTime.now().addMinutes(10);                
                // Call the service with callback
                HerokuAppLink.QuoteService.createQuotes_Response response = 
                   service.createQuotes(request, callbackHandler, callbackTimeout);                
                if (response != null && response.Code201 != null) {
                    // Show success message
                    // ....
            } catch (HerokuAppLink.QuoteService.createQuotes_ResponseException e) {
                // Handle specific service errors
                // ...
            }            
        } catch (Exception e) {
            // Show error message
            //  ...
        }        
        return null;
    }

Note: You may have noticed the above Apex Controller is that of a Visualforce page controller and not LWC! Surprisingly it seems (as far as I can see) this is still the only way to implement List View buttons with selection. Please do let me know of other native alternatives. Meanwhile the previous button is a modern LWC based button, but this is only supported on detail pages.

As before you can see Fastify used to expose the Node.js code invoked from the Apex controller – except that it is returning immediately to the caller (your Apex code) rather than waiting for the work to complete. This is because the work has been spun off in this case into another Heroku process known as a Worker. This pattern means that control returns to the Apex Controller and to the user immediately while the process continues in the background. Note that the callbackURL is automatically supplied by AppLink you just need to retain it for later.

// Asynchronous batch quote creation
  fastify.post('/createQuotes', {
    schema: createQuotesSchema,
    handler: async (request, reply) => {
      const { opportunityIds, callbackUrl } = request.body;
      const jobId = crypto.randomUUID();
      const jobPayload = JSON.stringify({
        jobId,
        jobType: 'quote',
        opportunityIds,
        callbackUrl
      });
      try {
        // Pass the work to the worker and respond with HTTP 201 to indicate the job has been accepted
        const receivers = await redisClient.publish(JOBS_CHANNEL, jobPayload);
        request.log.info({ jobId, channel: JOBS_CHANNEL, payload: { jobType: 'quote', opportunityIds, callbackUrl }, receivers }, `Job published to Redis channel ${JOBS_CHANNEL}. Receivers: ${receivers}`);
        return reply.code(201).send({ jobId }); // Return 201 Created with Job ID
      } catch (error) {
        request.log.error({ err: error, jobId, channel: JOBS_CHANNEL }, 'Failed to publish job to Redis channel');
        return reply.code(500).send({ error: 'Failed to publish job.' });
      }
    }
  });

The following Node.js is running in the Heroku Worker and performs the same work as the example above, querying Opportunities and using the Unit Of Work to create the Quotes. However in this case when it completes it calls the Apex Callback handler. Note that you can support different types of callbacks – such as an error state callback.

/**
 * Handles quote generation jobs.
 * @param {object} jobData - The job data object from Redis.
 * @param {object} logger - A logger instance.
 */
async function handleQuoteMessage (jobData, logger) {
  const { jobId, opportunityIds, callbackUrl } = jobData;
    try {
    // Get named connection from AppLink SDK
    logger.info(`Getting 'worker' connection from AppLink SDK for job ${jobId}`);
    const sfContext = await sdk.addons.applink.getAuthorization('worker');      
    // Query Opportunities 
    const opportunityIdList = opportunityIds.map(id => `'${id}'`).join(',');
    const oppQuery = `
      SELECT Id, Name, AccountId, CloseDate, StageName, Amount,
             (SELECT Id, Product2Id, Quantity, UnitPrice, PricebookEntryId FROM OpportunityLineItems)
      FROM Opportunity
      WHERE Id IN (${opportunityIdList})
    // ... 
    logger.info(`Processing ${opportunities.length} Opportunities`);
    const unitOfWork = dataApi.newUnitOfWork();
    // Create the Quotes and commit Unit Of Work
    // ...
    const commitResult = await dataApi.commitUnitOfWork(unitOfWork);
    // Callback to Apex Callback class
    if (callbackUrl) {
      try {
        const callbackResults = {
          jobId,
          opportunityIds,
          quoteIds: Array.from(quoteRefs.values()).map(ref => {
            const result = commitResult.get(ref);
            return result?.id || null;
          }).filter(id => id !== null),
          status: failureCount === 0 ? 'completed' : 'completed_with_errors',
          errors: failureCount > 0 ? [`${failureCount} quotes failed to create`] : []
        };
        const requestOptions = {
          method: 'POST',
          body: JSON.stringify(callbackResults),
          headers: { 'Content-Type': 'application/json' }
        };
        const response = await sfContext.request(callbackUrl, requestOptions);
        logger.info(`Callback executed successfully for Job ID: ${jobId}`);
      } catch (callbackError) {
        logger.error({ err: callbackError, jobId }, `Failed to execute callback for Job ID: ${jobId}`);
      }
    }
  } catch (error) {
    logger.error({ err: error }, `Error executing batch for Job ID: ${jobId}`);
  }
}

Finally the following code shows us what the CreateQuotesCallback Apex Callback (provided in the Apex controller logic) is doing. For this example its using the custom notifications to notify the user via UserInfo.getUserId(). It can do this because it is running as the original user that started the work. Also meaning that if it needed to do any further SOQL or DML these run in context of the correct user. Also worth noting that handler is bulkified – indicating that Salesforce will likely batch up callbacks if they arrive in close timing.

/**
 * Apex Callback handler for createQuotes asynchronous operations
 * Extends the generated AppLink callback interface to handle responses
 */
public class CreateQuotesCallback 
      extends HerokuAppLink.QuoteService.createQuotes_Callback {

    /**
     * Handles the callback response from the Heroku worker
     * Sends a custom notification to the user with the results
     */
    public override void createQuotesResponse(List<HerokuAppLink.QuoteService.createQuotes_createQuotesResponse_Callback> callbacks) {
        // Send custom notification to the user
        for (herokuapplink.QuoteService.createQuotes_createQuotesResponse_Callback callback : callbacks) {
            if (callback.response != null && callback.response.body != null) {
                Messaging.CustomNotification notification = new Messaging.CustomNotification();
                notification.setTitle('Quote Generation Complete');
                notification.setNotificationTypeId(notificationTypeId);                
                String message = 'Job ' + callback.response.body.jobId + ' completed with status: ' + callback.response.body.status;
                if (callback.response.body.quoteIds != null && !callback.response.body.quoteIds.isEmpty()) {
                    message += '. Created ' + callback.response.body.quoteIds.size() + ' quotes.';
                }
                if (callback.response.body.errors != null && !callback.response.body.errors.isEmpty()) {
                    message += ' Errors: ' + String.join(callback.response.body.errors, ', ');
                }                                
                notification.setBody(message);
                notification.setTargetId(UserInfo.getUserId());                    
                notification.send(new Set<String>{ UserInfo.getUserId() });
            }
        }
    }
}

Configuration and Monitoring

In general the Node.js code runs as the user invoking the actions – which is very Apex like and gives you confidence your code only does what the user is permitted. There is also an elevation mode thats out the scope of this blog – but is covered in the resources listed below. The technical notes section in the README covers an exception to running as the user – whereby the asynchronous Heroku worker logic is running as a named user. Note that the immediate Node.js logic and Apex Callbacks both still run as the invoking user so if needed you can do “user mode” work in those contexts. You can read more about the rational for this this in the README for this project.

Additionally there are subsections in the README that cover the technical implementation of Heroku AppLink asynchronous callbacks. Configuration for Heroku App Async Callbacks provides the OpenAPI YAML structure required for callback definitions, including dynamic callback URLs and response schemas that Salesforce uses to generate the callback interface. Monitoring and Other Considerations explains AppLink’s External Services integration architecture, monitoring through the BackgroundOperation object, and the 24-hour callback validity constraint with Platform Event alternatives for extended processing times or in progress updates.

Summary

As always I have shared the code, along with a more detailed README file on how to set the above demos up for yourself. This is just one of many ways to use Heroku AppLink, others are covered in the sample patterns here – including using Platform Events to trigger Heroku workers and transition control back to Apex or indeed Flow. This Apex Callback pattern is unique to using Heroku AppLink with Apex and is not yet that deeply covered in the official docs and samples – you can also find more information about this feature by studying the general External Services callback documentation.

Finally, the most important thing here is that this is not a DIY integration like you may have experienced in the past – though I omitted here the CLI commands (you can see them in the README) – Salesforce and Heorku are taking on a lot more management now. And overall this is getting more and more “Apex” like with user mode context explicitly available to your Heroku code. This blog was inspired by feedback on my last blog, so please keep it coming! There is much more to explore still – I plan to get more into the DevOps integration side of things and explore ways to automate the setup using the AppLink API.

Meanwhile, enjoy some additional resources!


1 Comment

Five ways Heroku AppLink Enhances Salesforce Development Capabilities

Over the years through this blog I have enjoyed covering various advancements in Salesforce APIs, Apex, Flow, and more recently, Agentforce. While I have featured Heroku quite a bit – despite it being a Salesforce offering, the reality has been that access to Heroku for a Salesforce developer has felt like plugging in another platform – not just because on the surface its DX is different from SFDX, but because in a more material sense, it has not been integrated with the rest of the platform and its existing tools – in the same way Apex and Flow are. Requiring you to do the integration plumbing before you can access its value.

Now with a new “free” Heroku AppLink add-on, Heroku has now been tangibly integrated by Salesforce into the Salesforce platform – it and code deployed to it even sits under the Setup menu. So now it is finally time to reflect on what Heroku brings to the party!

This blog starts a series on what this new capability means for Salesforce development. Choosing the best tool for the job is crucial for maximizing the holistic development approach the Salesforce platform offers. Apex, Flow, LWC, etc., are still important tools in your toolkit. In my next blog in this series, I’ll share hands-on content, but for now, let’s explore five reasons to be aware of what Heroku and Heroku AppLink can do for Salesforce development:

1. Seamlessly and Securely Attach Unlimited Compute to your Orgs

At times, certain automations or user interactions demand improved response times and/or abiility handle increasing data volumes. While Apex and Flow have a number of options here, they are inherently always constrained by the multi-tenant nature of the core platform that runs their respective logic. The core platform’s first priority is a stable environment for all – thus, largely we see the continued realities of the infamous governor limits. Going beyond some, though not all, of the governor limits that either stop or at least slow things down is now possible – and without leaving the Salesforce family of services.

You can deploy code to Heroku with git push heroku main, which works in much the same way as sf project deploy to upload your code and run it, then you declaratively assign your compute needs, and attach (using the publish command) access to it for use within your Flow, Apex, LWC or Agentforce implementations – across as many orgs as you like using the connect command.

Heroku supports both credit card (pay as you go) and contract billing for compute usage – with the smallest plan at $5 a month already able to run complex and lengthy compute tasks easily – though milage of course varies on usecase.

2. Tap into the worlds most popular languages and frameworks within Salesforce

Salesforce has some history of embracing industry languages such as Node.js for Lightning Web Components and, with that, taps into wider skill set pools, and also commercial and open-source web component libraries. With Heroku AppLink, this is now true for backend logic – and in fact, it extends language support to Python, .NET, Ruby, Java, and many more languages, all with their own rich communities, libraries, and frameworks. Does this mean I am suggesting you port all your Apex code to other languages? No – remember this is a best tool for the job mindset – so if what you need can be better served with existing skills, code, or libraries available in such languages, then with AppLink you can now tap into these while staying within the Salesforce services.

Note: Heroku AppLink provides additional SDK support presently only for Node.js and Python. That said its API is available to any language – and is fully documented. Java samples included with AppLink illustrate how to access the API directly – along with existing Salesforce API libraries.

You may also think that with this flexibility comes more complexity; well, like the rest of Salesforce, Heroku keeps things powerful yet simple. Its buildpacks and simple CLI command git push heroku main remove the heavy lifting of building, deploying, and scaling your code that would otherwise require skills in AWS, GCP, or other platforms – what’s more, Heroku also curates the latest operating system versions, and build tools for you.

3. More power to existing Apex, Flow and Agentforce investments

As we are practicing choosing the best tool for the job – for complex solutions it’s typically not a case of one size fits all – that’s why we have a spectrum of tools to choose from – while one solution, for example, might be mostly delivered through Flow, the most complex parts of it might depend on some code – and thus having interoperability between each approach is important.

Heroku AppLink draws on the use of platform actions – which has over the years become the de facto means to decompose logic/automations – allow reusable logic to be built in code via Apex or declaratively in Flow. Now with Heroku AppLink, you can also effectively write actions in any of the aforementioned languages and also if needed scale that code beyond traditional limits such as CPU timeout and heap – while benefiting from increased execution times.

What is also critical to such code, is user context, so that data access honors the current user, both in terms of their object, field, sharing permissions but also audit information retaining a trail of who did what and when to the data. Thus, Heroku AppLink has the ability to run code in Salesforce “user mode” – much like Apex and Flow – this means the same – your SOQL and DML all operate in this mode – in fact, that’s the default – no need to qualify it as with Apex. This approach follows the industry pattern of the Principle of Least Privilege – there is also a way to selectively elevate permissions as needed using permission sets.

4. Make External Integrations more Secure

Heroku is also known to the wider world as a Paas (Platform-as-a-Service) providing easy to use compute, data and more recently AI services without the infrastructure hassle. This leads to Heroku customers building practically any application or service they desire – again in any language they desire. For example, a web/mobile experience can be hosted along with required data storage – both able to scale to global event needs. Heroku AppLink, joins Heroku Connect to start a family of add-ons that also help such consumer facing or even internal experiences tap into Salesforce org or even Data Cloud data – by effectively managing the connection details securely in one place – elevating the complexity of managing oAuth, JWT, certifications etc.

5. Leverage additional data and AI services

If all your data resides within a Salesforce org or Data Cloud, Heroku AppLink provides an easy to use SDK to make using the most popular APIs easy and even provides a long time favorite of mine, Martin Fowlers, Unit of Work over the relatively complex composite Salesforce APIs to manage multi-object updates within a single transaction.

Beyond this, you can also take advantage of Heroku Postgres to store additional data that does not need to be in the org but needs to be close at hand to your code – likewise attach to data services elsewhere in AWS, DynamoDB for example. Heroku also provides new AI services that provide a set of simple to use AI tooling primitives on top of the latest industry LLM’s. All these Heroku services exist with the same trust and governance as other Salesforce services and thus leveraging them means you don’t have to move data or compute outside of Salesforce if thats something your business is particularly sensitive to.

Summary

Salesforce continues to bring new innovations to its no-code and code tools that are exciting but yet broaden the burden of choice and making the right choice. With Heroku AppLink, this has indeed added to the mix – and expands the classic vs. question – to – when to use Flow vs. Apex vs. Heroku?

I’ve noticed that the Flow vs. Apex debate is still strong at community events this year. When it comes to “code,” whether it’s Apex, Python, Java, or .NET—excluding Triggers, which AppLink doesn’t support—my opinion on no-code versus code remains the same – consider wisely use of one or both accordingly. In respect to coded needs, I still would still generally recommend Apex first, that is unless your project needs align with the points above – then it’s worth further discussion. Ultimately, it’s about finding a suitable mix instead with all three supporting actions, it’s easier to blend and evolve as needed.

As I hinted at the start of this blog, I plan to get into more hands-on blogs on Heroku AppLink and some reflections on ISV usage. Between these, I also have other Apex-related topics I want to explore—such as the new Apex Cursors feature. In the meantime, here below are some useful links about Heroku AppLink available as of the time of this blog.

Thanks for readying, hope it was useful!