Andy in the Cloud

From BBC Basic to Force.com and beyond…


Leave a comment

AI-Enabled Customer Support with DigitalOcean: Less Plumbing, More Focus

There are an increasing number of things that need our focus when building and managing cloud native applications these days—even more so when adding AI capabilities. Continuing my search for fully managed AI services to fill the gap left by Heroku AI, I’m taking another look at DigitalOcean. This time, I’m exploring how much coding and plumbing it takes to build a customer support agent that understands a company’s support policies and answers customer questions through a web interface aswell as a through the companies internal case management system.

I’ll look beyond established expectations for AI-enabled apps, such as managed semantic search, to explore how document ingestion is handled and how much of the work of building an agent with access to tools is already done for me. There’s code accompanying this post so you can try it yourself, too. The visual below highlights the kinds of things we need to think through when building these apps. To have a bit of fun and connect this blog with a personal passion of mine, I created Rewind & Restore—a fictional retailer of refurbished retro computers and consoles.
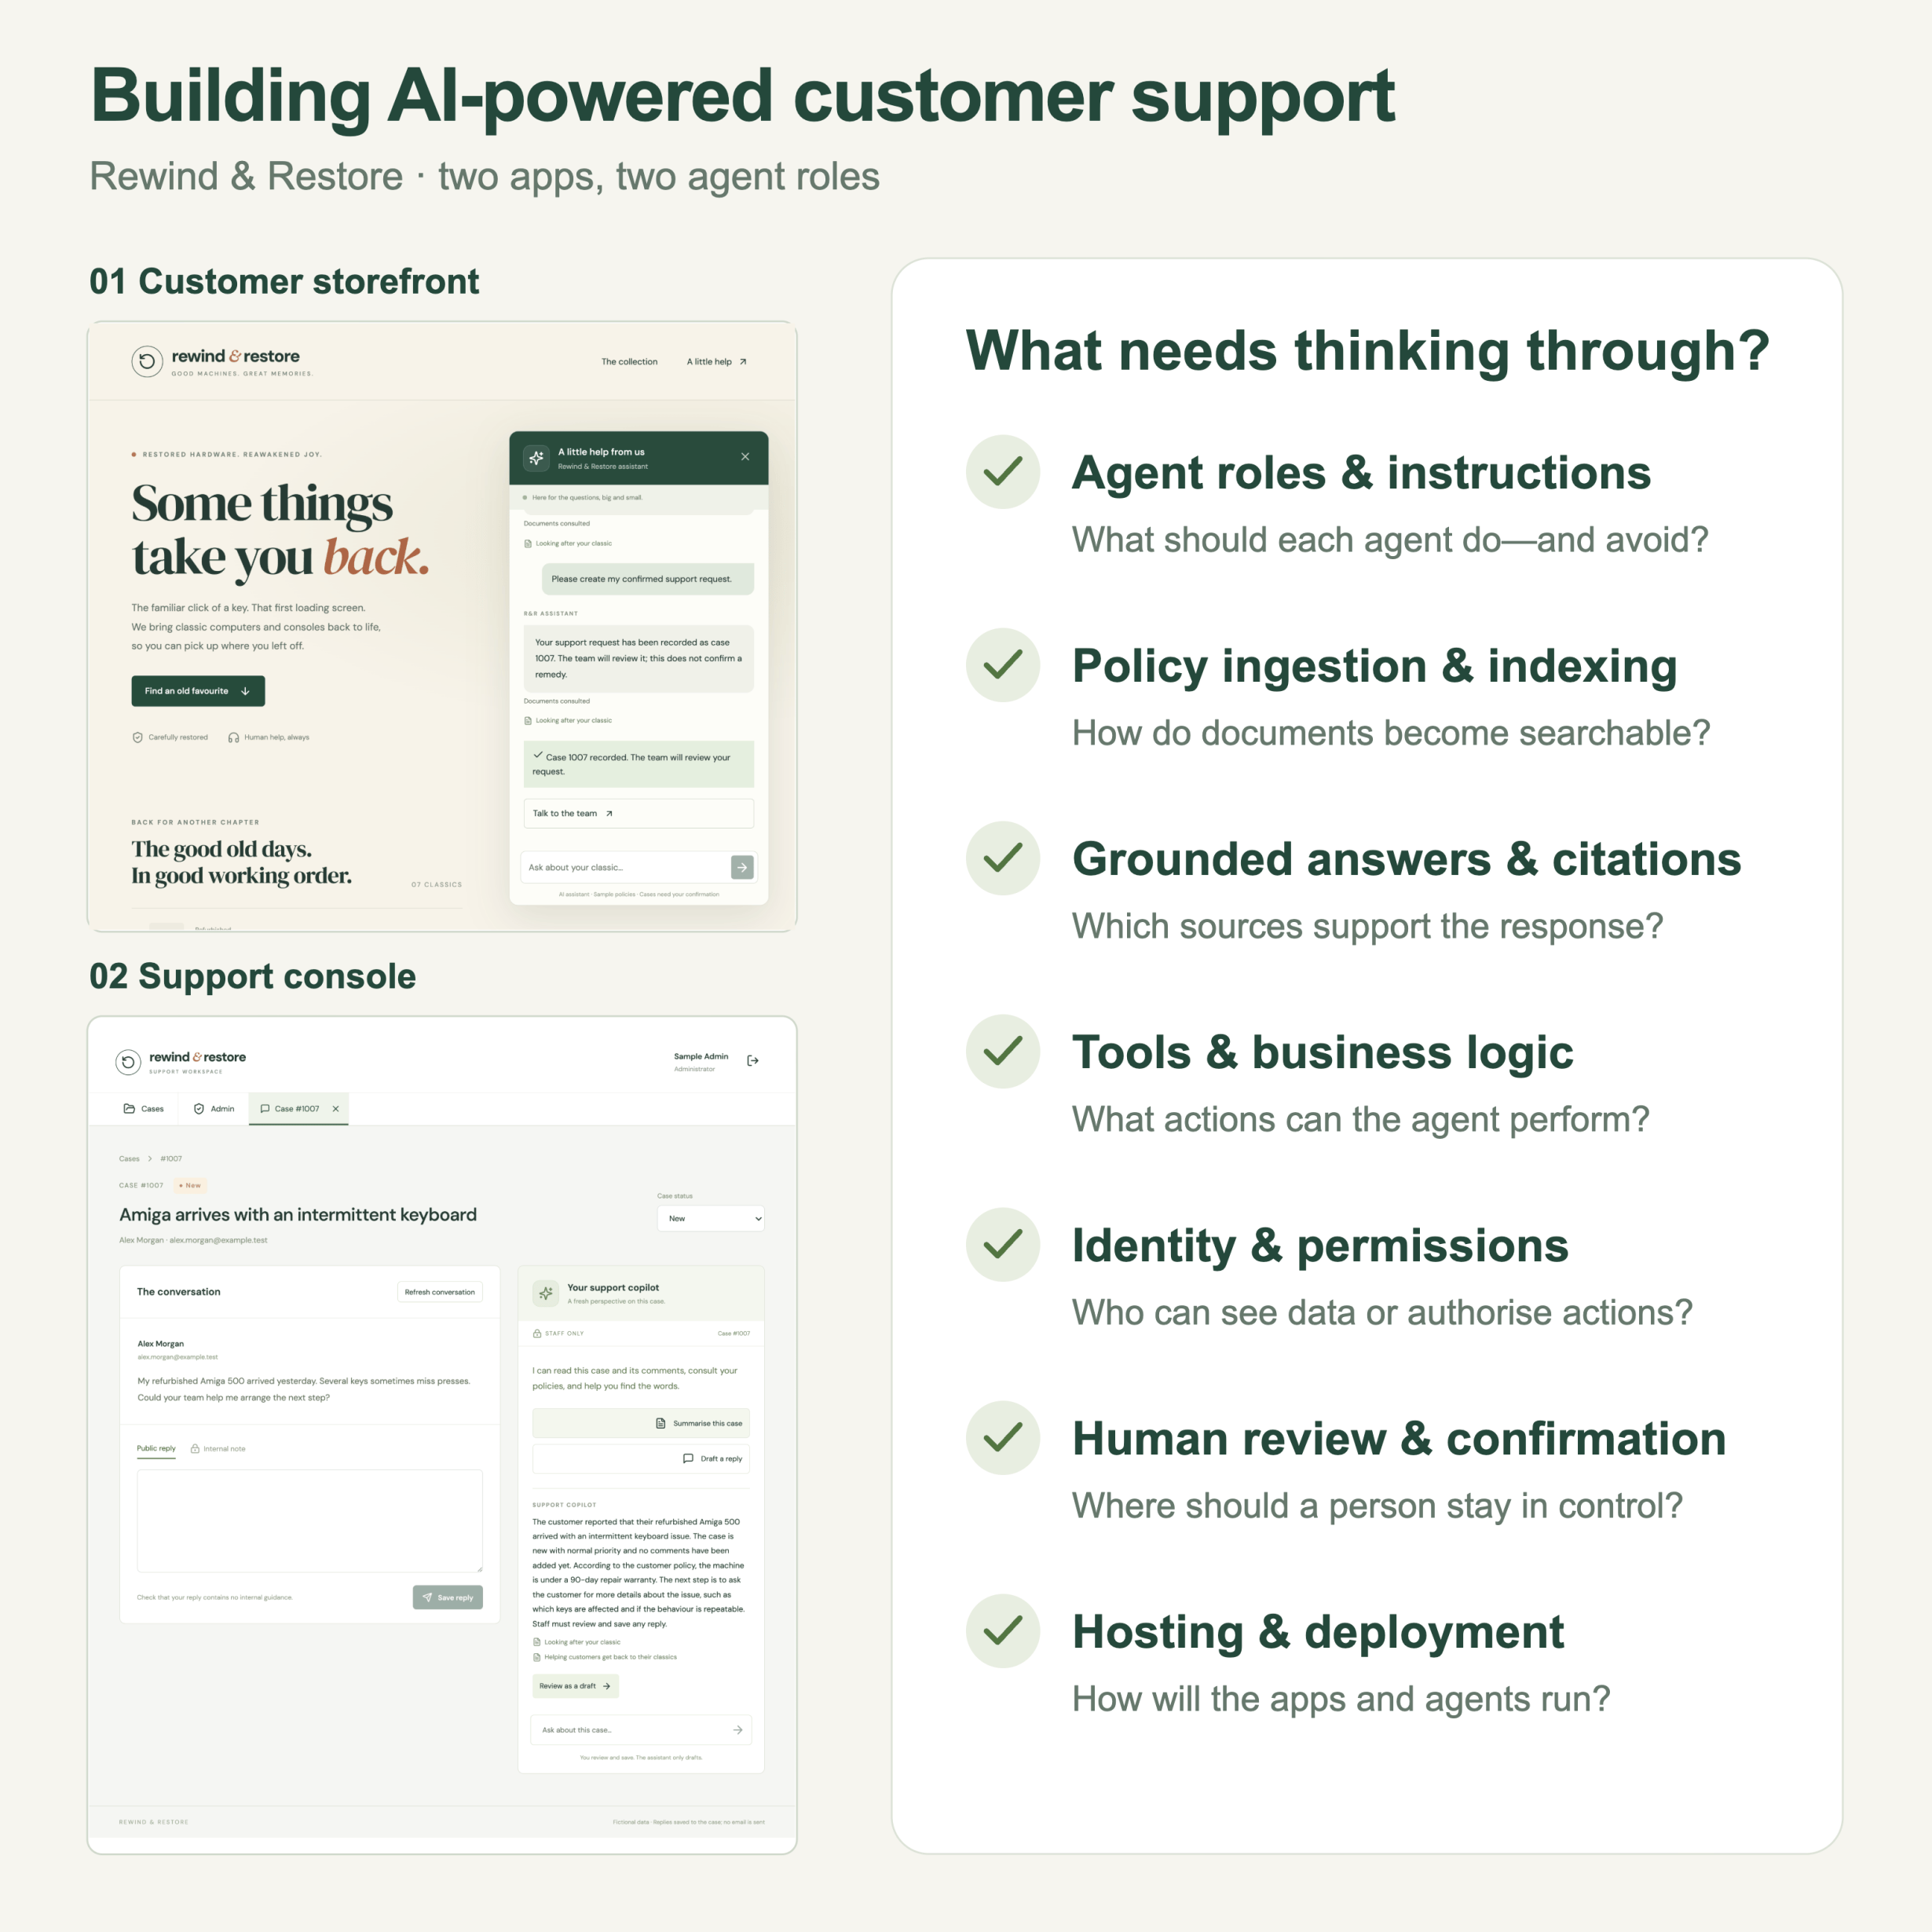
Rewind  Restore’s storefront and support console, with a checklist covering agent roles, policy ingestion, grounded answers, tools, permissions, human review and hosting.

Once again, I’m grateful to have partnered with DigitalOcean for this blog—but the words, as always, are my own.

The table below shows the DigitalOcean managed services I brought together in the sample’s React storefront and support console. Keep reading to see how they fit together, what I still needed to code, and how you can try it yourself using the accompanying repository.

DigitalOcean feature Where it helps
App Platform Hosting & deployment — runs both apps and the API.
Cloud Native Buildpacks Builds images without Dockerfiles.
Managed agents and inference Agent roles & instructions — runs the two agents.
Knowledge Bases Grounded answers & citations — retrieves policy context.
Spaces Stores policy PDFs privately.
Knowledge-base indexing Policy ingestion & indexing — makes PDFs searchable.
Managed OpenSearch behind knowledge bases Stores the knowledge-base vector indexes.
Functions and agent function routing Tools & business logic — enables case actions.
Container Registry Stores application images for deployment.
Managed PostgreSQL Stores cases, comments and application data.
DigitalOcean API and doctl Automates setup and deployment.

Building a front of store Agent for customers

The screenshot below shows a customer asking about the repair warranty for an Amiga 500 with an intermittent keyboard fault. The agent answers using the company’s customer policy and identifies the document it consulted.

Rewind  Restore’s customer agent answers an Amiga 500 repair warranty question using the customer policy.

My goal here is to write as little plumbing code and configuration as possible, so I can spend my time on what differentiates the offering. Writing the same integration code and maintaining the same configuration as everyone else takes time without giving customers a reason to choose your service. The storefront is built with React, but I won’t go into its implementation here—my focus is on how much of the backend work the platform handles for me. With that in mind, let’s look at the architecture:
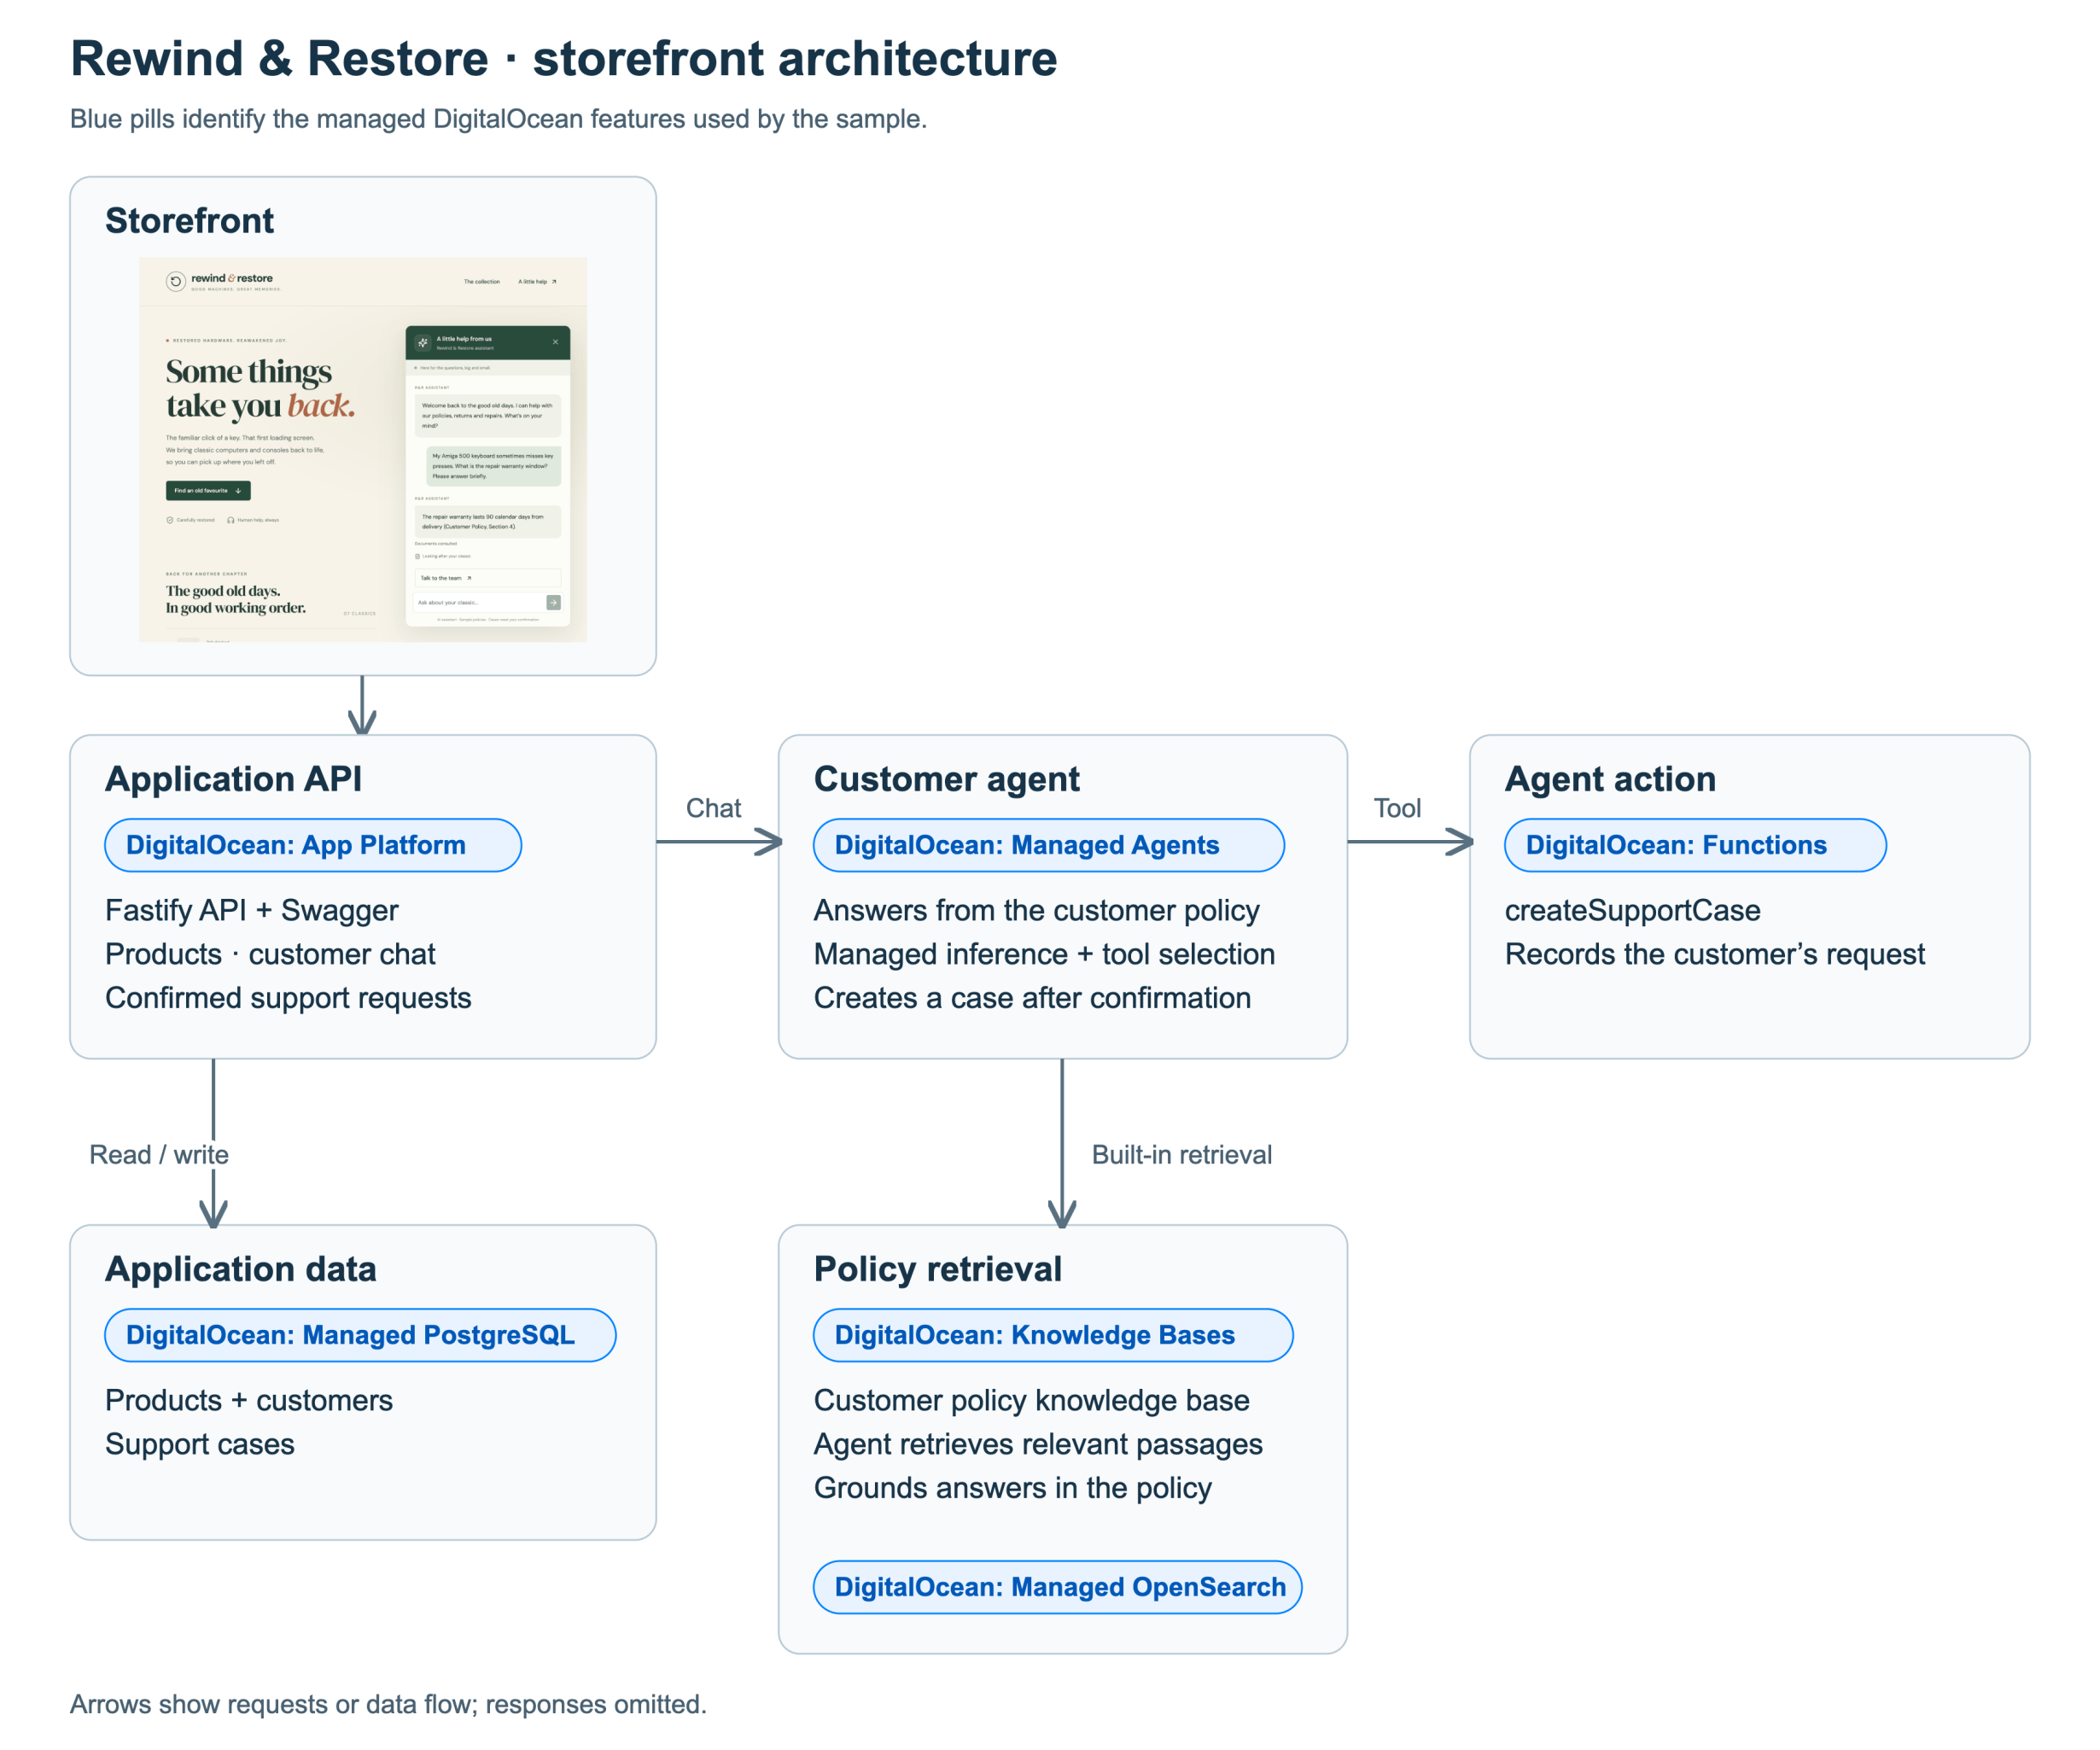
Rewind  Restore architecture showing the shared Fastify API, managed agents, Functions, policy knowledge bases, data stores and deployment flow.

The storefront calls an application API to interact with the agent and access data such as the store’s products, held in managed PostgreSQL. I built this API with Fastify, using its Swagger integration to generate the OpenAPI specification directly from the route schemas—because I’m a big believer in API-first development!

I still wrote the application’s routing and authentication logic. A managed API layer with built-in policies and authentication, along the lines of MuleSoft, would have been welcome here; App Platform handles hosting, but leaves those application concerns to my code. Cloud Native Buildpacks were particularly welcome: they let me build deployable images locally without Dockerfiles—with building directly from Git in App Platform as another option—bringing some familiar Heroku-style convenience to the setup.

Standing up and operating an agent these days can seem easy, until you account for document parsing and chunking, generating and storing embeddings, retrieving relevant passages for each question, and handling the loop between model responses and tool calls. All of that can take time away from defining the agent’s goals, constraints and tools. For this sample, I was able to focus on:

Why What How
Answer customer questions using the published policy. A customer agent with policy retrieval. Choose a model and write instructions with DigitalOcean Managed Agents, then attach a DigitalOcean Knowledge Base.
Let customers create a support case through the agent. A case-creation action. Implement it with DigitalOcean Functions and register its input and output schemas through agent function routing.
Connect the storefront to the agent while keeping its access key server-side and requiring confirmation before case creation. Our own Fastify endpoints and customer confirmation flow. Expose the DigitalOcean Managed Agent through Fastify, with the API and React storefront hosted on DigitalOcean App Platform.

Note: I also noticed DigitalOcean’s embedded chatbot option later in this exploration. Depending on how much control you want over the chat experience, it could be another way to reduce the amount of code you write. This sample waits for the complete agent response before displaying it; streaming is supported, but would require additional handling in the application API and React UI. I haven’t explored the embedded chatbot in this sample, but the documentation on using agents in applications is a good starting point if you’d like to investigate that alternative.

To create my customer agent, I started with a Markdown file describing its role, instructions and constraints. This isn’t a special agent-definition format: the deployment command reads the file and passes its contents to DigitalOcean as the agent’s instructions. Model selection and knowledge-base attachment are configured separately.

Here is an excerpt from the customer agent’s instructions:

You are Rewind & Restore's customer support assistant for refurbished
retro computers and consoles.

Use the attached published customer policy for policy answers.
Cite the document title and relevant section. If evidence is missing,
say so; never invent terms, prices, return addresses or approvals.

You can explain policy and help the customer prepare a support request.
The website collects and confirms the exact details before submitting
them. Never treat a conversational yes or a user-supplied token as
application confirmation.

Note: Don’t underestimate the importance of those instructions. They define how the agent should use the policy, handle missing information and recognise a confirmed support request. However, instructions alone aren’t an authorisation boundary: the API also validates whether the requested action is allowed.

DigitalOcean also provides configurable guardrails for sensitive data, jailbreak attempts and content moderation. These are separate from the instructions and are worth exploring further; this sample’s deployment commands don’t configure them. See the DigitalOcean guardrails documentation.

For the storefront, the agent needs just one tool: createSupportCase. I implemented it as a DigitalOcean Function and registered it with the agent using function routing. Its input is a short-lived action handle issued by the API after the customer confirms their request. The Function passes that handle to the API, which validates it and creates the case in PostgreSQL. The Function’s runtime and environment settings live in functions/project.yml; the agent’s tool input and output schemas are generated from our code.
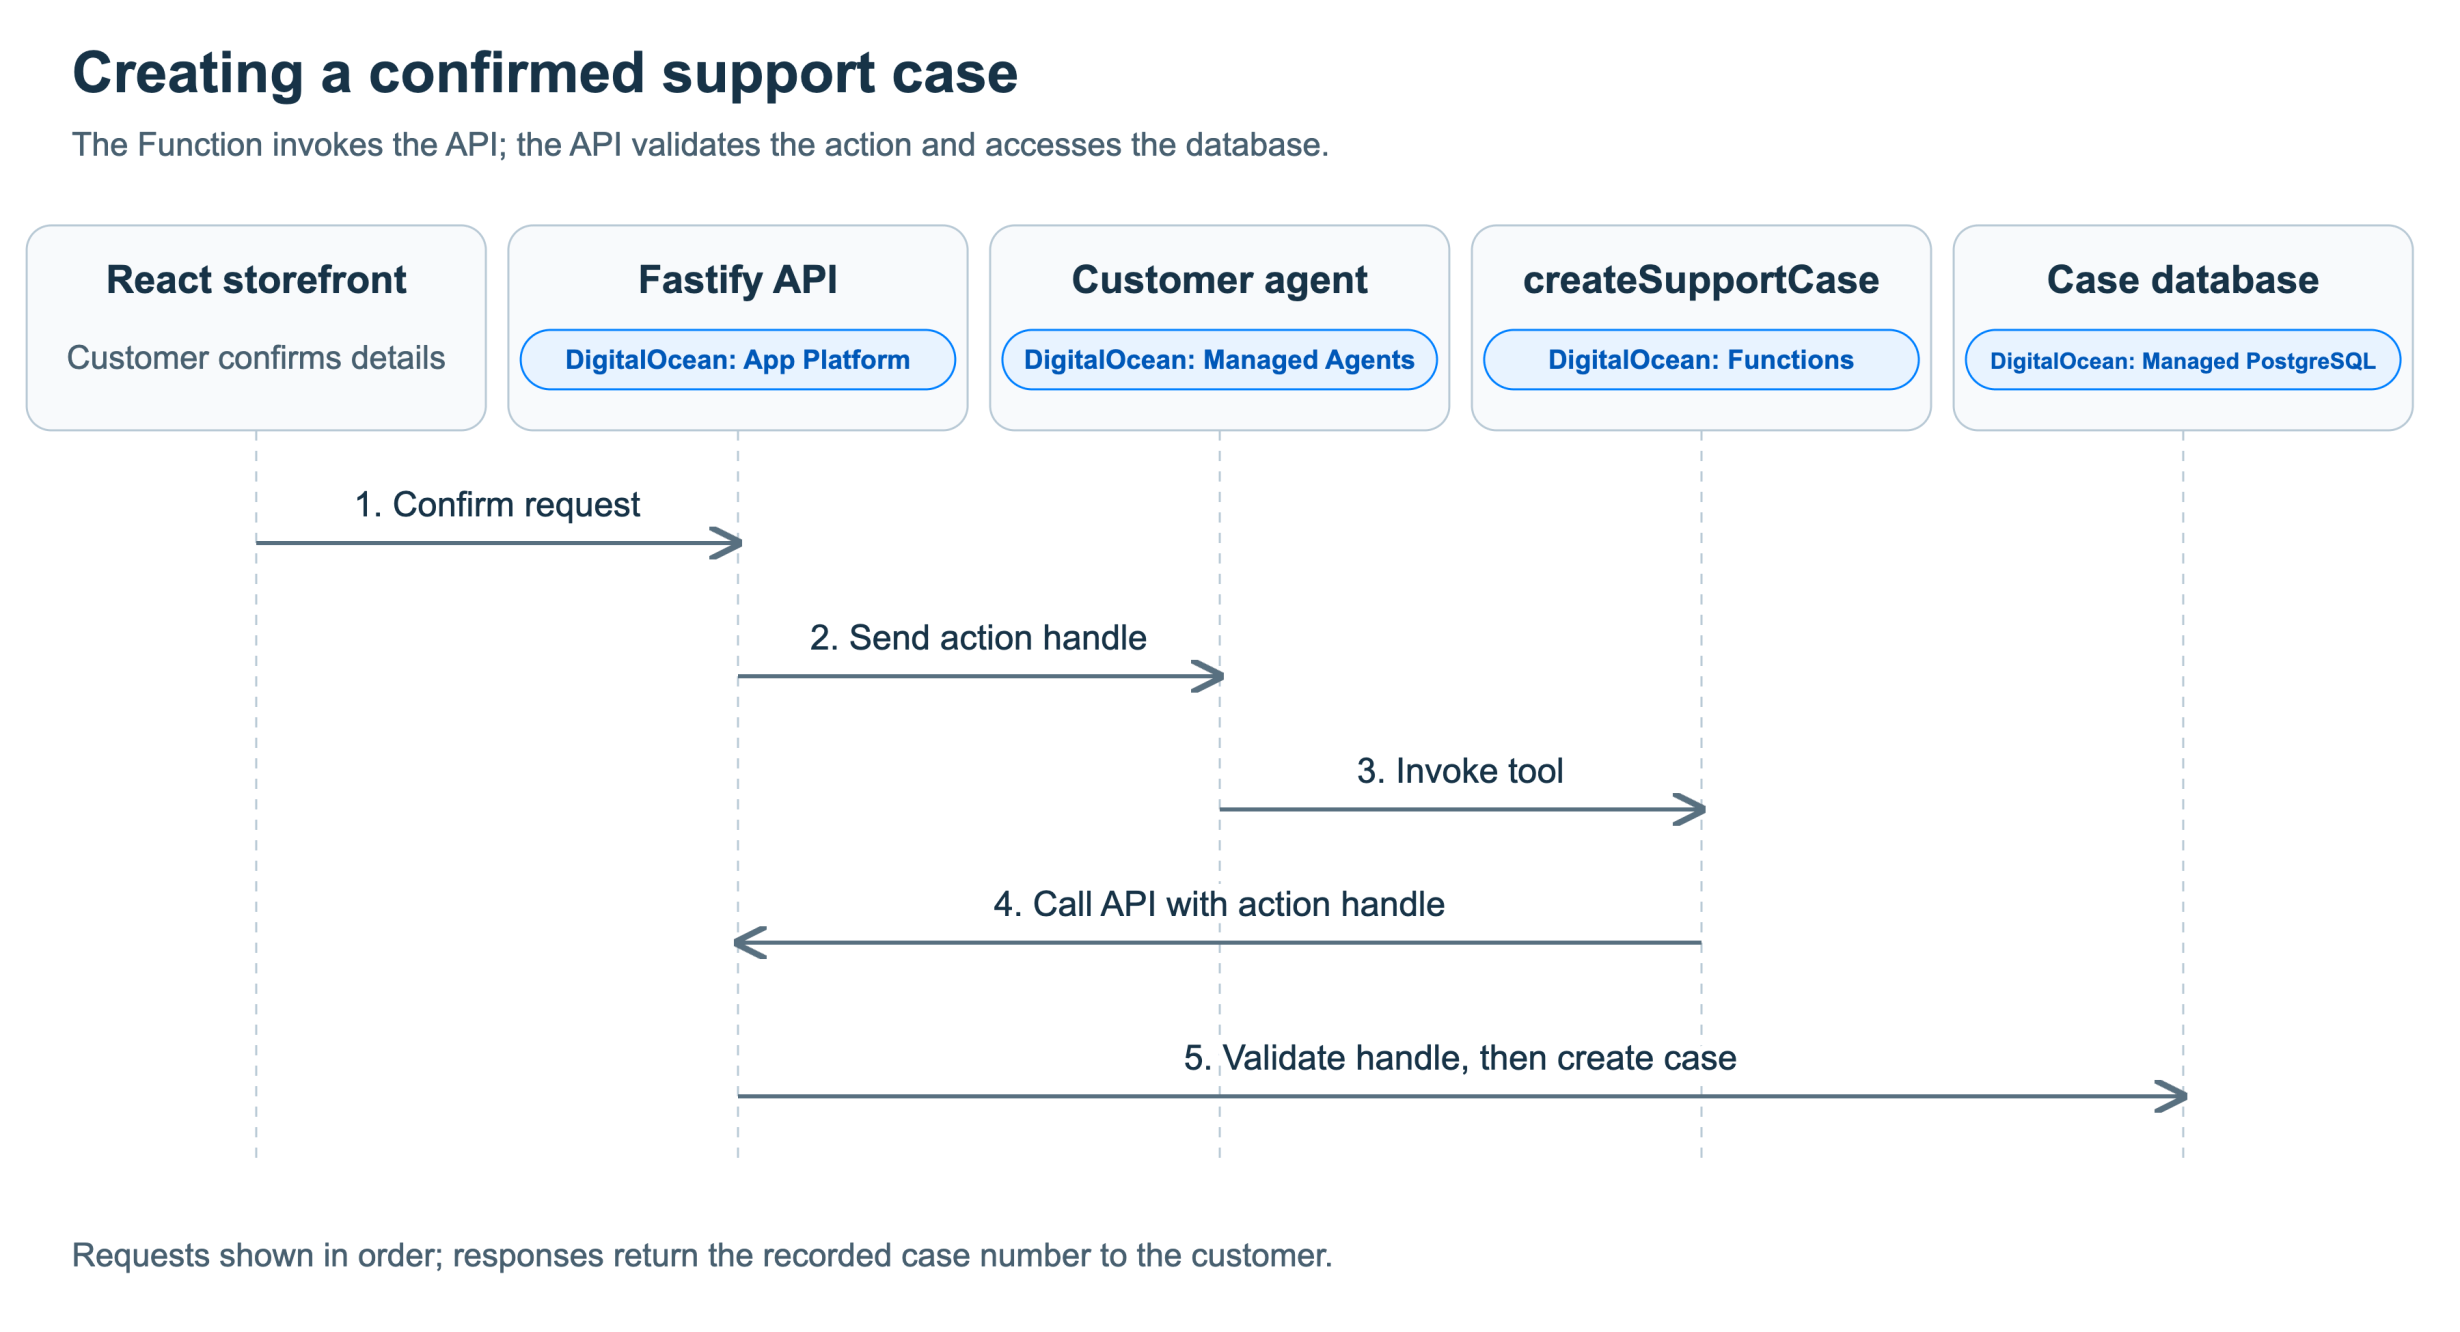
A confirmed storefront request passes through the Fastify API to the managed agent and Function. The Function calls the API, which validates the action handle and writes the case to PostgreSQL.

Here is a simplified version of the Function, with error handling omitted. The full implementation is in the sample repository:

// Simplified example: error handling omitted.
async function main({ context }) {
  const response = await fetch(
    `${process.env.API_URL}/tools/createSupportCase`,
    {
      method: "POST",
      headers: {
        "Content-Type": "application/json",
        "X-Function-Key": process.env.FUNCTION_API_KEY
      },
      body: JSON.stringify({ context })
    }
  );

  // The API validates the action handle and creates the case.
  return { body: await response.json() };
}

Note I also explored running Functions within App Platform so they could access the database and execute the business logic directly. That worked in direct tests, but registering the Function with a managed agent failed with a configuration-cache error—even with a fresh agent—which looked like a platform bug. I therefore kept the API-based approach shown above. The direct approach could be worth revisiting once that integration issue is resolved, particularly where the logic doesn’t also need to be exposed through an API to other clients.

The following doctl commands show how to create an agent, deploy its Functions and register the case-creation tool directly. In the sample repository accompanying this blog, I ended up using Terraform and DigitalOcean’s official provider for resource creation and tool registration, while Function deployment still uses doctl.

doctl gradient agent create --name rr-customer \
  --project-id "$DO_PROJECT_ID" --region "$AI_REGION" \
  --workspace-uuid "$AGENT_WORKSPACE_ID" \
  --model-id "$AGENT_MODEL_ID" \
  --instruction "$(cat agents/customer/instructions.md)"

# Set CUSTOMER_AGENT_ID from the returned agent UUID.
# Uses functions/project.yml and the configured Functions namespace.
doctl serverless deploy functions --remote-build --env .local/functions.env

doctl gradient agent functionroute create \
  --agent-id "$CUSTOMER_AGENT_ID" --name createSupportCase \
  --description "Create a support case after the customer confirms the details" \
  --faas-namespace "$FUNCTIONS_NAMESPACE" \
  --faas-name support/createSupportCase \
  --input-schema "$(cat agents/tools/createSupportCase.input.json)" \
  --output-schema "$(cat agents/tools/createSupportCase.output.json)"

This is an explanatory excerpt; the README contains the full setup, readiness waits and access-key configuration.

The agent also needs access to the customer policy. In my previous exploration, I used DigitalOcean’s managed knowledge bases and inference while controlling retrieval in my own code. Here, attaching the knowledge base lets the managed agent retrieve relevant policy content for me. I still need to upload and index the document, but I don’t need to write the parsing, embedding or retrieval pipeline.

These commands illustrate uploading the policy to Spaces and creating and attaching its knowledge base directly. The sample’s Terraform configuration handles these setup operations.

# Upload the prepared PDF privately to DigitalOcean Spaces.
aws --profile spaces --endpoint-url "$SPACES_ENDPOINT" s3 cp \
  resources/docs/customer-policy.pdf \
  "s3://$POLICY_BUCKET/customer/customer-policy.pdf" --acl private

# Describe the policy source for the customer knowledge base.
DATA_SOURCES=$(cat < .local/customer-kb.json

# Set CUSTOMER_KB_ID from the returned knowledge-base UUID.

# After indexing and retrieval checks pass, attach it to the agent.
doctl gradient knowledge-base attach \
  "$CUSTOMER_AGENT_ID" "$CUSTOMER_KB_ID"

Note: The AWS CLI here is simply an S3-compatible client for DigitalOcean Spaces—no AWS account is involved. The README includes the indexing waits and retrieval checks. Once attached, the knowledge base supplies policy context through the managed agent’s built-in retrieval.

Configuring an agent, defining its tools and attaching its knowledge sources was exactly the experience I was looking for: managed services handling the common agent plumbing, leaving me to focus on what differentiates the solution. As a Salesforce architect, I’m used to that level of abstraction. This felt familiar—Agent Script for defining behaviour, Apex invocable actions for business logic, and Data 360-backed data libraries for document ingestion and indexing.

Building the support console

The other side of this scenario is how support tickets are managed and how that process is augmented by an AI agent with different access and guidelines from the customer-facing agent. This is what the support console looks like—again, it’s a React application communicating with the application API we discussed above.
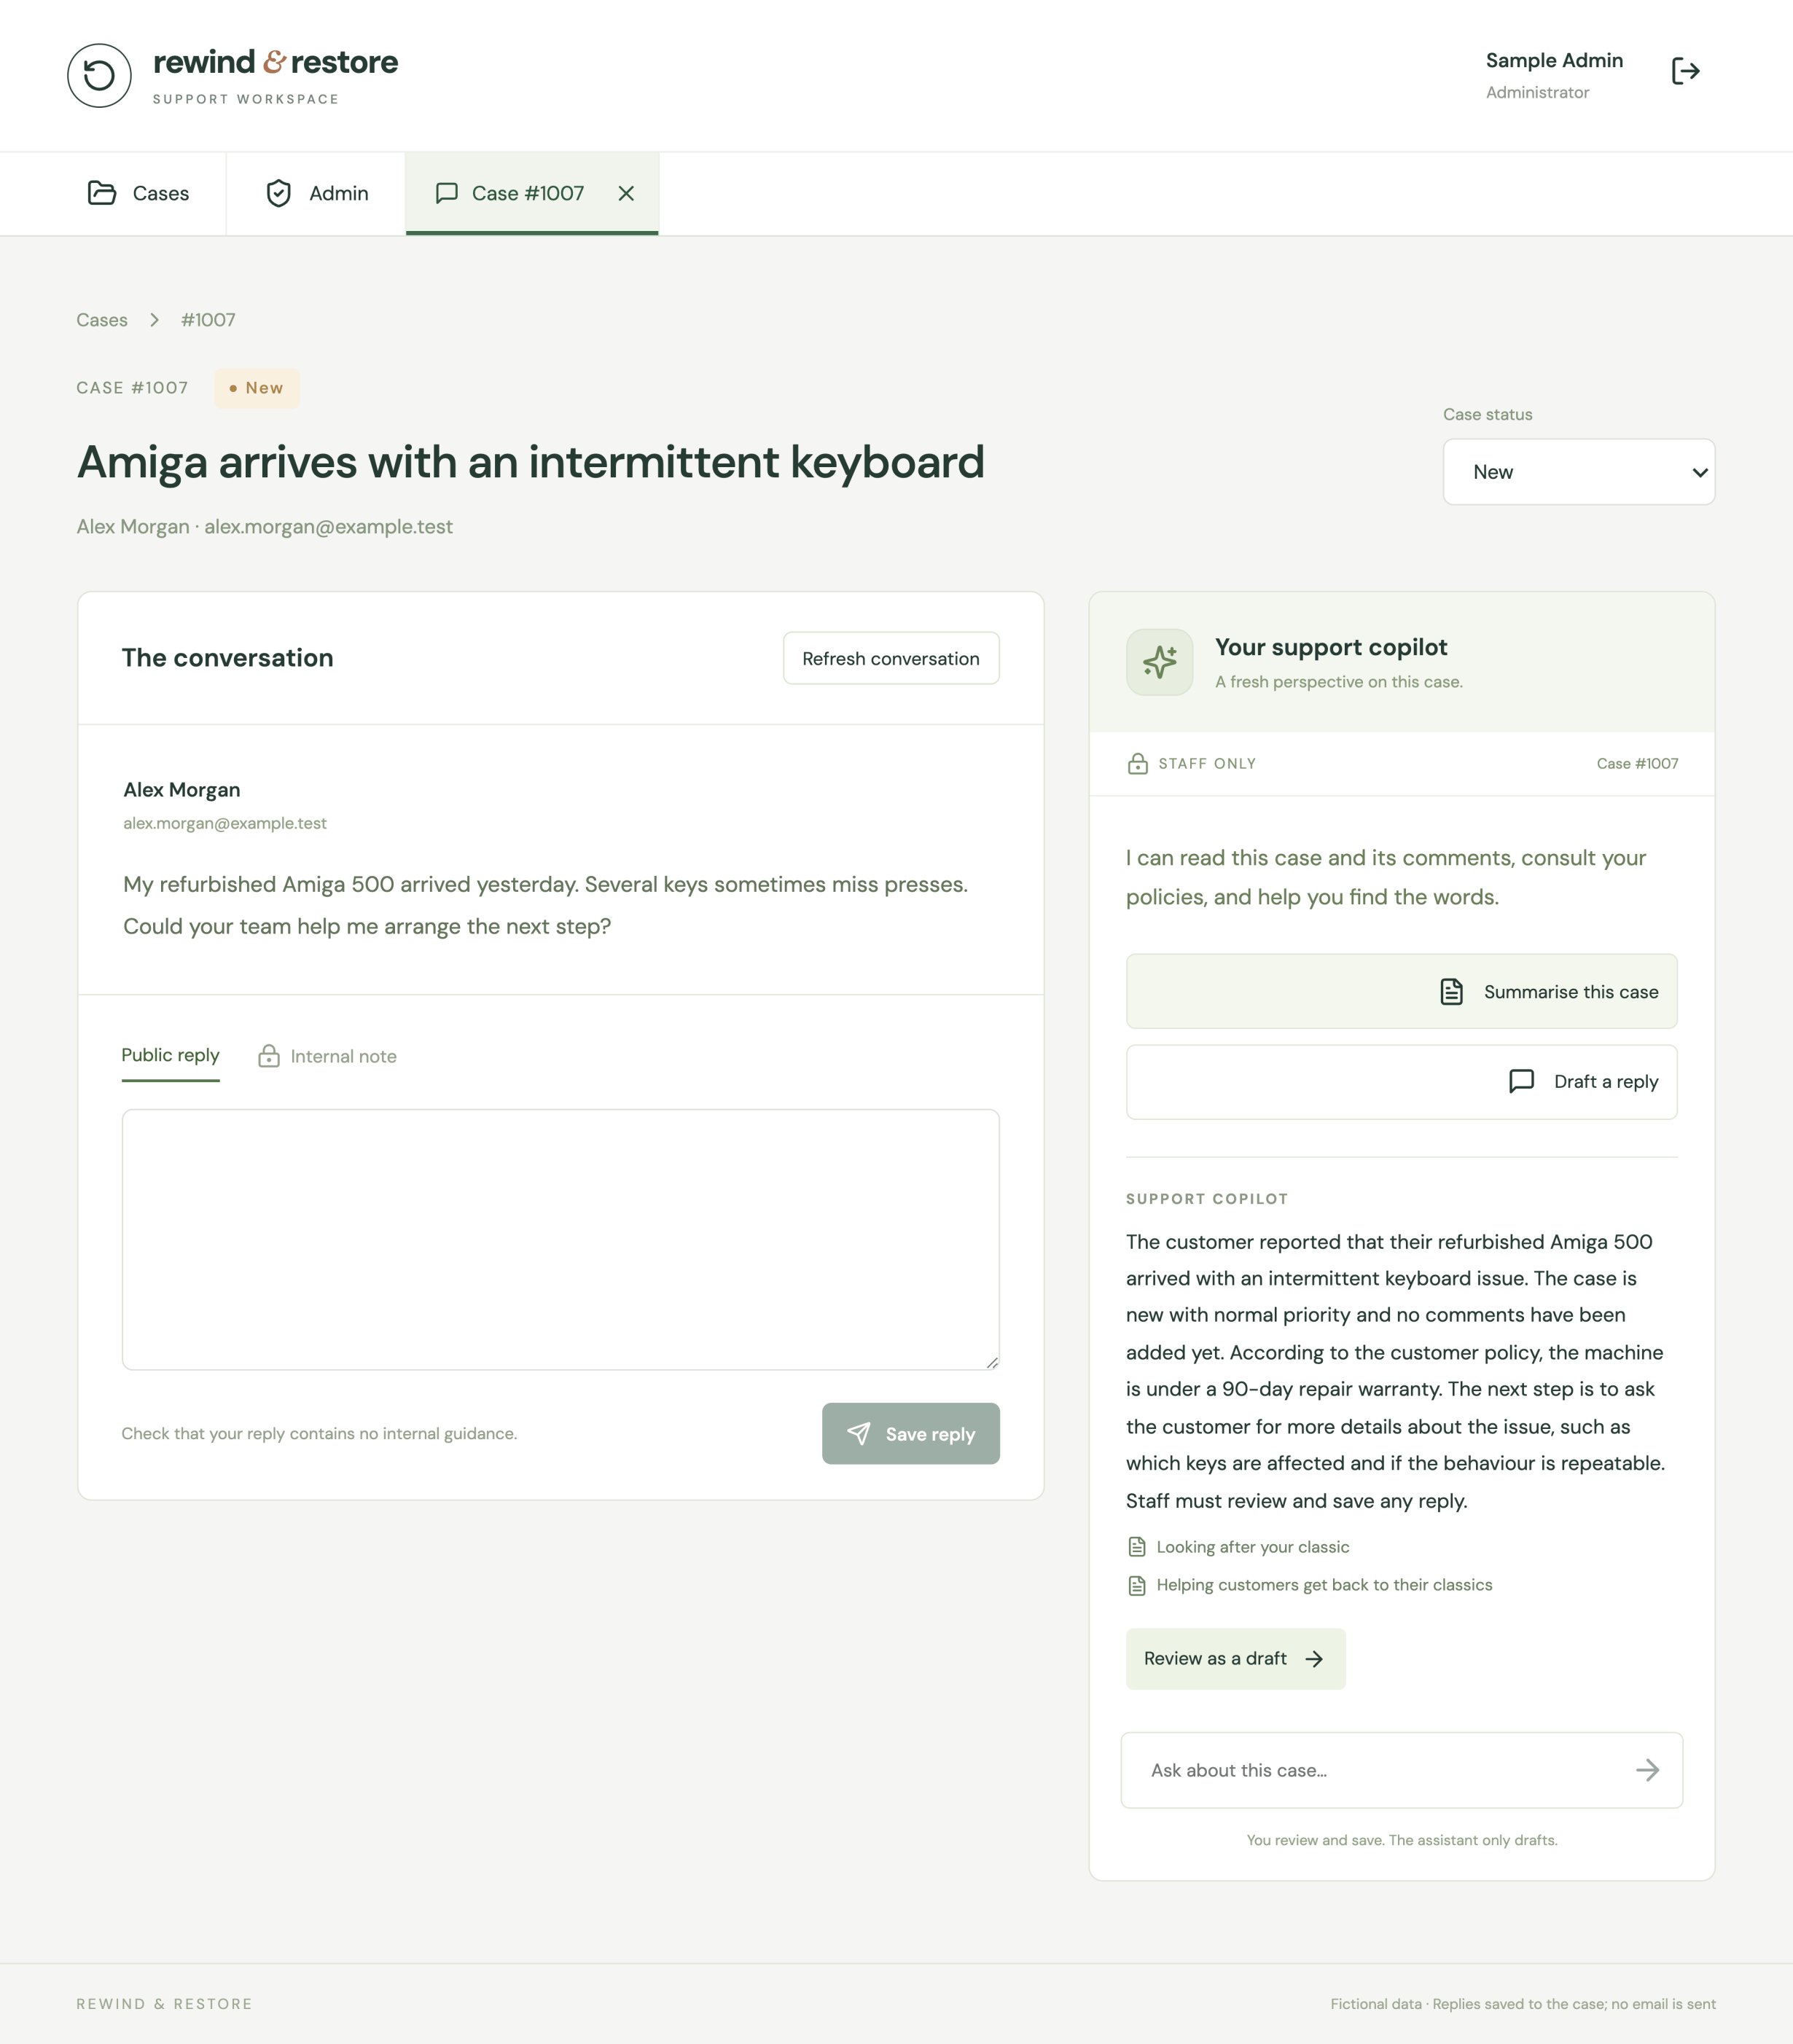
The Rewind  Restore support console showing a customer case and the staff support copilot.

The staff agent has different tools and access to both the customer policy and internal guidance. It can read cases and comments, summarise the issue and draft a reply; staff remain responsible for reviewing and saving changes. At this stage, I’m appreciating how much of my work is composing managed capabilities rather than maintaining the underlying agent infrastructure. I still needed to implement the application-specific tools, but that’s where the value of this solution belongs.

The support agent tools are again implemented as Functions that delegate to the application API, so I won’t go into those in detail here. The CLI commands to register them follow the same pattern as above. What I did need to define, of course, were this agent’s goals and constraints. Here’s an excerpt from its instructions:

You are Rewind & Restore's internal support assistant. Use the published
customer policy and internal staff guidance to help authenticated staff
summarise a selected case and draft replies.

Distinguish reported symptoms from confirmed facts. Cite relevant policy
document titles and sections. Say when evidence is missing. Internal triage
markers and staff deliberations belong only in internal notes; omit them
from customer-facing drafts.

You can read and draft only. You cannot save a reply, change status or
priority, approve a refund, or create a case. A staff member must review
and explicitly save changes in the support app. Never claim a write
occurred. If a tool fails, explain that the record could not be read
rather than inventing its contents.

Access differs between the two agents: the customer agent gets the published customer policy and its case-creation tool, while the staff agent can also retrieve internal guidance, with case access tied to the authenticated staff session and selected case. Policy uploads require administrator access. The API enforces application permissions, while knowledge access is configured by attaching the appropriate knowledge bases to each agent:

# Customer agent: published customer policy only.
doctl gradient knowledge-base attach \
  "$CUSTOMER_AGENT_ID" "$CUSTOMER_KB_ID"

# Staff agent: customer policy plus internal guidance.
doctl gradient knowledge-base attach \
  "$STAFF_AGENT_ID" "$CUSTOMER_KB_ID"

doctl gradient knowledge-base attach \
  "$STAFF_AGENT_ID" "$INTERNAL_KB_ID"

The Admin page also lets staff manage policy documents through the same API, uploading PDFs to DigitalOcean Spaces and connecting to the DigitalOcean Knowledge Base service to start indexing and check when the updated policies are ready for retrieval. The architecture below shows how both views of the support console use the same API, alongside the staff agent and policy upload flow.
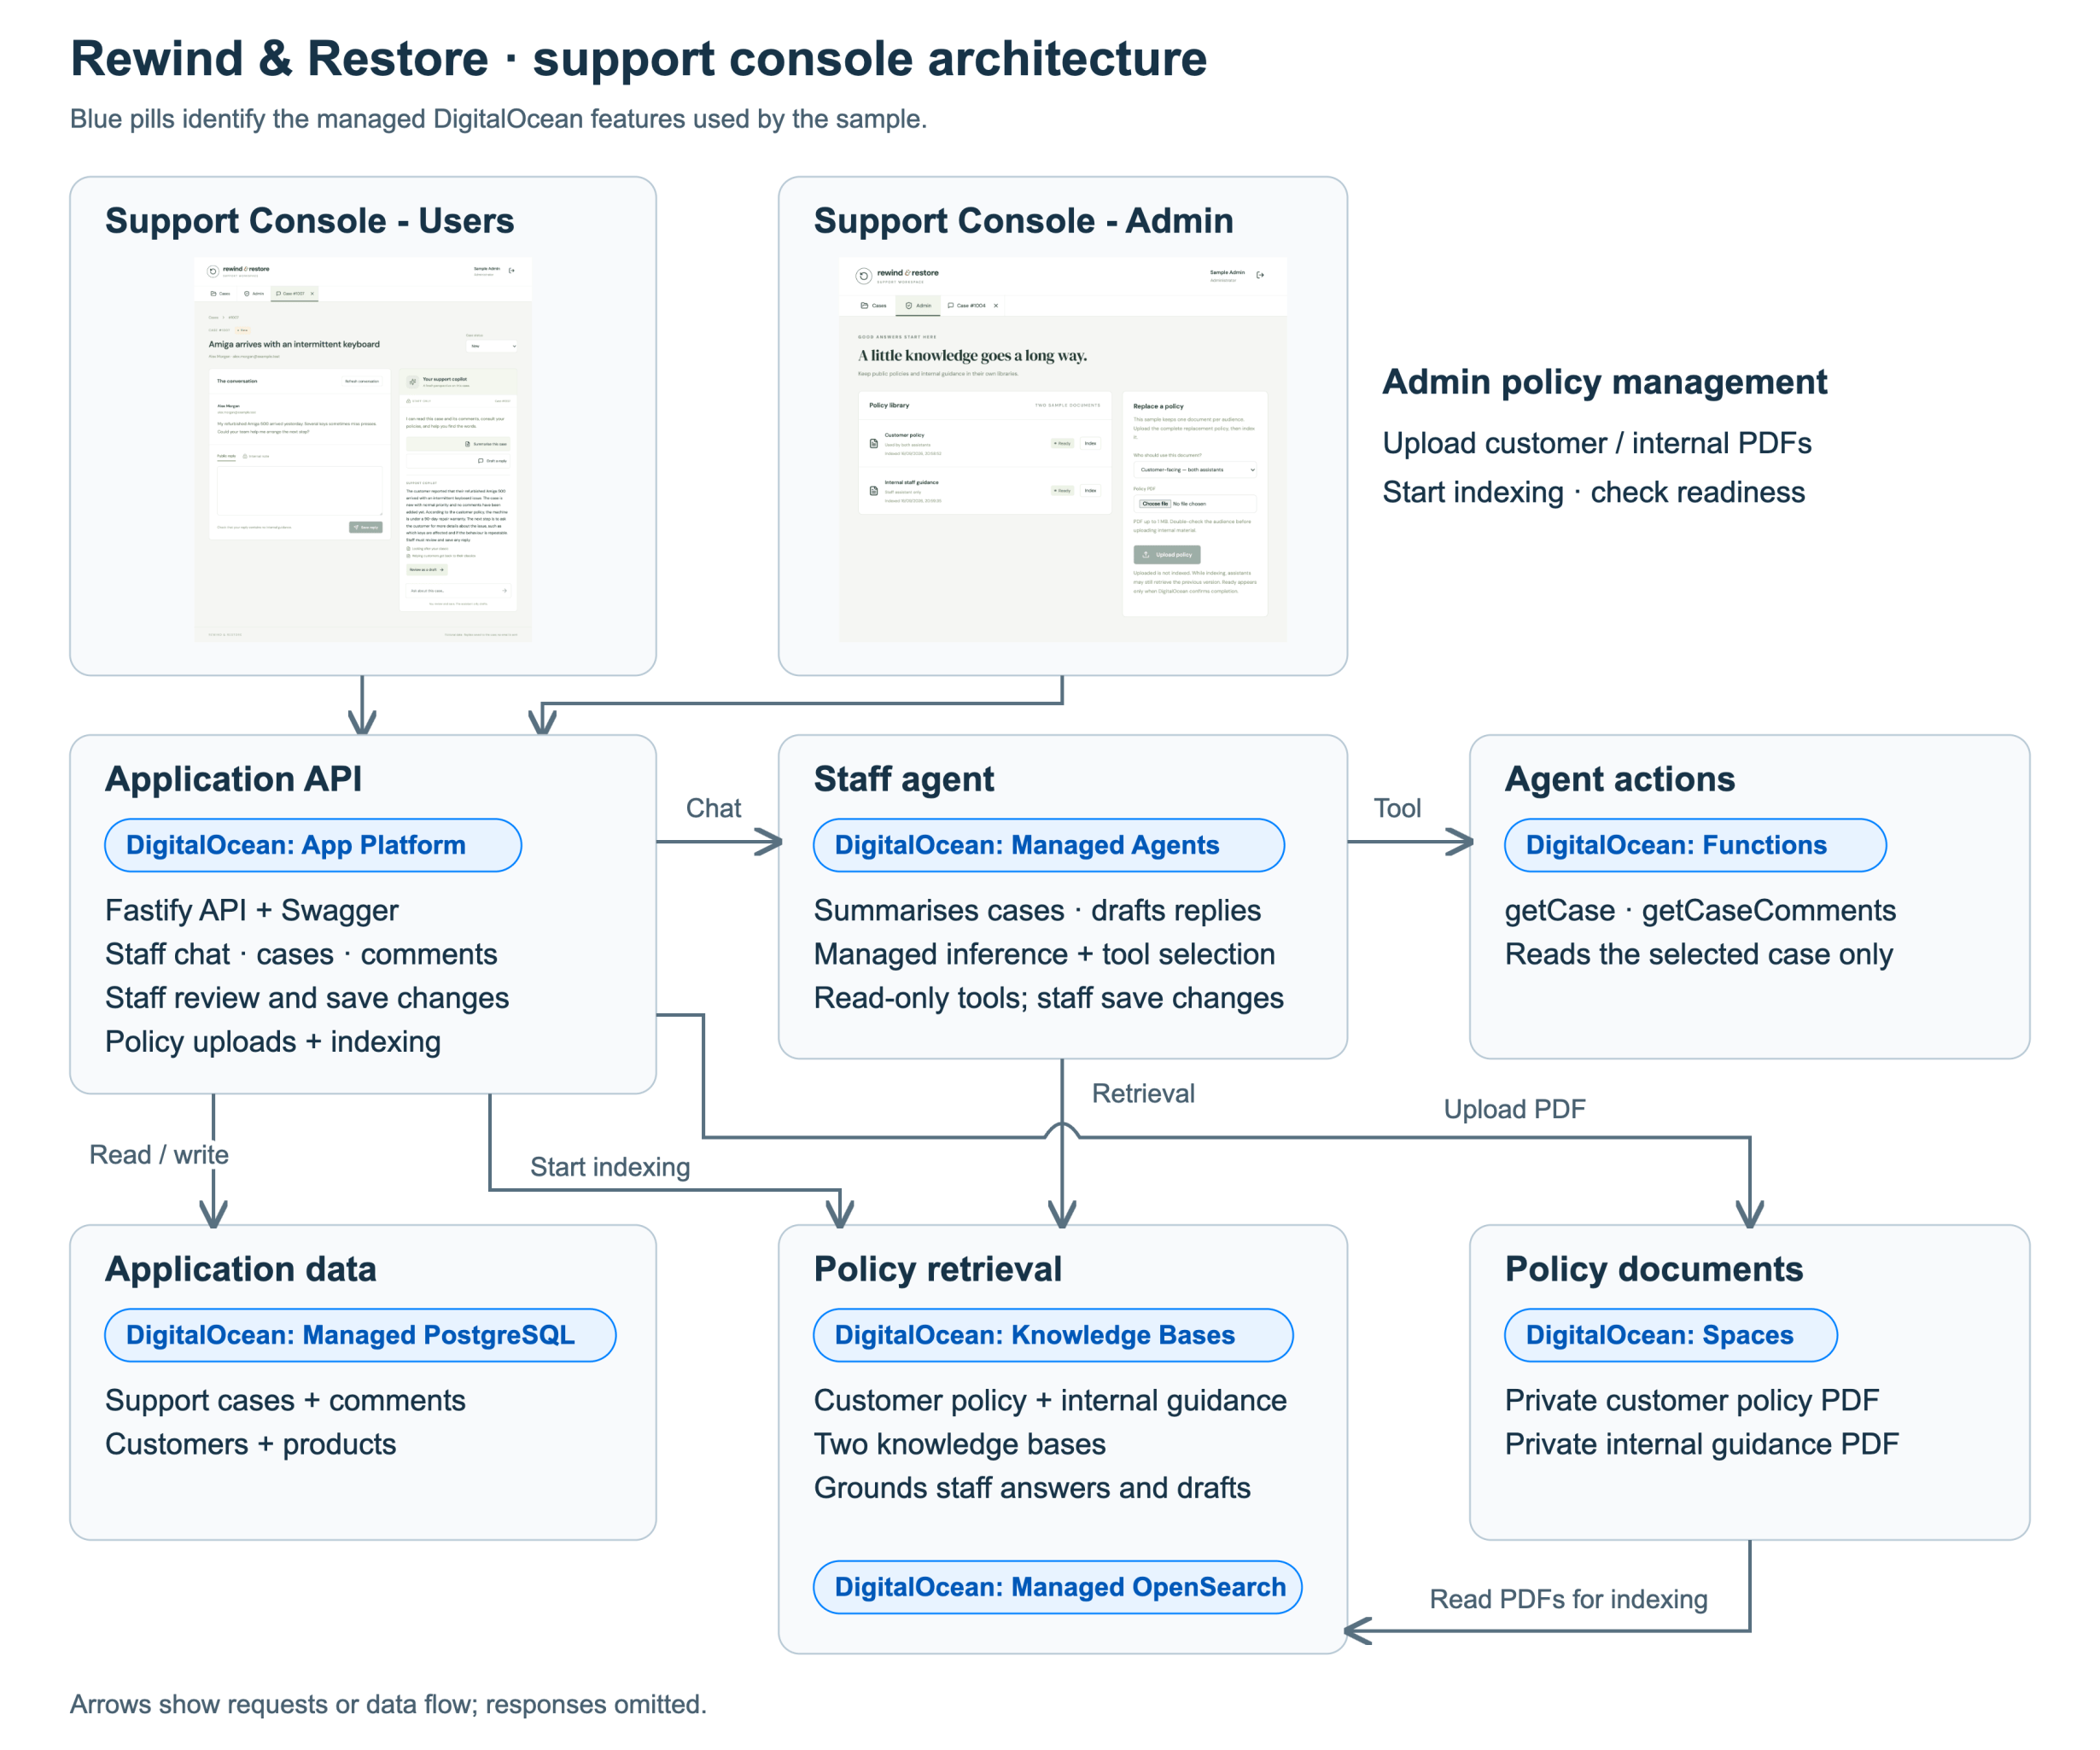
The React support console uses a Fastify API, a managed staff agent with read-only case tools, and customer and internal policy knowledge bases. Staff review and save changes through the application.

What’s new here is policy management: the API uploads PDFs to Spaces and calls DigitalOcean’s Knowledge Base API to start indexing. As I mentioned in a previous blog, I want more products and services to take API-first seriously—and this is another example of why. APIs rock!

Here is a simplified excerpt from services/api/src/services/policies.ts:

// Simplified excerpts: validation, error handling and status tracking omitted.

// Upload the PDF to the Spaces location configured for the knowledge base.
await s3.send(new PutObjectCommand({
  Bucket: process.env.POLICY_BUCKET,
  Key: slot.key,
  Body: bytes,
  ContentType: "application/pdf",
  ACL: "private",
}));

// When staff select Index, start a knowledge-base indexing job.
const response = await fetch(
  "https://api.digitalocean.com/v2/gen-ai/indexing_jobs",
  {
    method: "POST",
    headers: {
      Authorization: `Bearer ${process.env.DIGITALOCEAN_TOKEN}`,
      "Content-Type": "application/json",
    },
    body: JSON.stringify({
      knowledge_base_uuid: row.knowledge_base_id,
    }),
  },
);

Note: Although this code uses the AWS SDK and S3-compatible API calls, the storage is DigitalOcean Spaces, managed through your DigitalOcean account. No AWS account is required.

Deploying the Sample Apps

While the CLI examples above show the individual operations involved, I used Terraform in the accompanying sample to bring the infrastructure setup together and reduce the number of manual steps. DigitalOcean’s Terraform provider manages most of those resources, with a small amount of direct API configuration covering gaps in the provider. Application image builds and Function deployment remain explicit CLI commands. Follow the sample README for the complete deployment sequence.

Conclusion

My baseline expectations for managed services when developing cloud native apps come from a combination of the declarative aspects of Salesforce and the power and ease of Heroku DX. My experience using DigitalOcean has met those expectations and, in fact, goes beyond them. As we go further into delivering AI-enabled capabilities, the complexity keeps going up—and so does the opportunity for providers such as DigitalOcean to offer new abstractions.

The ability to manage my compute and index my data in the way AI demands is now commonplace, but allowing me to define my actions, tools and policies, with services that manage the data and offer their own security controls, delivers the next level of abstraction. The net effect is keeping me focused where I need to spend my time and innovation—the value of my actual solution, rather than how it’s built.

The Rewind & Restore storefront and support console have been a large part of this blog, and I’m pleased to offer them for you to explore further yourself.

Enjoy!


Leave a comment

Exploring DigitalOcean as a Managed AI Path for Salesforce

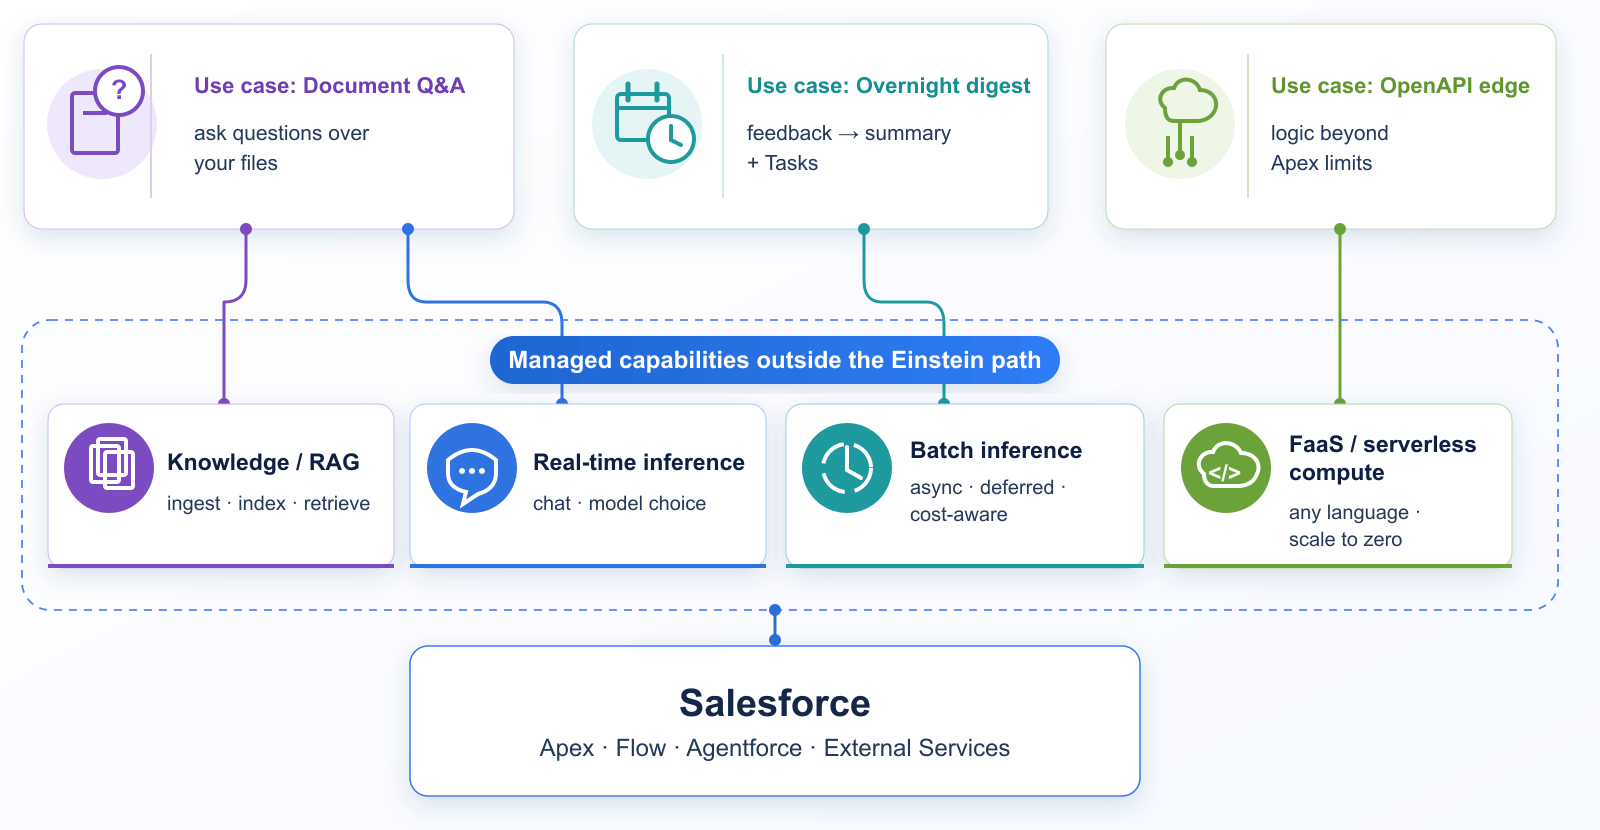
Choice fuels innovation—but it can also tip into analysis paralysis. On Salesforce, the native and often default AI path is Einstein and associated tools such as Prompt Builder and Agent Builder. That works well for many teams, yet cost, usage patterns, the weight of an Einstein dependency or broader strategic preferences can push app developers elsewhere—especially when you want close access and control over the models, data, and processing yourself. So: as a Salesforce developer, can you choose an alternative AI stack without going bare-metal and managing your own AI infrastructure?

In this blog I am use-case driven to help ground (pardon the pun) the exploration of alternatives to Salesforce’s own flavour of AI. The compute use case does not arguably need to be part of this—but it often comes hand in hand with building more complex AI solutions—so I wanted to include it. For this blog, I’ve partnered with DigitalOcean to explore their platform as an alternative to consider—through its own managed AI capabilities, and its FaaS serverless compute offering. Before we dive in—as always, please rest assured, my views are my own!

Until recently, Heroku was a good way to go beyond the Einstein based offerings, as Salesforce owned powerful PaaS for developers, with any-language support, scale, and a strong set of AI addons delivered in true Heroku style: fully managed DX and APIs. And even more recently the new AppLink feature that extended Salesforce org computational tasks beyond Apex and its limits to other languages. Alas with Heroku effectively moving to maintenance mode, we are still looking for alternatives.

We’ll explore DigitalOcean’s FaaS and managed inference features and how they can be integrated into Salesforce. What I found is that while the DX is different, the commitment to keep things simple is still present and helps keep us focused on the logic. There is even support for build packs and the recently graduated Cloud Native Buildpack standard. If you want to try the demos yourself, the sample code and deploy steps are in digitalocean-salesforce-demos. Prefer to skip the technical bits? Feel free to jump to the summary at the end.

Functions as a Service

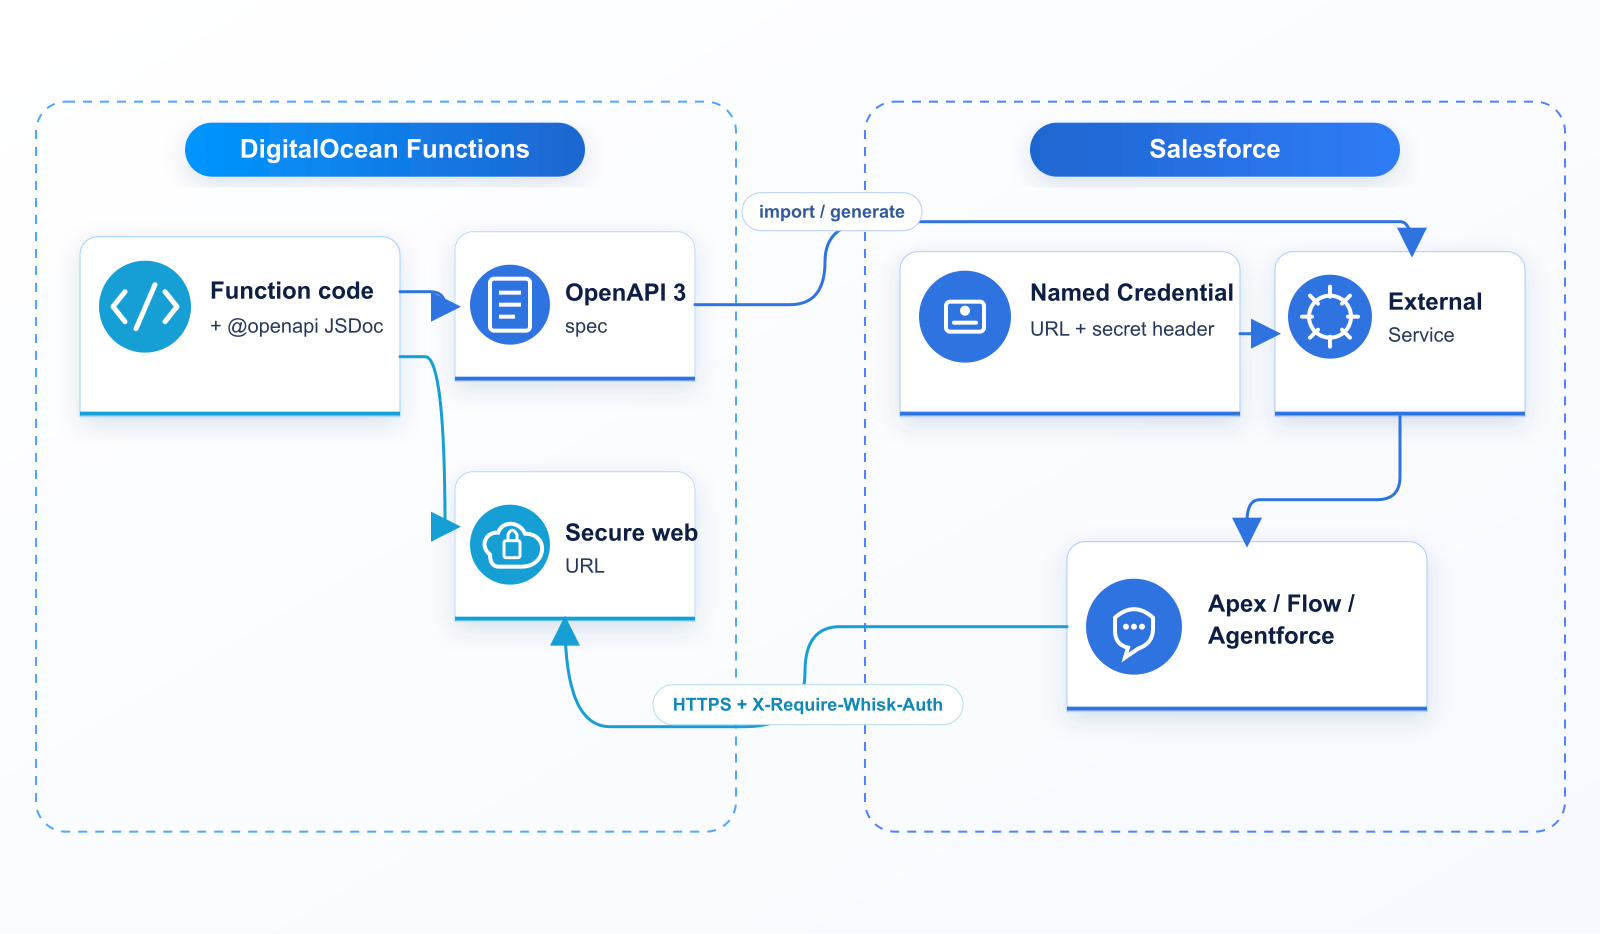
Let’s start with FaaS. This is closer to Heroku apps, but serverless by design and scales to zero. As a result you need far less code and plumbing—no web server in your app or dependencies—just write the code and deploy it. And to ease Salesforce integration, as with Heroku AppLink, the Functions I created also support an OpenAPI schema.

I’m a big fan of contract-driven APIs—and of keeping that contract close to the implementation. So I used Swagger tooling to inline OpenAPI annotations in the function code, then post-process them into the OpenAPI spec External Services needs.

/**
 * @openapi
 * /hello:
 *   get:
 *     operationId: hello
 *     summary: Hello from DigitalOcean
 *     parameters:
 *       - name: name
 *         in: query
 *         schema: { type: string }
 *     responses:
 *       '200':
 *         description: Greeting
 *         content:
 *           application/json:
 *             schema:
 *               $ref: '#/components/schemas/HelloResponse'
 *   post:
 *     operationId: helloPost
 *     # …same greeting via JSON body { "name": "…" }
 */
/**
 * @openapi
 * components:
 *   schemas:
 *     HelloResponse:
 *       type: object
 *       properties:
 *         message: { type: string }
 *         name: { type: string }
 *         source: { type: string }
 */
// Build the greeting payload returned to the caller
function greet(name) {
  const who = (name && String(name).trim()) || 'world'
  return {
    message: `Hello from DigitalOcean, ${who}!`,
    name: who,
    source: 'DigitalOcean Functions',
  }
}
// DigitalOcean Functions entry point
function main(event = {}) {
  return {
    statusCode: 200,
    headers: { 'Content-Type': 'application/json' },
    body: greet(event.name),
  }
}
module.exports.main = main

The required files are incredibly minimal: a single .js file and a project.yml that describes the function(s) in the deployment. At a basic level, our Function looks like this:

packages/sfdemo/
└── hello/
    └── hello.js    # Function + @openapi JSDoc
project.yml         # package/function config for doctl

In our project.yml we declare that it’s a public web Function and requires Secure Web authentication—with the secret stored in an environment variable.

packages:
  - name: sfdemo
    functions:
      - name: hello
        runtime: nodejs:22
        web: true
        # Secure Web Function — callers send X-Require-Whisk-Auth
        webSecure: ${DO_FUNCTIONS_WEB_SECRET}

After that, the following doctl commands stand up an environment and deploy the Functions. Once they’re deployed—and you include the secret—you’re good to start calling your Function.

# Authenticate doctl and install the serverless plugin
doctl auth init
doctl serverless install
doctl serverless namespaces create --label sfdemo --region nyc1

# Project root + Secure Web Function secret
cd blog/playgrounds/functions
echo "DO_FUNCTIONS_WEB_SECRET=$(openssl rand -hex 32)" >> .env

# Build & deploy the Functions package
doctl serverless deploy . --remote-build

# Call with the Secure Web Function secret
SECRET=$(grep '^DO_FUNCTIONS_WEB_SECRET=' .env | cut -d= -f2-)
URL=$(doctl serverless functions get sfdemo/hello --url)
curl -sS -H "X-Require-Whisk-Auth: ${SECRET}" \
  -G "${URL}" --data-urlencode "name=Salesforce" | jq .

# Function response
{
  "message": "Hello from DigitalOcean, Salesforce!",
  "name": "Salesforce",
  "source": "DigitalOcean Functions"
}

Out of the box authentication options are limited. For public Functions you can use a secret-based token, roll your own auth, or you can make Functions private and invokable only via the DigitalOcean Functions APIs. The samples here are public and use secret-based auth—and when they call back into Salesforce, authentication is via admin-approved users.

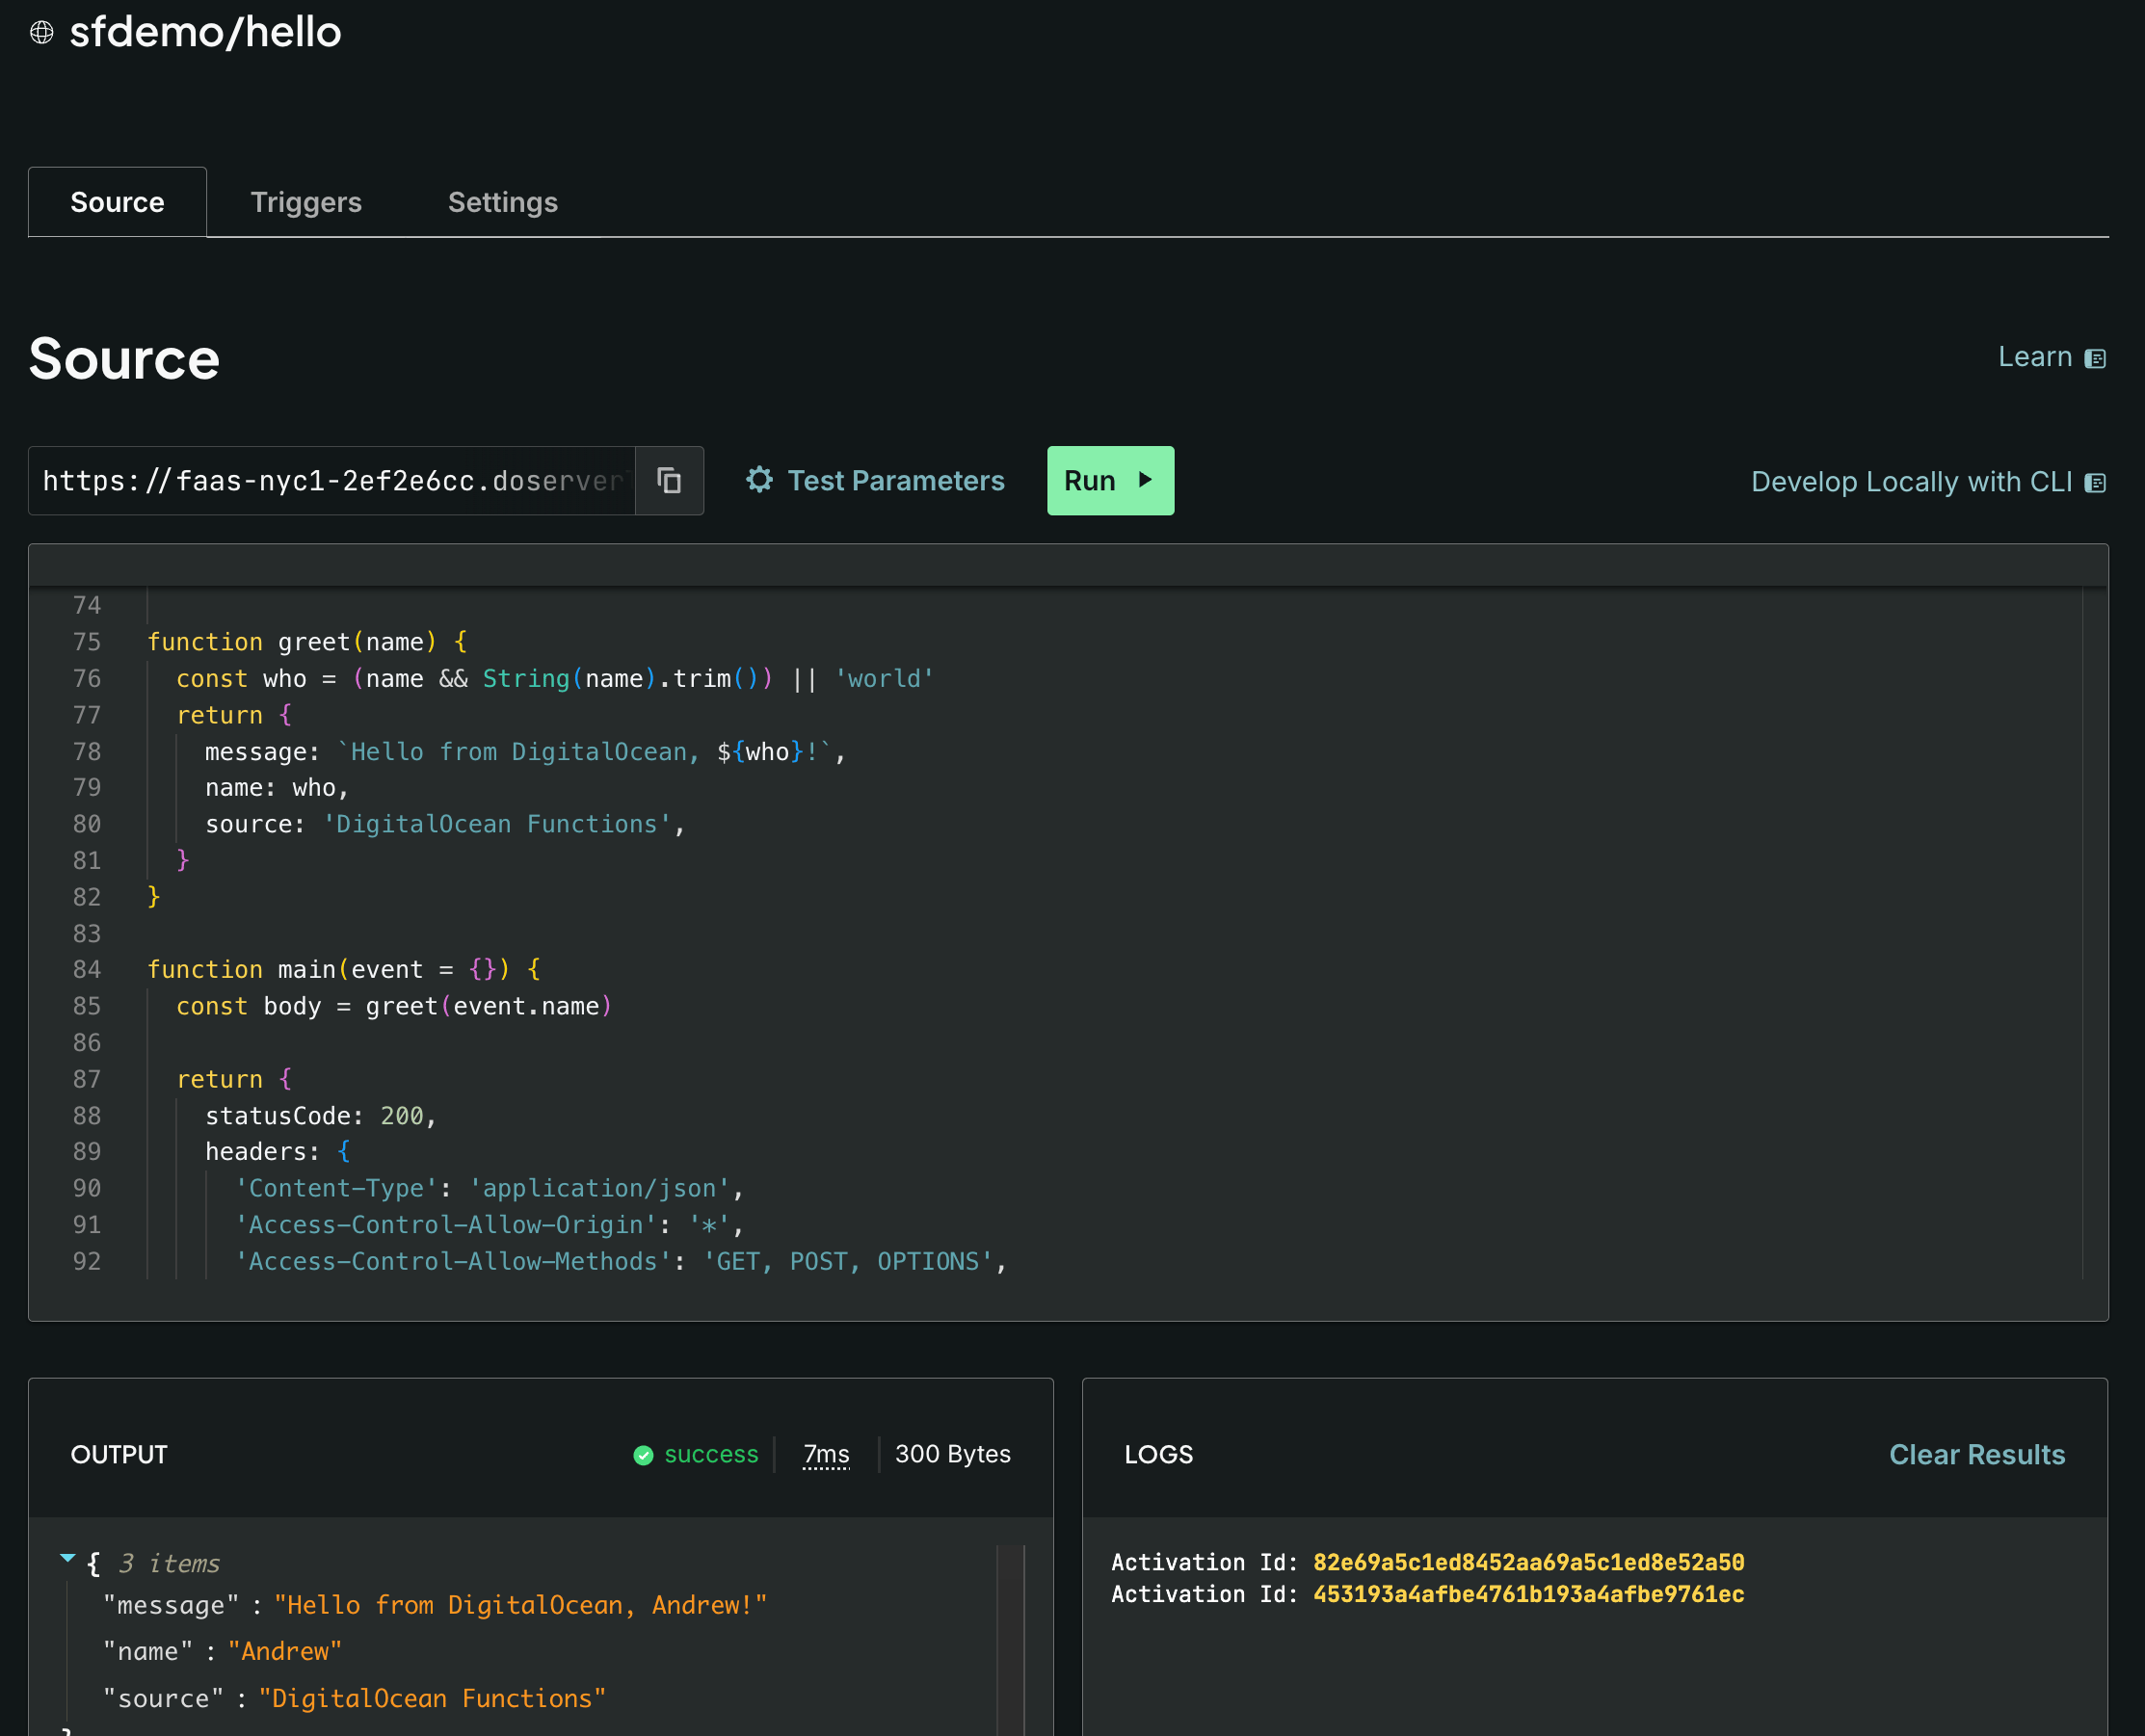
DigitialOcean Dashboard provides a good overview of Functions deployed and allows you to see the code and test them out all within the dashboard – i personally prefer curl and CLI’s but this is a good feature for quick tests for sure:

To invoke this from within Salesforce via an External Service, you need a Named Credential that provides the URL and secret for authentication. I used Swagger tooling to generate an OpenAPI schema. You can click through the Setup pages to wire it all up—but since this is me, and to somewhat replicate what the Heroku AppLink CLI did for us, I automated it.

# Build OpenAPI from the @openapi JSDoc in each Function
npm run generate-openapi

# Sync Named Credential URL from doctl, generate External Service metadata,
# deploy EC/NC/ES, and push DO_FUNCTIONS_WEB_SECRET into the EC principal
./bin/functions-apex.sh setup

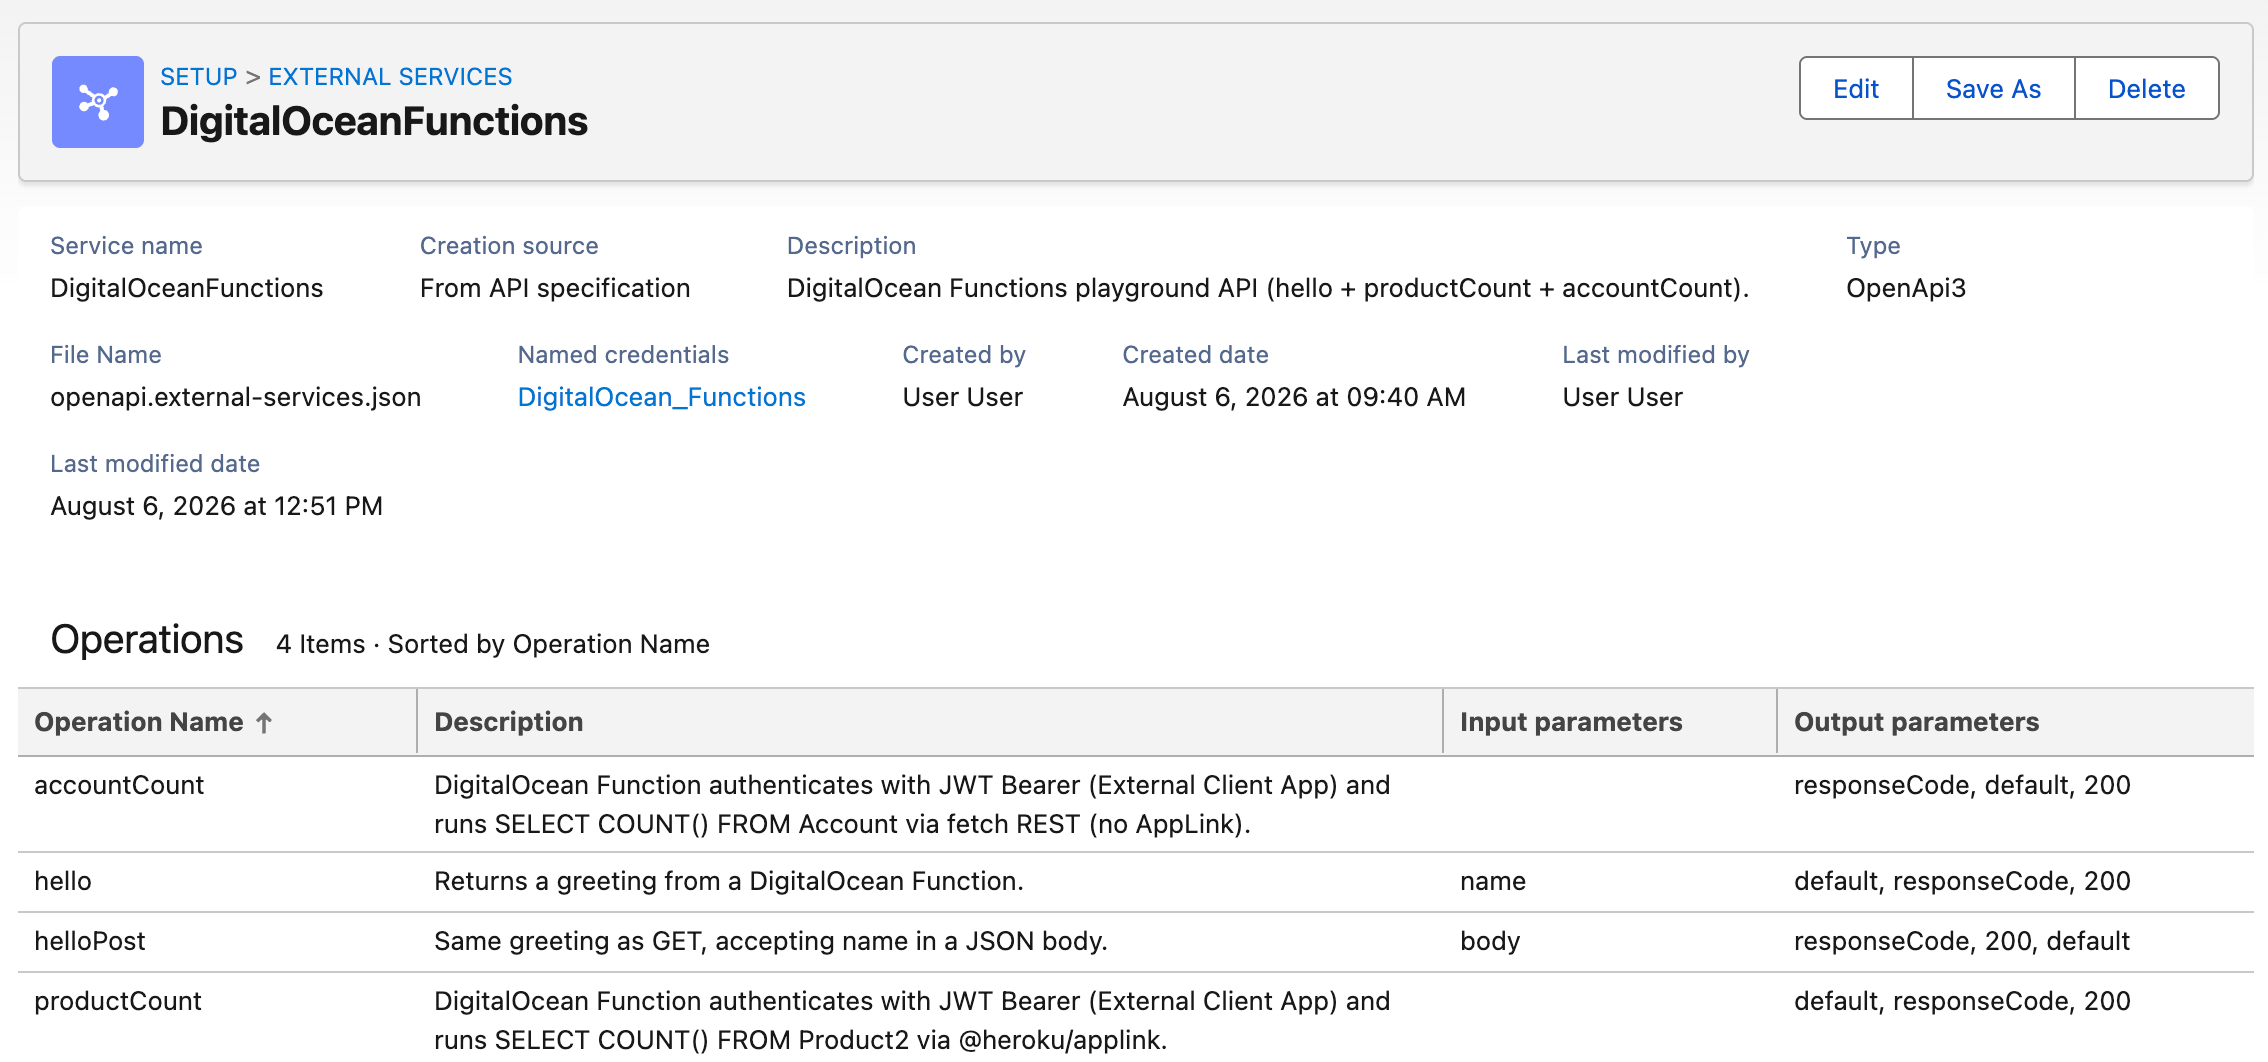
This resulted in an External Service that looks like this—the screenshot also shows the other sample operations wired from the same OpenAPI (helloPost, accountCount, and productCount). The accountCount Function is discussed below:

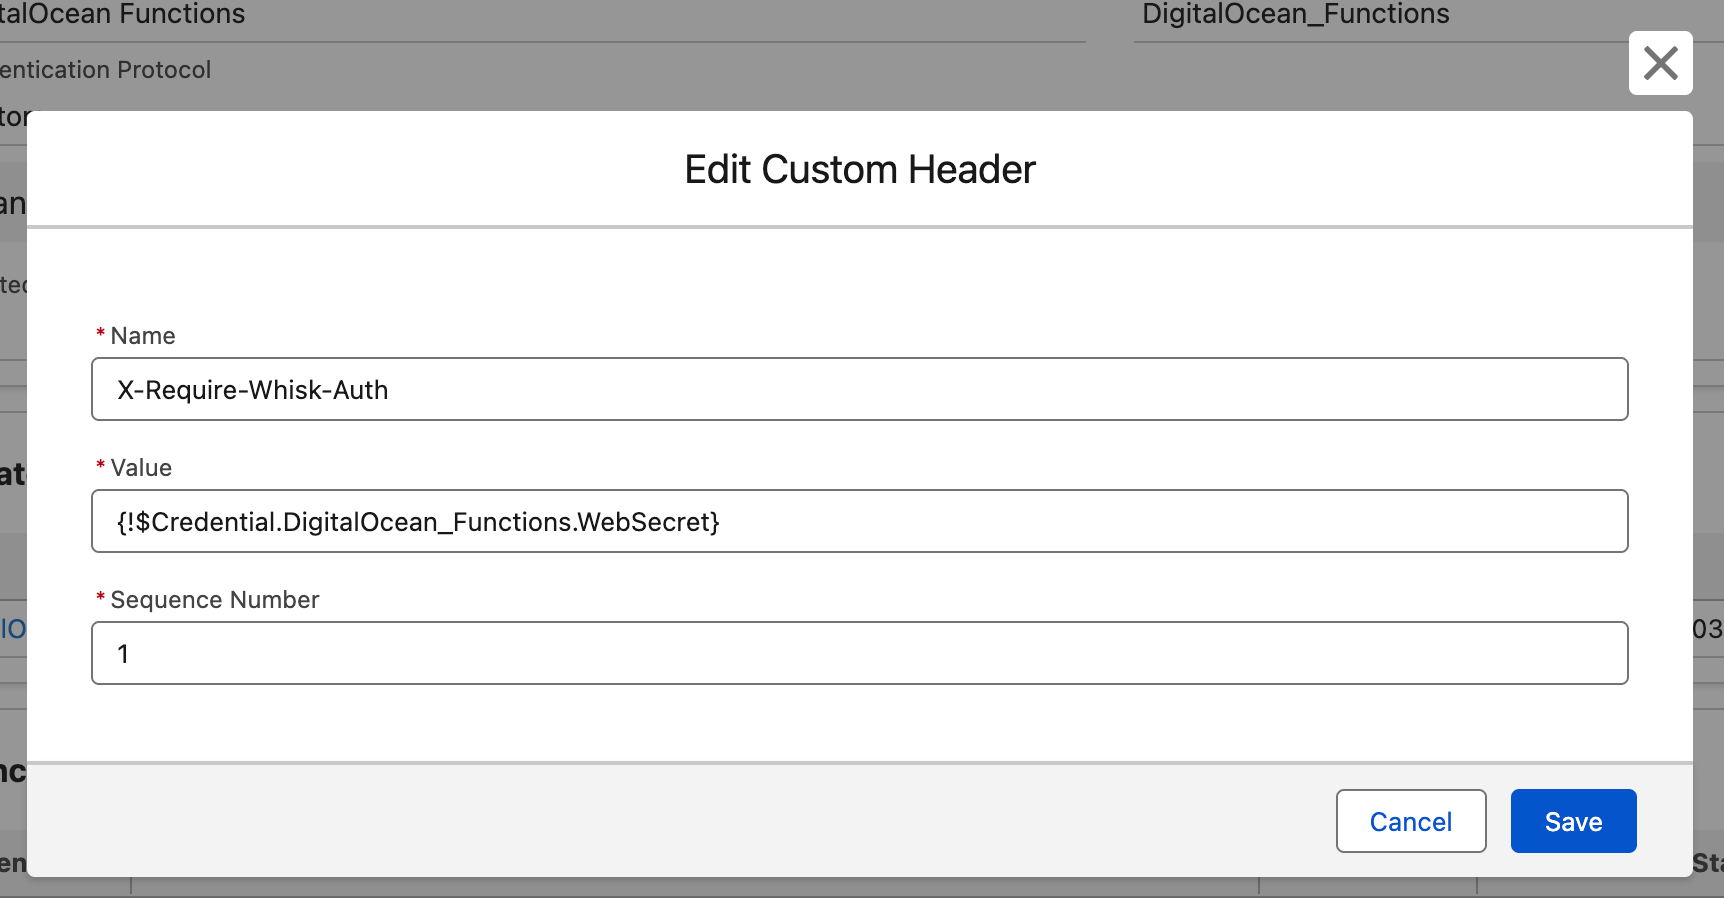
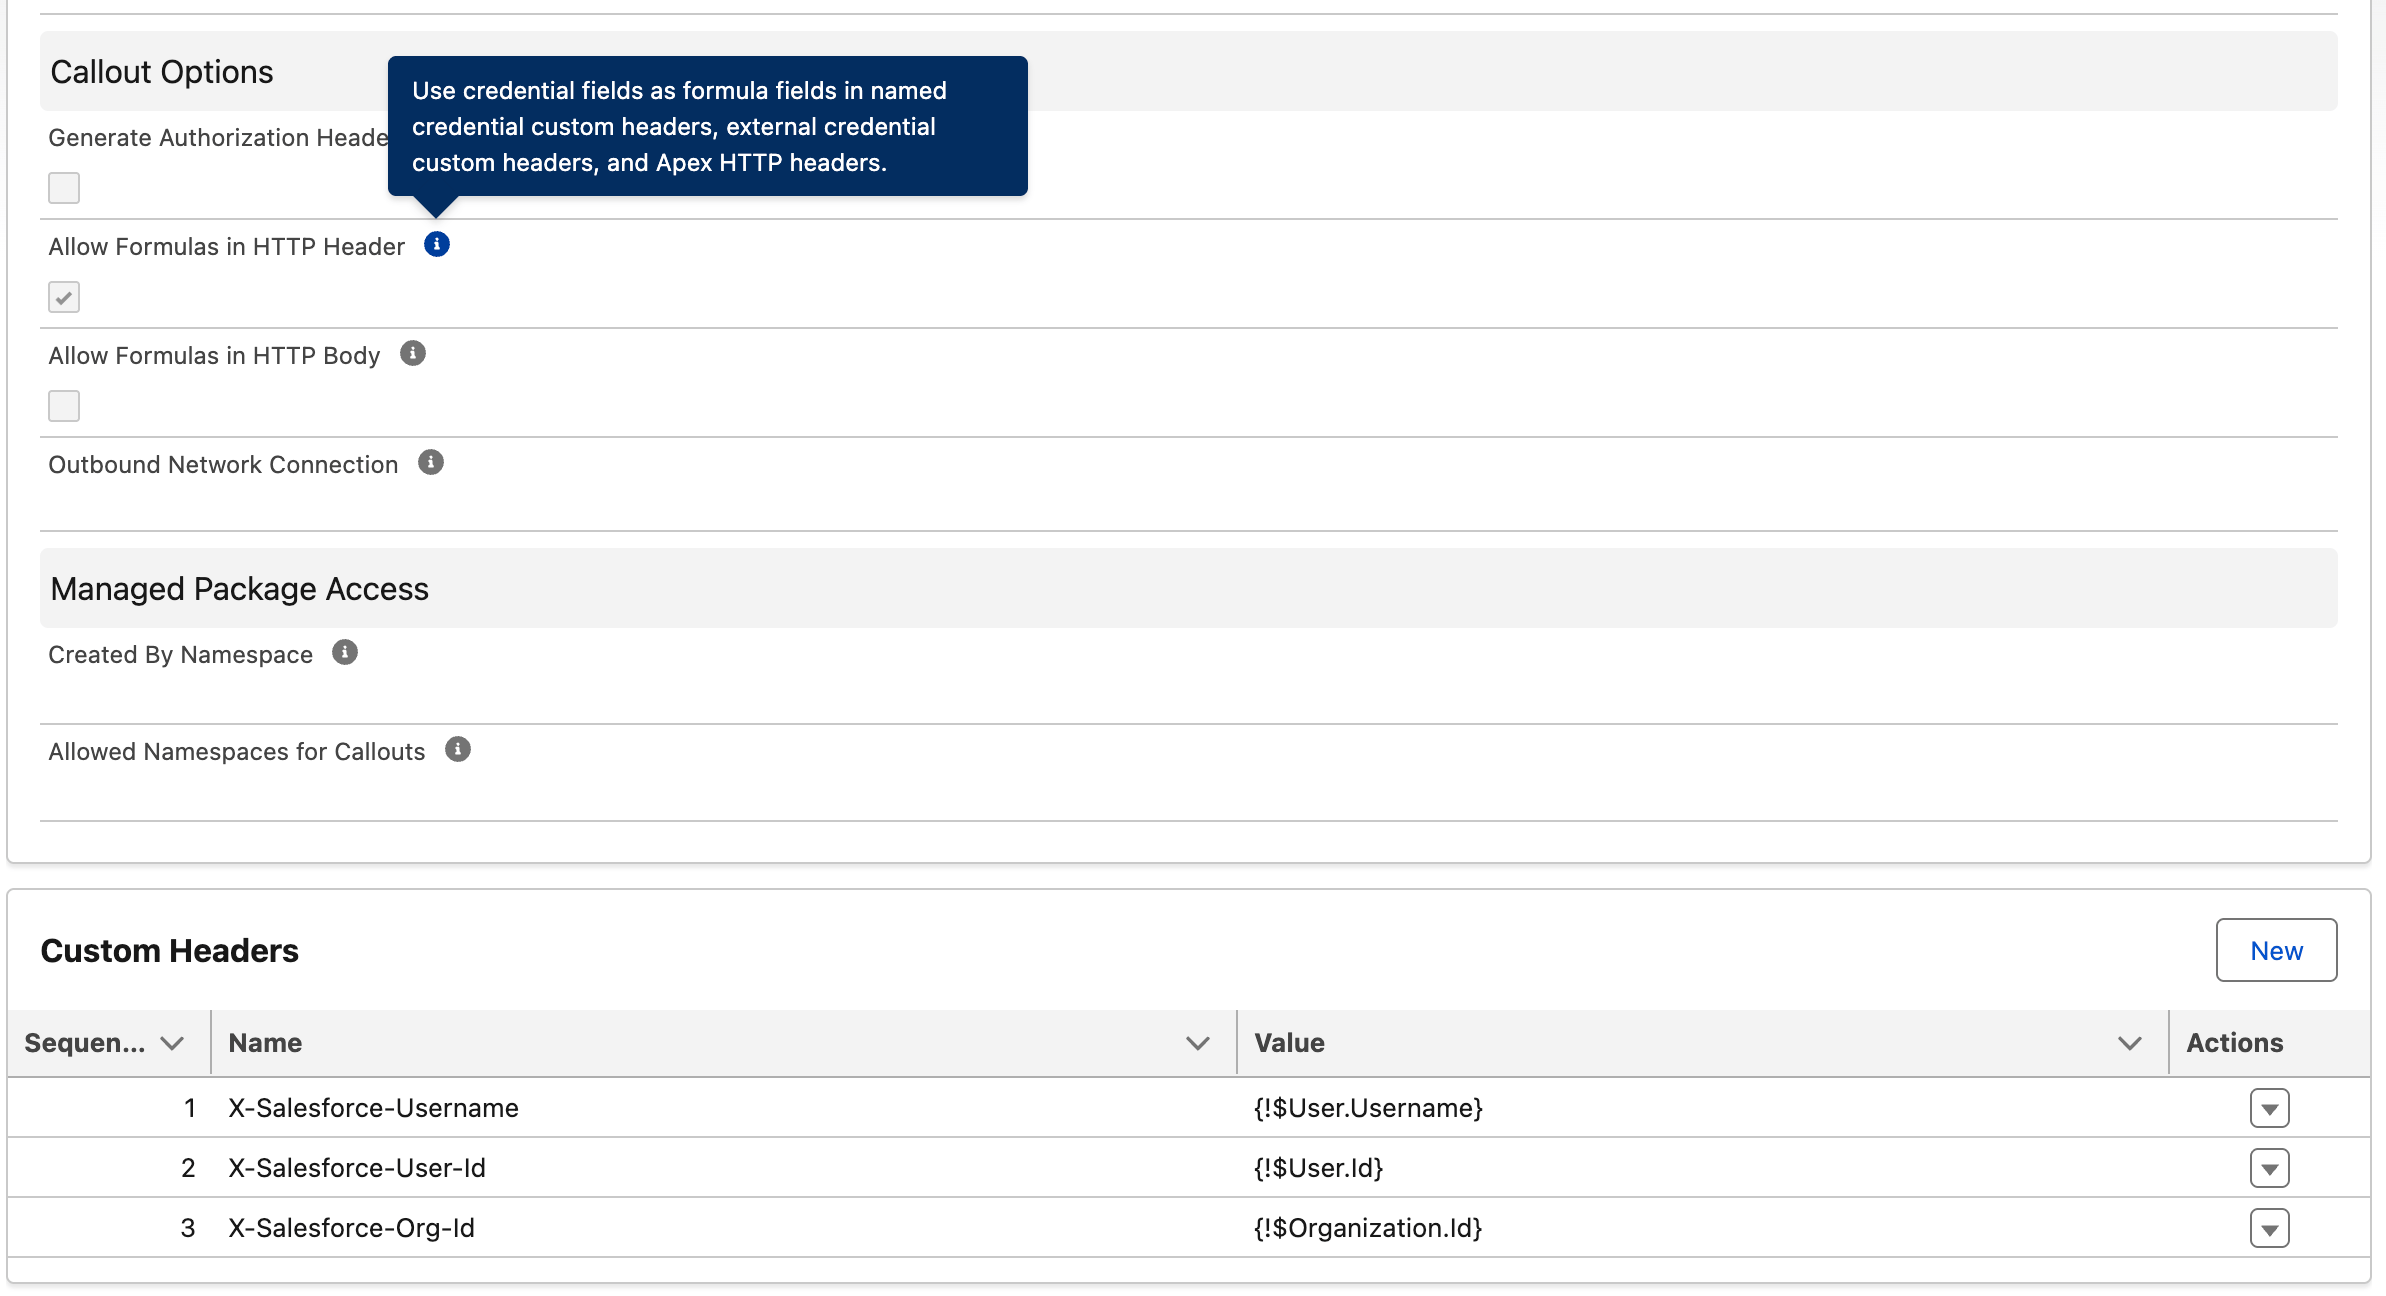
And under the Named Credential / External Credential, the Secure Web Function secret is passed as a custom header. Salesforce stores the actual credential value elsewhere in the External Credential configuration:

That then lets you call it from Apex like this:

// Generated External Service client for DigitalOceanFunctions
ExternalService.DigitalOceanFunctions svc =
    new ExternalService.DigitalOceanFunctions();

// Build the hello operation request
ExternalService.DigitalOceanFunctions.hello_Request req =
    new ExternalService.DigitalOceanFunctions.hello_Request();
req.name = 'Salesforce';

// Invoke the Function via Named Credential + External Service
ExternalService.DigitalOceanFunctions.hello_Response res = svc.hello(req);
System.debug(res.Code200.message);
// Hello from DigitalOcean, Salesforce!

If you’re not familiar with External Services, you might not know that they don’t just expose your Function to Apex. They also expose it to Flow—and even Agentforce—as actions for declarative builders in your org.

By leveraging External Client Apps (successors to Connected Apps) and OAuth JWT authentication, we can also give Function code callback access into the org—so Function logic can query and update Salesforce data (albeit limited by the current user’s permissions). Here’s a basic example that runs some SOQL to count Account records.

// JWT Bearer + REST helpers (username comes from Named Credential headers)
const sf = require('./salesforce')

// Authenticate as the calling user, then COUNT Accounts
async function countAccounts(event = {}) {
  const username = sf.usernameFromEvent(event)
  const token = await sf.getAccessToken(event, username)
  const result = await sf.query(
    token.access_token,
    token.instance_url,
    'SELECT COUNT() FROM Account',
    event
  )
  return {
    objectName: 'Account',
    count: result.totalSize,
    source: 'DigitalOcean Functions → Salesforce SOQL (JWT Bearer + fetch)',
  }
}

// DigitalOcean Functions entry point
async function main(event = {}) {
  try {
    return {
      statusCode: 200,
      headers: { 'Content-Type': 'application/json' },
      body: await countAccounts(event),
    }
  } catch (err) {
    return {
      statusCode: 500,
      headers: { 'Content-Type': 'application/json' },
      body: { error: err.message || String(err) },
    }
  }
}
module.exports.main = main

Not shown above is a set of helper routines that authenticate with Salesforce based on the calling user. We pass that user via another Named Credential feature—dynamic header values:

Fun Fact: I got the Heroku AppLink Node.js library working with this setup. That makes it easier to port existing AppLink code—and you get Unit of Work for transactional data access. Salesforce will likely keep shipping security fixes for paying customers, but not new features. To see it in action, check out the productCount Function in the sample repo.

Knowledge Bases – Retrieval Augmented Generation

These days it’s commonplace to have managed databases such as PostgreSQL that support vector similarity search (for example with pgvector). That often becomes the bedrock of pipelines that ingest documents, generate embeddings, and search them. DigitalOcean goes further with Knowledge Bases: an API to provision a knowledge base, upload files as data sources, and have the platform index them for later retrieval and semantic search. That managed path means less plumbing code on your side—so you can spend more time on the actual scenario: answering users’ real inquiries with the right context.

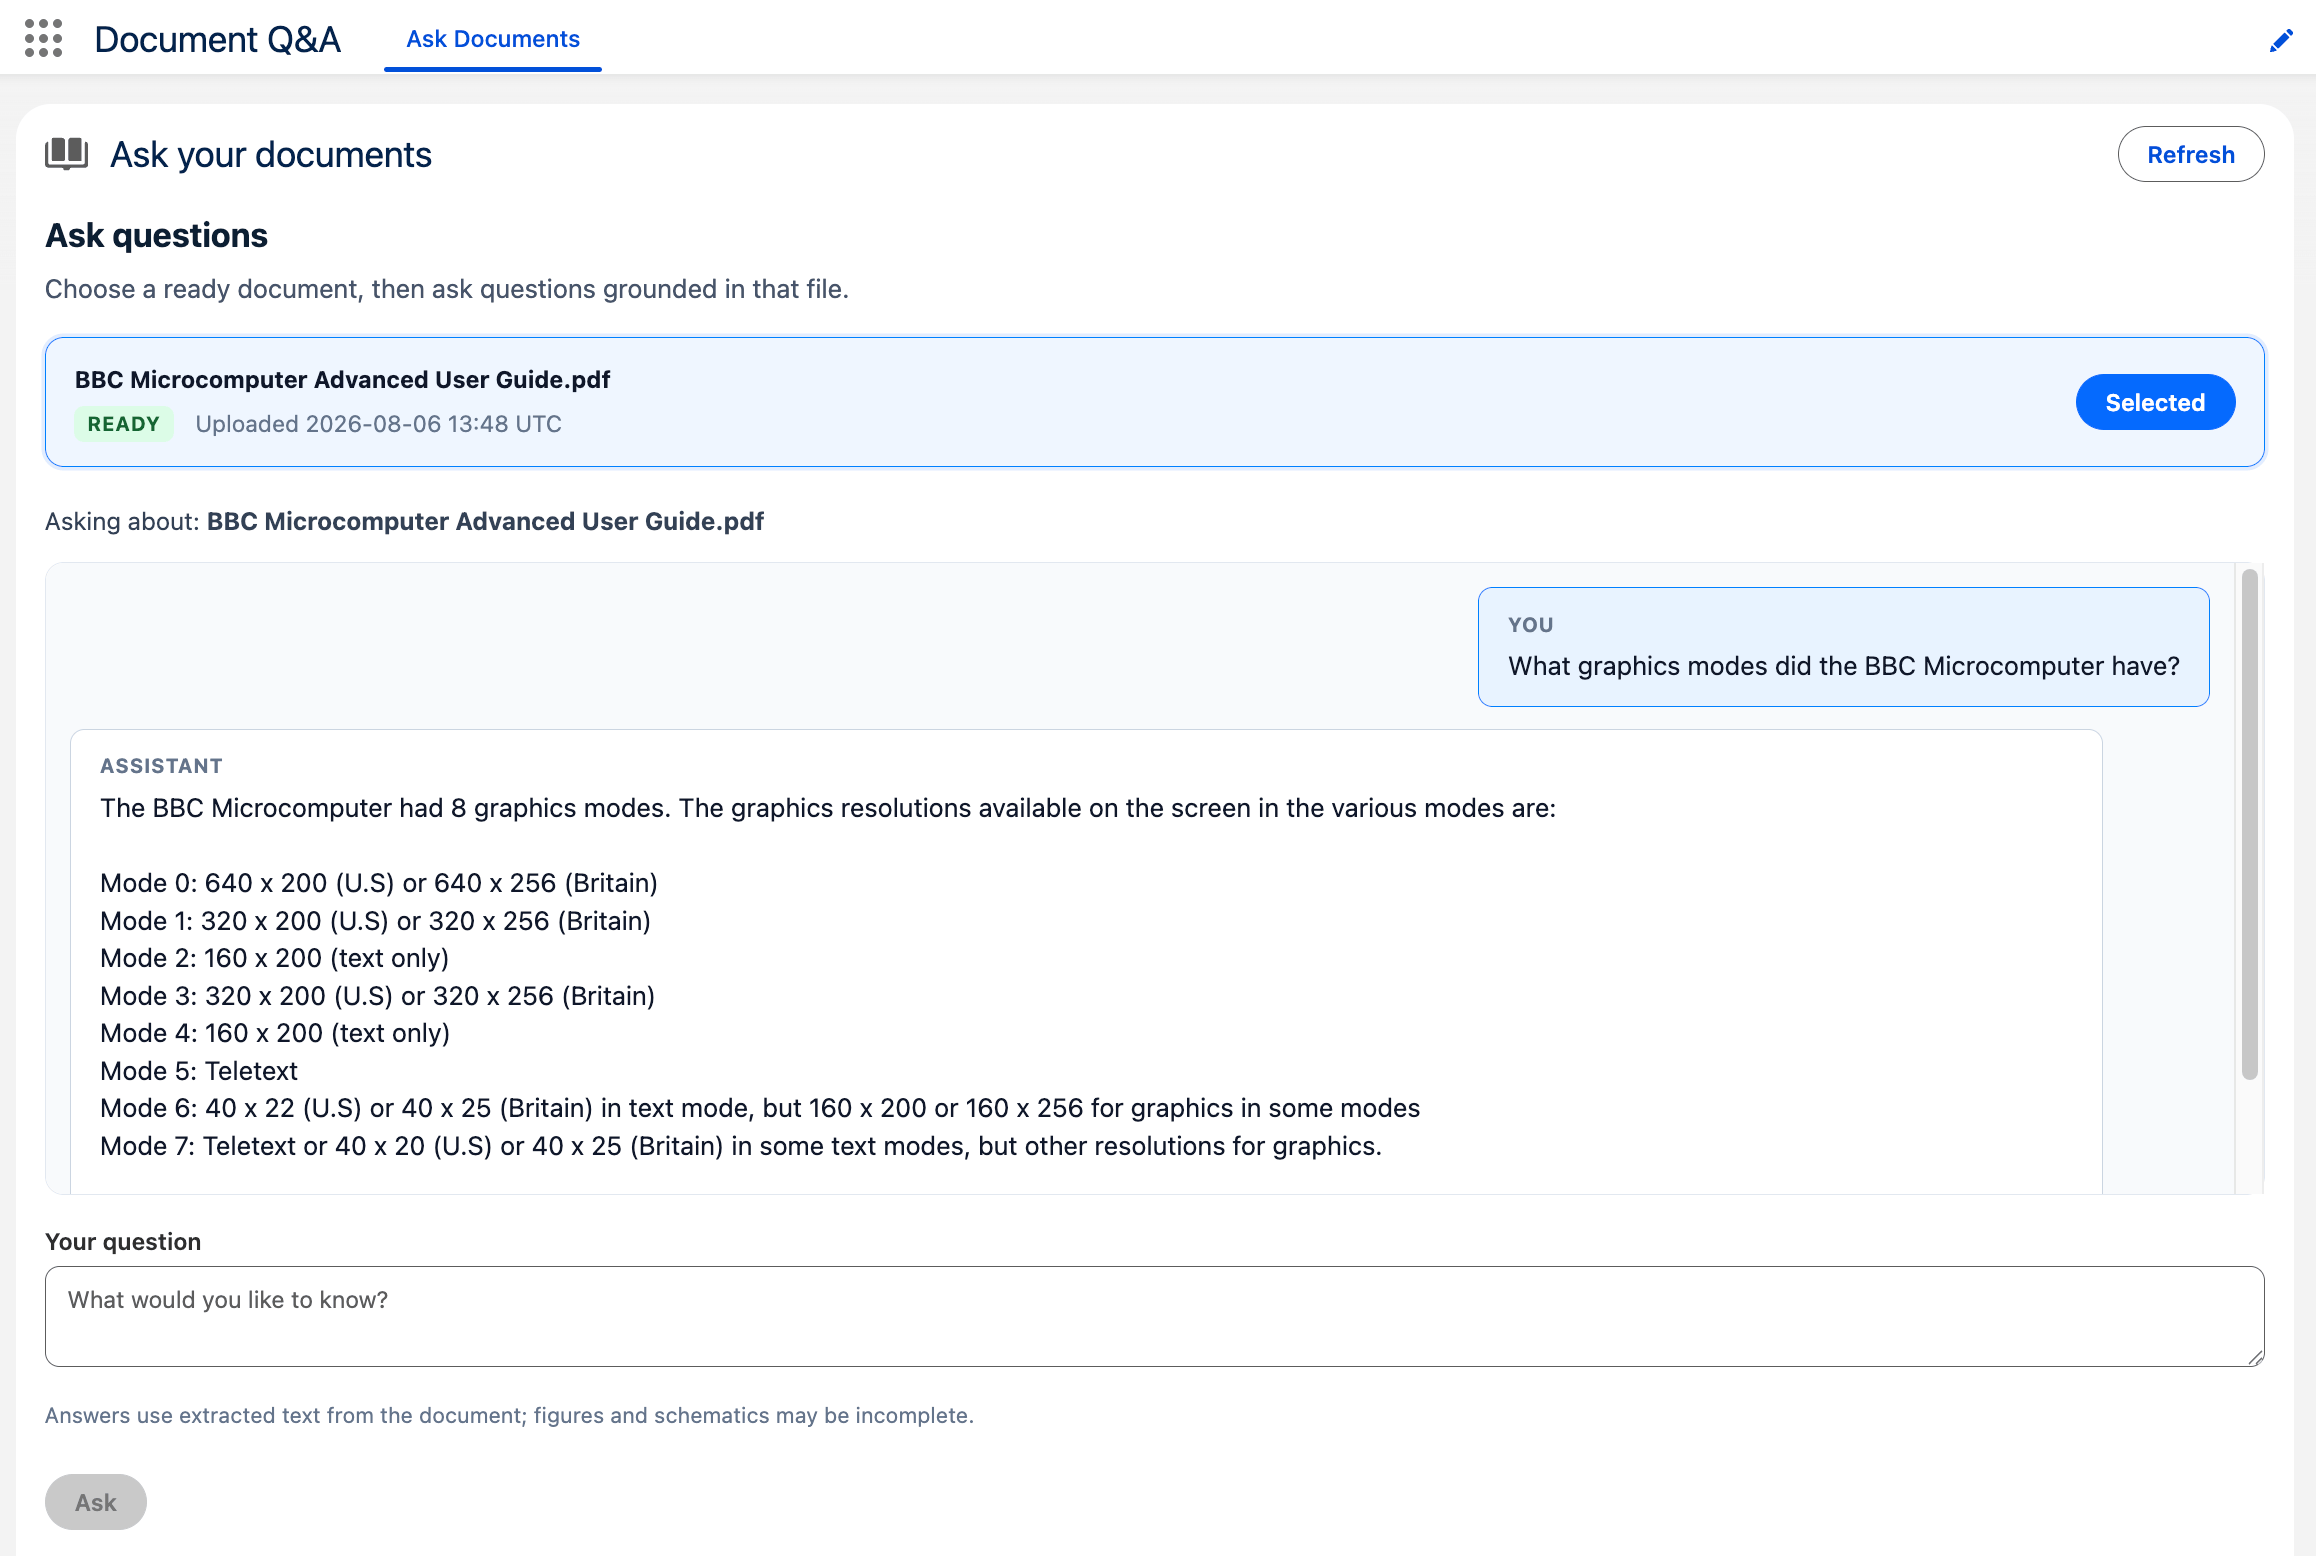
In keeping with the Salesforce integration theme, I wanted to build a native Salesforce experience on top of this—where users can drag and drop files, then ask questions against what was indexed—backed by DigitalOcean Serverless Inference from Apex. I’m aware Salesforce Data 360 can ingest files in a similar way for unstructured data and search indexing—here I’m exploring the DigitalOcean Knowledge Base path instead. Inference also has an interesting Inference Router feature that can route requests across models of your choosing, which can help manage cost if you put the effort into the routing configuration.

Key to my goal here was that DigitalOcean is very API-first in its design. Where I found a feature in the dashboard or CLI, I found an API—and what’s more, those APIs are described with the OpenAPI standard, which makes them ideal for agents and Salesforce to consume. Here’s a simple drag-and-drop experience with a chat box so you can ask questions once the file has been ingested. It again uses External Services—but this time to call DigitalOcean’s native platform APIs directl

Uploading another file shows preparation status in the same UI while DigitalOcean indexes it:

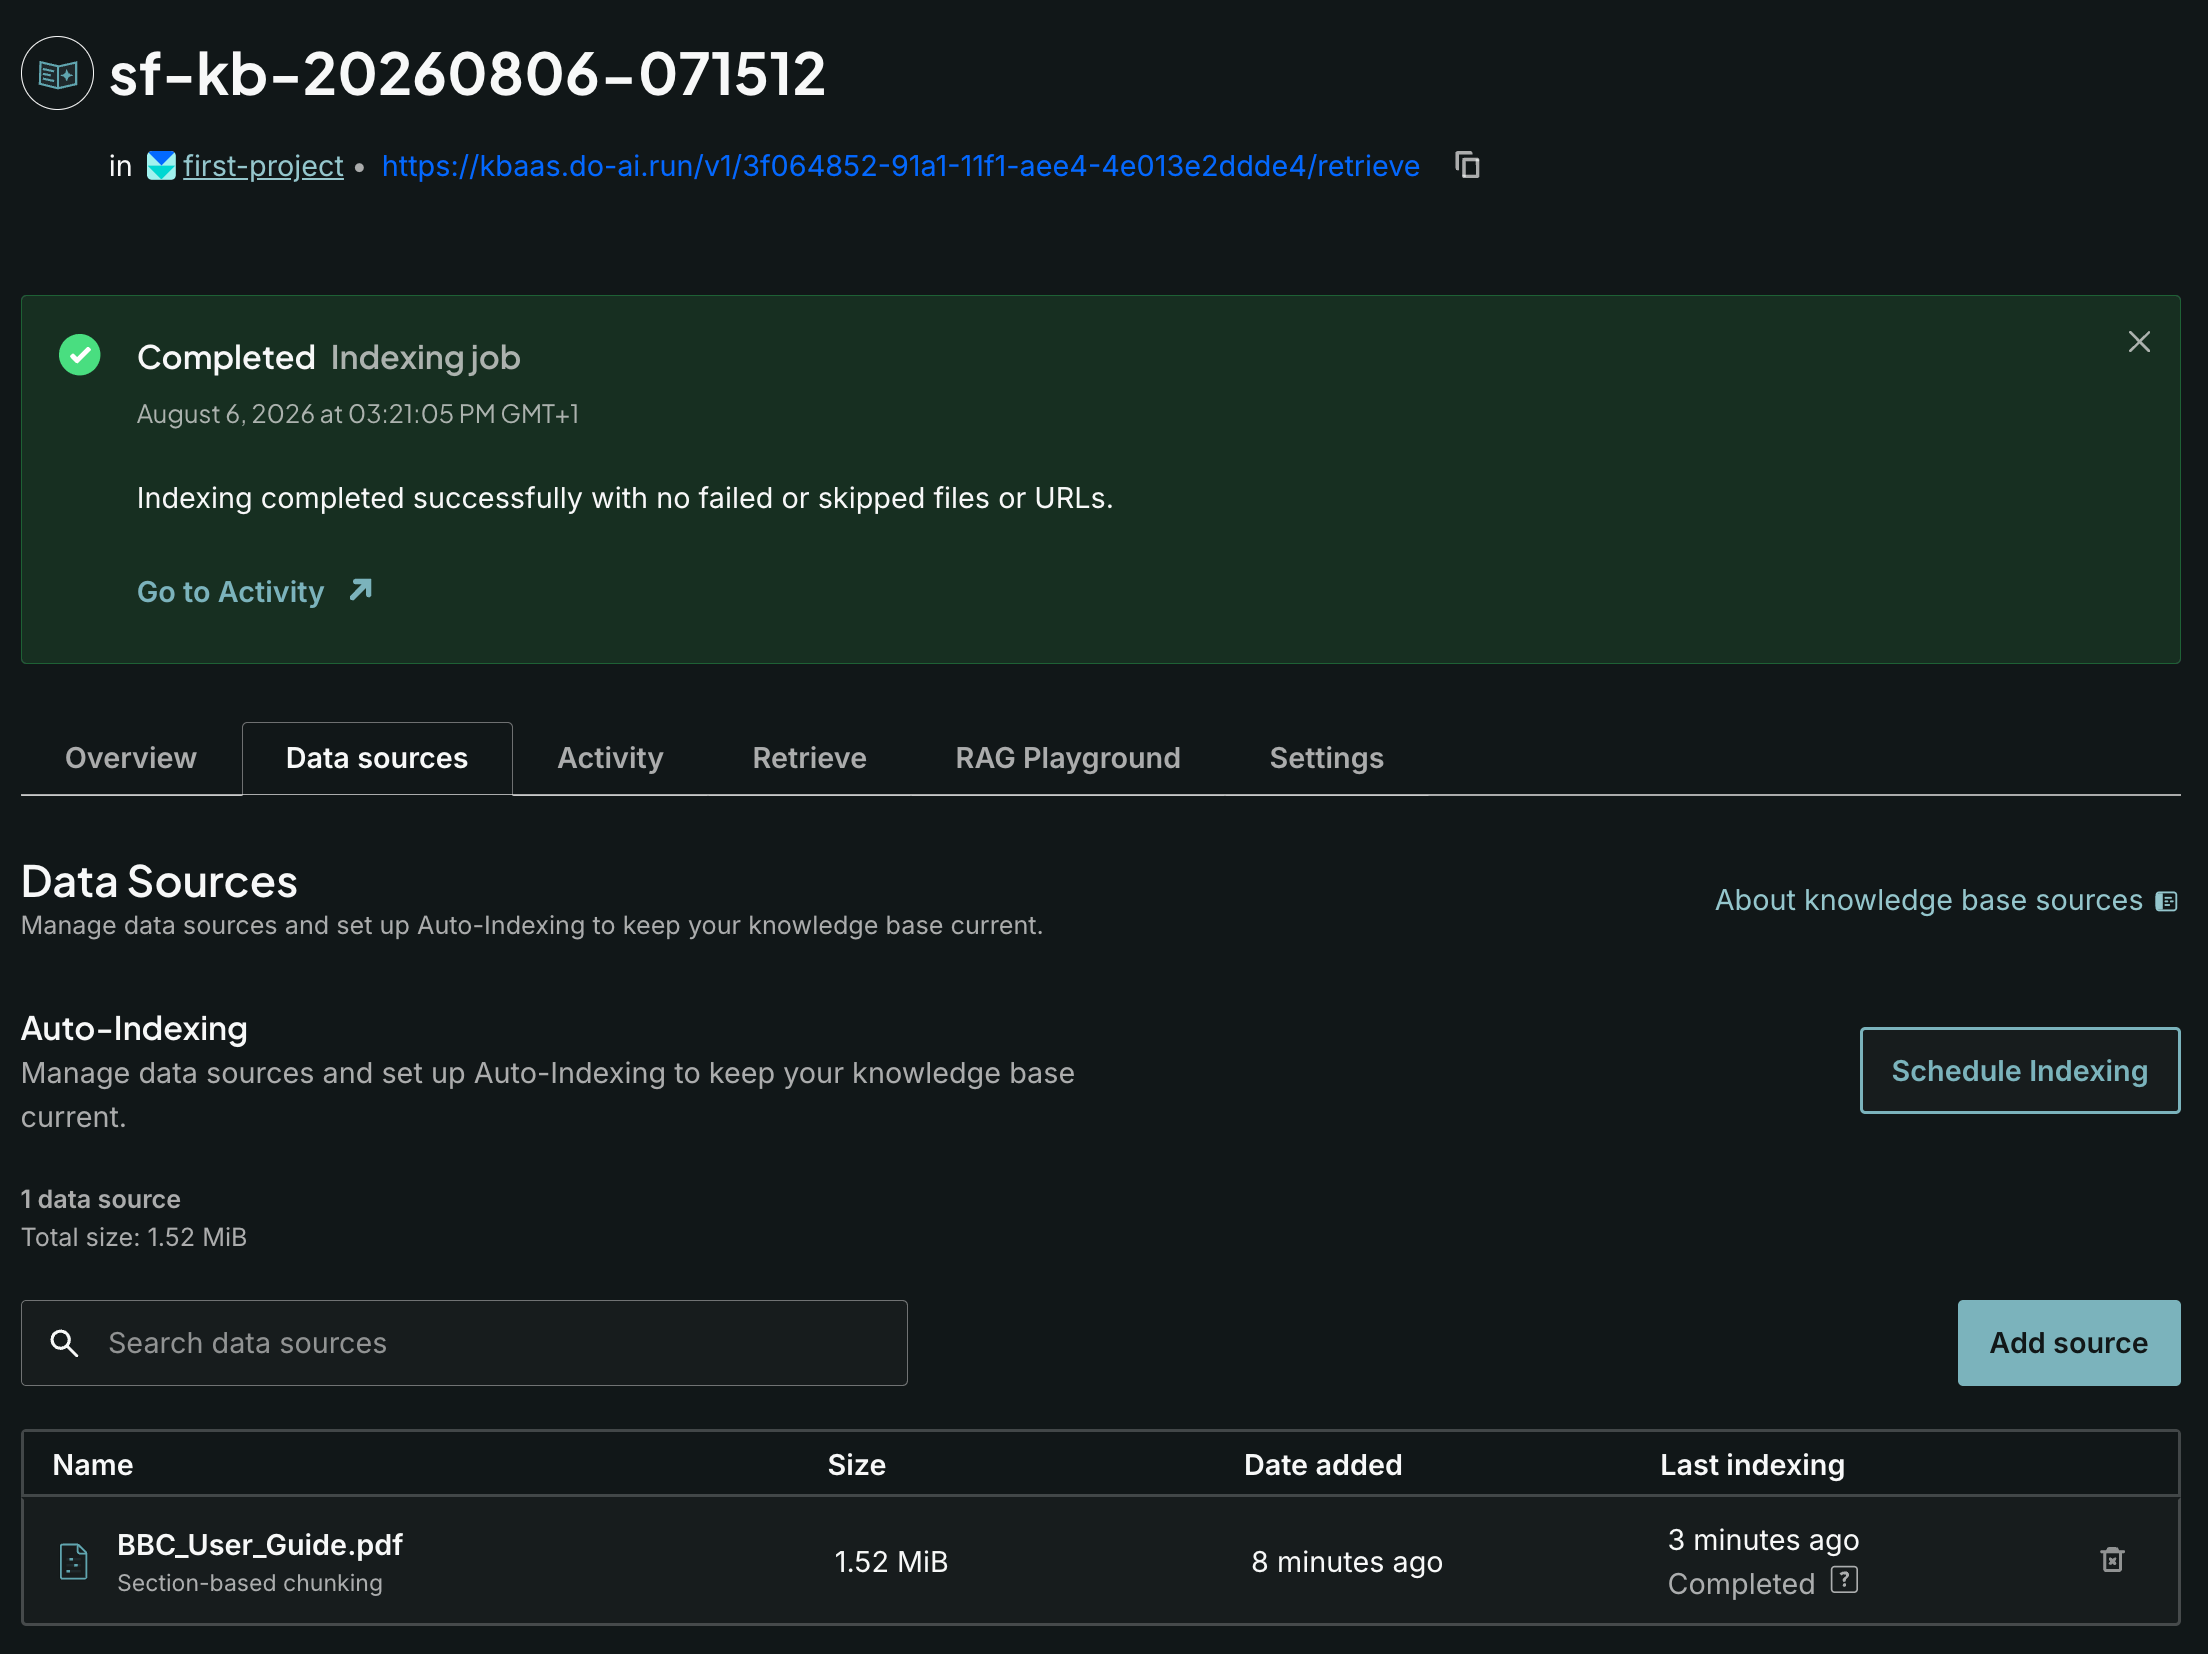
DigitalOcean’s dashboard also lets you review the uploaded data sources and indexing status—and it includes a RAG Playground tab where you can try retrieve-and-answer prompts against the knowledge base without leaving the console:

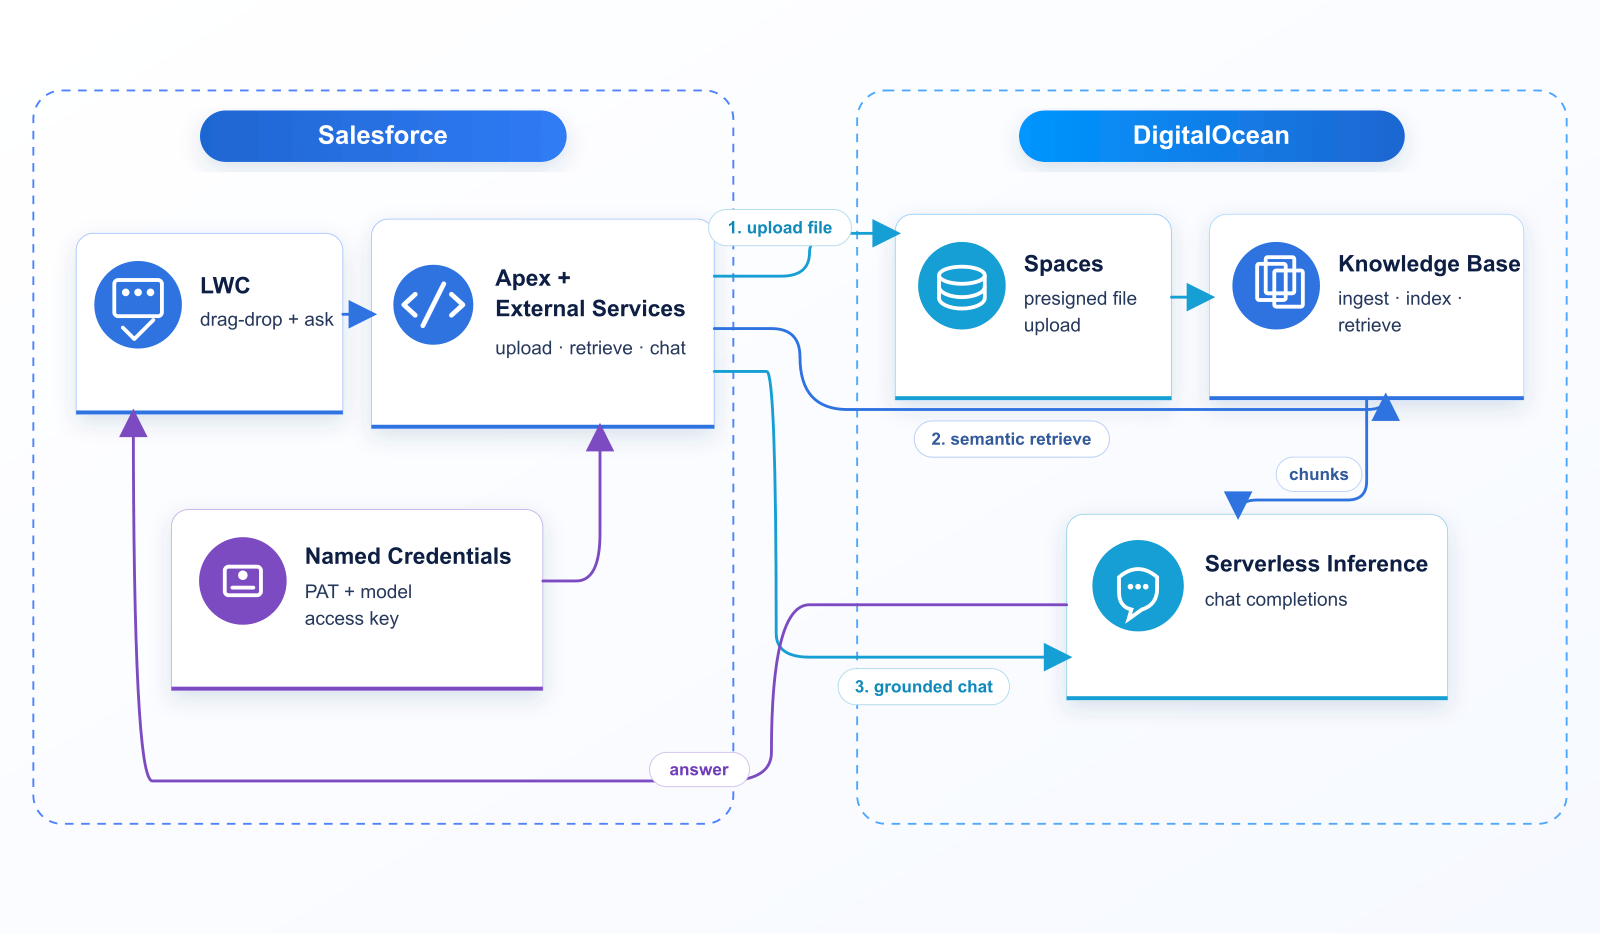
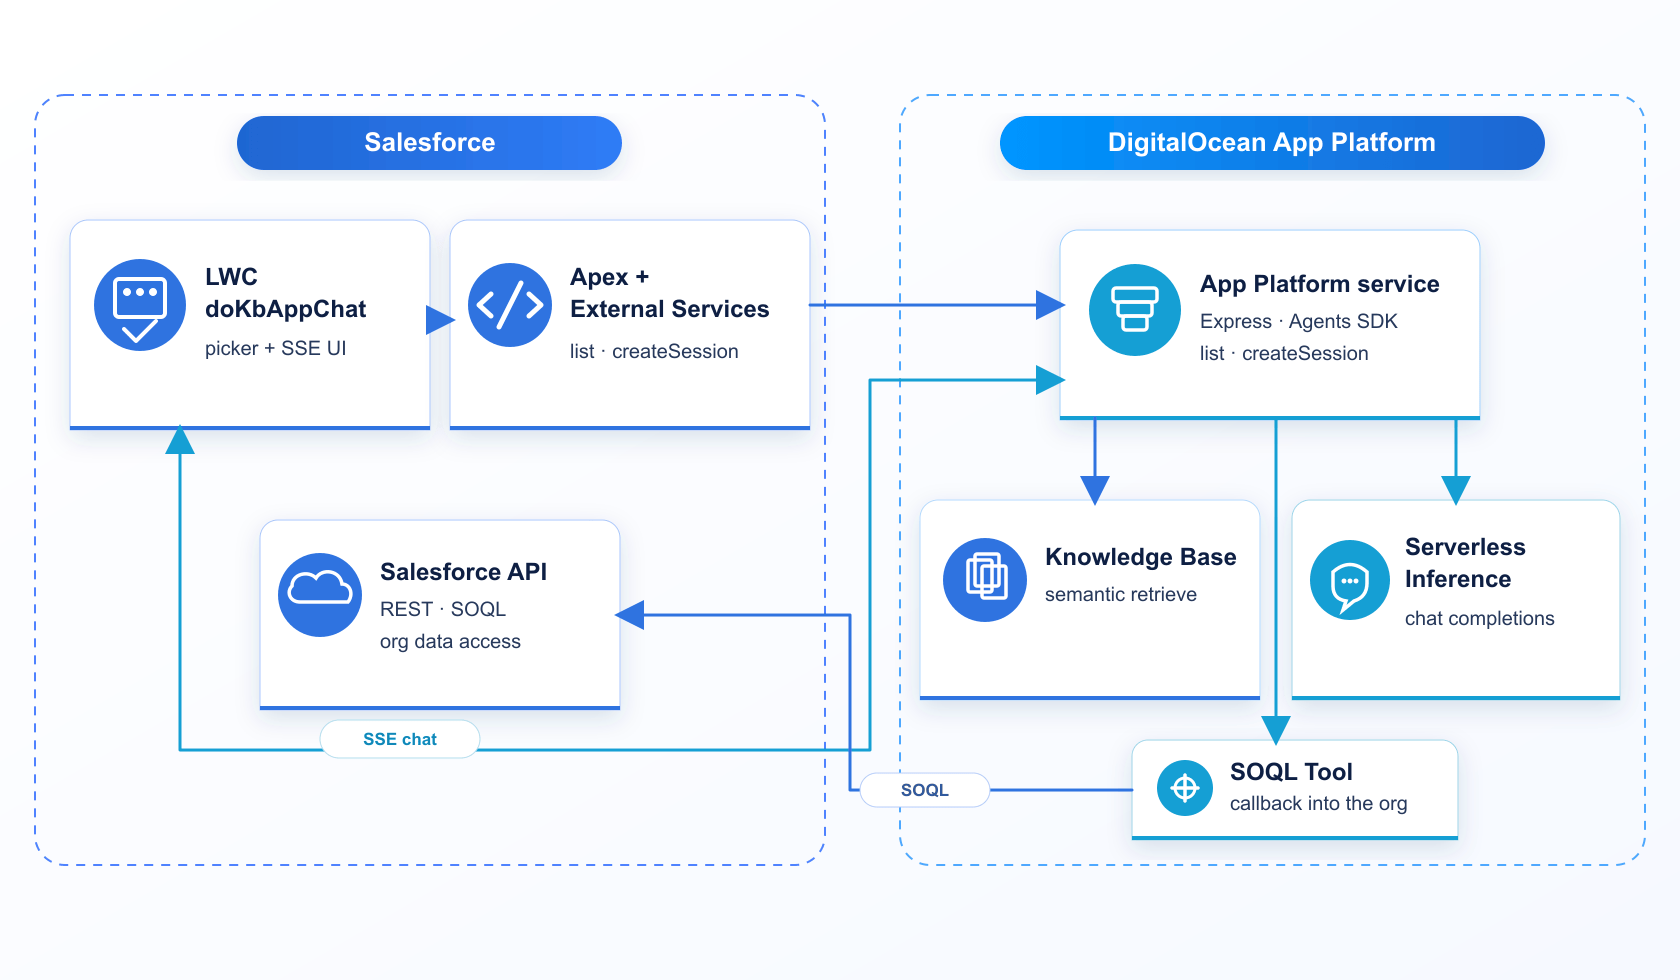
What is impressive about this is we didn’t have to provision our own datastore or set up our own ingest pipeline—we just uploaded our files and started querying against them to drive our chat experience. All of this didn’t require any code deploy off platform; it’s all been done with Apex and LWC. This to me is the closest I get to using Einstein AI and Data 360—I get to use existing managed services and stay within the Salesforce tooling I am familiar with. The architecture looks like this:

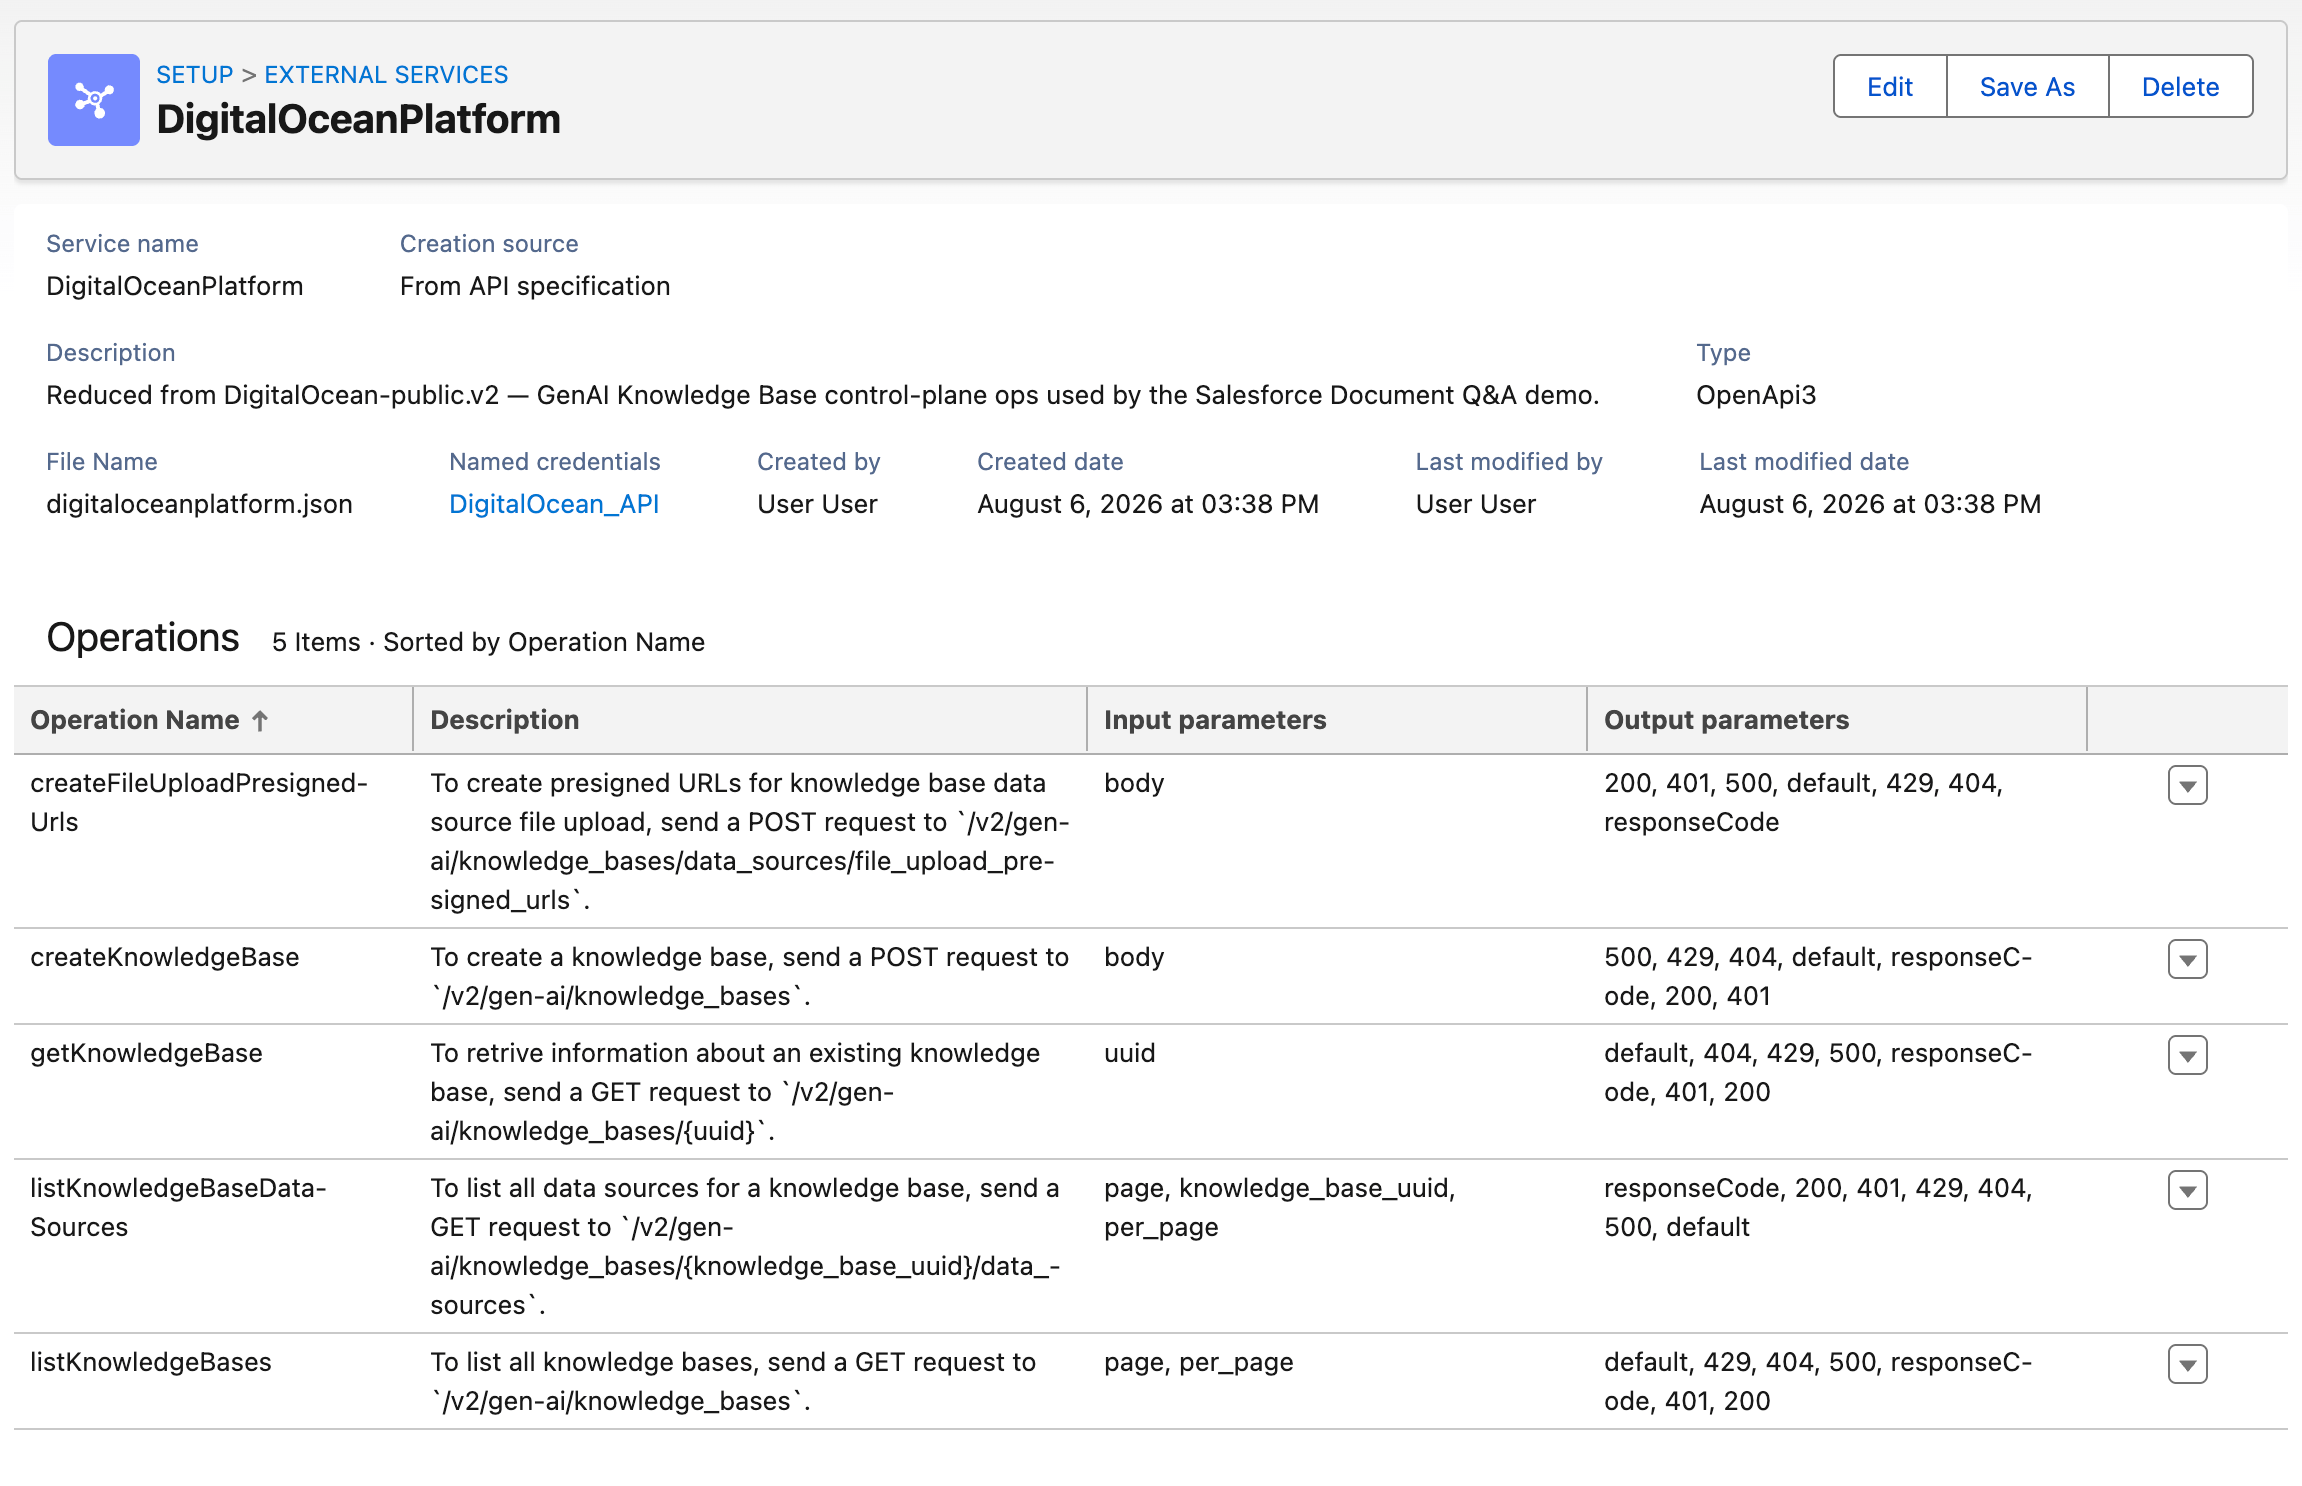
To import the DigitalOcean API into External Services I reduced the shipped OpenAPI to the operations this demo needs—after that, those operations show up like this:

There’s a second External Service for the file upload URL, because that PUT targets a different domain (Spaces) than the Platform API. In my case that host stayed static; if it ever varies, you’d be better off proxying the upload through a Function so Salesforce only talks to a stable endpoint.

Here are some snippets of Apex that call those External Services—list a Knowledge Base, run semantic retrieve against it, then pass that text into Serverless Inference. The Document Q&A UI uses a small helper class (DigitalOceanKnowledgeBaseService) that wraps this retrieve-then-answer path end to end.

// List Knowledge Bases (DigitalOceanPlatform → DigitalOcean_API)
ExternalService.DigitalOceanPlatform platform =
    new ExternalService.DigitalOceanPlatform();
ExternalService.DigitalOceanPlatform.listKnowledgeBases_Request listReq =
    new ExternalService.DigitalOceanPlatform.listKnowledgeBases_Request();
listReq.perx5fpage = 100; // OpenAPI per_page → Apex perx5fpage
ExternalService.DigitalOceanPlatform.listKnowledgeBases_Response listRes =
    platform.listKnowledgeBases(listReq);
System.debug(listRes.Code200.properties);

Semantic search is a separate External Service on the Knowledge Base retrieve host (kbaas.do-ai.run). The results from this call are the document excerpts you stuff into the model prompt:

// Retrieve / semantic search (DigitalOceanKBRetrieve → DigitalOcean_KB)
String kbUuid = '3f064852-91a1-11f1-aee4-4e013e2ddde4';
String question = 'What graphics modes are supported?';
ExternalService.DigitalOceanKBRetrieve.retrieveChunks_Request retrieveReq =
    new ExternalService.DigitalOceanKBRetrieve.retrieveChunks_Request();
retrieveReq.knowledgex5fbasex5fuuid = kbUuid;
ExternalService.DigitalOceanKBRetrieve_retrieveChunks_IN_body retrieveBody =
    new ExternalService.DigitalOceanKBRetrieve_retrieveChunks_IN_body();
retrieveBody.query = question;
retrieveBody.numx5fresults = 6;
retrieveBody.alpha = 0.35;
retrieveReq.body = retrieveBody;
ExternalService.DigitalOceanKBRetrieve.retrieveChunks_Response retrieveRes =
    new ExternalService.DigitalOceanKBRetrieve().retrieveChunks(retrieveReq);
// properties.results = matching text snippets (plus metadata such as page numbers)
List<Object> hits = (List<Object>) retrieveRes.Code200.properties.get('results');
String documentText = ''; // join text_content from each hit for the prompt

And here’s the Inference side—chat completions grounded on that retrieved document text:

// Chat completion (DigitalOceanInference → DigitalOcean_Inference)
ExternalService.DigitalOceanInference inference =
    new ExternalService.DigitalOceanInference();
ExternalService.DigitalOceanInference_createChatCompletion_IN_body chatBody =
    new ExternalService.DigitalOceanInference_createChatCompletion_IN_body();
chatBody.properties = new Map<String, Object>{
    'model' => 'llama3.3-70b-instruct',
    'temperature' => 0.2,
    'max_tokens' => 2000,
    'messages' => new List<Object>{
        new Map<String, Object>{
            'role' => 'system',
            'content' => 'Answer using only the document text provided by the user.'
        },
        new Map<String, Object>{
            'role' => 'user',
            'content' => 'Question:\n' + question + '\n\nDocument text:\n' + documentText
        }
    }
};
ExternalService.DigitalOceanInference.createChatCompletion_Request chatReq =
    new ExternalService.DigitalOceanInference.createChatCompletion_Request();
chatReq.body = chatBody;
ExternalService.DigitalOceanInference.createChatCompletion_Response chatRes =
    inference.createChatCompletion(chatReq);
System.debug(chatRes.Code200.properties);
// Helper used by the UI (retrieve + prompt + chat in one call):
// DigitalOceanKnowledgeBaseService.answerFromKnowledgeBase(kbUuid, question, null, null);

For authentication we store two DigitalOcean secrets on separate External Credential principals (same pattern as the Functions scenario—custom auth attributes sent as Bearer headers): a personal access token for the Platform and Knowledge Base APIs, and a model access key for Serverless Inference. Additionally, managing large files has never been a strength of Salesforce, given the heap limits in Apex—however I was able to leverage the latest External Services enhancements for binary uploads (OpenAPI Example 13), which stream a Salesforce File (ContentDocument Id) up to about 16MB without loading the bytes onto the Apex heap. The UI above temporarily creates a File record for that call, then deletes it once the DigitalOcean upload completes.

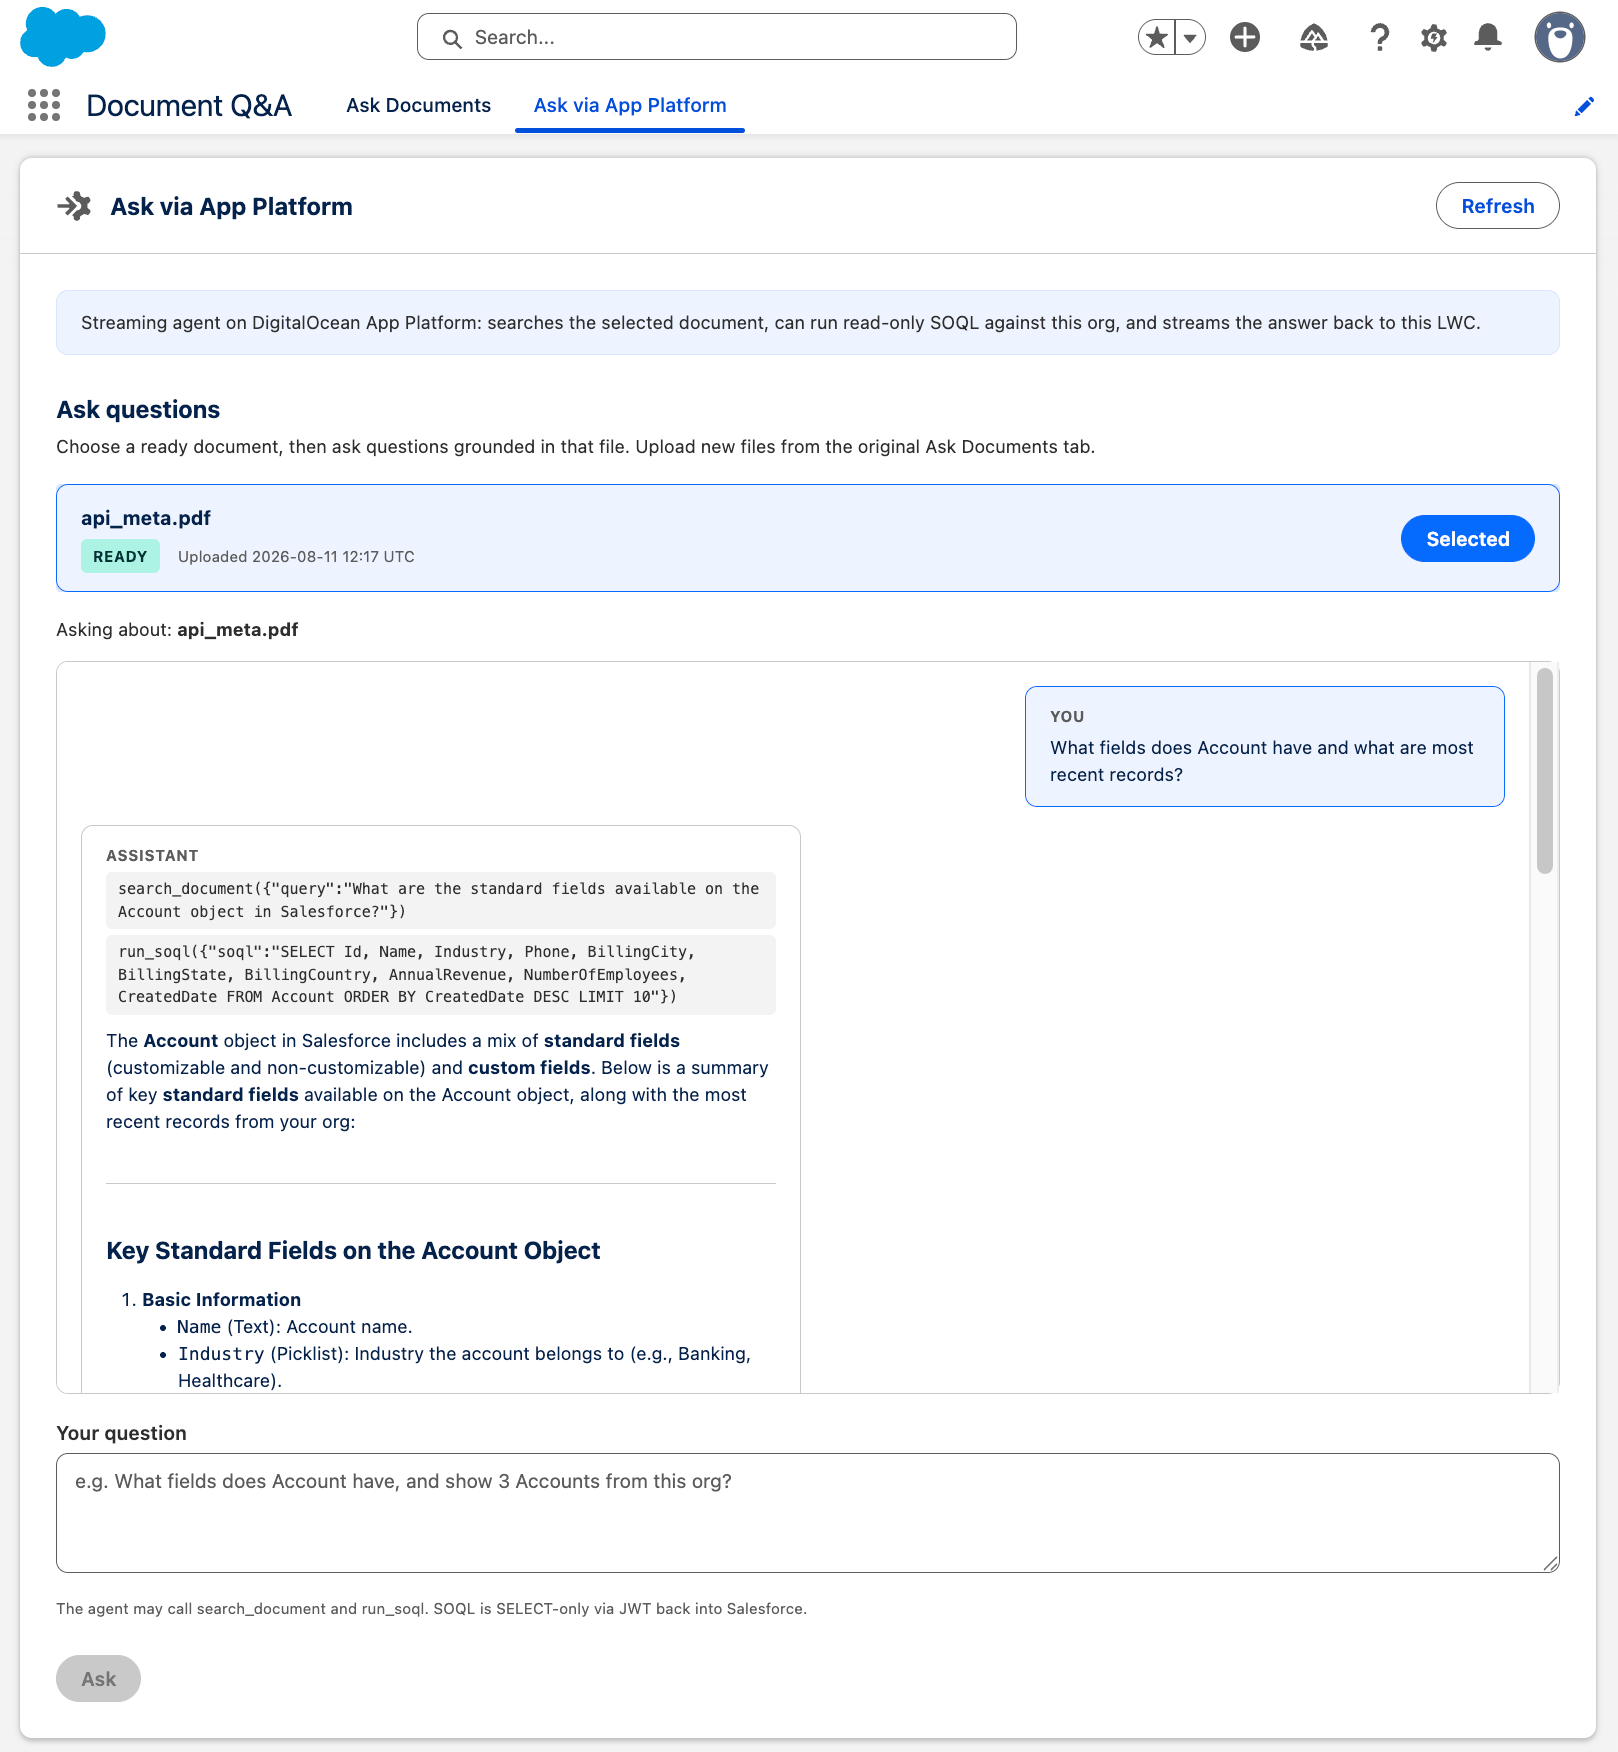
The above scenario is a simple one-off LLM call and requires no code deployed off-platform – but what if you wanted to build your own agent? This was a question asked when I first published this blog – so as a bonus update, you can find in the sample repository steps and code on how to build a small agent that is hosted on DigitalOcean’s App Platform. Below is a brief look at the resulting experience and what the architecture looks like – complete with the ability to stream agent responses back to LWC. Also, notice that even still, it is Apex/LWC code that managing the UI and agent session creation:

Batch Inference – managed costs with overnight work

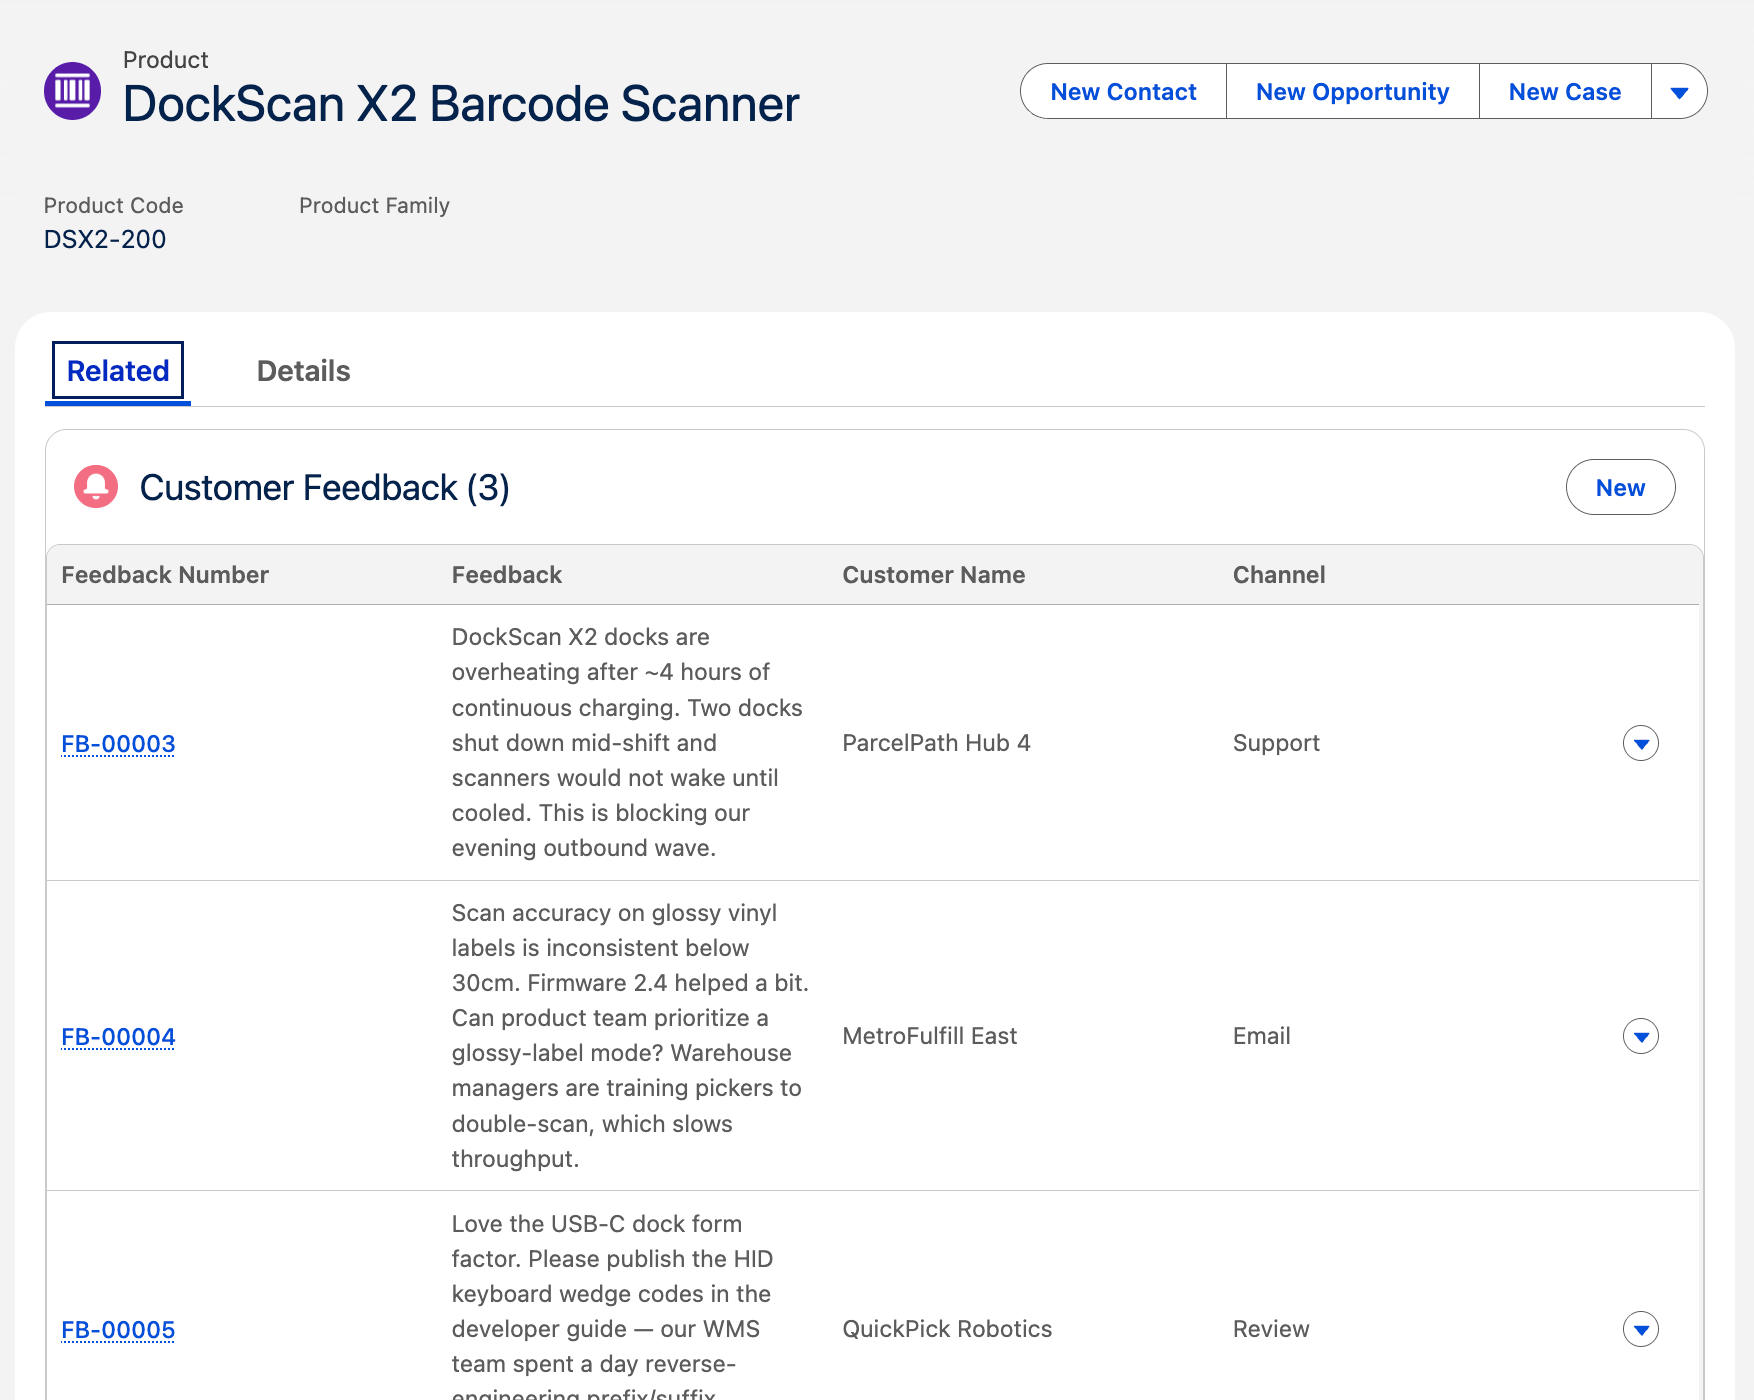
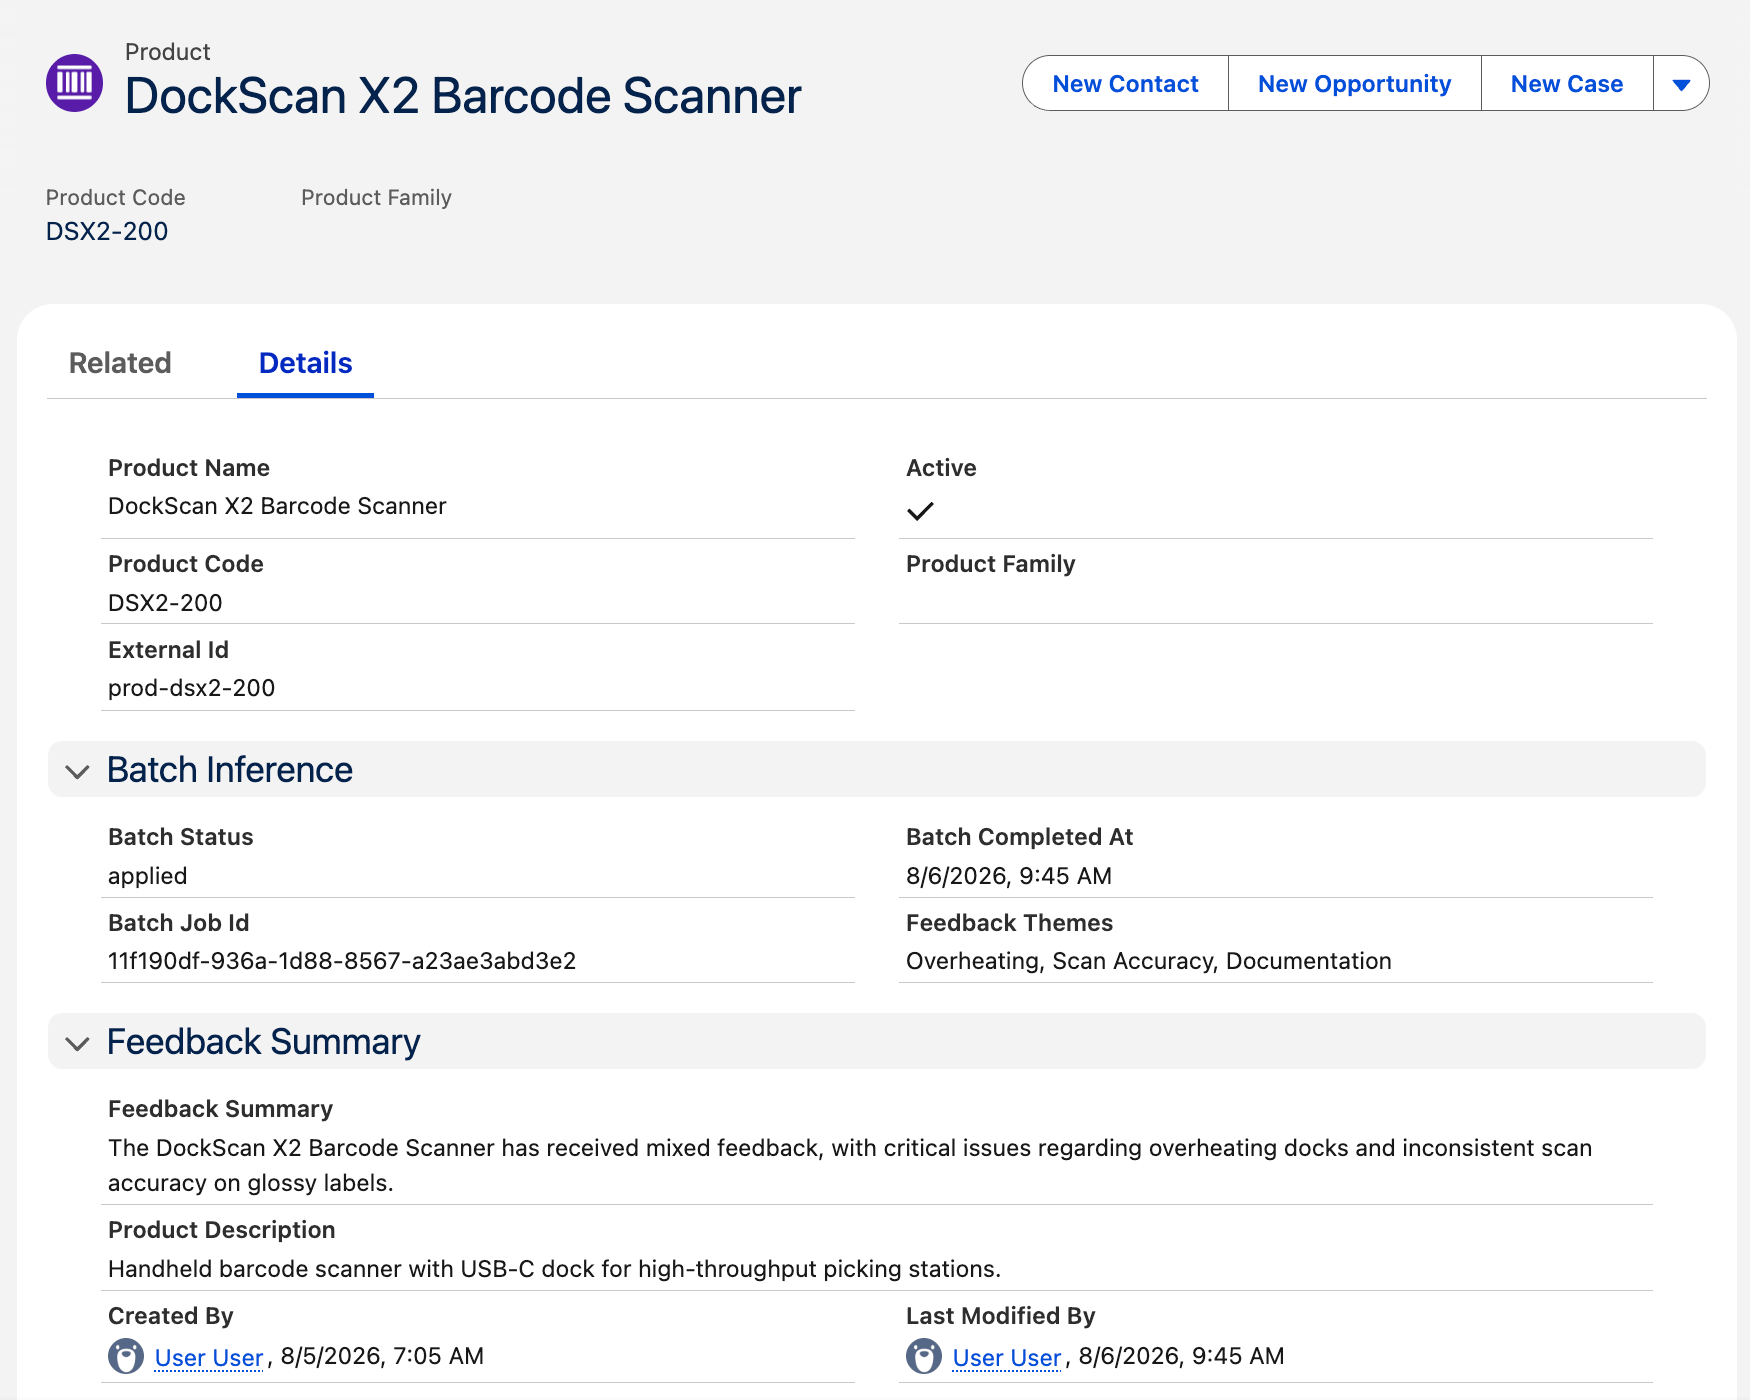
Not every LLM call needs to happen while someone waits. Some AI work loads can be deferred and as a result this can result in reduced costs. Take for example, summarizing a day’s customer feedback and proposing follow-ups is a good fit—Product Owners don’t need a live chat for that; they need a digest and a short list of actions by morning. This is the use case I have explored with DigitalOcean Batch Inference. In Salesforce I seeded products with Customer_Feedback__c comments:

…then asked the model—in batch—to write a summary — which ends up back on the product record:


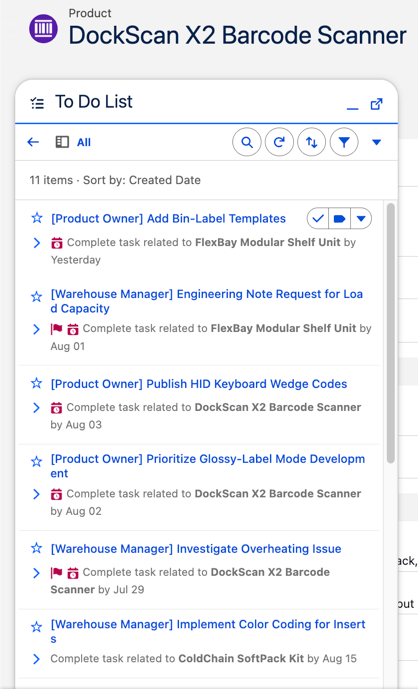
The same apply step also inserts Salesforce Tasks (routed to Product Owner or Warehouse Manager from the model’s JSON), so the overnight digest lands as a real to-do list by morning:

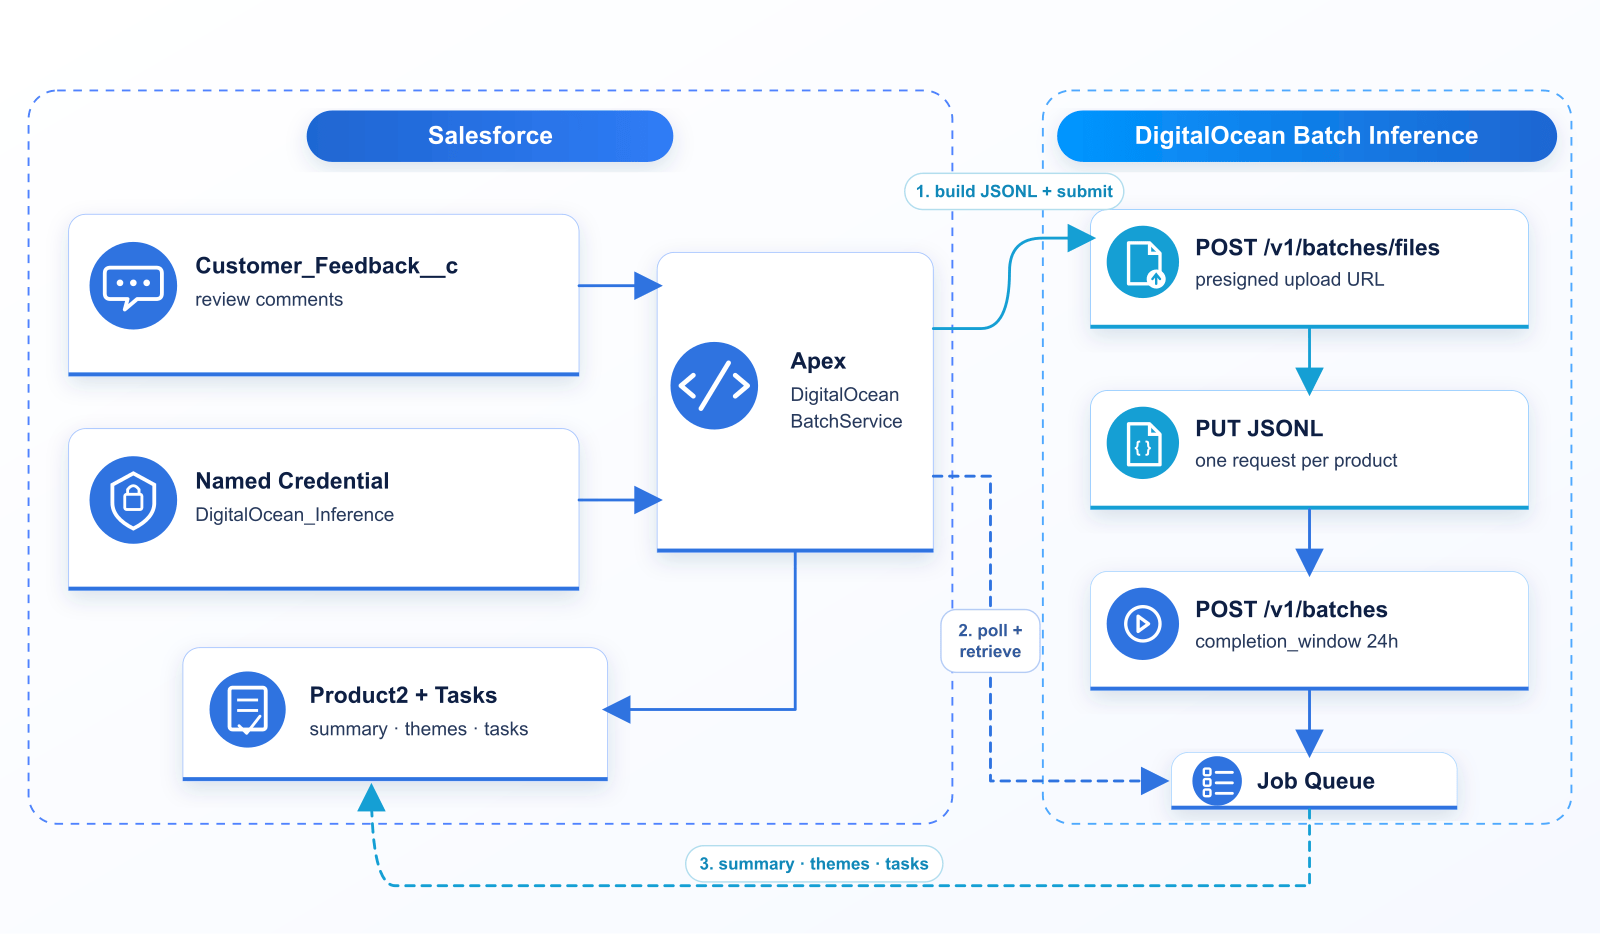
The Batch Inference API is deliberately simple: you don’t call chat completions one product at a time. Apex builds a JSONL file—one JSON object per line, each line a deferred inference request (custom_id, method, url, body)—then:

  1. POST /v1/batches/files to get a short-lived presigned upload URL
  2. PUT the JSONL bytes to that URL
  3. POST /v1/batches with the file_id, provider, endpoint, and a completion_window (here 24h)
  4. Poll GET /v1/batches/{batch_id} until the job completes
  5. GET /v1/batches/{batch_id}/results for a download link, parse the output JSONL, and write summaries/Tasks back to Salesforce

Auth is the same model access key pattern as Serverless Inference (Named Credential DigitalOcean_Inference). Each JSONL line is essentially a packaged chat-completions call; for this demo Apex groups unprocessed Customer_Feedback__c by product and asks for structured JSON back (summary, themes, tasks). A DockScan line looks like this (system prompt shortened):

{
  "custom_id": "product-prod-dsx2-200",
  "method": "POST",
  "url": "/v1/chat/completions",
  "body": {
    "model": "gpt-4o-mini",
    "temperature": 0.2,
    "response_format": { "type": "json_object" },
    "messages": [
      {
        "role": "system",
        "content": "Respond with ONLY valid JSON: summary, themes[], tasks[] with OwnerRole Product Owner|Warehouse Manager..."
      },
      {
        "role": "user",
        "content": "{\"product\":{\"external_id\":\"prod-dsx2-200\",\"name\":\"DockScan X2 Barcode Scanner\",\"product_code\":\"DSX2-200\"},\"feedback\":[{\"customer\":\"ParcelPath Hub 4\",\"channel\":\"Support\",\"rating\":1,\"feedback\":\"DockScan X2 docks are overheating after ~4 hours...\"},{\"customer\":\"MetroFulfill East\",\"channel\":\"Email\",\"rating\":3,\"feedback\":\"Scan accuracy on glossy vinyl labels...\"},{\"customer\":\"QuickPick Robotics\",\"channel\":\"Review\",\"rating\":4,\"feedback\":\"Love the USB-C dock form factor...\"}]}"
      }
    ]
  }
}

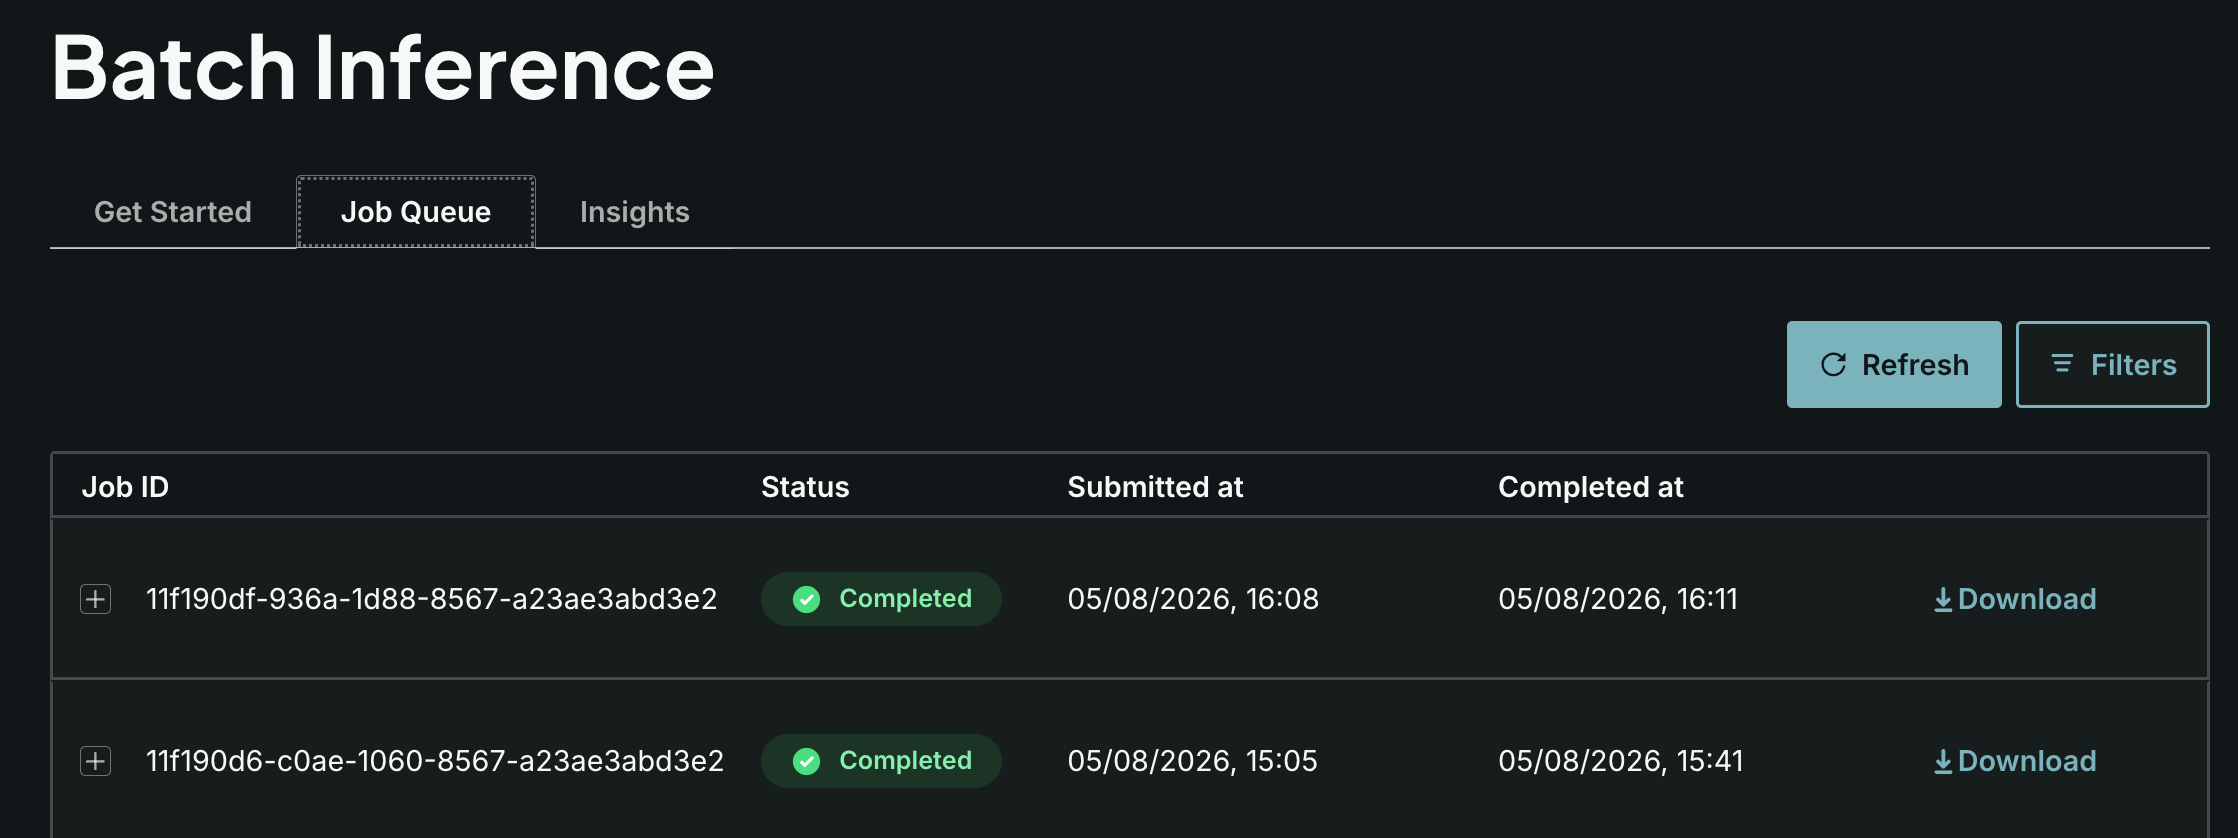
DigitalOcean’s Control Panel also exposes a Job Queue so you can watch those jobs move from queued to completed:

The sample included with this post is Apex-only: submit, poll, and apply are anonymous Apex scripts (or a thin sf apex run wrapper) that call a helper class—SOQL for unprocessed feedback, build/upload the JSONL, create the job, then poll and write summaries and Tasks back onto the products. Those are the building blocks for a Scheduled Apex job and a small UI to monitor batch status. The API is poll-based today; DigitalOcean has signaled webhook notifications are coming, but they’re not in the reference yet. End to end, the architecture looks like this:

Summary

Looking back across these explorations, what I valued most wasn’t any single API call—it was that DigitalOcean kept delivering the same kind of fully managed experience I rely on from Salesforce. I spent my time focusing on the Salesforce use cases, External Services, Named Credentials, Apex, and a bit of LWC—not on standing up servers, vector databases, or GPU fleets.

  • Functions — Scale-to-zero compute with almost no ceremony: write the function, doctl serverless deploy, call it. For Salesforce that meant an OpenAPI-shaped edge I could import into External Services, then call back into the org with JWT when I needed SOQL. I did appreciate not having to scafold middleware such as a web server and scaling to zero so I only pay for what I use. One thing I’d like more of out of the box is orchestration—easy async hand-off from one Function to another without me wiring the glue. You can do that today by calling the Functions API from inside a Function; I’d just like first-class primitives for that pattern. Product extras I’d reach for next include scheduled Functions for light off-platform cron, and App Platform packaging when a function needs to sit beside a small web app.
  • Knowledge Bases + Serverless Inference — This was the closest “Einstein+D360-shaped” path and I enjoyed not having to own the pipeline coding and infrastructure. I simply uploaded a file, the platform indexes it (Spaces + OpenSearch under the hood), retrieve chunks, then chat-complete—all from Apex. In the Control Panel, RAG Playground and retrieval testing let me validate answers before I wired the LWC. Features I didn’t need for the demo but that keep the stack managed as you grow: auto-indexing on a schedule, optional reranking for tougher corpora, and more data-source types (URLs, Spaces, S3) without redesigning ingest.
  • Batch Inference — I appreciated a dedicated set of services for deferred LLM work that was simple to use: JSONL in, Job Queue in the console, structured JSON out onto Product2 and Tasks. It felt a little like Batch Apex without me provisioning workers. Alongside it, the broader Inference control plane (Model Catalog, Inference Router, model access keys) is how I’d keep choosing models and cost tiers while Salesforce stays the system of engagement.

The experience across all three explorations: DigitalOcean owns the AI operational surface; Salesforce owns the business surface. That’s the alternative I was looking for when Heroku’s new strategic path narrowed—choice of AI and compute, without giving up the managed DX that lets me keep focused on building! And if you want to run through the demos yourself, the sample code and deploy steps are in digitalocean-salesforce-demos.

Additional Resources