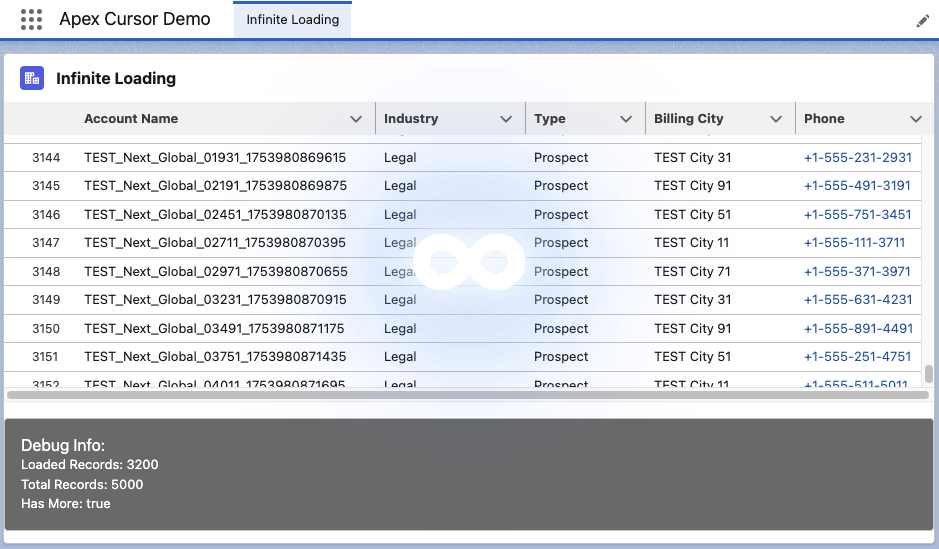
Andy in the Cloud

From BBC Basic to Force.com and beyond…


Leave a comment

New Book – Salesforce Platform Enterprise Architecture 4th Edition

It has been nearly 10 years back in 2014 when the first edition of my book Force.com Enterprise Architecture was first published and clearly a lot has moved on since then and not just the platform capabilities. Keeping pace with branding changes resulted in the second edition of the book being called Lightning Platform Enterprise Architecture. This latest 4th edition, Salesforce Platform Enterprise Architecture has probably the most accurate and I hope enduring title! This 4th edition is also nearly twice the size of the first edition, coming in at 681 pages. So much so, its 16 chapters is now split over 4 parts to make digesting the book easier. As is tradition by now, this blog will cover some of latest updates and additions and what to expect in general from the book.

Links: Amazon | Packt Publishing

Motivation and what to expect…

I first came to the platform with a lot of experience and understanding of architecture principles from other platforms, including leveraging platform agnostic patterns such as those of Martin Fowler. Applying patterns to the platform requires some nuance at times, thus this book is about enterprise architecture considerations as applied to the Salesforce Platform and much more in respect to its capabilities that accelerate traditional application development concerns and tasks for you – and can hinder if not considered upfront in your architecture design.

The book dedicates 3 of its 16 chapters to Apex code separation of concerns, how to layout your code, while the rest covers the full spectrum of app concerns such as designing for code and database performance, profiling, testing, data storage design, building apis, extensibility and more and of course how to write much less code by harnessing the declarative aspects. All this is driven throughout the book via a fictitious reference application known as FormulaForce based on Formula1 motor racing – full source is included. Also included are numerous tips and tricks and info blocks pitted among the pages that highlight learnings from my own experiences, and latterly that of the many amazing reviewers.

As good as the platform is at abstracting a huge amount of the complexity of managing and securing modern day applications for you, there is no escaping having to fully understand good architecture principles that would, and do, in most cases apply elsewhere, such as query optimization and indexing.

If you are developing a lot on the Salesforce Platform, have a few years experience and are passionate about creating applications that are enduring and empathetic to the platform itself – this book is for you. Read on for further highlights!

Is it for ISVs or anyone?

This edition is the first to split out the motivations of packaging in respect to internal distribution needs within your own company vs distributing a commercial solution on AppExchange. Regardless of which motivation you fit into, the chapters will callout which bits are relevant vs not. Even if you are not into packaging at all right now, much of the content on Apex, Lightning, Flow, APIs etc is of course agnostic to how you choose to distribute your application. Regardless who you are sharing it with, the book gives you an appreciation of advantages and limits of packaged based distribution and in my view is a key aspect of your overall architecture considerations checklist.

Have the Apex coding patterns evolved given recent features?

The advent of user mode capabilities has had a big impact on the approach taken within the sample application of the book when it comes to using the Apex Enterprise Patterns Library (fflib), specifically in how the Unit of Work and Selector patterns are used when updating and querying for data respectively.

Additionally, the Domain pattern chapter now reflects on how Domain logic, can, if desired allow the developer to split Domain and Trigger logic into separate classes and thus introduces a new pattern (SDCL) to captured this approach. Thats not to say the original model has gone, it is still very much present, but it felt appropriate to include something in the book that reflects how the library usage has also evolved over the years – thanks to my good friend John M. Daniel for pushing for this!

Apply skills in other languages and additional scaling options

A brand new chapter in the book is dedicated to how Heroku and Functions can be used to leverage existing skills or indeed investments in open source or internally for code written in other languages such as Java or Node.js. These technologies also open up further scaling options. The chapter breaks down the approaches using the books sample application as a basis. Thus it continues the Formula1 motor racing theme by introducing Web and API interfaces for race fans and vendors (authentication scenario) to interact with the application backend APIs. Later in the book the integration chapter doubles down further on authoring APIs via OpenAPI standards and how that simplifies integration with the platform.

Lightning Web Components and Lightning Experience expansion

Since the third book, all but one of the Aura components have now been removed as many only existed at the time as workarounds to the lack of LWC enabled integration points. Two large chapters are dedicated to the Lightning framework itself, how it handles separation of concerns, eventing, security and its alignment with the industry Web Component standard. Completing with a section covering the ever expanding possibilities to extend vs build when thinking about your applications user experience, regardless if thats desktop, mobile or driven through the native UIs and tools such as Lightning Pages or Flow. And yes, I still love the Utility Bar integration the most – as you can see from the number of historic posts and tools on the topic here.

APIs, APIs and APIs…

Many years ago a product manager once thanked me for pushing an API strategy internally, since they appreciated first hand as a past buyer that APIs are effectively an insurance policy for buyers when it comes to unexpected feature gaps post or during implementation. Thus several of the chapters highlight the many Salesforce APIs in contextual ways.

Though its not until the integration and extensibility chapter the book really doubles down on building your own application APIs, versioning, naming and design and the value they bring to your fellow developers, customers and/or partner ecosystems. External Services is one of the most impressive aspects of integrating with the Salesforce Platform for me and it was my pleasure to update the book with an updated Heroku based API leveraging OpenAPI to get the full power of the feature – the two are a perfect combo!

And …

This blog is already in danger of becoming chapter size itself, so I will leave it here with the above highlights and before I close share my deepest thanks to this editions reviewers John M. Daniel, Sebastiano Costanzo, Arvind Narasimhan and foreword author Daniel J. Peter.

I will be popping up in the not to distant future in ApexHours (https://www.apexhours.com/) and perhaps other locations to talk in more depth about the book and likely other side topics of interest. I will update this blog as those resources arrive. Thank you all in the meantime, the Salesforce community is the best and remains very close to my heart, enjoy!

AndyInTheCloud

P.S. Suffice to say this 4th edition is an evolution of the prior three books! I would like to also thank the following fine folks for their support as past reviewers and foreword authors!

Past Reviewers and Forewords:
Matt Bingham, Steven Herod, Matt Lacey, Andrew Smith, Rohit Arora, Karanraj Samkaranarayanan, Jitendra Zaa, Joshua Burk, Peter Knolle, John Leen, Aaron Slettenhaugh, Avrom Roy-Faderman, Michael Salem, Mohith Shrivastava and Wade Wegner


3 Comments

The Third Edition

bookI’m proud to announce the third edition of my book has now been released. Back in March this year I took the plunge start updates to many key areas and add two brand new chapters. Between the 2 years and 8 months since the last edition there has been several platform releases and an increasing number of new features and innovations that made this the biggest update ever! This edition also embraces the platforms rebranding to Lightning, hence the book is now entitled Salesforce Lightning Platform Enterprise Architecture.

You can purchase this book direct from Packt or of course from Amazon among other sellers.  As is the case every year Salesforce events such as Dreamforce and TrailheaDX this book and many other awesome publications will be on sale. Here are some of the key update highlights:

  • Automation and Tooling Updates
    Throughout the book SFDX CLI, Visual Studio Code and 2nd Generation Packaging are leverage. While the whole book is certainly larger, certain chapters of the book actually reduced in size as steps previously reflecting clicks where replaced with CLI commands! At one point in time I was quite a master in Ant Scripts and Marcos, they have also given way to built in SFDX commands.
  • User Interface Updates
    Lightning Web Components is a relative new kid on the block, but benefits greatly from its standards compliance, meaning there is plenty of fun to go around exploring industry tools like Jest in the Unit Testing chapter. All of the books components have been re-written to the Web Component standard.
  • Big Data and Async Programming
    Big data was once a future concern for new products, these days it is very much a concern from the very start. The book covers Big Objects and Platform Events more extensibility with worked examples, including ingest and calculations driven by Platform Events and Async Apex Triggers. Event Driven Architecture is something every Lightning developer should be embracing as the platform continues to evolve around more and more standard platforms and features that leverage them.
  • Integration and Extensibility
    A particularly enjoyed exploring the use of Platform Events as another means by which you can expose API’s from your packages to support more scalable invocation of your logic and asynchronous plugins.
  • External Integrations and AI
    External integrations with other cloud services are a key part to application development and also the implementation of your solution, thus one of two brand new chapters focuses on Connected Apps, Named Credentials, External Services and External Objects, with worked examples of existing services or sample Heroku based services. Einstein has an ever growing surface area across Salesforce products and the platform. While this topic alone is worth an entire book, I took the time in the second new chapter, to enumerate Einstein from the perspective of the developer and customer configurations. The Formula1 motor racing theme continued with the ingest of historic race data that you can run AI over.
  • Other Updates
    Among other updates is a fairly extensive update to the CI/CD chapter which still covers Jenkins, but leverages the new Jenkins Pipeline feature to integrate SFDX CLI. The Unit Testing chapter has also been extended with further thoughts on unit vs integration testing and a focus on Lightening Web Component testing.

The above is just highlights for this third edition, you can see a full table of contents here. A massive thanks to everyone involving for providing the inspiration and support for making this third edition happen! Enjoy!


5 Comments

Custom Keyboard Shortcuts with Lightning Background Utilities

kbsexample2

As readers of my blog will know I am a big fan of the rich features the Lightning Experience UI provides to developers. Having blogged several times about the amazing Utility Bar, I have been keen to explore new possibilities with the new Background Utility feature. These are utilities that have no UI so do not use up space in the Utility Bar. Instead, they sit in the background monitoring things like other events generated by the user. One such documented use case is the possibility to monitor keyboard events! And so the Custom Keyboard Shortcut Component has been born! This component effectively runs Flows based on keyboard shortcuts defined by the admin! More on this later…

standardshortcuts.png

You may or may not know that Lightning Experience actually already provides some standard keyboard shortcut cuts? Just press Cmd+/ (Mac) or Ctrl+/ (Windows) to get a nice summary of them!

However, per the standard shortcut documentation, it’s not possible to add custom ones. By using the new lightning:backgroundUtilityItem interface we can rectify this. This blog explains a basic hardcoded example component and also introduces an open source component (installable package provided) that links admin defined keyboard shortcuts to Flows and certain navigation events.

In just a few lines of markup and JavaScript code you can get a basic example up and running.

<aura:component implements="lightning:backgroundUtilityItem" >
	<aura:handler name="init" value="{!this}" action="{!c.init}" />
</aura:component>

The component controller simply uses the standard addEventListener method. You can also inspect the keydown event properties to determine what keys are pressed, such as Shift or Control plus another key. This example simply determines if H is pressed and navigates to Home.

({
   init: function(component, event, helper) {
      window.addEventListener('keydown', function(e) {
      if (e.key === 'H') {
         $A.get('e.force:navigateToURL').fire({ url: '/lightning/page/home' })
      }
    });
  }
})

Once deployed go to the App Manager under Setup and add the component to the Utility Items list and that’s it! Note that the component has a different icon indicating it’s a non-visual component. Neat!

Of course, I could not simply leave things like this, so I set about making a more dynamic version. The configuration of the Custom Keyboard Shortcut component is shown at the top of this blog. It’s leveraging the fact that when you configure a Utility Bar component the App Manager inspects the .design file for the component to understand what attributes the component needs the user to configure. At runtime, the controller logic then parses the 9 attributes containing the keyboard shortcuts entered by the user into an internal map that is used by the keyboard event handler to match actions against keyboard activity.

Once you have installed the component either via a package install (admin friendly) or via sfdx force:source:deploy (devs). Add the component within the App Manager to configure keyboard shortcuts.

Through configuration you can connect keyboard shortcuts to the following:-

  • Open a UI Flow in a modal popup
  • Run an Autolaunch Flow
  • Display popup messages communicating the actions taken by the flow
  • Navigate the user to the Home tab
  • Navigate the user to records created by the flow

Further details on configuring the component can be found in the README here. Finally, you may recall that I used a Background Utility in this years Dreamforce presentation. In this case, it was using the new Streaming Component to listen to Platform Events. You can find the source code here.

Have fun!


34 Comments

Managing Dependency Injection within Salesforce

When developing within Salesforce, dependencies are formed in many ways, not just those made explicitly when writing code, but those formed by using declarative tools. Such as defining Actions and Layouts for example. This blog introduces a new open source library I have been working on called Force DI. The goal is to simplify and more importantly consolidate where and how to configure at runtime certain dependencies between Apex, Visualforce or Lightning component code.

Forming dependencies at runtime instead of explicitly during development can be very advantageous. So whether you are attempting to decompose a large org into multiple DX packages or building a highly configurable solution, hopefully, you will find this library useful!

So what does the DI bit stand for?

The DI bit in Force DI stands for Dependency Injection, which is a form of IoC (Inversion of Control). Both are well-established patterns for providing the runtime glue between two points, basically the bit in the middle. Let’s start with an Apex example. In order to use DI, you need to forgo the use of the “new” operator at the point where you want to do the injection. For example, consider the following code:-

PaymentEngine engine = new PayPal();

In the above example, you are explicitly expressing a dependency.  Which not only means you have to deploy or package all your payment engines together, but you have hardcoded a finite set you support and thus also forgone extensibility. With Force DI you can instead write

PaymentEngine engine = (PaymentEngine) di_Injector.Org.getInstance(PaymentEngine.class);

How does it know which class to instantiate then?

Whats happening here is the Injector class is using binding configuration (also dynamically discovered) to find out which class to actually instantiate. This binding configuration can be admin controlled, packaged (e.g. “PayPal Package”) and/or defined dynamically via code. Setting up binding config via code enables dynamic binding by reading other configuration (e.g. the user’s payment preference) and binding accordingly.

The key goal of DI is that calling code is not concerning itself with how an instance is obtained, only what it does with it. The following shows how a declarative binding is expressed via the libraries Binding Custom Metadata Type:-

If this all seems a bit indirect, that’s the point! Because of this indirection, you can now choose to deploy/package other payment gateway implementations independently from each other as well as be sure that everywhere your other code needs a PaymentEngine the implementation is resolved consistently. For a more advanced OOP walkthrough see the code sample here.

Can this help me with other kinds of dependencies?

Yes! Let’s take an example of Lightning Component used as an Action Override. Typically you would create a Lightning Component and associate it directly with an action override. However, this means that the object metadata, action override and the Lightning code (as well as whatever is dependent on that) must travel around together. Rather than, for example, in separate DX packages. It also means that if you want to offer different variations of this action you would need to code all of that into the single component as well.

As before let’s review what the Lightning Component Action Override looks like without DI:-

<aura:component implements="lightning:actionOverride,force:hasSObjectName">
   <lightning:cardtitle="Widget">
     <p class="slds-p-horizontal_small">Custom UI to Create a Widget ({!v.sObjectName})</p>
   </lightning:card>
</aura:component>

This component (and all its dependencies) would be directly referenced in the Action Override below:-

Now let us take a look at this again but using the Lightning c:injector component in its place:-

<aura:component implements="lightning:actionOverride,force:hasSObjectName">
   <c:di_injector bindingName="lc_actionWidgetNew">
      <c:di_injectorAttribute name="sObjectName" value="{!v.sObjectName}"/>
   </c:di_injector>
</aura:component>

To make things clearer when reviewing Lightning Components in the org, the above component follows a generic naming convention, such as actionWidgetNew. This component is instead bound to the Action Override, not the above one and now looks like this:-

The binding configuration looks like this:-

Finally, the injected Lightning Component widgetWizard looks like this:-

<aura:component>
   <aura:attribute name="sObjectName"type="String"/>
   <lightning:card title="Widget">
     <p class="slds-p-horizontal_small">Custom UI to Create a Widget ({!v.sObjectName})</p>
   </lightning:card>
</aura:component>

Note: You have the ability to pass context through to the bound Lightning Component just as the sObjectName attribute value was passed above. The c:injector component can be used in many other places such as Quick Actions, Lightning App Builder Pages, and Utility Bar. Check out this example page in the repo for another example.

What about my Visualforce page content can I inject that?

Visualforce used by Actions and in Layouts can be injected in much the same way as above, with a VF page acting as the injector proxy using the Visualforce c:injector component. We will skip showing what things looked like before DI, as things follow much the same general pattern as the Lightning Component approach.

The following example shows the layoutWidgetInfo page, which is again somewhat generically named to indicate its an injector proxy and not a real page. It is this page that is referenced in the Widget objects Layout:-

<apex:page standardController="Widget__c" extensions="di_InjectorController">
   <c:di_injector bindingName="vf_layoutWidgetInfo" parameters="{!standardController}"/>
</apex:page>
The following shows an alternative means to express binding configuration via code. The ForceApp3Module class defines the bindings for a module/package of code where the Visualforce Component that actually implements the UI is stored. Note that the binding for vf_layoutWidgetInfo points to an Apex class in the controller, not the actual VF component to inject. The Provider inner class actually creates the specific component (via Dynamic Visualforce).
public class ForceApp3Module extends di_Module {

    public override void configure() {

        // Example named binding to a Visualforce component (via Provider)
        bind('vf_layoutWidgetInfo').visualforceComponent().to(WidgetInfoController.Provider.class);

        // Example SObject binding (can be used by trigger frameworks, see force-di-demo-trigger)
        bind(Account.getSObjectType()).apex().sequence(20).to(CheckBalanceAccountTrigger.class);

        // Example named binding to a Lightning component
        bind('lc_actionWidgetManage').lightningComponent().to('c:widgetManager');
    }
}

NOTE: The above binding configuration module class is itself injected into the org-wide Injector by a corresponding custom metadata Binding record here. You can also see in the above example other bindings being configured, see below for more on this.

The actual implementation of the injected Visualforce Component widgetInfo looks like this:-

<apex:component controller="WidgetInfoController">
  <apex:attribute name="standardController"
     type="ApexPages.StandardController"
     assignTo="{!StandardControllerValue}" description=""/>
  <h1>Success I have been injected! {!standardController.Id}</h1>
</apex:component>

Decomposition Examples

The examples, shown above and others are contained in the sample repo. Each of the root package directories, force-app-1, force-app-2, and force-app-3 helps illustrate how the point of injection vs the runtime binding can be split across the boundaries of a DX package, thus aiding decomposition. The force-di-trigger-demo (not shown below) also contains a sample trigger handler framework using the libraries ability to resolve multiple bindings (to trigger handlers) in a given sequence, thus supporting the best practice of a single trigger per object.

Further Background and Features

I must confess when I started to research Java Dependency Injection (mainly via Java Guice) I was skeptical as to how much I could get done without custom annotation and reflection support in Apex. However, I am pretty pleased with the result and how it has woven in with features like Custom Metadata Types and how the Visualforce and Lightning Component injectors have turned out. A plan to write future Wiki pages on the associated GitHub repo to share more details on the Force DI API. Meanwhile here is a rundown of some of the more advanced features.

  • Provider Support
    Injectors by default only return one instance of the bound object, hence getInstance. Bindings that point to a class implementing the Provider interface (see inner interface) can override this. Which also allows for the construction of classes that do not have default constructors or types not supported by Type.forName. This feature also works in conjunction with the ability to pass a parameter via the Apex Injector, e.g. Injector.Org.getInstance(PaymentEngine.cls, someData);
  • Parameters
    Each of the three Injectors permits the passing of parameter/context information into the bound class or component. The examples above illustrate this.
  • Modules, Programmatic Binding Configuration and Injector Scopes
    Binding Modules group programmatic bindings and allow you to hook programmatically into the initialization of the Injector. Modules use the Fluent style interface to express bindings very clearly. The force-app-3 package in the repo uses this approach to define the bindings shown in the VF example above. You can also take a look at a worked example here of how local (one-off) Injectors can be used and here for a more complex OO example of conditional bindings works.
  • StandardController Passthrough
    For Visualforce Component injections the frameworks parameter passing capabilities supports passing through the instance of the StandardController from the hosting page into the injected component, as can be seen in the example above.
  • Binding Discovery by SObject vs Name
    The examples above utilize single bindings by a unique name. However, it is becoming quite common to adapt trigger frameworks to support DI and thus allow a single trigger to dynamically reach out to one or more handlers (perhaps installed in separate DX packages). This example shows how Force DI could be used in such a scenario.

Conclusion

This blog has hopefully wet your appetite to learn more! If so, head over to the repo and have a look through the samples in this blog and others. My next step is to wrap this up in a DX package to make it easier to get your hands on it, for now, download the repo and deploy via DX. I am also keen to explore what other aspects of Java Guice might make sense, such as the Linked Bindings feature.

Meanwhile, I would love feedback on the sample code and library thus far. Last but not least I would like to give a shout out to John Daniel and Doug Ayers for their great feedback during the initial development of the library and this blog. Enjoy!


5 Comments

Adding Clicks not Code Extensibility to your Apex with Lightning Flow

Building solutions on the Lightning Platform is a highly collaborative process, due to its unique ability to allow Trailblazers in a team to operate in no code, low code and/or code environments. Lightning Flow is a Salesforce native tool for no code automation and Apex is the native programming language of the platform — the code!

A flow author is able to create no-code solutions using the Cloud Flow Designer tool that can query and manipulate records, post Chatter posts, manage approvals, and even make external callouts. Conversely using Salesforce DX, the Apex developer can, of course, do all these things and more! This blog post presents a way in which two Trailblazers (Meaning a flow author and an Apex developer) can consider options that allow them to share the work in both building and maintaining a solution.

Often a flow is considered the start of a process — typically and traditionally a UI wizard or more latterly, something that is triggered when a record is updated (via Process Builder). We also know that via invocable methods, flows and processes can call Apex. What you might not know is that the reverse is also true! Just because you have decided to build a process via Apex, you can still leverage flows within that Apex code. Such flows are known as autolaunched flows, as they have no UI.

Blog_Graphic_01_v01-02_abpx5x.png

I am honored to have this blog hosted on the Salesforce Blog site.  To continue reading the rest of this blog head on over to Salesforce.com blog post here.


7 Comments

User Notifications with the Utility Bar API

utilityprogressIn this blog, I want to highlight a couple of great UI features provided by the Utility Bar in Lightning Experience. These are relatively new and accessed only via the Utility Bar API, so are not immediately accessible. This blog is based on code and material I prepared for Dreamforce 2017. However, I did not have time to dig into the code during that session so this blog provides that opportunity. My session also covered other cool features in Lightning Experience, such as the amazing App Console mode!

Enabling and Understanding the Utility Bar API
The utility bar API is enabled at a component level though it does have access to the whole utility bar. You can specify the lightning:utilityBarAPI component in any component, regardless if its in the utility bar or not. This component will not display anything but it does have a very useful selection of methods!

<lightning:utilityBarAPI aura:id="utilitybar"/>

In your component code you simple access it like any other component.

var utilityAPI = cmp.find("utilitybar");

Once you have access to an instance of the component you can call any of its methods. All methods take a utilityId parameter. Although if you call it within the context of a component running in the utility bar you can omit this parameter and the API will discover it for you. All the methods take a single JavaScript object with properties representing the parameters to the method.

utilityAPI.setPanelHeaderLabel({ label: "My Label" });

One interesting design aspect of these methods is they do not respond immediately, all responses are returned via a callback. To do this the API uses the JavaScript Promises pattern. Fortunately, its a pretty easy convention to pick up and use. It is worth taking the time to understand, it has fast become defacto callback approach.

Providing Notifications

notificationdemo

There are many occasions that you want to notify the user of something that’s happened since they last logged in or during login as a result of some background process. The setUtilityHighlighted method is a good way to drive such notifications.

You can, of course, evaluate on initialize of your component, but it’s worth considering using Platform Events, it’s really easy to send them from your Apex code or Process Builder and you can easily integrate my Streaming API component to respond to the event. The code below is a very simple isolated example using browser timers, but it helps illustrate the API and give you a basis to build one.

<lightning:button 
   class="slds-m-around_medium" 
   label="{! v.readNotification ? 'Mark as Read' : 'Wait' }" 
   onclick="{!c.demoNotifications}"/>
<aura:if isTrue="{!v.readNotification}">
   <ui:message title="Confirmation"severity="info">
      This is a confirmation message.</ui:message>
</aura:if>
    demoNotifications: function (cmp, event) {
		var utilityAPI = cmp.find("utilitybar"); 
        var readNotification = cmp.get('v.readNotification');
        if(readNotification == true) {
			utilityAPI.setUtilityHighlighted({ highlighted : false });                        
            cmp.set('v.readNotification', false);
        } else {
            utilityAPI.minimizeUtility();                            
            setTimeout($A.getCallback(function () {
                utilityAPI.setUtilityHighlighted({ highlighted : true });            
				cmp.set('v.readNotification', true);
            }), 3000);                    
        }
    }, 

Providing Progress Updates

progressdemo

By using a combination of setUtilityLabel and setUtilityIcon you can create an eye-catching progress updating effect. This sample is a pretty simple browser timer based example. However, you could again use Platform Events to send events as part of a Batch Apex execution to update on progress or just poll the AsyncApexJob object.

 <lightning:button 
    class="slds-m-around_medium" 
    label="{! v.isProgressing ? 'Stop' : 'Start' }" 
    onclick="{!c.demoProgressIndicator}"/>
 <lightning:progressBar 
    value="{! v.progress }" size="large" />
demoProgressIndicator: function (cmp, event) {
    var utilityAPI = cmp.find("utilitybar"); 
    if (cmp.get('v.isProgressing')) {
        // stop
        cmp.set('v.isProgressing', false);
        cmp.set('v.progress', 0);
        cmp.set('v.progressToggleIcon', false);
        clearInterval(cmp._interval);
        utilityAPI.setUtilityLabel({ label : 'Utility Bar API Demo' });                    
        utilityAPI.setUtilityIcon({ icon : 'thunder' } );                                    
    } else {
        // start
        cmp.set('v.isProgressing', true);
        utilityAPI.minimizeUtility();        
        cmp._interval = setInterval($A.getCallback(function () {
            var progresToggleIcon = 
               cmp.get('v.progressToggleIcon') == true ? false : true;
            var progress = cmp.get('v.progress');
            cmp.set('v.progress', progress === 100 ? 0 : progress + 1);
            cmp.set('v.progressToggleIcon', progresToggleIcon);
            utilityAPI.setUtilityLabel(
                { label : 'Utility Bar API Demo (' + progress + '%)' });        
            utilityAPI.setUtilityIcon(
                { icon : progresToggleIcon == true ? 'thunder' : 'spinner' });
        }), 400);
    }
}

Summary

There is still plenty to dig into in the code samples from the session. You can also deploy the sample code into an org and try out some of the other interactive API demos. Enjoy!

utildemo


6 Comments

Adding User Feedback to your Package

featurefeedbackFeature Management has become GA in Winter’18 and with it the ability to have finer control and visibility over how users of your package consume its functionality. It provides an Apex API and corresponding objects in your License Management Org (LMO). With these objects, you can switch features on and off or even extend the capacity or duration of existing ones. For features that you simply want to monitor adoption on you can also track adoption and send metrics back to your LMO as well. This is all done within the platform, no HTTP callouts are required.

This blog focuses on a tracking and metrics use case and presents a Lightning Component to allow users to activate a given feature and after that contribute to an aggregated scoring of that feature sent back to you the package owner!

Consider this scenario. The latest Widgets App package has added a new feature to its Widgets Overview tab. The ability to analyze widgets! Using Feature Management they can now track who activates this feature and ratings their customers give it.

featureactivate

Trying it Out: You can find the full source code for this sample app and component here. You can also easily give it a try via the handy Deploy to SFDX button! Do not worry though, it will not write back to your production org, it’s totally isolated in this mode. Unless you choose to package it up and associate your LMA etc.

withoutmanagefeatures.pngYour customers may not want every user to have the ability to activate and deactivate features as shown above. The sample application associated with this blog includes a Manage Featurescustom permission that controls this ability. Users without this custom permission assigned only see the feedback portion of the component. If the feature has not been activated a message is displayed informing the user to consult with their admin.

The component only sends the average score per feature per customer back to you. However, a user’s individual score is captured in the subscriber org via custom objects. Enabling you to pick up the phone and dig a bit deeper together with customers showing particularly low or high scores.

featureadoption.png

The following shows what you get back in your License Management Org LMO (typically your companies production org). By using standard reporting you can easily see what features have been activated, their average score and how many users contributed to the rating.

featurereport

NOTE: The average score returned to the production org is represented as a value from 1 to 50.

So let’s now dig into the code and the architecture of this solution. Firstly we need some feature parameters, then some corresponding Apex API to read and write to them. You define the parameters via XML under the/featureParameters folder.

FeatureParam

NOTE: In this blog, we are dealing with parameter values that flow from your customers org back into your production org, hence the SubscriberToLmo usage. Also keep in mind that per the docs, updates to your LMO may take up to 24 hrs.

You can also create package feature parameters via a new tab on the Package Details page in your packaging org. However, if you are using Scratch Orgs you define them via metadata directly. The Feedback component needs you to define three parameters per feature. To support our scenario, the following parameters are defined. WidgetAnalysis (Boolean), WidgetAnalysisCount (Integer), and WidgetAnalysisScore (Integer).

featuremanagementapi

NOTE: When your code sets parameter values, mixed DML rules apply. So typically you would set these via an async context such as @future or a queueable.

To use the Feedback Component included in the sample code for this blog, you set two attributes, the name of your feature parameter and an attribute that the rest of your component code can use to conditionally display your new feature! The following shows how in the above scenario, the new Widget Analysis component has used c:featureFeedback component to activate the feature, get a user rating and control the display of the new graph to the user.

feedbackcomponent.png

Take a deeper look at the Feature Feedback Component Apex controller to see the above Feature Management API in action, as well as how it aggregates the scores.

Back over in your License Management Org, the above report was based on one of the four new custom objects provided by a Salesforce package. The Feature Parameter object represents the package parameters defined above. The Feature Parameter Date, Feature Parameter Integer, and Feature Parameter Boolean are the values set via code running in the subscriber org associated with the License record. Per the documentation, it can take up to 24hrs for these to update.

featureparamsschema

Summary

Knowing more about how your customers consume applications you build on the platform is a big part of customer success and your own. You should also check out the Usage Metrics feature if you have not already.

There is a quite a bit more to Feature Management to explore. Such as controlling feature activation exclusively from your side, useful for pilots or enabling paid features. Of special note is the ability tohide related Custom Objects until features are activated. This is certainly a welcome feature to your customer’s admins when working with large packages since they only see in Object Manager objects relating to activated features.

Finally, I recommend you read the excellent documentation in the ISVForce guide very carefully before going ahead and trying this out in your main package. Since this feature integrates with your live production data. The documentation recommends to try this out in a temporary package first and discuss rollout with your legal team.

P.S. You can also use the FeatureManagement.checkPermission method to check if the user has been assigned a given custom permission without SOQL. Very useful!