Last year, Salesforce launched the Beta of Apex Cursors, allowing you to traverse up to 50M records using SOQL-derived datasets – fast forward to the upcoming Spring ’26 release and it’s now GA! Since Beta, Salesforce has been busy introducing a whole new cursor type dedicated to UI use cases. In this blog, I will cover the new UI pagination cursor type and its differences from the standard cursors; included is an updated version of the sample I provided in last year’s blog – that allows you to use LWCs infinite scrolling component to explore both modes and try them out for yourself.
Why add a new pagination cursor type?
The beta experience was simple and effective but had some limitations and buried within it a corner case of additional complexity that was not great for UI use cases – there are three key differences:
More Cursors per 24hrs. Standard cursors have a limit of 100k active cursors per 24-hour period; this is now 200k to cater to more active users. If this is not enough, see my further thoughts below.
Deleted Record Handling. Perhaps more subtly, some UI helper logic that the standard cursor would otherwise leave to you is handled for you. This means that it would not always retrieve a full page of results in cases when records had been deleted after the cursor was created. If your logic was not paying attention to this, it could skip records unintentionally.
Reduction in Total Records. Lastly, there is now a new row limit on pagination cursors of 100k records (down from 50m of standard cursors).
Overall Total Records per 24hr Remains. Regardless of individual cursor row limits, both types of cursors share the same 100m 24hr limit. Read more about the limits and Apex limits methods here.
At first, it may seem like Salesforce has given with one hand and taken away with the other here… but it’s sometimes easy to forget we are also entrusting them to manage a shared service for us as well – it’s a balance. This statement from the docs is quite well framed:
"This higher instance limit supports many users accessing records lists that rely on smaller pagination cursors."
Are standard cursor types now not allowed for use in an UI?
I was also pleased to see that Salesforce has not blocked us from using ‘standard’ cursors in the UI – even making a GA fix to allow the Database.Cursor type to be serialized in LWC. So we do get to choose depending on the use case and cursor sharing strategy. As an architect, I appreciate the flexibility here from Salesforce; thank you!
Which should I use for my UIs?
I would recommend using pagination cursors for your UIs unless you have a good reason to go beyond the record limit of 100k. Also applicable to both types is the ability to consider if cursors can be shared between sessions/users via platform cache – thus helping to work within the 100k/200k active cursor limit if that applies to the size of your target users. On this last point, please pay attention to record-sharing requirements if you go down this path – I covered this a little further in my prior blog as well.
Using the new Pagination Cursor API
My previous blog covered the now ‘standard’ cursors API quite well and made a few tweaks in that blog as well to update it for GA – as such, I will not repeat further here. Instead, let’s dive into the pagination API – firstly, this is what the Apex Controller for the above LWC looks like:
    @AuraEnabled(cacheable=false)
    public static LoadMoreRecordsResult loadMoreRecordsWithPagination(Database.PaginationCursor paginationCursor, Integer start, Integer pageSize) {
        try {
            if(paginationCursor == null) {
                paginationCursor = Database.getPaginationCursor('SELECT Id, Name, Industry, Type, BillingCity, Phone FROM Account WHERE Name LIKE \'TEST%\' ORDER BY Name', AccessLevel.USER_MODE);
            }

            LoadMoreRecordsResult result = new LoadMoreRecordsResult();
            Database.CursorFetchResult fetchResult =
                paginationCursor.fetchPage(start, Math.min(pageSize, paginationCursor.getNumRecords() - start));
            result.paginationCursor = paginationCursor;
            result.records = fetchResult.getRecords();
            result.offset = fetchResult.getNextIndex();
            result.totalRecords = paginationCursor.getNumRecords();
            result.hasMore = result.offset < result.totalRecords;
            result.deletedRows = fetchResult.getNumDeletedRecords();
            return result;
        } catch (Exception e) {
            throw new AuraHandledException('Error loading records with pagination: ' + e.getMessage());
        }
    }

    public class LoadMoreRecordsResult {
        @AuraEnabled public Database.PaginationCursor paginationCursor;
        @AuraEnabled public List<Account> records;
        @AuraEnabled public Integer offset;
        @AuraEnabled public Boolean hasMore;
        @AuraEnabled public Integer totalRecords;
        @AuraEnabled public Integer deletedRows;
    }
The API design approach mostly follows parallel with standard cursors Apex API, but with the introduction of ‘Pagination‘ or ‘P‘ to distinguish new limits. There is, however, an additional type Database.CursorFetchResult (link); despite its name, it is only used by the pagination fetchPage method. This additional class helps encapsulate the logic that skips deleted records and thus ensures (albeit for the last page potentially) you always get a page full of data – nice!
If you’re curious or want to warn the user that records have been deleted since then, you have the ability to call the getNumDeletedRecords. Finally, watch out for the isDone method – I initially mapped this to the isDone of my client, and it stopped loading records. This is because the scope of the CursorFetchResult.isDone method is at the page level, not the overall cursor level – hence, this method is not used in the Apex code above – I just used the offset < total records calculation instead.
Here is what the corresponding LWC client controller looks like:
The controller above shows the above Apex controller method in use when the LWC lightning-datatable component reaches out for more records to load. As you can see, Database.PaginationCursor (and now Database.Cursor) is serializable via Aura serialization and thus permits the LWC to manage the scope and state of the cursor:
Summary
In summary, I am glad to have such an architectural primitive supported on the Salesforce Platform and appreciative of the design here that supports two different modalities, indicating a good understanding of the general use cases. Yes, it has its limits, but then, as I mentioned above, we trust Salesforce to give us innovation and manage the shared resources—often both don’t balance out in what we think is to our favor at times—and in those times, we can respond with new ideas, feedback supported by those ideas—those are the most powerful ways to make change. Certainly in this case, given the Trailblazer group community feedback, I see that happening between Beta and GA for this offering—so well done product and engineering team! Thank you!
In my other blogs, I have focused on how Heroku’s elastic services can add additional powerful and scalable features to your Salesforce applications, seamlessly extending existing Flow and Apex investments in doing so. This blog, however, focuses on another use case that Salesforce developers can also find themselves involved in—and that is building integrations with Salesforce data.
Heroku’s fully managed services also make a great choice to keep focused on the task of building your integration apps and services, such as ingesting data transformations, filtering, aggregations, as well as supporting you in building user experiences you might need to deploy for other systems or users outside of Salesforce. One critical aspect of such endeavors is how you are managing the authentication and access to your precious Salesforce data!
Unless you have been under a rock of late, you’ll likely be aware of the now increased focus on managing Connected Apps in your orgs; these are the traditional way in which access to Salesforce is gated and typically require you to create, set up, and manage. While Heroku AppLink also leverages Connected Apps, the setup and configuration is, as you would expect for Heroku DX, fully managed for you.
This blog is going to delve into the more practical side of things, so after a little framing, we’ll start to get deeper into technical details than usual, and as a result, it is a bit longer than typical. As always, there is accompanying source code to explore as well. We will explore integration use cases and how Heroku AppLink is configured to manage access to your org data. Finally, I want to thank Heroku for sponsoring this blog and assure readers, as always, that the words and opinions are my own.
In this blog, we will review what Heroku AppLink is doing and see how it allows you to configure three types of authentication: user, user-plus, and authorized-user. Each of the integration examples below leverages one of these three modes. Simply put, though, user modes are designed for Salesforce to Heroku, and authorized user mode is designed for Heroku to Salesforce, where the Salesforce user is not known – and thus authentication is configured upfront. The following diagram helps illustrate this:
User mode simply requires assigning a permission set to gate access to the Heroku service, and that’s it, the logged-in user within Salesforce is the same user used when performing operations within Heroku-deployed code – the authorization context is seamlessly but securely exchanged.
This is actually the first major plus in my view, as before it was tempting to pass the UI session token (not good practice) or have to resort to re-authentication as some general-purpose user and thus breaking auditability, and typically resulting in over-permissioning around such an “integration user”. Heroku AppLink user mode only works because an authentication context has already been established. However, when the flow of control originates outside of Salesforce, there still has to be an authentication process required, no escaping that. Heroku AppLink does allow you to define one or more pre-authenticated users that you set up beforehand and reference in your code via an alias – more on this later.
Heroku DX provides a full CLI and UI dashboard for admins to see what connections have been connected to specific orgs. There is also a bunch of permissions and controls within Salesforce as well – that we will get into a little later! Meanwhile, here are a couple of examples of the AppLink dashboard.
Exploring Integration Types
Integrations come in various forms; at a high level, there are those that are triggered by an action within Salesforce by an authenticated, logged-in user or those that occur as a result of an external system or user that is not a Salesforce user. These integration types fit perfectly with the Heroku AppLink authentication modes, as the table below explains.
Public or gated websites/mobile applications that wish to leverage Salesforce data in some direct or indirect form. Calculations, summary info, validations etc. May also have their own authentication, but is not linked to a Salesforce user.
Public or gated APs that leverage as part of their implementation access to Salesforce, for example APIs that are tailored to a certain type or structure of data that requires some form of coded transformation before data can be inserted into one or more Salesforce object.
Integrations that flow from actions or events within a Salesforce org as a result of an authenticated users action or asynchronous process, such as a button press or platform event. Here Heroku deployed code can be used as a middleware to perform additional compute , query additional org data, orchestrate callouts and transform data from Salesforce format to that of the external API.
As an extension to integrations that flow from within Salesforce, as in the above use case, additional object and field access maybe required beyond that of the invoking user – without having permanently grant that user such permissions.
Integration operations that exceed HTTP callout limits can leverage async HTTP callbacks to the Salesforce org once they have completed their processing. Such callbacks directly invoke Apex code handlers running with the authority of the invoking user.
User Mode / User Mode Plus
In the following sections, we start to get deeper into the weeds of the above use cases and how to configure Heroku AppLink, along with exactly what Heroku AppLink is setting up for you.
Web Site Data Integration
Imagine you are a product marketing team and want to engage influencers on your latest campaigns managed within Salesforce. Influencers will not have Salesforce logins. In the past, you might have built such a site and stored those in a related database or even updated the web pages manually as new campaigns launched and completed.
With a data integration to Salesforce, the website can extract approved information from the Campaign object dynamically, ensuring it’s always up to date. You could even extend this further by allowing influencers to show an interest and have that updated within a related object in Salesforce, triggering internal workflows for review and approval. Here is what our example looks like:
The above page is updated by an endpoint that dynamically fetches the records using the AppLink SDK. It uses the AppLink Node.js SDK to retrieve a pre-authorization; this is effectively the authorized user mode we discussed earlier, and that’s it, you can then go on to make SOQL or DML requests:
The important thing here is that in the code above there is no need for Connected App OAuth secrets, token management, JWT certs, or other logic; the SDK is basically calling the AppLink API to obtain a token for you. To break this down further, let’s replicate the getAuthorization SDK call via curl using the /authorizations AppLink API.
The above curl command uses the jq command to parse AppLink env vars and display the API result in a friendly format where we can see the typical domain, user, and token values required to call Salesforce APIs:
You can also run the command heroku applink:authorizations:info, which also uses the same API. You may have noticed that the above example uses some HEROKU_APPLINK_ env variables to gain access to the AppLink API. These are only supplied to your Heroku application as part of adding the Heroku AppLink addon. Only the Heroku app owners can download these environment variable values—and thus, how we can also run such apps and tests locally per the instructions in the README files.
Note: The HEROKU_APP_ID environment is something you can pretty much ignore once set (see below). Without getting into details, it is more of an implementation detail being surfaced at this point and will hopefully be removed from the user-facing experience in the future.
You may also be wondering about the connectionName / developer_name variables used in the above code and CURL example. This is effectively an alias used to reference a prior authentication of a given user to a given org; in this case, ours is influencerPortal (named after its usage in this case). The CLI and API can be used to make these authorizations, both in interactive and headless modes (useful for your DevOps pipelines).
Finally, to set all this up, below are the CLI commands used by the sample code included here to create a Heroku app, install the Heroku AppLink addon, and then authorize a user with our influencerPortal alias. Finally, the code is deployed to Heroku (steps are also provided in the README for local development). This alias is then configured via the CONNECTION_MARKETING env var above in the code.
# Create a Heroku app and install the AppLink add-on
heroku create
heroku addons:create heroku-applink --wait

# Authorize the org (popups up Salesforce login page)
heroku salesforce:authorizations:add influencerPortal -l https://test.salesforce.com

# Expose the connection name and app ID to the dyno
heroku config:set CONNECTION_MARKETING=influencerPortal
heroku config:set HEROKU_APP_ID="$(heroku apps:info --json | jq -r '.app.id')"

# Deploy the API to Heroku
git push heroku main
In order to configure AppLink in an org, your user will need the Manage Heroku AppLink permission; otherwise, any authentication attempt will fail. The salesforce:authorizations:add CLI command prompts you in the browser during the login (headless JWT auth is also available) to accept a number of confirmations – these confirm the permissions Heroku AppLink is being given in your org – so be sure to review these carefully:
If you review your Connected App OAuth Usage page will see the Heroku Credentials Service:
Since you name these authenticated connections, you can, of course, use as many as you like – connecting many orgs to your service or app. Perhaps you do want to designate different users for different purposes, or even have the code read from different orgs! That’s right, the AppLink add-on supports multiple orgs. There is a great example of this in the standard documentation samples here.
As final note, although the AppLink SDK was used here, you can call the AppLink API directly as well, and once you have the domain and session Id you can of course use Salesforce APIs directly. Especially useful if your not using Node.js or Python, since the SDK is currently only availble in these languages. The Heroku AppLink API is fully documented here.
Data Ingest APIs
Heroku can also be a great place to host coded custom APIs that simplify data ingestion from one format into that which the Salesforce APIs and your data model expect. In this example, imagine we are a consumer-facing business, and every month we want to ingest product updates from our suppliers. This API will create or update product information accordingly, using the productCode as an external reference.
The following curl will exercise the API from the locally running web server:
Once again, in reality, it’s expected that this API would also have its own authentication schema suppliers use, but this is not based on Salesforce users. Before we move on from this point, it’s worth pointing out that building your own authentication for web or API endpoints is generally not a good idea; instead, seek out support from frameworks such as Spring Boot, .NET or API gateways such as Mulesoft.
Once more, the AppLink authorized user mode is used to integrate with Salesforce data to upsert the transformed records. I originally hoped to use the AppLink SDK’s Unit of Work feature for this, a handy wrapper around the composite API; however, it does not support upsert operations presently. This, however, gave me a new opportunity to highlight a great fallback feature of the AppLink SDK, the org.request method. This method allows you to directly call Salesforce APIs, as shown below, but still take advantage of AppLink adding the authentication details for you—nice!
It’s worth also noting that languages such as Node.js support easy ways to make parallel Salesforce API invocations, which are of course possible, allowing you to reduce ingest execution time dramatically (see this example here for more). Be careful to profile and test such approaches though to check for deadlines and conflicts. You can review the full implementation of the API here.
Finally, worthy of reference here is Heroku Connect; this addon uses a Heroku Postgres database that syncs with your Salesforce org data. In this case, you’re using SQL to write to Postgres, so performance is improved over Salesforce APIs, at the trade-off of maintaining a copy of your data in Postgres. This option really needs to justify itself accordingly.
Third Party API Callouts initiated from within Salesforce
In cases where Salesforce is not the system of record, it is common to initiate integrations from within Salesforce to trigger processes elsewhere. Imagine we are selling cloud infrastructure services, and each time an opportunity is closed, we want to automate the provisioning of those services. We are using Heroku-deployed code to integrate with Salesforce data and transform it into a format required by the third-party provisioning APIs. Provisioning can take some time, so processing returns back to Salesforce via callbacks that trigger Apex, which can send notifications to the user, for example.
Apex (or Flow or AgentForce for that matter) can be used to call the Heroku-deployed code that is managing and orchestrating third-party API calls. Here we have an Apex code fragment that invokes Heroku-deployed code and provides an Apex class, offering a callback (more on this later):
// Provisioning orchestration service request
HerokuAppLink.ProvisioningService service = new HerokuAppLink.ProvisioningService();
HerokuAppLink.ProvisioningService.provisionServices_Request request =
       new HerokuAppLink.ProvisioningService.provisionServices_Request();
request.body = new HerokuAppLink.ProvisioningService_ProvisionServicesRequest();
request.body.opportunityIds = opportunityIds;

// Create callback handler for notifications
ProvisioningCallback callbackHandler = new ProvisioningCallback();

// Set callback timeout to 60 minutes from now
DateTime callbackTimeout = DateTime.now().addMinutes(60);

// Call the service with callback
HerokuAppLink.ProvisioningService.provisionServices_Response response =
        service.provisionServices(request, callbackHandler, callbackTimeout);
The above Apex is, of course, already running as an authenticated Salesforce user, and due to AppLink user mode, the following Node.js code that performs additional SOQL queries is also operating as that user as well. As such, the same profile, permission set, and sharing rules apply – ensuring that provisioning only occurs with opportunities that the user has access to! Users also need an additional permission to invoke the Heroku service.
In the code deployed to Heroku, we are using Node.js Fastify to implement the API. In its route handler, we can see request.salesforce is a reference to the Heroku AppLink SDK being used once again to obtain a secure authentication to Salesforce. Additionally, notice that Salesforce passes in a callback URL:
The above relies on a Fastify HTTP processing middleware hook (not shown but included in the sample code as /src/server/middleware/salesforce.js) that calls the Heroku AppLink SDK to parse a unique HTTP header. This header is passed from Salesforce that works together with the addons environment variables to retrieve a secure connection using the invoking user’s authority. Further code is able to query the opportunities to orchestrate calling the actual underlying provisioning APIs (not shown) and eventually uses the AppLink SDK again to callback to Salesforce:
// Query opportunities and line items
const opportunityIdList = opportunityIds.map(id => sanitizeSalesforceId(id)).filter(Boolean).map(id => `'${id}'`).join(',');
const oppQuery = `
  SELECT Id, Name, AccountId, CloseDate, StageName, Amount,
         (SELECT Id, Product2Id, Product2.Name, Quantity, UnitPrice, PricebookEntryId FROM OpportunityLineItems)
  FROM Opportunity
  WHERE Id IN (${opportunityIdList})
const opportunities = await queryAll(oppQuery, { context: { org } }, logger);

// Process opportunity lines items to provision services ...
// ...

// Callback to Salesforce Apex handler to notify user
const callbackResults = {
  jobId,
  opportunityIds,
  services,
  summary,
  status: 'completed',
};
const requestOptions = {
  method: 'POST',
  headers: { 'Content-Type': 'application/json' },
  body: JSON.stringify(callbackResults)
};
await org.request(callbackUrl, requestOptions);
We will explore the Apex callback code later; for now, we have seen the code. Let’s take a look at how Heroku AppLink was configured to allow this use of user mode to work. Unlike the above examples, we are not authenticating a specific user; we are granting users permission to call the Heroku service. To do this, we must publish that service into one or more orgs. The following AppLink CLI commands are used:
# Connect to Salesforce org
heroku salesforce:connect my-org -l https://test.salesforce.com

# Publish API to Salesforce using the OpenAPI schema defined in api-docs.yaml
heroku salesforce:publish api-docs.yaml --client-name ProvisioningService --connection-name my-org

# Assign Permission Sets to allow your user to invoke the Heroku code
sf org assign permset --name ProvisioningService
sf org assign permset --name ProvisioningServicePermissions
As we experience in the previous use case, the browser-based interactive login is used; however, this user is not the user used to invoke the Heroku service. That’s still the user logged in at the time the service is called since we are in user mode here. The permission sets are generated by AppLink and are required to be assigned to any user invoking the service. The second permission set, ProvisioningServicePermissions, allows you to add additional permissions required by the service (more on this later). Here is what the service looks like once published, under the Setup menu:
Heroku AppLink has gone ahead and created Connected Apps and External Services for you. Note that the External Services show a source of Heroku, indicating these are managed by Heroku, not the org admin. In normal practice, you do not need to interact with these, but it is important to know they exist, especially as you should now become aware of all Connected Apps used in your org—right!
Managing Additional Integration Permissions
In some cases, integrations require information that the invoking user does not have access to. Rather than adding that permission to the user and just not telling them about it—which is bad, of course, right?! Instead, we can add additional object and field permissions to a permission set created by AppLink. Imagine that we have provisioning parameters stored in a ProvisioningParameters__mdt custom metadata type object. By adding permissions to the ProvisioningServicePermissions permission set, the code can now query this object—but the sales person otherwise cannot:
The ProvisioningServicePermissions permission set is created as a Session Based permission set, which means it does need to be assigned to users but it will not be activated until the system assigns it to them. In this case the system is Heroku AppLink, which is automatically activating it during Heroku code execution and deactivating it after. This is what AppLink refers to as user plus mode.
You can also find another example of this elevation pattern here.
Aysnc Integration Callbacks to Salesforce
Some integrations are long-running; for example, in our provisioning case, it might take several minutes to provision all services sold—well beyond the synchronous HTTP callout limit of Apex. In this case, Heroku AppLink supports secure callbacks to Salesforce that invoke Apex code. In fact, it can support multiple callbacks, allowing for progressive updates to be made back to Salesforce if required.
The Apex code from the previous example showed a callback handler being provided to send notifications to the salesperson once the provisioning was complete – this could also perform updates to the Opportunity record itself:
public class ProvisioningCallback
    extends HerokuAppLink.ProvisioningService.provisionServices_Callback {

    // Static variable to store the notification type ID
    private static Id notificationTypeId;

    // Static constructor to query the CustomNotificationType once when class is loaded
    // ...

    /**
     * Handles the callback response from the Heroku application
     * Sends a custom notification to the user with the results
     */
    public override void provisioningStatus(List<HerokuAppLink.ProvisioningService.provisionServices_provisioningStatus_Callback> callbacks) {
        // Send custom notification to the user
        for (herokuapplink.ProvisioningService.provisionServices_provisioningStatus_Callback callback : callbacks) {
            List<herokuapplink.ProvisioningService_provisioningStatusCallback_IN_body_services> services = callback.response.body.services;
            if (services != null && !services.isEmpty()) {
                for (herokuapplink.ProvisioningService_provisioningStatusCallback_IN_body_services serviceResult : services) {
                    Messaging.CustomNotification notification = new Messaging.CustomNotification();
                    notification.setTitle('Service Provisioning Update');
                    notification.setNotificationTypeId(notificationTypeId);
                    notification.setBody(serviceResult.message);
                    notification.setTargetId(UserInfo.getUserId());
                    notification.send(new Set<String>{ UserInfo.getUserId() });
                }
            }
        }
    }
}
The Apex callbacks run as the original user also, so once again maintaining a security flow of permissions that are bounded by the user’s permissions. Finally, if you want to know more about this pattern, I covered it more in depth in my previous blog here – in terms of the required changes to the OpenAPI specification provided when publishing the service.
Summary
As the world continues to build more services and generate more data, the more humans and now AIs become users of them – the need for ensuring those integrations are built securely increases. While I have been around long enough to know some of what it takes, including a pretty good understanding of OAuth – it’s simply an area I do not focus on – I build apps and services, not infrastructure.
Heroku and Salesforce engineers are, however, focusing on this. Heroku AppLink, Connected Apps (or External Client Apps more recently) are all technologies we should be learning vs. the more DIY approaches of the past. Complete working examples accompany this blog, integration-applink-api, integration-applink-web and integraiton-applink-callout. Associated README files include full instructions on how to deploy these samples yourself and additional technical notes not covered here. Here are some additional resources:
In my new role, I am enjoying getting back into a favorite pastime of trawling through the release notes and Metadata API for the latest new features and changes. That’s right – I really do compare the Metadata API as it often uncovers smaller changes or draws attention to something I might have missed in clicking through the documentation. This blog is not exhaustive – it’s simply a quick list of things that caught my eye (thus far) from a more developer, architect, and general architecture perspective. Rest assured, a number of these have gone on the future blogs list for a deeper dive!
Integration Features and API Updates
External Services continues to impress me with how easy it makes integrating well-documented (aka via OpenAPI schema) external APIs into Apex and Flow. It’s no longer just robotically generating stubs but adding actual platform integration value as well. With async APIs, it does a great job at integrating with platform callbacks. With Winter, it now sets its sights on binary information being passed around in APIs. Something that would easily blow heap limits today – per the documentation, it now appears that it will marshal binary content between ContentVersion records automatically. I literally had to write API code this week to manually write to this object myself to avoid a heap issue – now all I have to do is declare a binary type – nice!
Make use of your Lightning Web Component investments outside of Salesforce with the return of a tech I explored a lot in the past, Lightning Out! Now we have Lightning Out v2.0 based on LWR (Lightning Web Runtime) which appears to have had a big refit and UX shake-up with a fancy new page under Setup that allows you to set up and list your external apps (websites) that want to access your LWC and provides a nice tool to provide the code needed to integrate.
Make more use of industry web development innovation inside your Lightning Web Components with the ability to elevate third-party scripts to fully trusted mode. Having been around the block a number of times getting excited about a new widget or library to use in my Salesforce UIs only to find it’s blocked – this is a welcome option! It is behind, wisely a number of permissionsto enable in the org – but at least we now have the option to make this decision ourselves – wonderful!
Being more efficient with your LWC API requests is always a good thing! Sticking with LWC again, it’s great to see Salesforce investing in making native integrations with their APIs, such as the new GraphQL module lightning/graphql – which replaces the now deprecated lightning/uiGraphQLApi. This new version exposes access to optional fields and dynamic query construction. This is an area I have not really poked around in much – but I intend to now!
Now you can use Flow to more easily automate around changes in external systems – albeit if you have a Mulesoft license that is. Still this is a welcome addition showing that Salesforce is getting more serious about giving us a single pane of glass when it comes to their offerings and not forcing us to build glue integrations. This facility immediately, of course, leverages many existing Mulesoft connectors – allowing you, for example, to make a Flow that responds to Asana task completions or Calendly invites being accepted. Of course, we do have full Salesforce API support for invoking Flows as I have covered in the past – so you still have the DIY option to connect your Flows.
Developer Experience
You can now access your Apex Controllers and Data from Local LWC (Beta). Local development still alas eludes Apex but less so LWC over the years. Salesforce is certainly ensuring web development on the platform is less jarring when coming from other platforms and frameworks here – with the ability to run your LWC locally and yet still have it access (deployed) Apex and data in the attached org. I do a reasonable amount of LWC development, and deploying (and refreshing) gets very tedious (even when AI-assisted) – so I think it’s about time with this new feature I took a deeper look at this.
Logic is logic, no matter if it’s expressed as a Flow and/or Apex, and both need a good test solution. Thankfully, in later years, we have seen an uplift in recognizing this for Flow. And this release now brings together what I suspect has been scripted up until now – a more unified way of seeing Apex and Flow test results also see here.
Standardizing documentation for Apex code has historically been a case of borrowing what largely JavaDocs has done – with the Winter release, Salesforce has now officially defined annotations for documenting Apex code – allowing tools to generate better docs and IDEs and AIs to better respond to the insights captured within them. I was not able to find more information other than release note topic at the time of writing – I am sure others will be eager to dive further into this for sure!
A modern feature uplift for Salesforce packaging in the form of automatic dependency discovery. In the past, you had to list and manage the full dependency tree – now you can – much like other dependency managers elsewhere – define the immediate dependencies and have child dependencies automatically discovered. I suspect there will be a lot of attention to the details of how this one works once folks get their hands further on it – including myself.
Other Notables
This is already a long post – so my 10th area of interest is more of a catch all – so here are a few other things that also caught my attention:
New Metadata Type – BatchProcessJobDefinition. This was observed only through comparing the Metadata APIs, I cannot find another reference to it other than here. Alas it appears to be less general purpose than its name implies – relating I believe to a feature in Loyalty cloud.
p.s if you are interested in the output from my Metadata API compare – I uploaded it here. Maybe you can spot something cool or useful thats yet to be documented!
I’m proud to announce the third edition of my book has now been released. Back in March this year I took the plunge start updates to many key areas and add two brand new chapters. Between the 2 years and 8 monthssince the last edition there has been several platform releases and an increasing number of new features and innovations that made this the biggest update ever! This edition also embraces the platforms rebranding to Lightning, hence the book is now entitled Salesforce Lightning Platform Enterprise Architecture.
You can purchase this book direct from Packt or of course from Amazon among other sellers. As is the case every year Salesforce events such as Dreamforce and TrailheaDX this book and many other awesome publications will be on sale. Here are some of the key update highlights:
Automation and Tooling Updates
Throughout the book SFDX CLI, Visual Studio Code and 2nd Generation Packaging are leverage. While the whole book is certainly larger, certain chapters of the book actually reduced in size as steps previously reflecting clicks where replaced with CLI commands! At one point in time I was quite a master in Ant Scripts and Marcos, they have also given way to built in SFDX commands.
User Interface Updates
Lightning Web Components is a relative new kid on the block, but benefits greatly from its standards compliance, meaning there is plenty of fun to go around exploring industry tools like Jest in the Unit Testing chapter. All of the books components have been re-written to the Web Component standard.
Big Data and Async Programming
Big data was once a future concern for new products, these days it is very much a concern from the very start. The book covers Big Objects and Platform Events more extensibility with worked examples, including ingest and calculations driven by Platform Events and Async Apex Triggers. Event Driven Architecture is something every Lightning developer should be embracing as the platform continues to evolve around more and more standard platforms and features that leverage them.
Integration and Extensibility
A particularly enjoyed exploring the use of Platform Events as another means by which you can expose API’s from your packages to support more scalable invocation of your logic and asynchronous plugins.
External Integrations and AI
External integrations with other cloud services are a key part to application development and also the implementation of your solution, thus one of two brand new chapters focuses on Connected Apps, Named Credentials, External Services and External Objects, with worked examples of existing services or sample Heroku based services. Einstein has an ever growing surface area across Salesforce products and the platform. While this topic alone is worth an entire book, I took the time in the second new chapter, to enumerate Einstein from the perspective of the developer and customer configurations. The Formula1 motor racing theme continued with the ingest of historic race data that you can run AI over.
Other Updates
Among other updates is a fairly extensive update to the CI/CD chapter which still covers Jenkins, but leverages the new Jenkins Pipeline feature to integrate SFDX CLI. The Unit Testing chapter has also been extended with further thoughts on unit vs integration testing and a focus on Lightening Web Component testing.
The above is just highlights for this third edition, you can see a full table of contents here. A massive thanks to everyone involving for providing the inspiration and support for making this third edition happen! Enjoy!
This blog will cover three ways by which you can interact programmatically with Salesforce DX. DX provides a number of time-saving utilities and commands, sometimes though you want to either combine those together or choose to write your own that fit better with your way of working. Fortunately, DX is very open and in fact, goes beyond just interacting with CLI.
If you are familiar with DX you will likely already be writing or have used shell scripts around the CLI, those scripts are code and the CLI commands and their outputs (especially in JSON mode) is the API in this case. The goal of this blog is to highlight this approach further and also other programming options via REST API or Node.js.
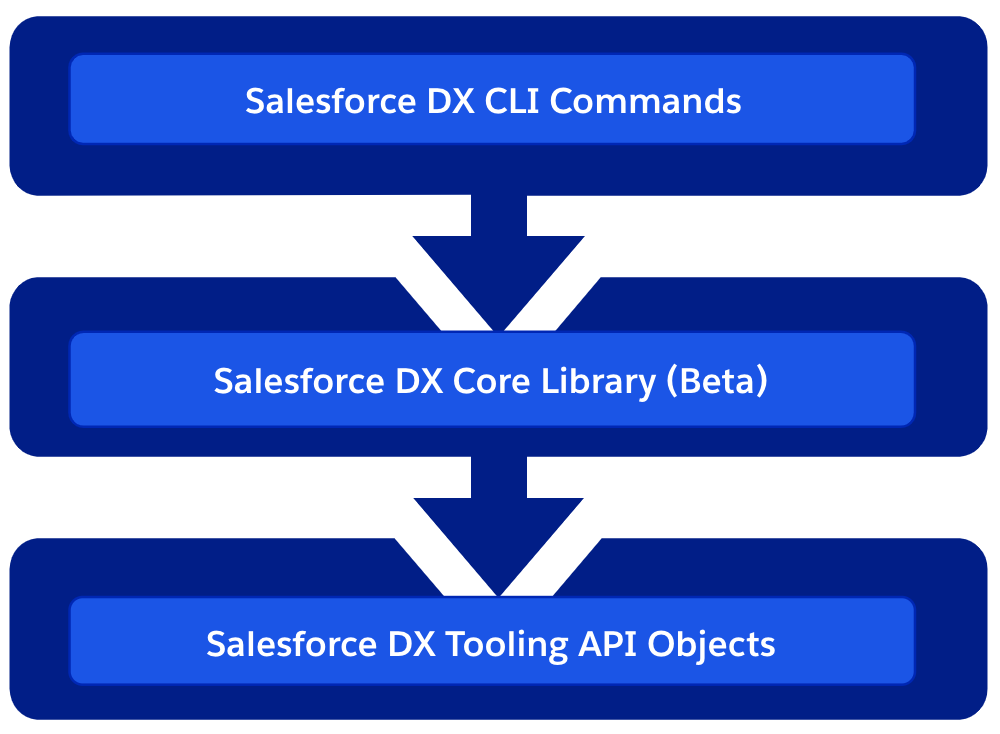
Broadly speaking DX is composed of layers, from client side services to those at the backend. Each of these layers is actually supported and available to you as a developer to consume as well. The diagram shown here shows these layers and the following sections highlight some examples and further use cases for each.
DX CLI
Programming via shell scripts is very common and there is a huge wealth of content and help on the internet regardless of your platform. You can perform condition operations, use variables and even perform loops. The one downside is they are platform specific. So if supporting users on multiple platforms is important to you, and you have skills in other more platform neutral languages you may want to consider automating the CLI that way.
Regardless of how you invoke the CLI, parsing human-readable text from CLI commands is not a great experience and leads to fragility (as it can and should be allowed to change between releases). Thus all Salesforce DX commands support the –json parameter. First, let’s consider the default output of the following command.
sfdx force:org:display
=== Org Description
KEY              VALUE
───────────────  ──────────────────────────────────────────────────────────────────────
Access Token     00DR00.....O1012
Alias            demo
Client Id        SalesforceDevelopmentExperience
Created By       admin@sf-fx.org
Created Date     2019-02-09T23:38:10.000+0000
Dev Hub Id       admin@sf-fx.org
Edition          Developer
Expiration Date  2019-02-16
Id               00DR000000093TsMAI
Instance Url     https://customization-java-9422-dev-ed....salesforce.com/
Org Name         afawcett Company
Status           Active
Username         test....a@example.com
Now let’s contrast the output of this command with the –json parameter.
If you are using a programming language with support for interpreting JSON you can now start to parse the response to obtain the information you need. However, if you are using shell scripts you need a little extract assistance. Thankfully there is an awesome open source utility called jq to the rescue. Just simply piping the JSON output through the jq command allows you to get a better look at things…
All the DX commands support JSON output, including the query commands…
sfdx force:data:soql:query -q "select Name from Account" --json | jq .result.records[0].Name -r
GenePoint
The Sample Script for Installing Packages with Dependencies has a great example of using JSON output from the query commands to auto-discover package dependencies. This approach can be adapted however to any object, it also shows another useful approach of combining Python within a Shell script.
DX Core Library and DX Plugins
This is a Node.js library contains core DX functionality such as authentication, org management, project management and the ability to invoke REST API’s against scratch orgs vis JSForce. This library is actually used most commonly when you are authoring a DX plugin, however, it can be used standalone. If you have an existing Node.js based tool or existing CLI library you want to embed DX in.
  // Enter a new alias
  const { newAlias } = await inquirer.prompt([
    { name: 'newAlias', message: 'Enter a new alias (empty to remove):' }
  ]);

  if (alias !== 'N/A') {
    // Remove the old one
    aliases.unset(alias);
    console.log(`Unset alias ${chalk.red(alias)}`);
  }

  if (newAlias) {
    aliases.set(newAlias, username);
    console.log(
      `Set alias ${chalk.green(newAlias)} to username ${chalk.green(username)}`
    );
  }
Tooling API Objects
Finally, there is a host of Tooling API objects that support the above features and some added extra features. These are fully documented and accessible via the Salesforce Tooling API for use in your own plugins or applications capable of making REST API calls. Keep in mind you can do more than just query these objects, some also represent processes, meaning when you insert into them they do stuff! Here is a brief summary of the most interesting objects.
PackageUploadRequest, MetadataPackage, MetadataPackageVersion represent objects you can use as a developer to automate the uploading of first generation packages.
Package2, Package2Version, Package2VersionCreateRequest and Package2VersionCreateRequestError represent objects you can use as a developer to automate the uploading of second generation packages.
PackageInstallRequestSubscriberPackageSubscriberPackageVersion and Package2Member (second generation only) represent objects that allow you to automate the installation of a package and also allow you to discover the contents of packages installed within an org.
SandboxProcess and SandboxInfo represent objects that allow you to automate the creation and refresh of Sandboxes, as well as query for existing ones. For more information see the summary at the bottom of this help topic.
SourceMember represents changes you make when using the Setup menu within a Scratch org. It is used by the push and pull commands to track changes. The documentation claims you can create and update records in this object, however, I would recommend that you only use it for informationally purposes. For example, you could write your own poller tool to drive code generation based on custom object changes.
IMPORTANT NOTE: Be sure to consider what CLI commands exist to accomplish your need. As you’ve read above its easy to automate those commands and they manage a lot of the complexity in interacting with these objects directly. This is especially true for packaging objects.
Summary
The above options represent a rich set of abilities to integrate and extend DX. Keep in mind the deeper you go the more flexibility you get, but you are also taking on more complexity. So choose wisely and/or use a mix of approaches. Finally worthy of mention is the future of SFDX CLI and Oclif. Salesforce is busy updating the internals of the DX CLI to use this library and once complete will open up new cool possibilities such as CLI hooks which will allow you to extend the existing commands.
Building solutions on the Lightning Platform is a highly collaborative process, due to its unique ability to allow Trailblazers in a team to operate in no code, low code and/or code environments. Lightning Flow is a Salesforce native tool for no code automation and Apex is the native programming language of the platform — the code!
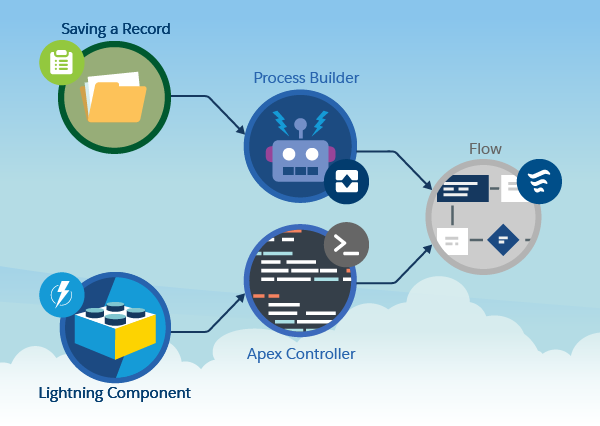
A flow author is able to create no-code solutions using the Cloud Flow Designer tool that can query and manipulate records, post Chatter posts, manage approvals, and even make external callouts. Conversely using Salesforce DX, the Apex developer can, of course, do all these things and more! This blog post presents a way in which two Trailblazers (Meaning a flow author and an Apex developer) can consider options that allow them to share the work in both building and maintaining a solution.
Often a flow is considered the start of a process — typically and traditionally a UI wizard or more latterly, something that is triggered when a record is updated (via Process Builder). We also know that via invocable methods, flows and processes can call Apex. What you might not know is that the reverse is also true! Just because you have decided to build a process via Apex, you can still leverage flows within that Apex code. Such flows are known as autolaunched flows, as they have no UI.
Its been nearly 9 years since i created my first Salesforce developer account. Back then I was leading a group of architects building on premise enterprise applications with JavaJ2EE and Microsoft .Net. It was fair to say my decision to refocus my career not only in building the first Accounting application in the cloud, but to do so on an emerging and comparatively prescriptive platform, was a risk. Although its not been an easy ride, leading and innovating rarely is, it is a journey that has inspired me and my perspective on successfully delivering enterprise applications.
Clearly since 2008 things have changed a lot! For me though, it was in 2014 when the platform really started to evolve in a significant way, when Lightning struck! It has continued to evolve at an increasingly rapid pace. Not just for the front end architecture, but the backend and latterly the developer tooling as well.
Component and Container Driven UI Development Decomposing code into smaller reusable units is not exactly new, but has arguably taken time to find its feet in the browser. By making Lightning Components the heart of their next generation framework, Salesforce made decomposition and reuse the primary consideration and moved us away from monolithic page centric thinking. Components need a place to live! With the increase of usability features in the various Lightning containers, namely Experience, Mobile and Community, we are further encouraged to build once run everywhere. Lightning Design System has not only taken the leg work out of creating great UI’s, but also brings with it often forgotten aspects such as keyboard navigation and support for accessibility.
Metadata Driven Solutions Metadata has been at the heart of Salesforce since the beginning, driving it forward as low code or zero code, high productivity platform for creating solutions and applying customisations. When Salesforce created Custom Metadata, it enabled developers to also deliver solutions that harness these same strengths that has made the platform so successful, driving up productivity and easy of implementation and time scales down.
Event Driven Architecture Decomposition of processing is key to scalability and resiliency. While we often get frustrated with the governors, especially in an interactive/synchronous context, the reality is safe guarding server resources responsible for delivering a responsive UI to the user is critical.Batch Apex, Future and Queables have long since been ways to manage async processing. With Platform Events, Salesforce has delivered a much more open and extensible approach to orchestrating processing within the platform as well as off platform. With a wealth of API’s for developers on and off platform, and tooling integration, EDA is now firmly integrated into the platform. Retry semantics with Platform Events is also a welcome addition to what has previously been left to the developer when utilising the aforementioned technologies.
Industry Standards and Integrations Salesforce has always been strong in terms of its own API’s, the Enterprise and Partner API’s being the classic go to API’s, now available in REST form. With External Objects and External Services supporting the OData and Swagger industry standards, off platform data sources and external API’s are obtained at a much reduced implementation overhead. Also without the user having to leave behind the value of various platform tools or the latest Lightning user experience.
Open Tools and Source Driven Development The tooling ecosystem has been a rich tapestry of story telling and is still emerging. The main focus and desire has been to leverage other industry standard approaches such as Continuous Integration and Deployment, with varying degrees of success. With SalesforceDX going GA, the first wave of change is now with us, with the ability to define, create, manage and destroy development environments at will. With more API’s and Services allowing for richer IDE experiences to be built in a more open and IDE agnostic way. I am very much looking forward to the future of DX, especially upcoming improvements around packaging.
Hybrid Architectures Last but not least, many of the above advancements provide more secure, responsive and integrated options for leveraging services and capabilities of other cloud application platforms. Heroku is the natural choice for those of us wanting to stay within the Salesforce ecosystem. With both Heroku Connect and Salesforce Connect (aka External Objects) integrating and synchronising data is now possible at much greater easy and reliability. Platform Events and External Services also both provide additional means for developers to connect the two platforms and take advantage of broader languages, libraries and additional compute resources. FinancialForce has open sourced an exciting new library, Orizuru, to assist in integrating Force.com and Heroku that will be showcased for the first time at Dreamforce.
The above list is certainly not exhaustive, when you consider Big Data (Big Objects), Analytics (Einstein/Wave Analytics) and of course AI/ML (Einstein Platform). Its a great time to being heading into my 5thDreamforce i am sure the list will grow even further!
I will be presenting in the following sessions at Dreamforce 2017.
In my previous blog i covered an exciting new integration tool from Salesforce, which consumes API’s that have a descriptor (or schema) associated with them. External Services allows point and click integration with API’s. The ability for Salesforce to consume API’s complying with API schema standards is a pretty huge step forward. Extending its ability to integrate with ease in a way that is in-keeping with its low barrier to entry development and clicks not code mantra.
At the time of writing my previous blog, only Interagent schema was supported by External Services. However as of the Winter’18 release this is no longer the case. In this blog i will explore the more widely adopted Swagger / Open API 2.0 standard, using Node.js and Heroku and External Services. As bonus topic,i will also touch on using Swagger Code Generator with Apex!
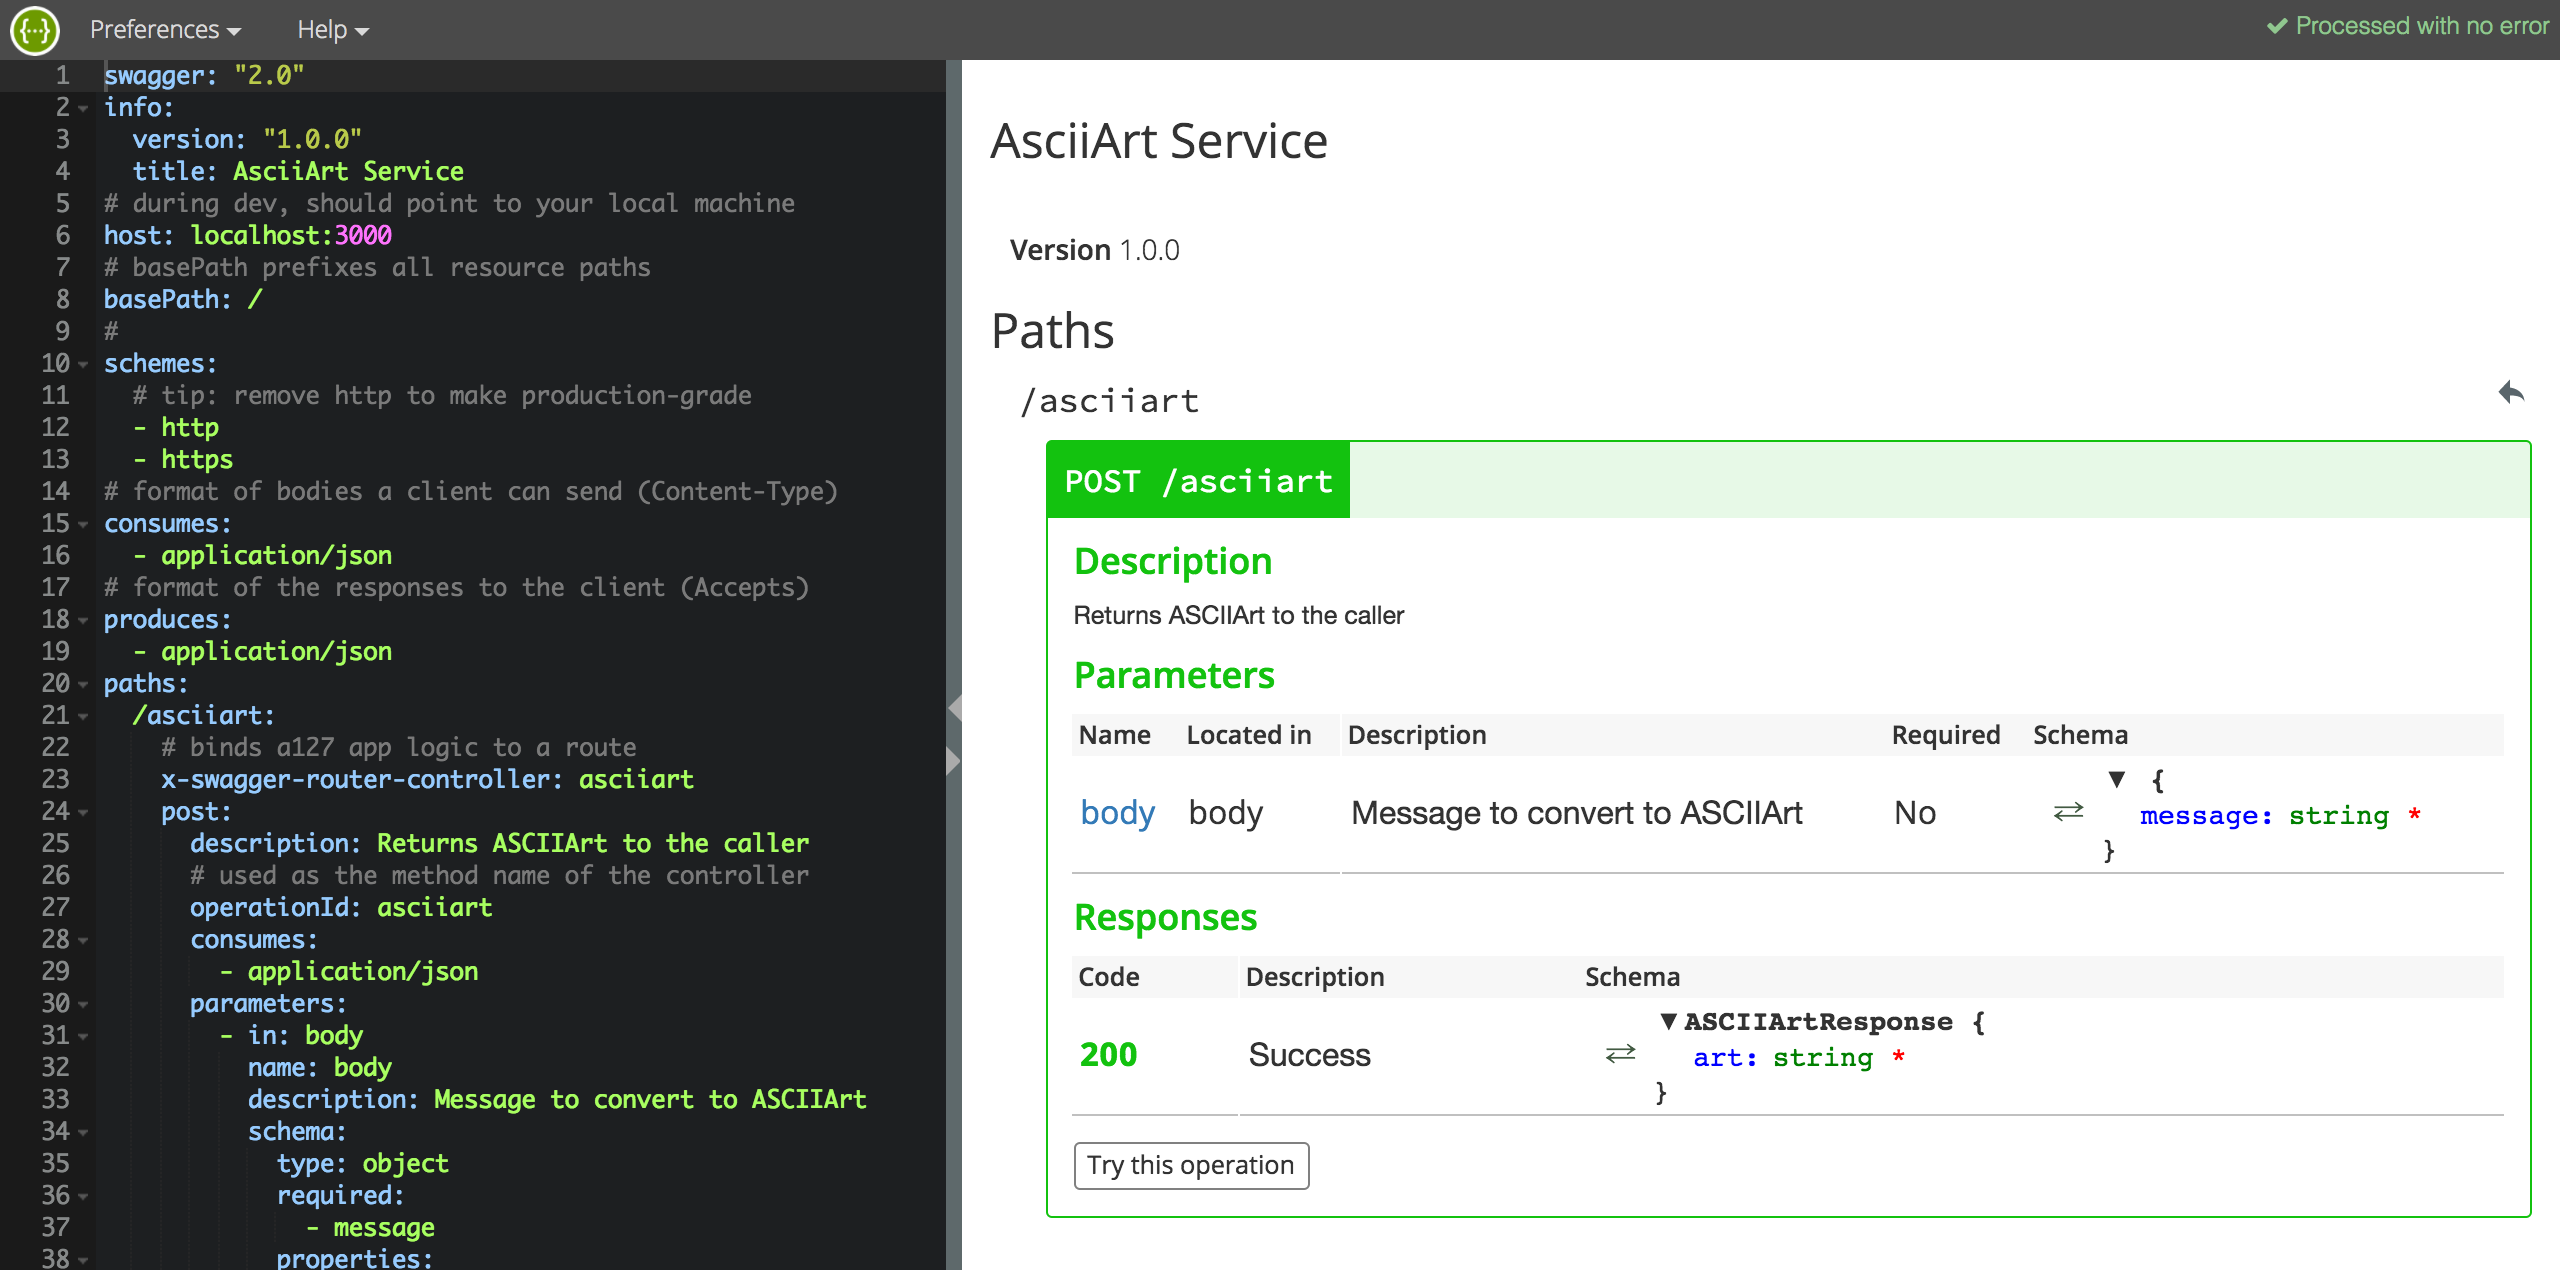
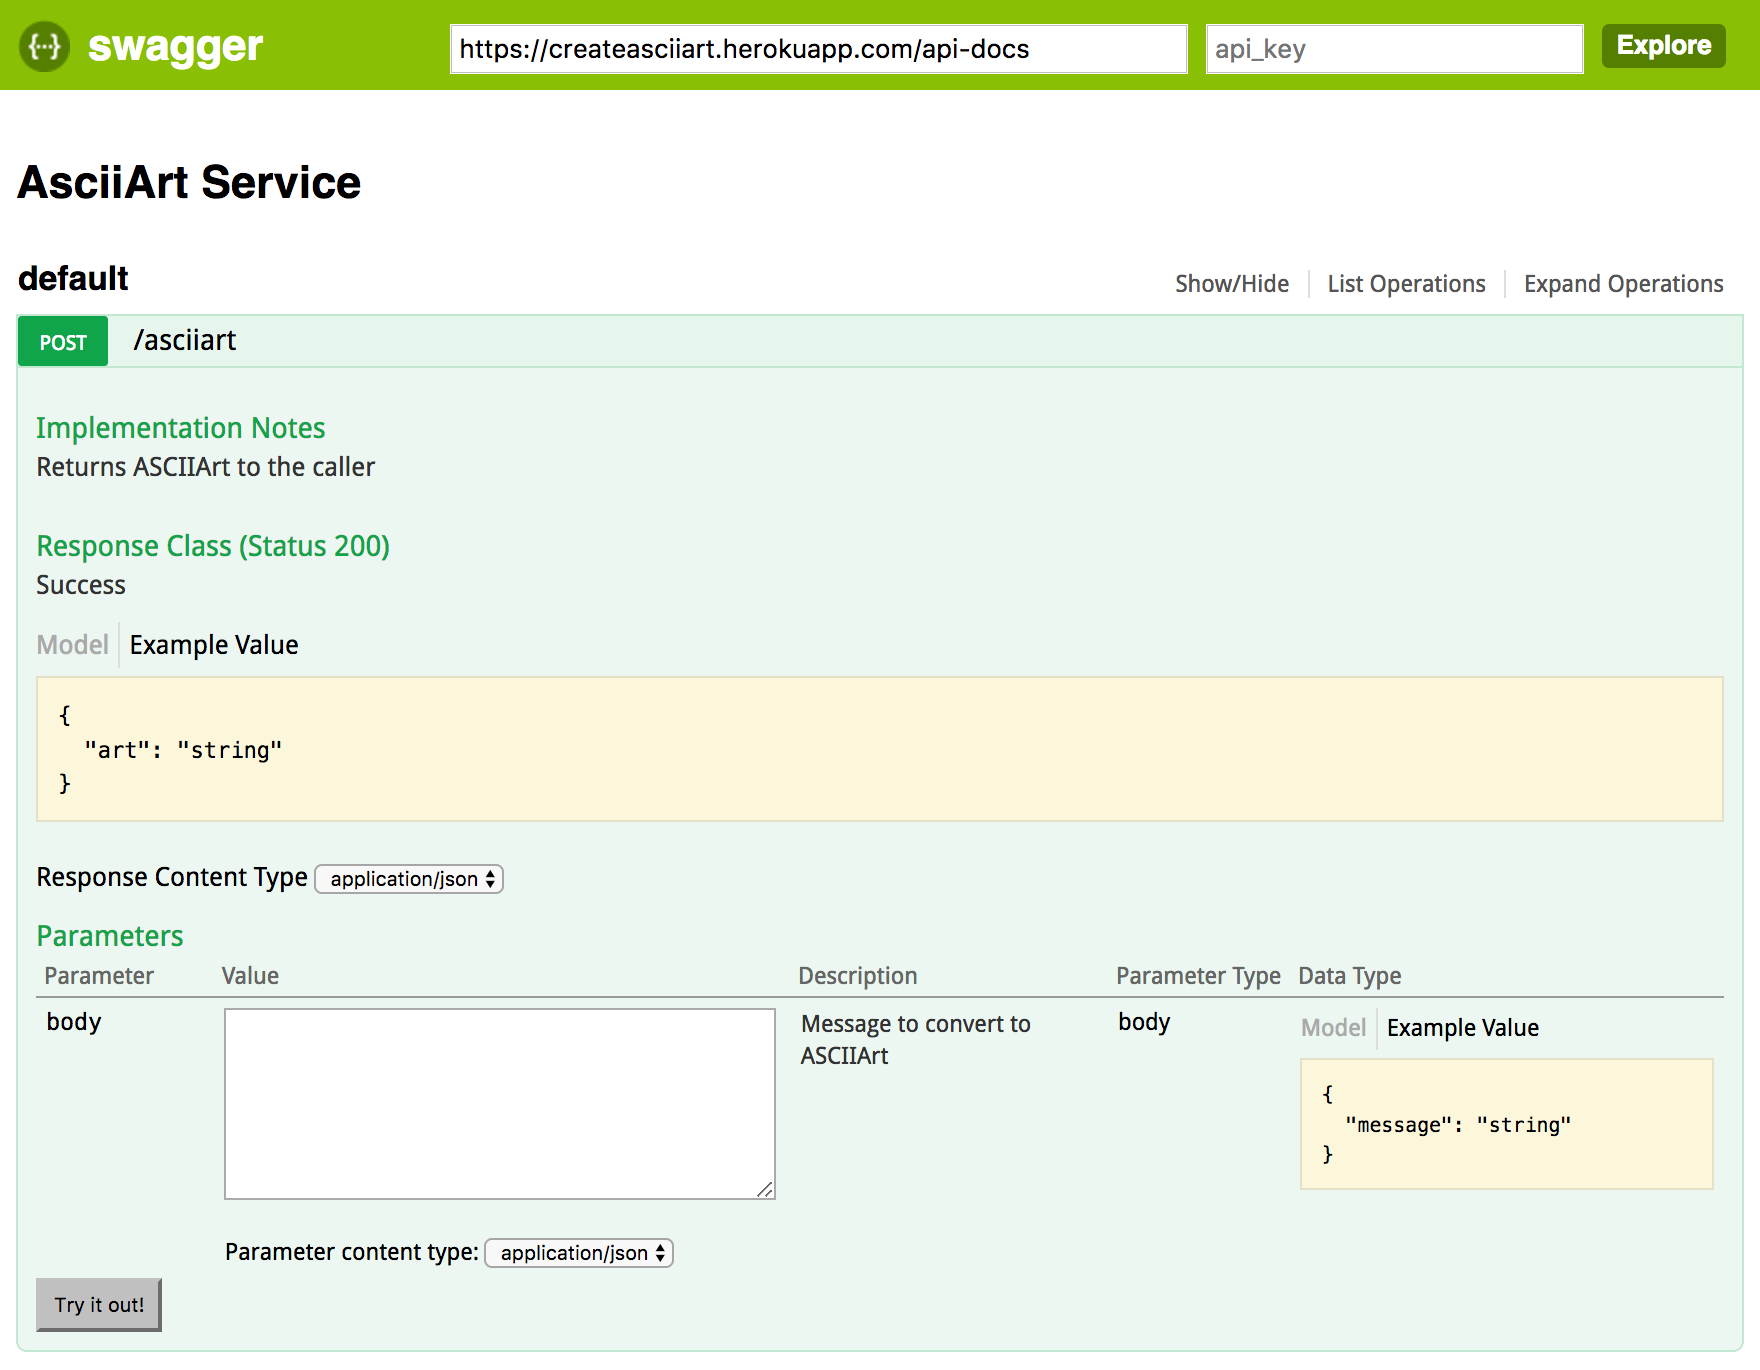
One of the many benefits of supporting the Swagger / Open API standard is the ability to generate documentation for it. The following screenshot shows the API schema on the left and generated documentation on the right. What is also very cool about this, is the Try this operation button. Give it a try for yourself now!
Whats the difference between Swagger and Open API 2.0? This was a question i asked myself and thought i would cover the answer here. Basically as at, Swagger v2.0, there is no difference, the Open API Initiative is a rebranding, born out of the huge adoption Swagger has seen since its creation. This move means its future is more formalised and seems to have more meaningful name. You can read more about this amazing story here.
Choosing your methodology for API development
The schema shown above might look a bit scary and you might well want to just get writing code and think about the schema when your ready to share your API. This is certainly supported and there are some tools that support generation of the schema via JSDoc comments in your code or via your joi schema here (useful for existing API’s).
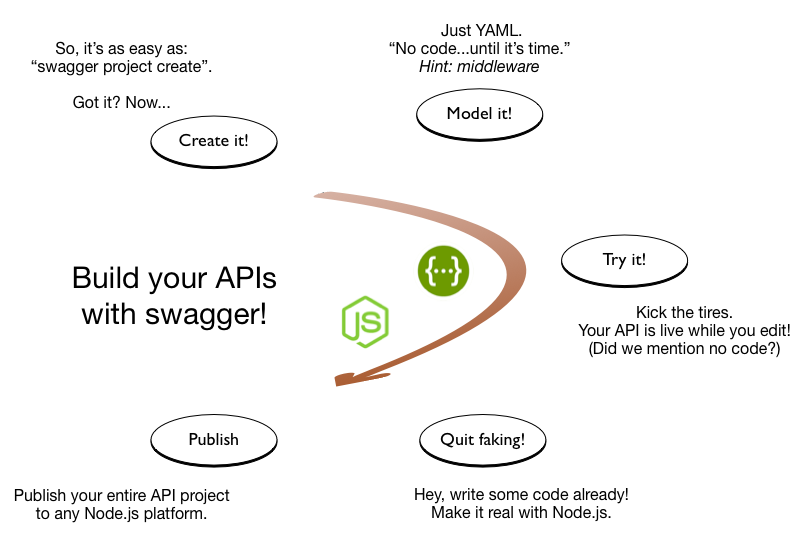
However to really embrace an API first strategy in your development team i feel you should start with the requirements and thus the schema first. This allows others in your team or the intended recipients to review the API before its been developed and even test it out with stub implementations. In my research i was thus drawn to Swagger Node, a tool set, donated by ApiGee, that embraces API-design-first. Read more pros and cons here. It is also the formal Node.js implementation associated with Swagger.
The following describes the development process of API-design-first.
Swagger Node is very easy to get started with and is well documented here. It supports the full API-design-first development process show in the diagram above. The editor (also shown above) is really useful for getting used to writing schemas and the UI is dynamically refreshed, including errors.
The overall Node.js project is still pretty simple (GitHub repo here), now consisting of three files. The schema is edited inYAML file format (translated to JSON when served up to tools). The schema for the ASCIIArt service now looks like the following and is pretty self describing. For further documentation on Swagger / Open API 2.0 see here.
swagger: "2.0"
info:
  version: "1.0.0"
  title: AsciiArt Service
# during dev, should point to your local machine
host: localhost:3000
# basePath prefixes all resource paths
basePath: /
#
schemes:
  # tip: remove http to make production-grade
  - http
  - https
# format of bodies a client can send (Content-Type)
consumes:
  - application/json
# format of the responses to the client (Accepts)
produces:
  - application/json
paths:
  /asciiart:
    # binds a127 app logic to a route
    x-swagger-router-controller: asciiart
    post:
      description: Returns ASCIIArt to the caller
      # used as the method name of the controller
      operationId: asciiart
      consumes:
        - application/json
      parameters:
        - in: body
          name: body
          description: Message to convert to ASCIIArt
          schema:
            type: object
            required:
              - message
            properties:
              message:
                type: string
      responses:
        "200":
          description: Success
          schema:
            # a pointer to a definition
            $ref: "#/definitions/ASCIIArtResponse"
  /schema:
    x-swagger-pipe: swagger_raw
# complex objects have schema definitions
definitions:
  ASCIIArtResponse:
    required:
      - art
    properties:
      art:
        type: string
The entry point of the Node.js app, the server.js file now looks like this…
'use strict';

var SwaggerExpress = require('swagger-express-mw');
var app = require('express')();
module.exports = app; // for testing
var config = {
  appRoot: __dirname // required config
};

SwaggerExpress.create(config, function(err, swaggerExpress) {
  if (err) { throw err; }
  // install middleware for swagger ui
  app.use(swaggerExpress.runner.swaggerTools.swaggerUi());
  // install middleware for swagger routing
  swaggerExpress.register(app);
  var port = process.env.PORT || 3000;
  app.listen(port);
});
Note: I changed the Node.js web server framework from hapi (used in my previous blog) to express. As I could not get the Swagger UI to integrate with hapi.
The code implementing the API has been moved to its asciiart.js file.
var figlet = require('figlet');

function asciiart(request, response) {
    // Call figlet to generate the ASCII Art and return it!
    const msg = request.body.message;
    figlet(msg, function(err, data) {
        response.json({ art: data});
    });
}

module.exports = {
    asciiart: asciiart
};
Note: There is no parameter validation code written here, the Swagger Node module dynamically implements parameter validation for you (based on what you define in the schema) before the request reaches your code! It also validates your responses.
To access the documentation simply use the path /docs. The documentation is generated automatically, no need to manage static HTML files. I have hosted my sample AsciiArt service in Heroku so you can try it by clicking the link below.
NOTE: There is a small bug that prevents the callout if the basePath is specified as root in the schema. Thus this has been commented out in the deployed version of the schema for now. Salesforce will likely have fixed this by the time you read this.
Swagger Tools
Swagger Editor, the interactive editor shown in the first screenshot of this blog.
Swagger Code Generator, creates server stubs and clients for implementing and calling Swagger enabled API’s.
Swagger UI, the browser based UI for generating documentation. You can call this from the command line and upload the static HTML files or use frameworks like the one used in this blog to generated it on the fly.
Can we use Swagger to call or implement API’s authored in Apex?
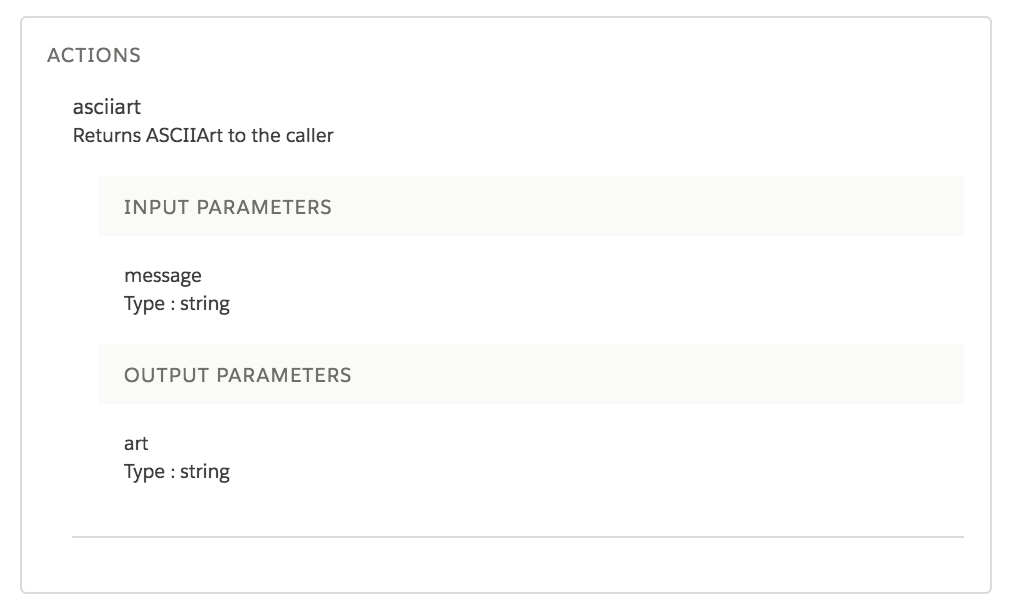
Swagger Tools are available on a number of platforms, including recently added support for Apex clients. This gives you another option to consume API’s directly in Apex. Its not clear if this is going to a better route than consuming the classes generated by External Services, i suspect it might have some pros and cons tbh. Time will tell!
public class SwagDefaultApi {
    SwagClient client;

    public SwagDefaultApi(SwagClient client) {
        this.client = client;
    }

    public SwagDefaultApi() {
        this.client = new SwagClient();
    }

    public SwagClient getClient() {
        return this.client;
    }

    /**
     *
     * Returns ASCIIArt to the caller
     * @param body Message to convert to ASCIIArt (optional)
     * @return SwagASCIIArtResponse
     * @throws Swagger.ApiException if fails to make API call
     */
    public SwagASCIIArtResponse asciiart(Map<String, Object> params) {
        List<Swagger.Param> query = new List<Swagger.Param>();
        List<Swagger.Param> form = new List<Swagger.Param>();

        return (SwagASCIIArtResponse) client.invoke(
            'POST', '/asciiart',
            (SwagBody) params.get('body'),
            query, form,
            new Map<String, Object>(),
            new Map<String, Object>(),
            new List<String>{ 'application/json' },
            new List<String>{ 'application/json' },
            new List<String>(),
            SwagASCIIArtResponse.class
        );
    }
}
The code is also generated in a Salesforce DX compliant format, very cool!
AI services are becoming more and more accessible to developers than ever before. Salesforce acquired Metamind last year and made some big announcements at Dreamforce 2016. Like many developers, i was keen to find out about its API. The answer at the time was “check back with us next year!”.
True AI consists of recognition, be that visual or spoken, performing actions and the final most critical peace, learning. This blog explores the spoken and visual recognition peace further, with the added help of Flow for performing practically any action you can envision!
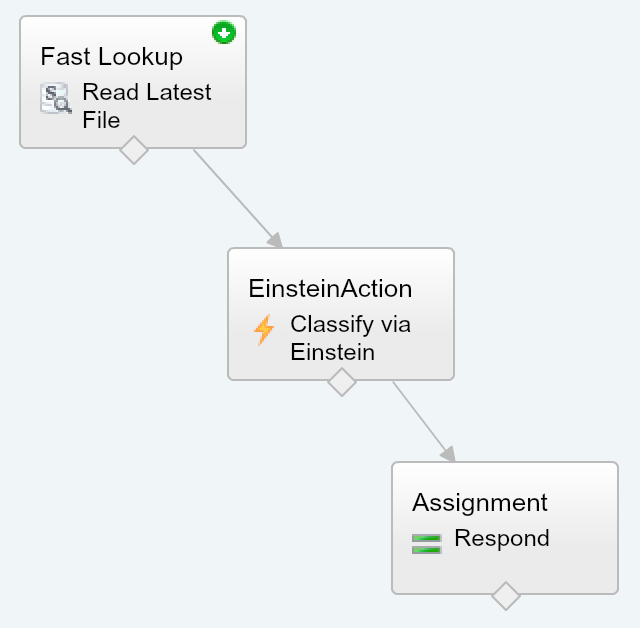
You may recall a blog from last year relating to integrating Salesforce with Amazon Echo. To explore the new Einstein API, I decided to leverage that work further. In order to trigger recognition of my pictures from Alexa. Also the Salesforce Flow usage enabled easy extensibility via custom Apex Actions. Thus the Einstein Apex Action was born! After a small bit of code and some configuration i had a working voice activated image recognition demo up and running.
The following diagram breaks down what just happened in the video above. Followed by a deeper walk through of the Predictive Vision Service and how to call it.
Using Salesforce1 Mobile app I uploaded an image using the Files feature.
Salesforce stores this in the ContentVersion object for later querying (step 6).
Using the Alexa skill, called Einstein, i was able to “Ask Einstein about my photo”
This NodeJS skill runs on Amazon and simply routes requests to Salesforce Flow
Spoken terms are passed through to a named Flow via the Flow API.
The Flow is simple in this case, it queries the ContentVersion for the latest upload.
The Flow then calls the Einstein Apex Action which in turn calls the Einstein REST API via Apex (more on this later). Finally a Flow assignment takes the resulting prediction of what the images is actually of, and uses it to build a spoken response.
How does theEinstein Predictive Vision Service API work?
The service introduces a few new terms to get your head round. Firstly a dataset is a named container for the types of images (labels) you want to recognise. The demo above uses a predefined dataset and model. A model is the output from the process of taking examples of each of your data sets labels and processing them (training). Initiating this process is pretty easy, you just make a REST API call with your dataset ID. All the recognition magic is behind the scenes, you just poll for when its done. All you have to do is test the model with other images. The service returns ranked predictions (using the datasets labels) on what it thinks your picture is of. When i ran the pictures above of my family dogs, for the first time i was pretty impressed that it detected the breeds.
Salesforce saved me the trouble of wrapping the REST API in Apex and have started an Apex wrapper here in this GitHub repo. When you signup you get private key file you have to upload into Salesforce to authenticate the calls. Currently the private key file the pilot gives you seems to be scoped by yourorg users associated email address.
public with sharing class EinsteinAction {

    public class Prediction {
        @InvocableVariable
        public String label;
        @InvocableVariable
        public Double probability;
    }

    @InvocableMethod(label='Classify the given files' description='Calls the Einsten API to classify the given ContentVersion files.')
    public static List<EinsteinAction.Prediction> classifyFiles(List<ID> contentVersionIds) {
        String access_token = new VisionController().getAccessToken();
        ContentVersion content = [SELECT Title,VersionData FROM ContentVersion where Id in :contentVersionIds LIMIT 1];
        List<EinsteinAction.Prediction> predictions = new List<EinsteinAction.Prediction>();
        for(Vision.Prediction vp : Vision.predictBlob(content.VersionData, access_token, 'GeneralImageClassifier')) {
            EinsteinAction.Prediction p = new EinsteinAction.Prediction();
            p.label = vp.label;
            p.probability = vp.probability;
            predictions.add(p);
            break; // Just take the most probable
        }
        return predictions;
    }
}
NOTE: The above method is only handling the first file passed in the parameter list, the minimum needed for this demo. To bulkify you can remove the limit in the SOQL and ideally put the file ID back in the response. It might also be useful to expose the other predictions and not just the first one.
The VisionController and Vision Apex classes from the GitHub repo are used in the above code. It looks like the repo is still very much WIP so i would expect the API to change a bit. They also assume that you have followed the standalone example tutorial here.
Summary
This initial API has made it pretty easy to access a key part of AI with what is essentially only a handful of simple REST API calls. I’m looking forward to seeing where this goes and where Salesforce goes next with future AI services.
As a self confessed API junkie,each time the new Salesforce platform release notes land. I tend to head straight to anything API related, such as sections on REST API, Metadata, Tooling, Streaming, Apex etc etc. This time Spring’17 release seems more packed than ever with API potential for building apps on platform, off platform and combinations of the two! So i thought i would write a short blog highlight what i found and my thoughts on the following…
New or updated API’s in Spring’17…
Lightning API (Developer Preview)
External Services (Beta)
Einstein Predictive Vision Service (Selected Customers Pilot)
Apex Stub API (GA)
SObject.getPopulatedFieldsAsMap API (GA)
Reports and Dashboard REST API Enhancements (GA)
Composite Resource and SObject Tree REST APIs (GA)
Enterprise Messaging Platform Java API (GA)
Bulk API v2.0 (Pilot)
Tooling API (GA)
Metadata API (GA)
Lightning API (Developer Preview)
This REST API seems to be UI helper API that wraps a number of smaller already existing REST API’s on the platform. Providing a one stop shop (a single API call) for reading both record dataandrelated record metadata such as layout and theme information. In addition to that it will resolve security before returning the response. If your building your own replacement UI or integrating the platform into a custom UI. This API looks like it could be quite a saving on development costs, compared to the many API calls and client logic that would be required to figure all this out. Reading between the lines its likely its the byproduct of a previously internal API Salesforce themselves have been using for Salesforce1 Mobile already? But thats just a guess on my behalf! The good news if so, is that its likely pretty well battle tested from a stability and use case perspective. The API has its own dedicated Developer Guide if want to read more.
External Services (Beta)
If there is one major fly in the ointment of the #clicksnotcode story so far, it’s been calling API’s. By definition they require a developer to write code to use them, right? Well not anymore! A new feature of delivered via Flow (and likely Process Builder) allows the user to effectively teach Flow about REST API’s via JSON Hyper-Schema (an emerging and very interesting independent specification for describing API’s). Once the user points the new External Services Wizard to an API supporting JSON Hyper Schema it uses the information to generate Apex code for an Invocable Method that makes the HTTP callout. Generating Apex code, is a relatively new approach by Salesforce to a tricky requirement to bring more power to non-developers and one i am also a fan of. It is something they have done before for Transaction Security Policies plugins and of course Force.com Sites. At time of writing i could not find it in my pre-release org, but i am keen to dig in deeper! Read more here.
Einstein Predictive Vision Service (Selected Customers Pilot)
Following the big splash made at Dreamforce 2016 around the new AI capability known as Einstein. The immediate question on mine and many other partner and developers mind was “How do we make use of it from code?”. Spring provides an invite only pilot access to a new REST API around image processing and recognition. No mention yet of an APEX API though. You can read more about the API at in the release notes and in more detailed via the dedicated Metamind “A Salesforce Company” site here. There is also some clearer information on exactly where it popups up in Salesforce products.
So calling this an “API” is a bit of stretch i know. Since its basically a existing Apex method on the SObject class. The big news though is that a gap in its behaviour has been fixed / filled that makes it more useful. Basically prior to Spring this method would not recognise fields set by code after a record (SObject) was queried. Thus if for example your attempting to implement a generic FLS checking solution using the response from this method, you where left feeling a little disappointed. Thankfully the method now returns all populated fields, regardless if they are populated via the query or later set by code.
Reports and Dashboard REST API Enhancements (GA)
Its now possible to create and delete reports using the Analytics REST API (no mention of the Apex API equivalent and i suspect this wont be supported). Reports are a great way to provide a means for driving data selection for processes you develop. The Analytics API is available in REST and Apex contexts. As well as driving reports from your code, Report Notifications allow users to schedule reports and have actions performed if certain criteria is met. I recently covered the ability to invoke an Apex class and Flow in response to Report Notification in this blog, Supercharing Salesforce Report Subscriptions. In Spring, the Reports REST API can now create notifications.
Composite Resource and SObject Tree REST APIs (GA)
An often overlooked implication of using multiple REST API calls in response to a user action is that if those calls update the database, there is no over arching database transaction. Meaning if the user was to close the page before processing was done, or kill the mobile app or your client code just crashed. It is possible to leave the records in an an invalid state. This is bad for database integrity. Apart from this, making multiple consecutive REST API calls can eat into an orgs 24hr rolling quota.
To address these use cases Salesforce have now released in GA form the composite and tree APIs (which actually this was already GA, how did i miss that?!). The composite resource API does allow you to package multiple CRUD REST API calls into one call and optionally control transaction scope via the AllOrNothing header. Allowing the possibility of committing multiple records in one CRUD API requested. The tree API allows you to create an account with a related set of contacts (for example) in one transaction wrapped REST API call. Basically the REST API is now bulkified! You can read more in the release notes here and in the REST API developers guide here and here.
Salesforce is overhauling their long standing Bulk REST API. Chances are you have not used it much, as its mostly geared towards data loading tools and integration frameworks (its simply invoked by ticking a box in the Salesforce Data Loader). The first phase of v2.0 changes to this API allow it to support larger CSV files to be uploaded and automatically chunked by the platform without the developer having to split them. Also changing the way limits are imposed, making it more record centric. Read more here.
Tooling API (GA)
Tooling API appears to be taken on new REST API resources that expose more standard aspects of the platform, such as formula functions and operators. For those building alternative UI’s over these features its a welcome alternative to hard coding these lists and having to remember to check / update them each release. Read more here.
Metadata API (GA)
Ironically my favourite API, the Metadata API has undergone mainly typical changes relating to new features elsewhere in the release. So no new methods or general features. I guess given all the great stuff above, i can not feel to sad! Especially with the announcement recently from the Apex PM that the native Apex Metadata API is finally under development, of course safe harbour and no statement yet on dates… but progress!


 I’m proud to announce the third edition of my book has now been released. Back in March this year I took the plunge start updates to many key areas and add two brand new chapters. Between the 2 years and 8 months since the last edition there has been several platform releases and an increasing number of new features and innovations that made this the biggest update ever! This edition also embraces the platforms rebranding to Lightning, hence the book is now entitled Salesforce Lightning Platform Enterprise Architecture.


 Its been nearly 9 years since i created my first Salesforce developer account. Back then I was leading a group of architects building on premise enterprise applications with Java J2EE and Microsoft .Net. It was fair to say my decision to refocus my career not only in building the
 Swagger Editor, the interactive editor shown in the first screenshot of this blog.
 With
With 
 The service introduces a few new terms to get your head round. Firstly a dataset is a named container for the types of images (labels) you want to recognise. The
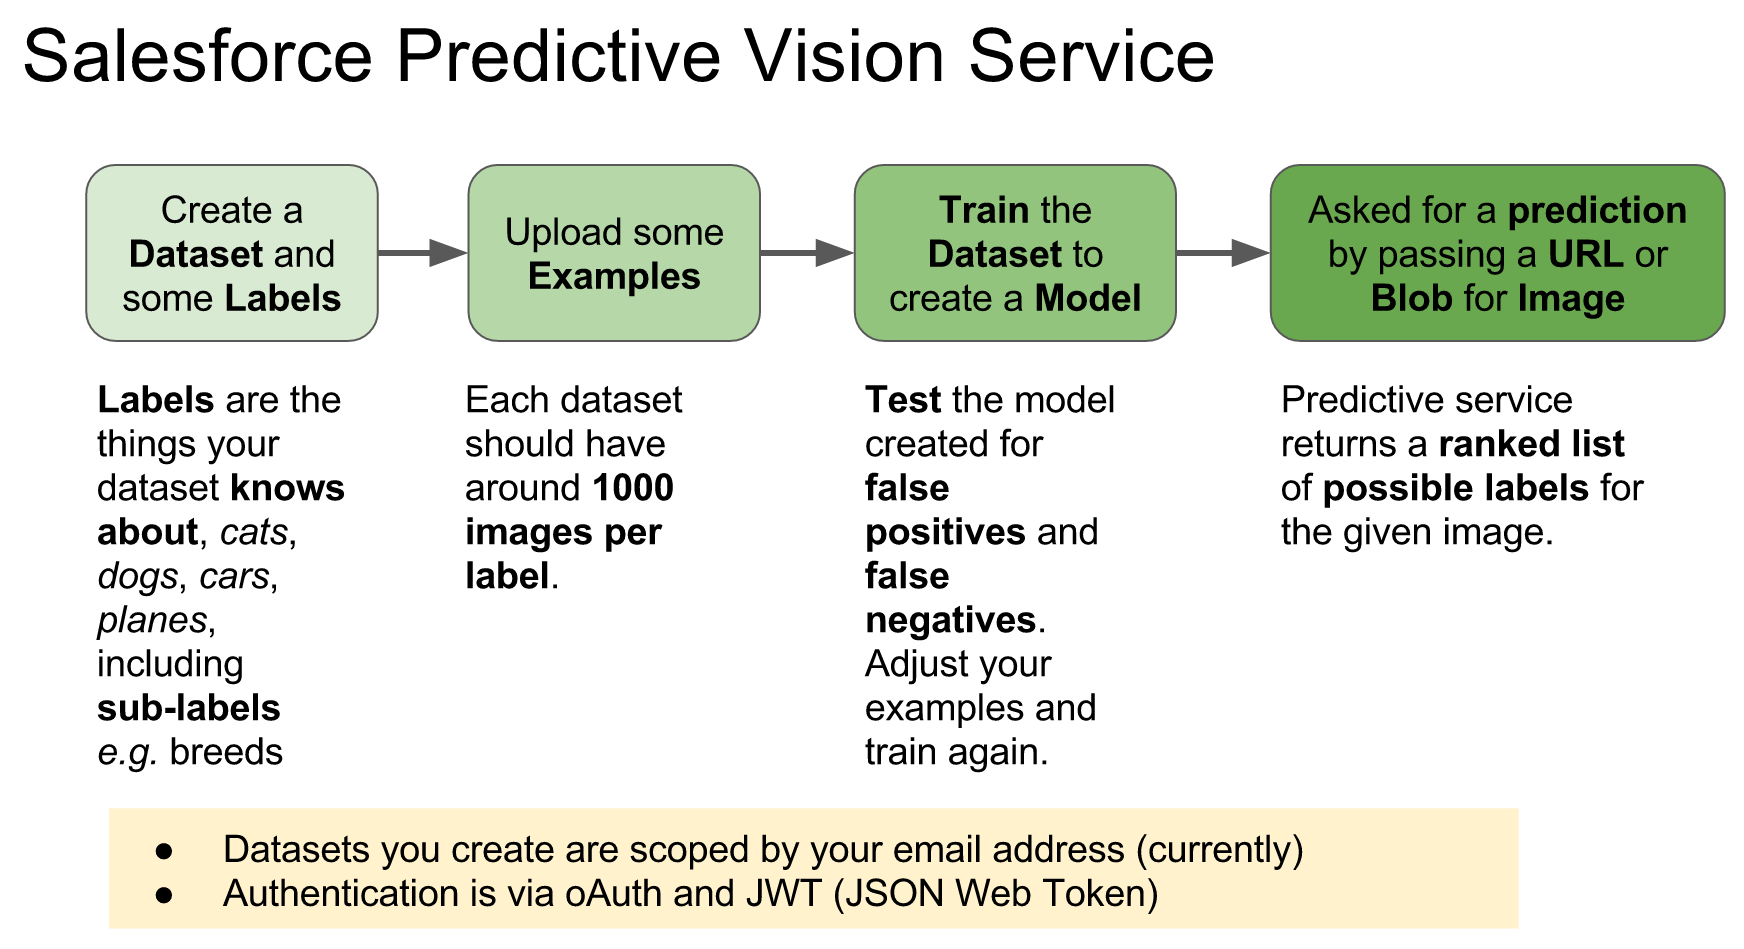
 As a self confessed API junkie, each time the new Salesforce platform release notes land. I tend to head straight to anything API related, such as sections on REST API, Metadata, Tooling, Streaming, Apex etc etc. This time