

The Amazon Echo device sits in your living room or office and listens to your verbal instructions, much like Siri. It performs various activities. Such as fetching and relaying information and/or performing actions on your behalf. It also serves as a large bluetooth speaker. Now, after a run in the US, it has finally been released in the UK!
Why am i writing about it here? Well it has an API of course! So lets roll up our sleeves with an example i built recently with my FinancialForce colleague and partner in crime for all things gadget and platform, Kevin Roberts.
Kevin reached out to me when he noticed that Amazon had built this device with a means to teach it to respond to new phrases. Developers can extend its phrases by creating new Skills.You can read and hear more about the results over on FinancialForce blog site.
The sample code and instructions to reproduce this demo yourself are here. Also don’t worry if you do not have an Amazon Echo, you can test by speaking into your computer by using the EchoSim.io.
Custom Skill Architecture
To create a Skill you need to be a developer, capable of implementing a REST API endpoint that Amazon calls out to when the Echo recognizes a phrase you have trained it with. You can do this in practically any programming language you like of course, providing you comply with the documented JSON definition and host it securely.
 One thing that simplifies the process is hosting your skill code through the Amazon Lambda service. Lambda supports Java, Python and NodeJS, as well as setting up the security stack for you. Leaving all you have to do is provide the code! You can even just type your code in directly to developer console provided by Amazon.
Training your Skill
You cannot just say anything to Amazon Echo and expect it to understand, its clever but not that clever (yet!). Every Skill developer has to provide a set of phrases / sample utterances. From these Amazon does some clever stuff behind the scenes to compile these into a form its speech recognition algorithms can match a users spoken words to.
You are advised to provide as many utterances as you can, up 50,000 of them in fact! To cover as many varied ways in which we can say things differently but mean the same thing. The sample utterances must all start with an identifier, known as the Intent. You can see various sample utterances for the CreateLead and GetLatestLeads intents below.
CreateLead Lets create a new Lead
CreateLead Create me a new lead
CreateLead New lead
CreateLead Help me create a lead
GetLatestLeads Latest top leads?
GetLatestLeads What are our top leads?
Skills have names, which users can search for in the Skills Marketplace, much like an App does on your phone. For Skill called “Lead Helper” users would speak the following phrases to invoke any of its intents.
- “Lead Helper, Create me a new lead”
- “Lead Helper, Lets create a new lead”
- “Lead Helper, Help me create a lead”
- “Lead Helper, What are our top leads?”
Your sample utterances can also include parameters / slots.
DueTasks What tasks are due for {Date}?
DueTasks Any tasks that are due for {Date}?
Slots are essentially parameters to your Intents, Amazon supports various slot types. The date slot type is quite flexible in terms of how it handles relative dates.
- “Task Helper, What tasks are due next thursday?”
- “Task Helper, Any tasks that are due for today?”
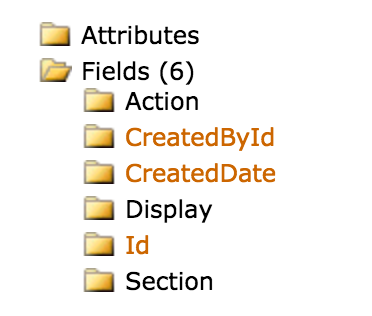
Along with your sample utterances you need to provide an intent schema, this lists the names of your intents (as referenced in your sample utterances) and the slot names and types. Further information can be found in Defining the Voice Interface.
{
  'intents': [
    {
      'intent': 'DueTasks',
      'slots': [
        {
          'name': 'Date',
          'type': 'AMAZON.DATE';
        }
      ]
    }
  ]
}
Mapping Skill Intents and Slots to Flows and Variables
As i mentioned above, Skill developers implement a REST API end point. Instead of receiving the spoken words as raw text, it receives the Intent name and name/value pair of Slot names and values. That method can then invoke the appropriate database query or action and generate a response (as a string) to response back to the user.
To map this to Salesforce Flows, we can consider the Intent name as the Flow Name and the Slot name/values as Flow Input Parameters. Flow Output Parameters can be used to generate the spoken response to the user. For the example above you would define a Flow called DueTasks with the following named input and output Flow parameters.
- Flow Name: DueTasks
- Flow Input Parameter Name: Alexa_Slot_Date
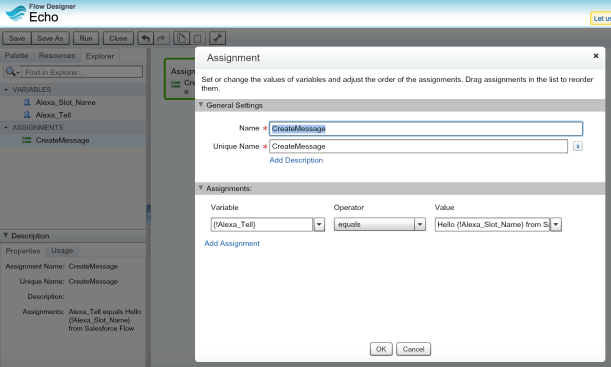
- Flow Output Parameter Name: Alexa_Tell
You can then basically use the Flow Assignment element to adjust the variable values. As well as other elements to query and update records accordingly. By using an output variable named Alexa_Tell before your Flow ends, you end the conversation with a single response contained with the text variable.
For another example see the Echo sample here, this one simply repeats “echo’s” the name given by the user when they speak a phrase with their name in it.
The sample utterances and intent schema are shown below. These utterances also use a literal slot type, which is a kind of picklist with variable possibilities. Meaning that Andrew, Sarah, Kevin and Bob are just sample values, users can use other words in the Name slot, it is up to the developer to validate them if its important.
Echo My name is {Andrew|Name}
Echo My name is {Sarah|Name}
Echo My name is {Kevin|Name}
Echo My name is {Bob|Name}
{
  'intents': [
    {
      'intent': 'Echo',
      'slots': [
        {
          'name': 'Name',
          'type': 'LITERAL'
        }
      ]
    }
  ]
}
Alternatively if create and assign the Alexa_Ask variable in your Flow, this starts a conversation with your user. In this case any Input/Output Flow Parameters are retained between Flow calls. Finally if you suffix any slot name with Number, for example a slot named AmountNumber would be Alexa_Slot_AmountNumber, this will ensure that the value gets converted correctly to pass to a Flow Variable of type Number.
The design for managing conversations with Flow Input/Output variables was inspired by an excellent article on defining conversations in Alexa Skills here.
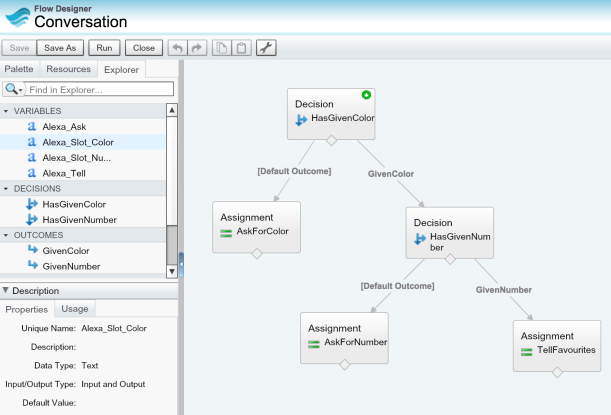
The following phrases are for the Conversation Flow included in the samples repository.
Conversation About favourite things
Conversation My favourite color is {Red|Color}
Conversation My favourite color is {Green|Color}
Conversation My favourite color is {Blue|Color}
Conversation My favourite number is {Number}
NodeJS Custom Skill
 To code my Skill I went with NodeJS, as i had not done a lot of coding in it and wanted to challenge myself. The other challenge i set myself was to integrate in a generic and extensible way with Salesforce. Thus i wanted to incorporate my old friend Flow!
With its numerous elements for conditional logic, reading and updating the database. Flow is the perfect solution to integrating with Salesforce in the only way we know how on the Salesforce platform, with clicks not code! Now of course Amazon does not talk Flow natively, so we need some glue!
Amazon provide NodeJS developers a useful base class to get things going. In NodeJS this is imported with the require function (interesting “how it works” article). In my case i also leveraged the most excellent nforce library from Kevin O’Hara.
var AlexaSkill = require('./AlexaSkill');
var nforce = require('nforce');

/**
* SalesforceFlowSkill is a child of AlexaSkill.
* To read more about inheritance in JavaScript, see the link below.
*
* @see https://developer.mozilla.org/en-US/docs/Web/JavaScript/Introduction_to_Object-Oriented_JavaScript#Inheritance
*/
var SalesforceFlowSkill = function () {
    AlexaSkill.call(this, APP_ID);
};
The AlexaSkill base class exposes four methods you can override, onSessionStarted, onLaunch, onSessionEnded and onIntent. As you can see from the method names, requests to your skill code can be scoped in a session. This allows you to manage conversations users can have with the device. Asking questions and gathering answers within the session that build up to perform a specific action.
I implemented the onIntent method to call the Flow API.
SalesforceFlowSkill.prototype.eventHandlers.onIntent =
   function (intentRequest, session, response) {
       // Handle the spoken intent from the user
       // ...
   }
Calling the Salesforce Flow API from NodeJS
Within the onIntent method I used the nforce library to perform oAuth user name and password authentication for simplicity. Though Alexa Skills do support the oAuth web flow by linking accounts. The following code performs the authentication with Salesforce.
SalesforceFlowSkill.prototype.eventHandlers.onIntent =
    // Configure a connection
    var org = nforce.createConnection({
        clientId: 'yourclientid',
        clientSecret: 'yoursecret',
        redirectUri: 'http://localhost:3000/oauth/_callback',
        mode: 'single'
    });
    // Call a Flow!
    org.authenticate({ username: USER_NAME, password: PASSWORD}).
        then(function() {
The following code, calls the Flow API, again via nforce. It maps the slot name/values to parameters and returning any Flow output variables back in the response. A session will be kept open when the response.ask method is called. In this case any Input/Output Flow Parameters are retained in the Session and passed back into the Flow again.
// Build Flow input parameters
var params = {};
// From Session...
for(var sessionAttr in session.attributes) {
    params[sessionAttr] = session.attributes[sessionAttr];
}
// From Slots...
for(var slot in intent.slots) {
    if(intent.slots[slot].value != null) {
        if(slot.endsWith('Number')) {
            params['Alexa_Slot_' + slot] = Number(intent.slots[slot].value);
        } else {
            params['Alexa_Slot_' + slot] = intent.slots[slot].value;
        }
    }
}
// Call the Flow API
var opts = org._getOpts(null, null);
opts.resource = '/actions/custom/flow/'+intentName;
opts.method = 'POST';
var flowRunBody = {};
flowRunBody.inputs  = [];
flowRunBody.inputs[0] = params;
opts.body = JSON.stringify(flowRunBody);
org._apiRequest(opts).then(function(resp) {
    // Ask or Tell?
    var ask = resp[0].outputValues['Alexa_Ask'];
    var tell = resp[0].outputValues['Alexa_Tell'];
    if(tell!=null) {
        // Tell the user something (closes the session)
        response.tell(tell);
    } else if (ask!=null) {
       // Store output variables in Session
       for(var outputVarName in resp[0].outputValues) {
           if(outputVarName == 'Alexa_Ask')
               continue;
           if(outputVarName == 'Alexa_Tell')
               continue;
           if(outputVarName == 'Flow__InterviewStatus')
               continue;
            session.attributes[outputVarName] =
               resp[0].outputValues[outputVarName];
       }
       // Ask another question (keeps session open)
       response.ask(ask, ask);
Summary
I had lot of fun putting this together, even more so seeing what Kevin did with it with his Flow skills (pun intended). If you have someone like Kevin in your company or want to have a go yourself, you can follow the setup and configuration instructions here.
I would also like to call out that past Salesforce MVP, now Trailhead Developer Advocate Jeff Douglass started the ball rolling with his Salesforce CRM examples. Which is also worth checking out if you prefer to build something more explicitly in NodeJS.


 You might be thinking having started to read this blog that the primary use case of
 Having just completed some improvements to the
 Doing this manually is a simple matter of dragging a

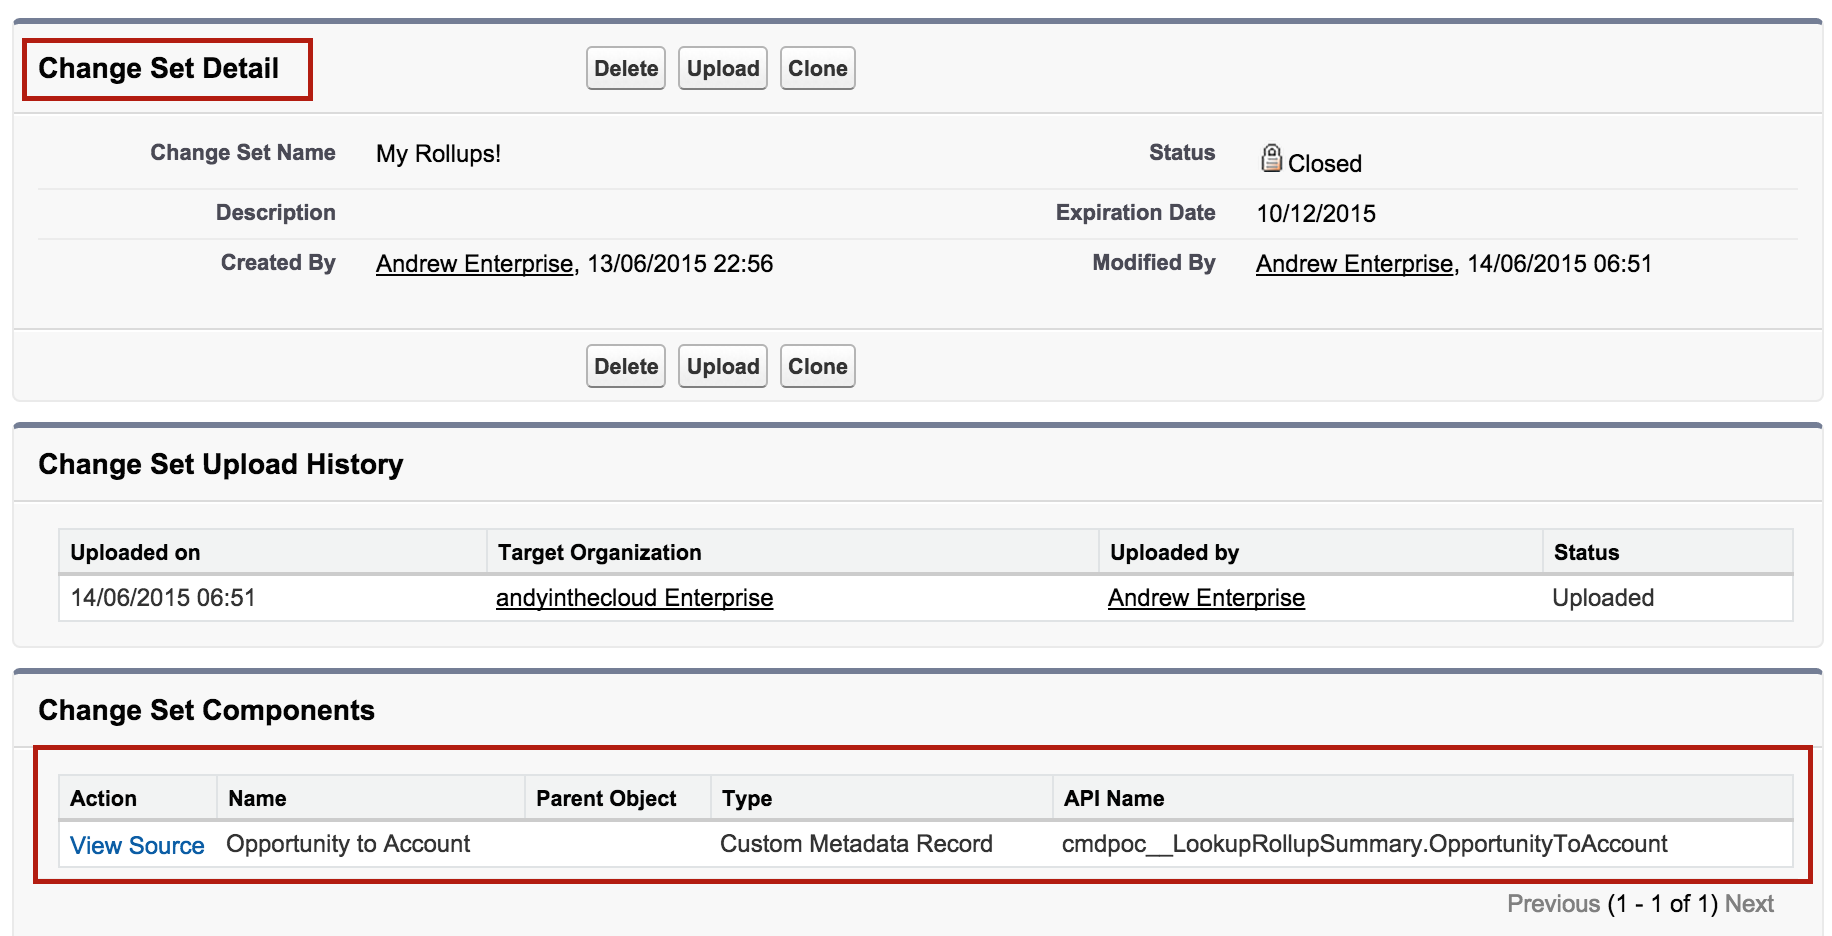
 Wow, this is a BIG thing and opens up a lot of tooling and greater compliance support for changes around orgs. Prior to this, folks where so keen to get hold of this information programatically they would resort to
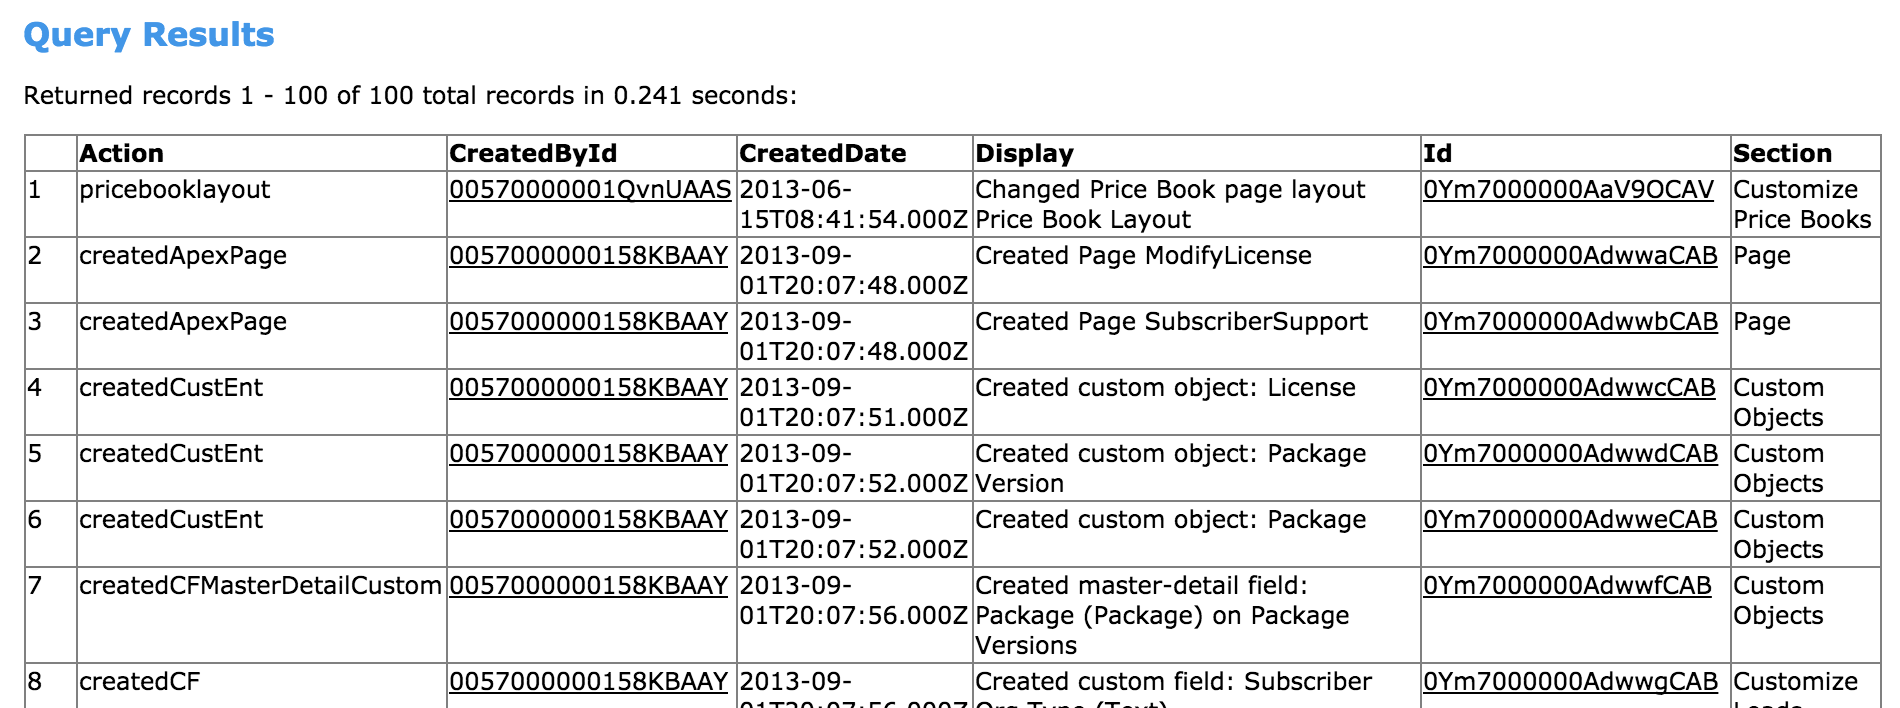

 Salesforce recently introduced a new platform feature which has now


 I was pleased and proud to see Salesforce themselves leveraging the


