During last years fun with IoT and the LittleBits devices, i developed a package imaginatively called Salesforce LittleBits Connector. My aim for that connector was to allow none coders, to have some fun with IoT and Salesforce. Instead of requiring Apex code to control devices and respond to events i wanted to allow the user to leverage Flows. When building it a previously observed limitation with the Apex integration with Flow surfaced again…
Whats the problem?
While Apex can create a Flow that is known at the time code is written, it cannot dynamically create a Flow determined at runtime. My blog entry Calling Flow from Apex goes into what is currently possible and highlights this restriction towards the end. This idea proposes that Salesforce adds something like the following to Apex…
// Create the Flow named in the userDefinedFlow variable
Flow.Interview.Interview anyFlow =
    Flow.Interview.newInstance(userDefinedFlow, flowParams);
// Run the Flow
anyFlow.start();
// Retrieve a value from one of its variables
String outputValue =
    (String) anyFlow.getVariableValue('outputVarName)';
Current solutions…
Salesforce describes the current options for launching Flow here, one of which is indeed via its REST API, which if called from Apex would provide the facility we are looking for here, however i wanted to avoid HTTP callout and the limitations that entails. With the Salesforce LittleBits Connector i solved the problem using an Apex interface, the utilisation of the factory pattern and a Tab that provides a facility to manage the code generation of a Flow factory class.
The following code snippet from the tool shows how the Flow factory approach works. It uses Apex type.forName to create an instance of the above generated class (from the unmanaged namespace of the org).
// Get a Type reference to the Flow Factory class
Type typeFactory = Type.forName('', 'lbc_LittleBitsFlowFactory');
if(typeFactory==null) {
	System.debug(FlowFactoryClass + ' class not found.');
	return;
}
// Create an instance of the Flow Factory
ILittleBitsFlowFactory flowFactory = (ILittleBitsFlowFactory) typeFactory.newInstance();
// Create an instance of the Flow via the factory newInstance method
Flow.Interview flow = flowFactory.newInstance(flowName, flowParams);
// Start and interact with the Flow as normal
if(flow!=null)
	flow.start();
The interface looks like this…
// Interface implemented by the generated Flow Factory class
global interface ILittleBitsFlowFactory {
	Flow.Interview newInstance(String flowName, Ma<String, Object> params);
}
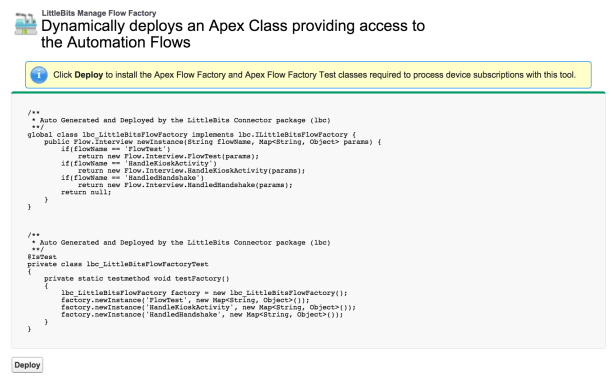
The key with this solution is the Tab above that provides a means for the Admin user to dynamically create or refresh the lbc_LittleBitsFlowFactory Apex code which has access to the specific Flows. This class lives as an unmanaged class in the org. Before we look at how the Tab works, lets take a closer look at what it generates in the org.
/**
* Auto Generated and Deployed by the LittleBits Connector package (lbc)
**/
global class lbc_LittleBitsFlowFactory implements lbc.ILittleBitsFlowFactory {
public Flow.Interview newInstance(String flowName, <String, Object&amp> params) {
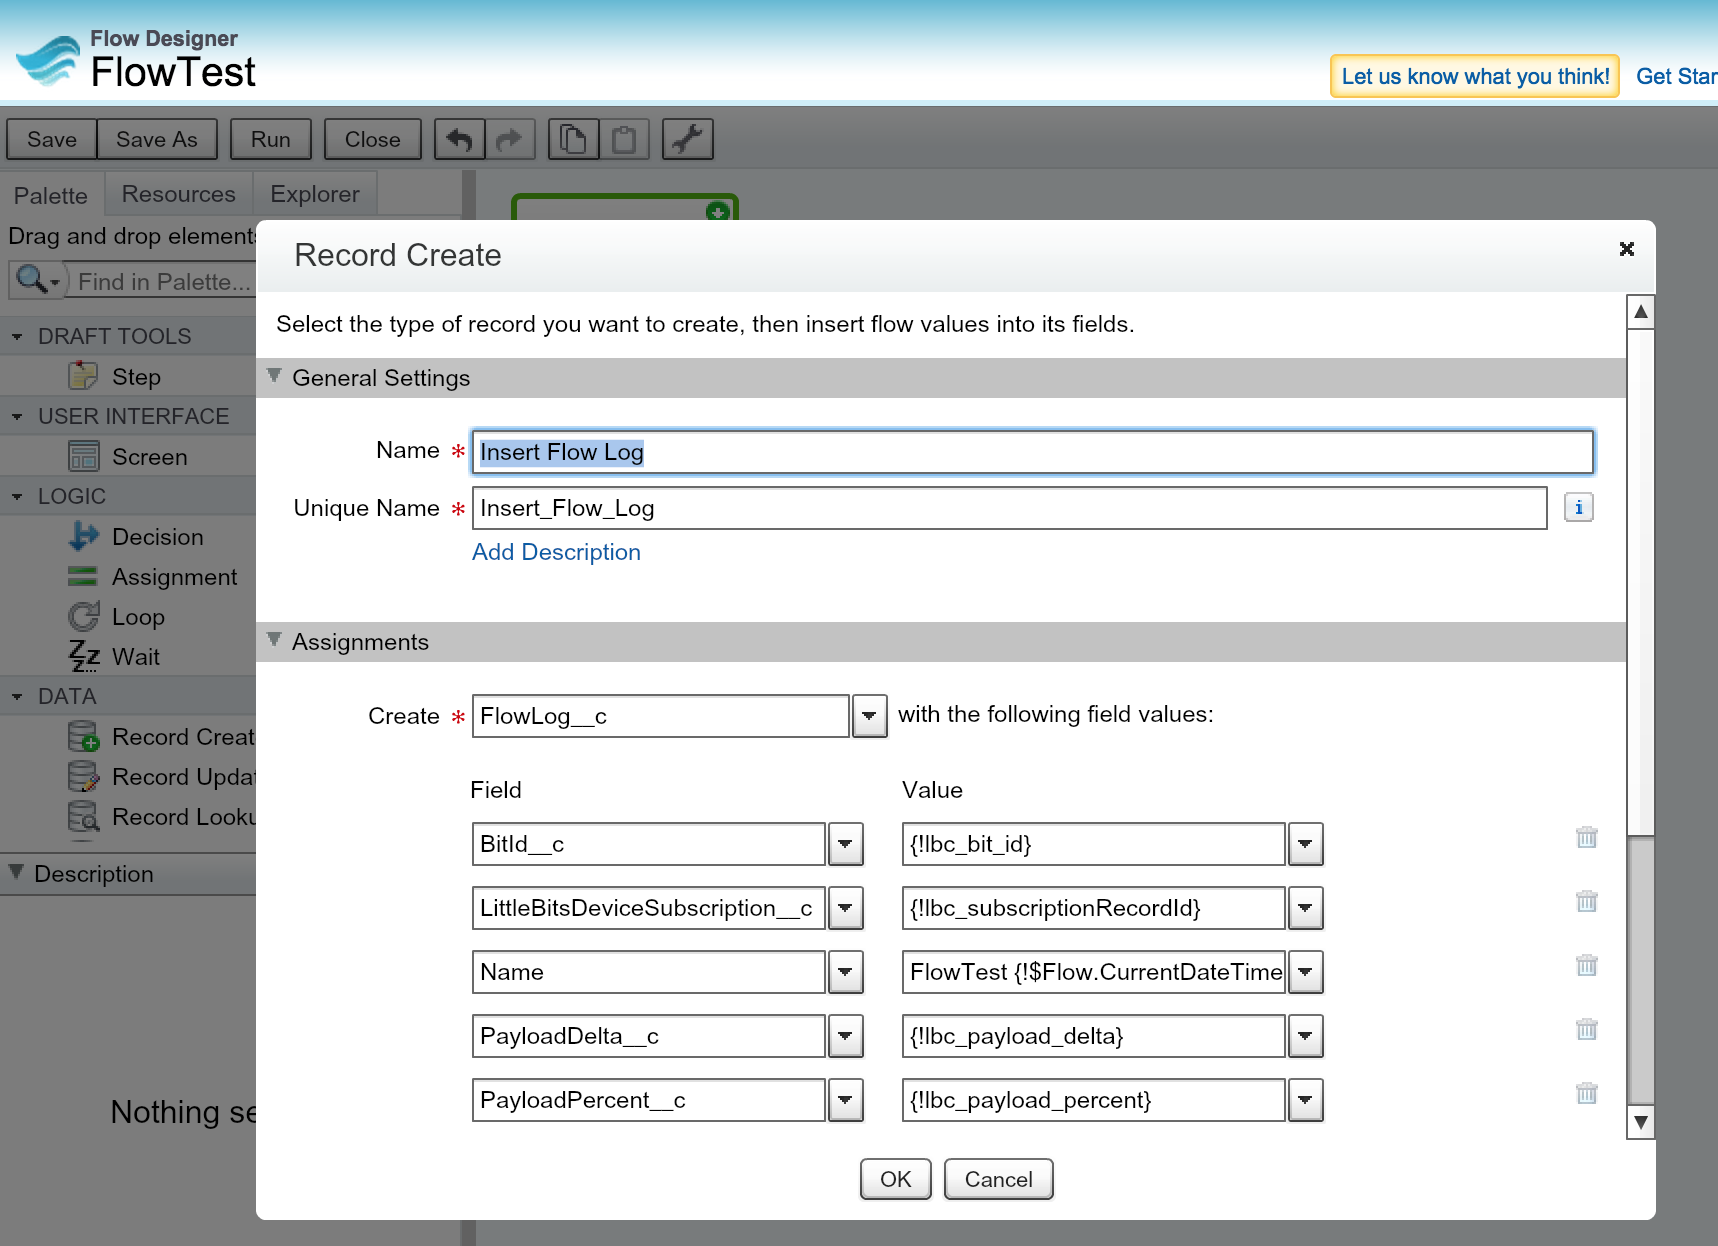
if(flowName == 'FlowTest')
return new Flow.Interview.FlowTest(params);
if(flowName == 'HandleKioskActivity')
return new Flow.Interview.HandleKioskActivity(params);
if(flowName == 'HandledHandshake')
return new Flow.Interview.HandledHandshake(params);
return null;
}
}
Note: I found that i needed the class to be marked as global at the time, i suspected this might have been that the packaged code was not Aloha status. If your not packaging your solutions code, this your code runs in the unmanaged namespace, you’ll find that you don’t need global and public will be fine. The Tab also generates an Apex Test for the above code as well, to ensure code coverage is satisfied.
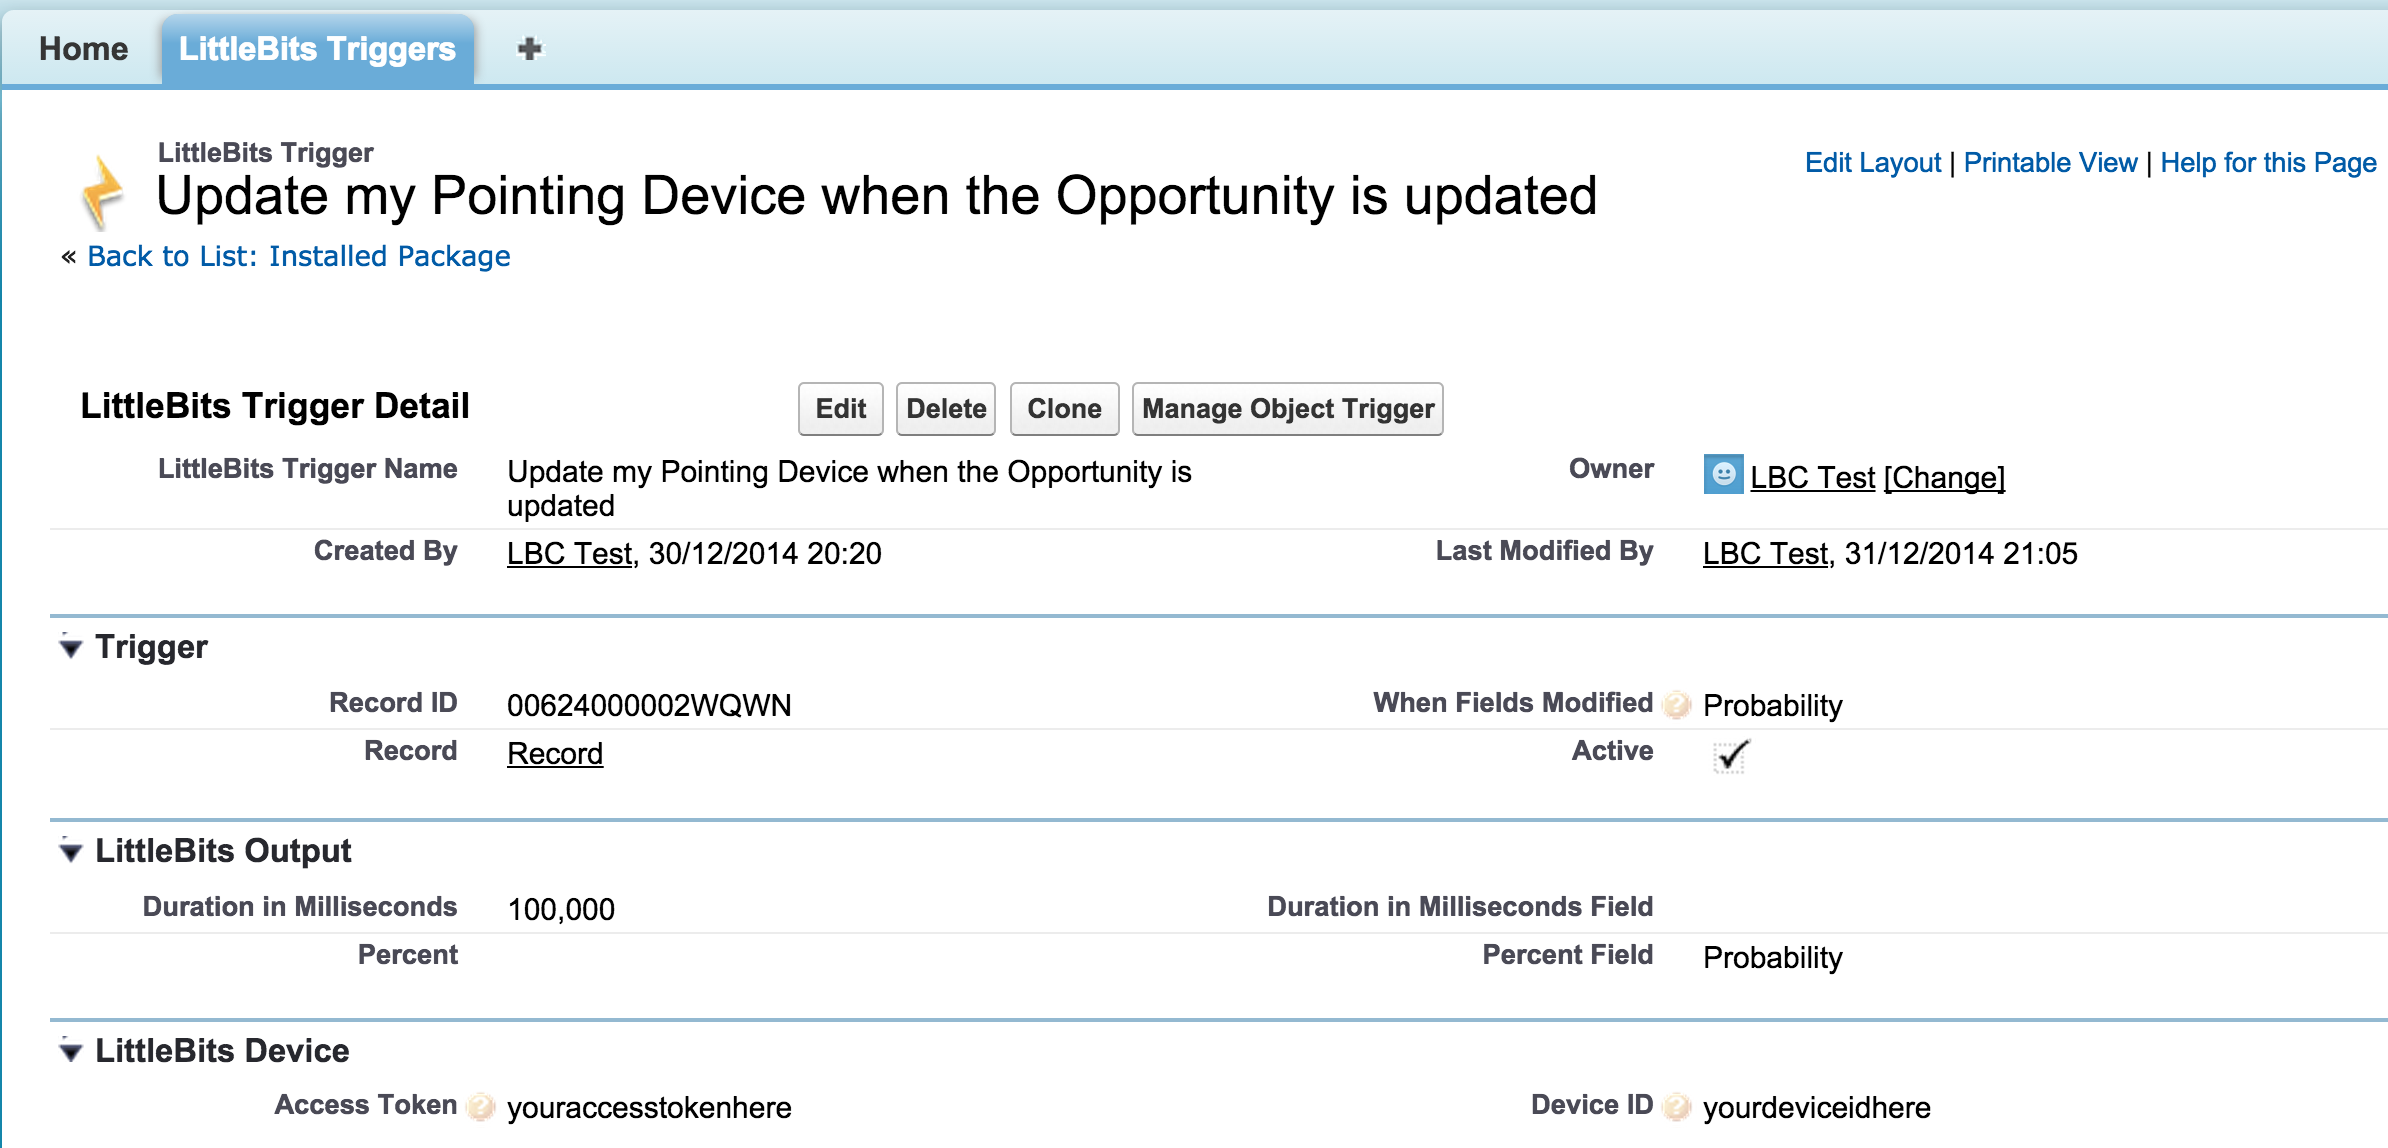
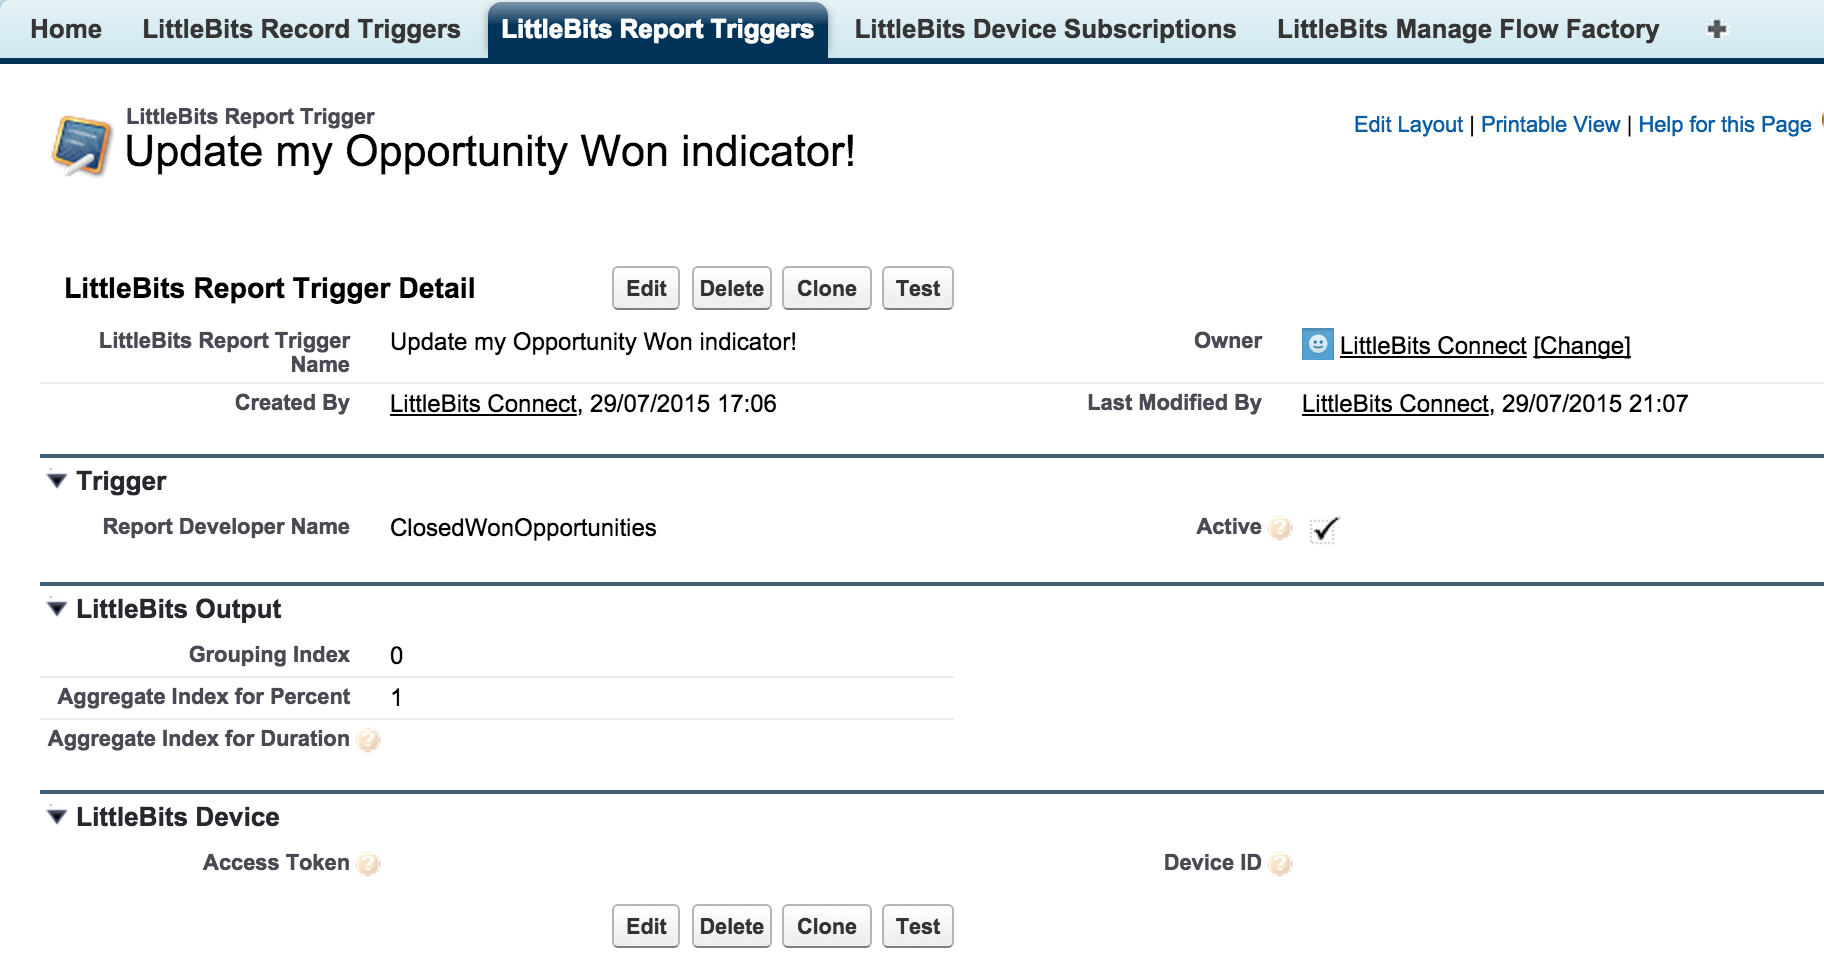
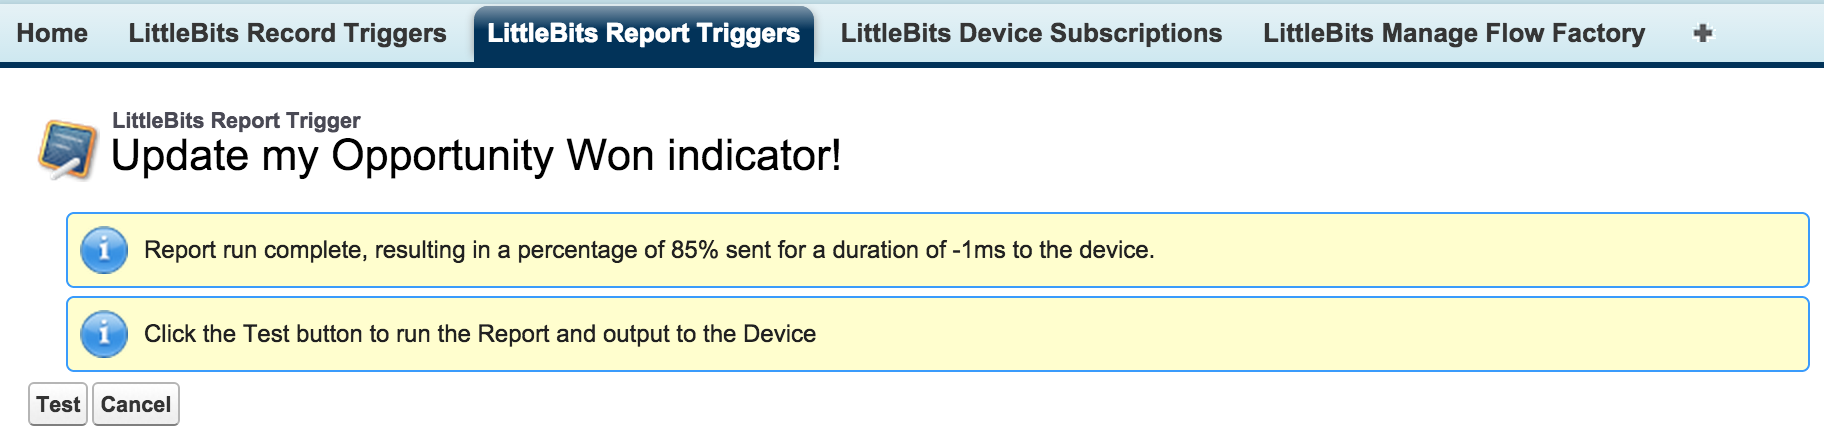
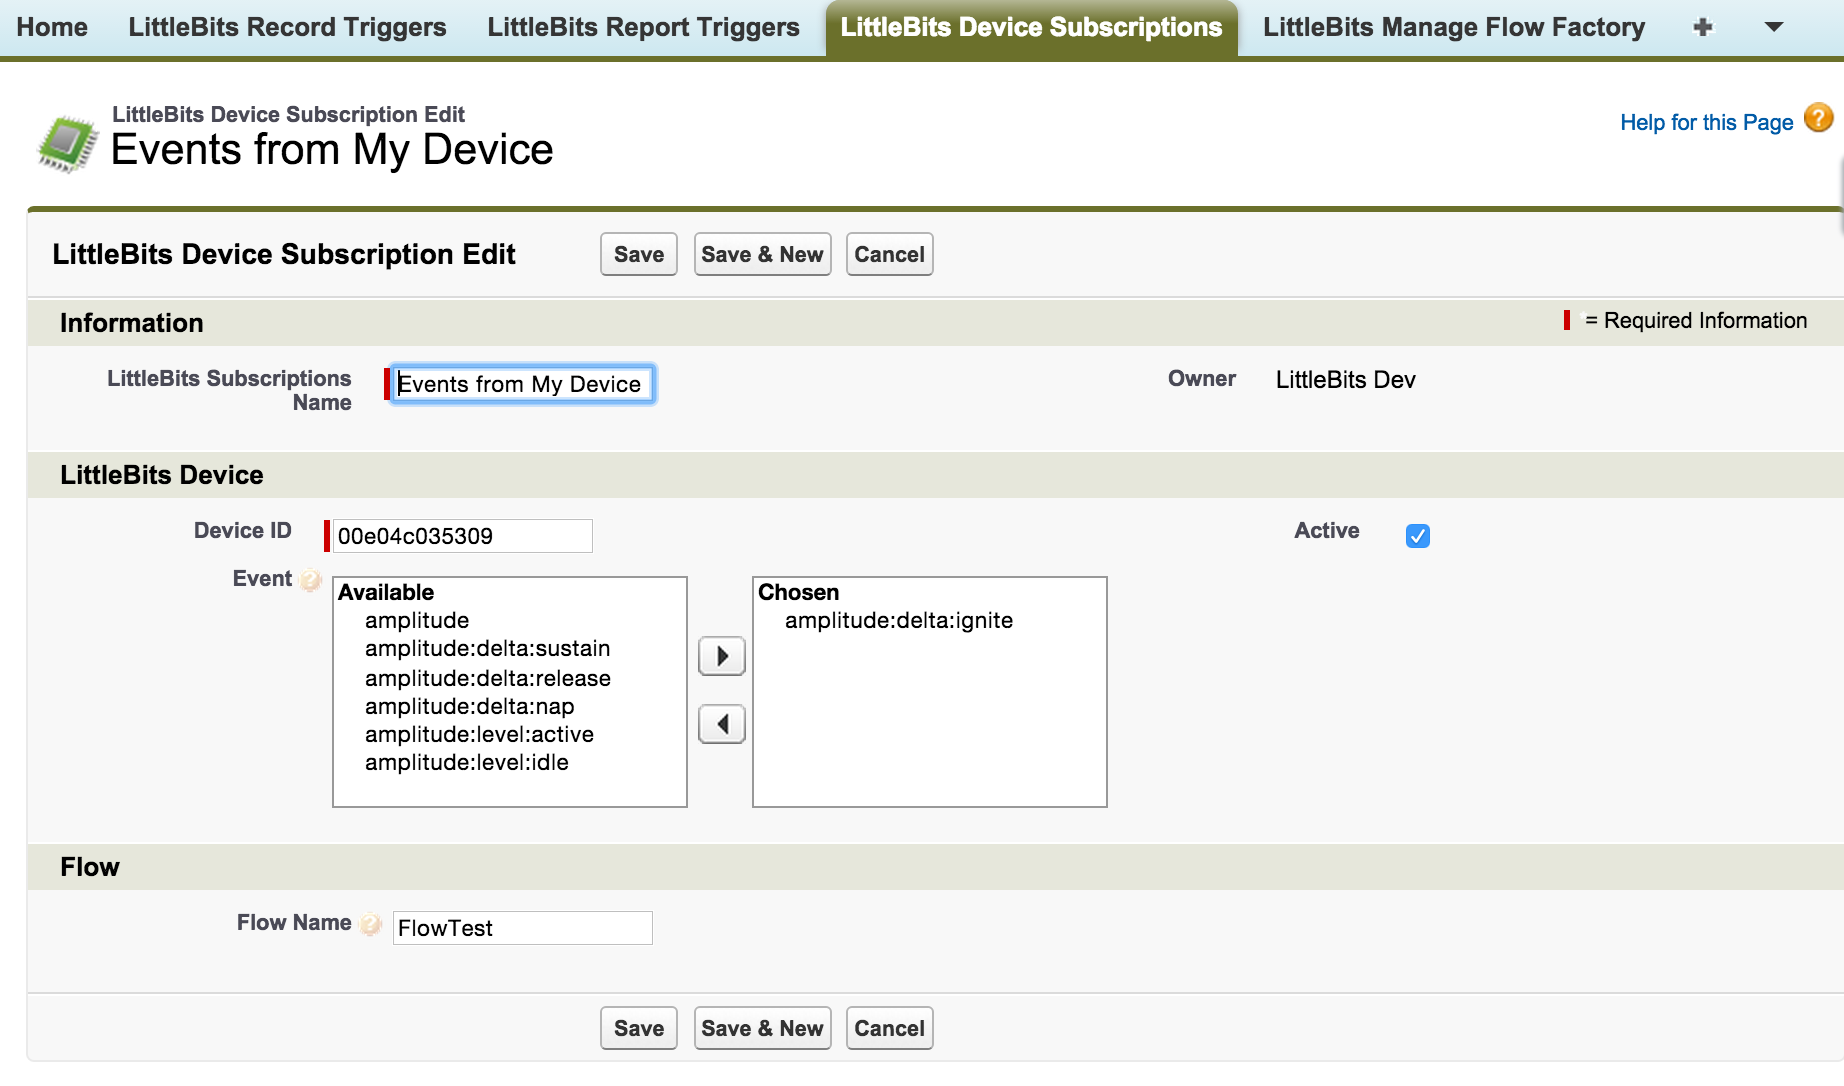
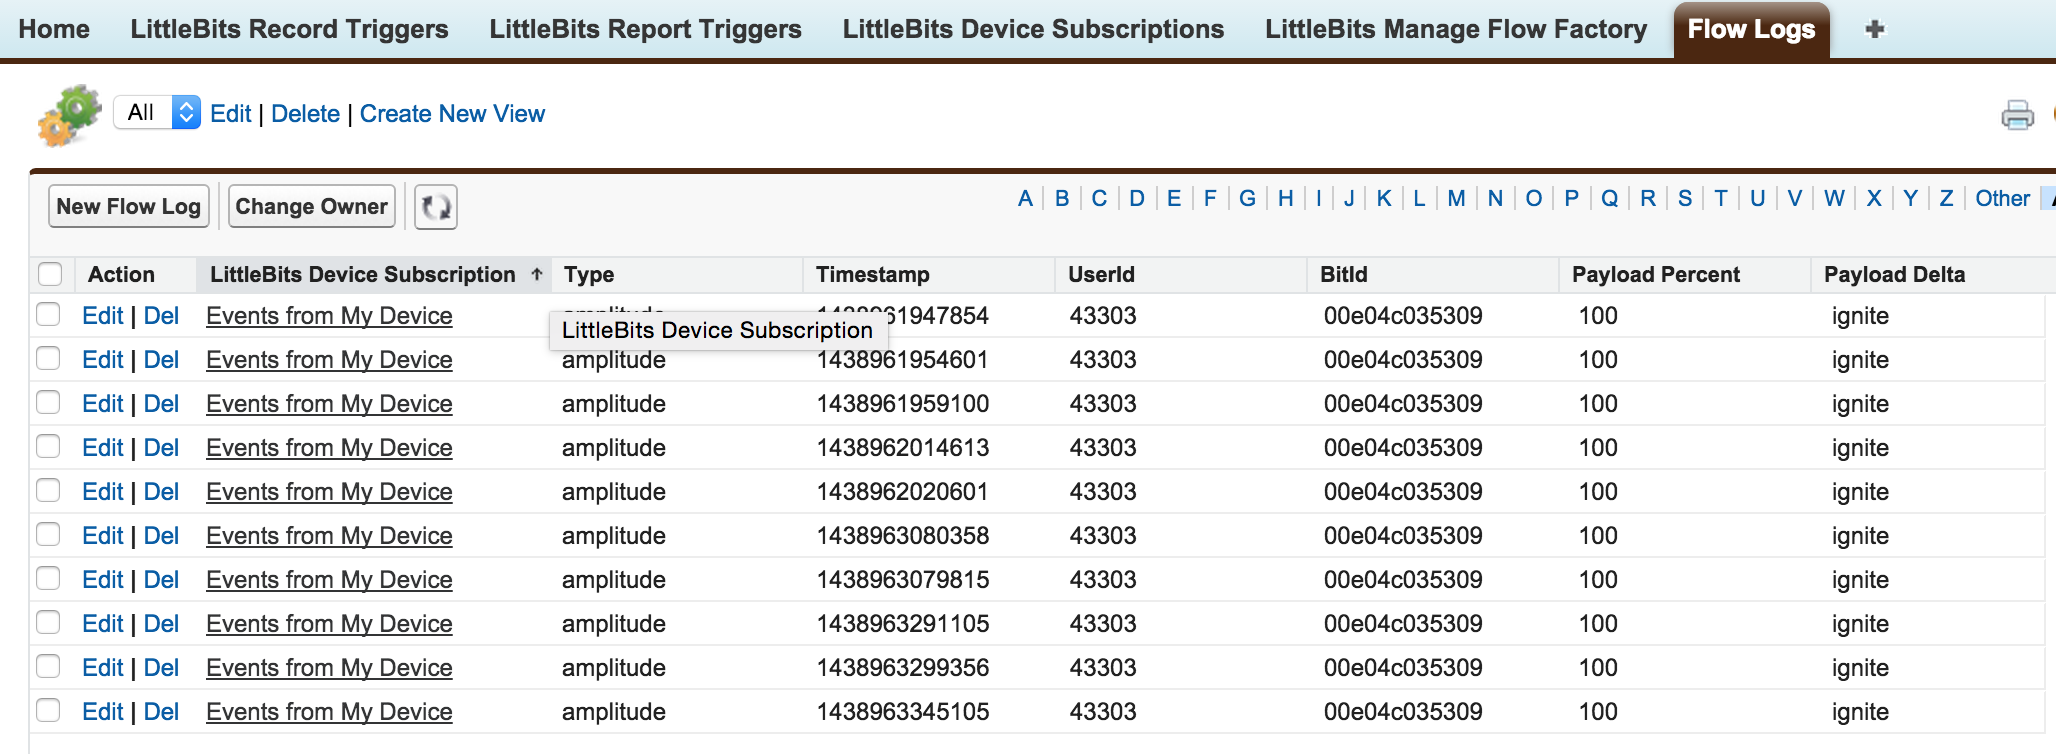
The Tab itself scans the configurations of the tool for references to Flow names, in this case it was LittleBits Device Subscriptions, it could also utilise the Apex Metadata API listMetadata as well. The former approach does keep the generated code focused on the Flows needed by the tool. The page then uses the Apex Metadata API to deploy the generated code to the org. If you want to review this code in more detail take a look at ManageFlowFactoryController and the manageflowfactory page.
Summary
I find Flow to be a hugely liberating technology for creating solutions without requiring coding skills on Salesforce. I hope to wrap the above solution in a standalone open source solution that contains a dynamic Flow API and the Tab above, such that others can start to integrate Flow into other tools as I did with the LittleBits connector. Meanwhile please enjoy reviewing the approach in its current form and let me know your thoughts!
Note: Key to this solution is the use of the Apex Metadata API to deploy the factory code. I have learnt recently that Salesforce are increasing security around Apex execution invoked from Lightning Components (via @AuraEnabled annotated methods). The implication of this is that UserInfo.getSessionId does not return an API capable Session Id. This effectively blocks such code from calling any Salesforce API’s (including Metadata API) via Http callouts using the users Session Id. I’ll be looking at means in the future to use oAuth to formalise access like this.
Update: See blog Flow Factory.

 The
The 

 Increasingly my Salesforce community time is spent responding to questions, ideas and submissions via
 Immediately i set about to rectify this! With a mission to allow the
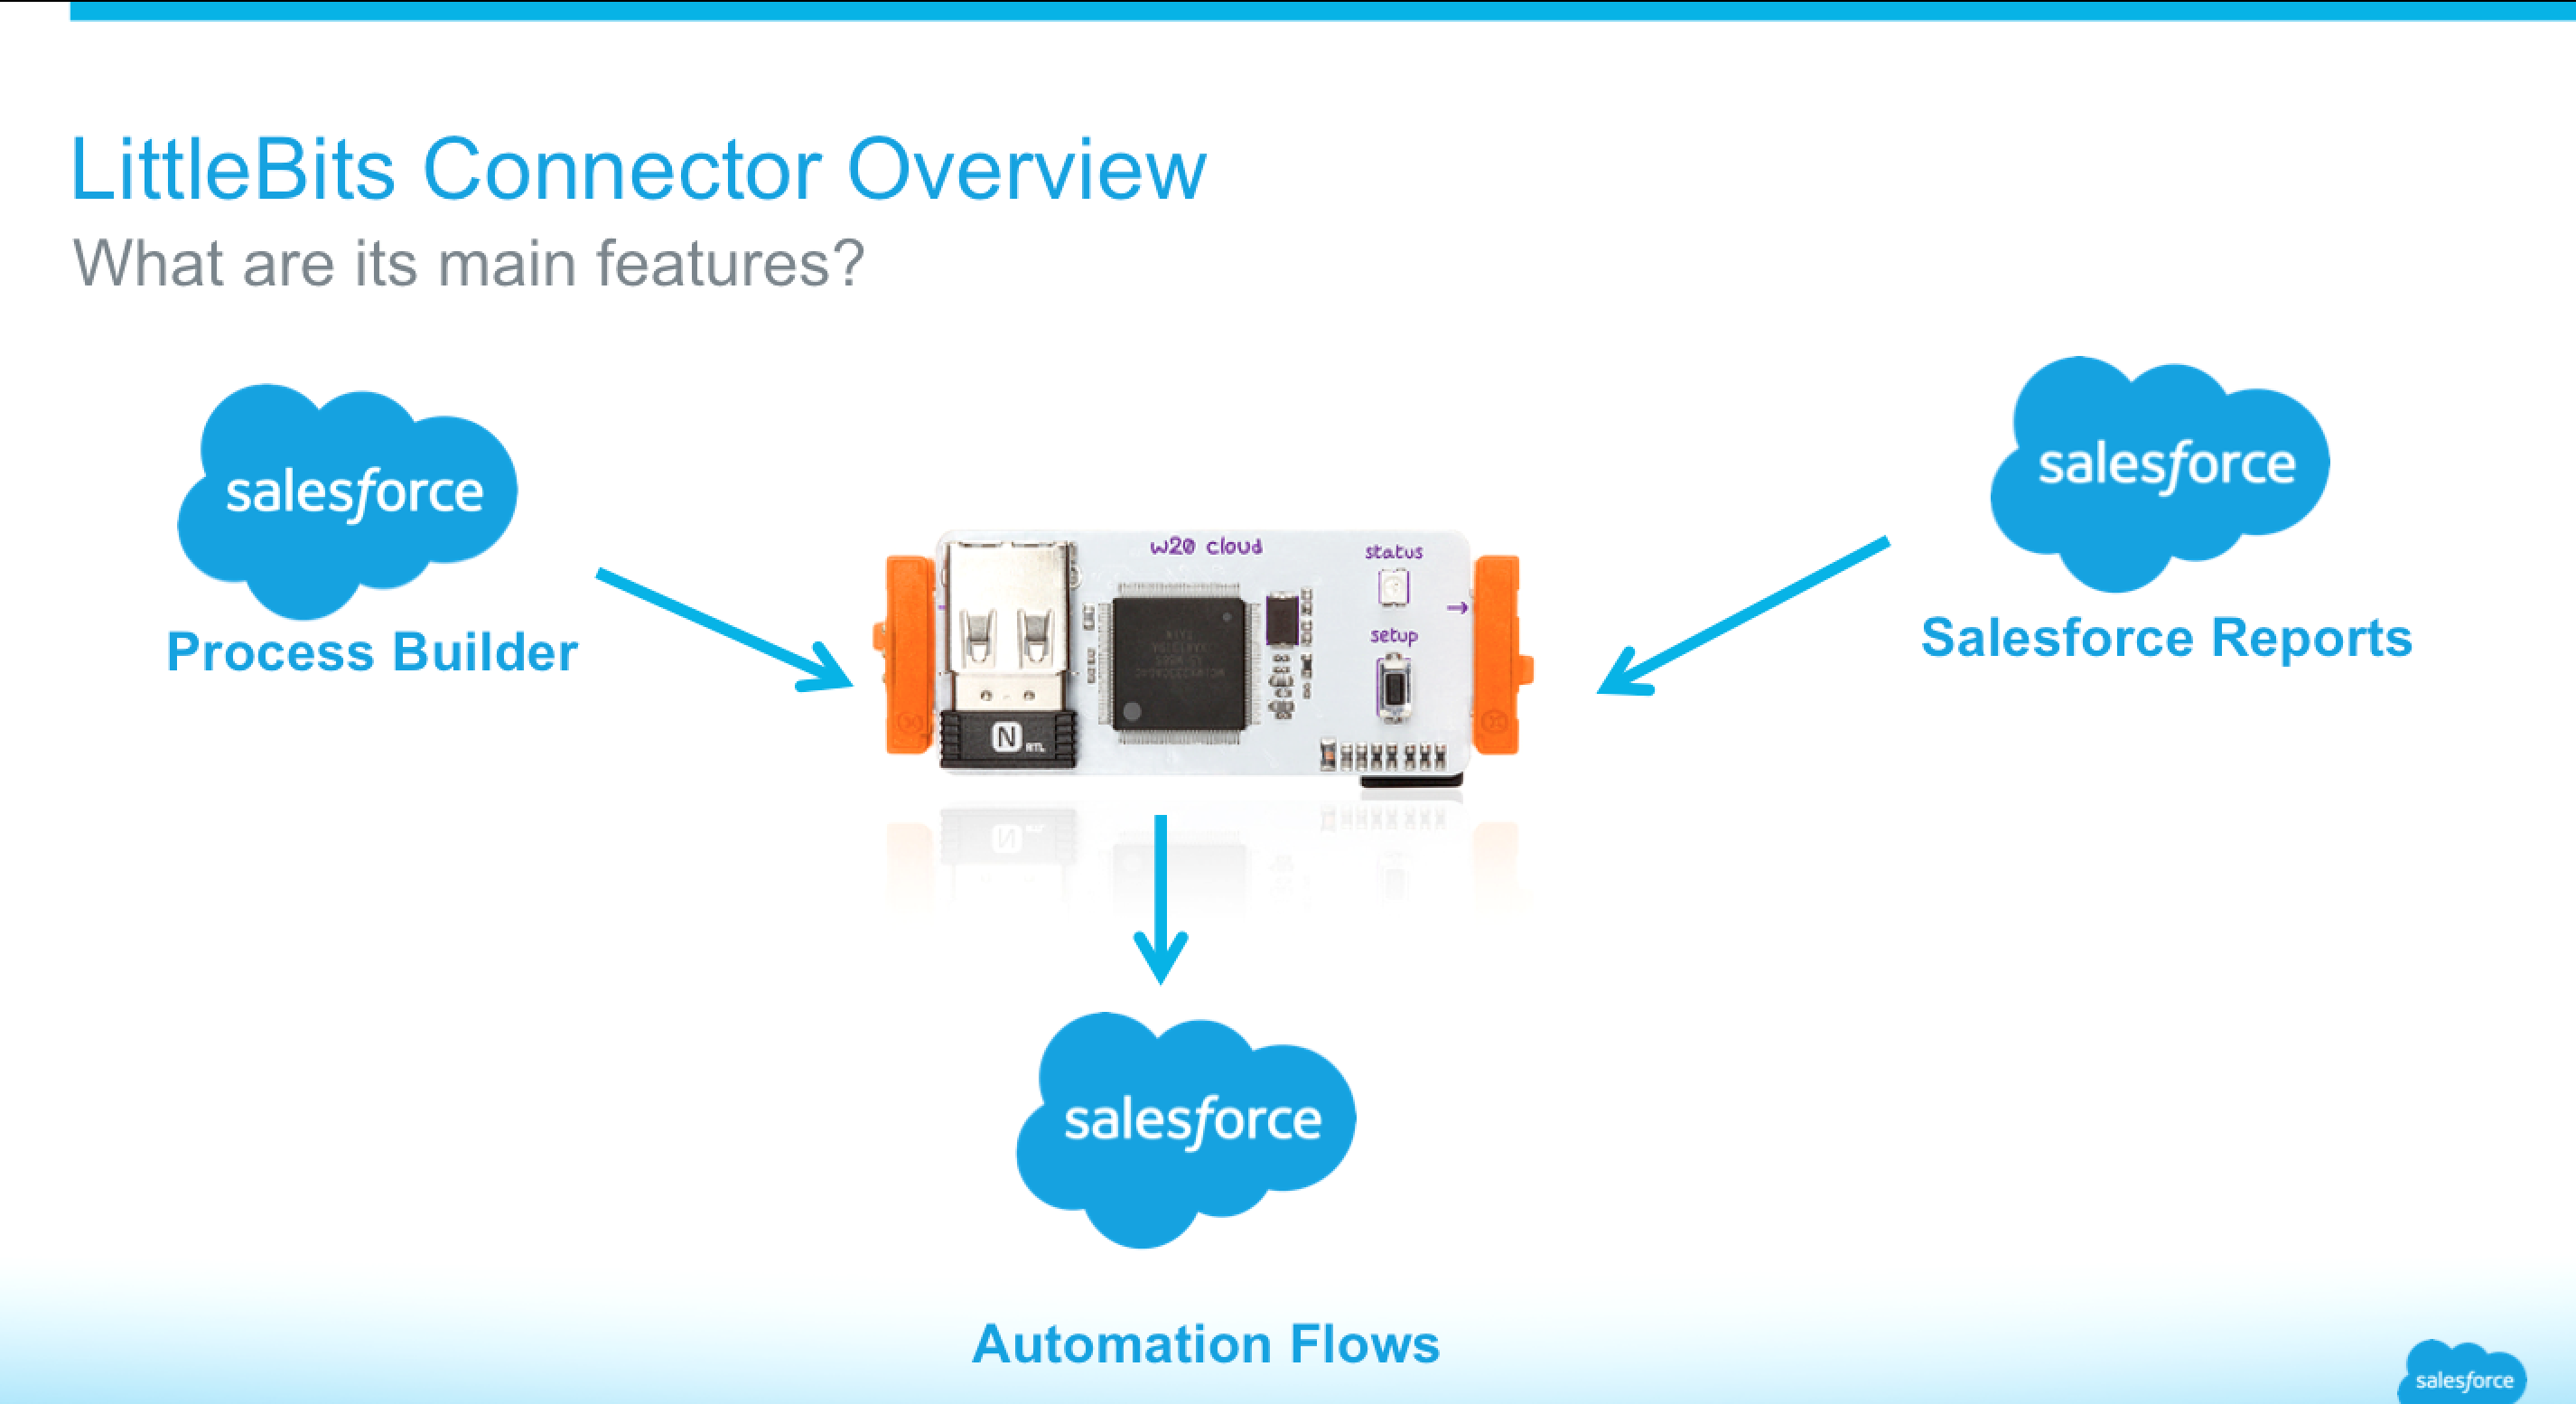
 If you’ve been following my blog, you’ll have already read my earlier
 Fellow Salesforce MVP,
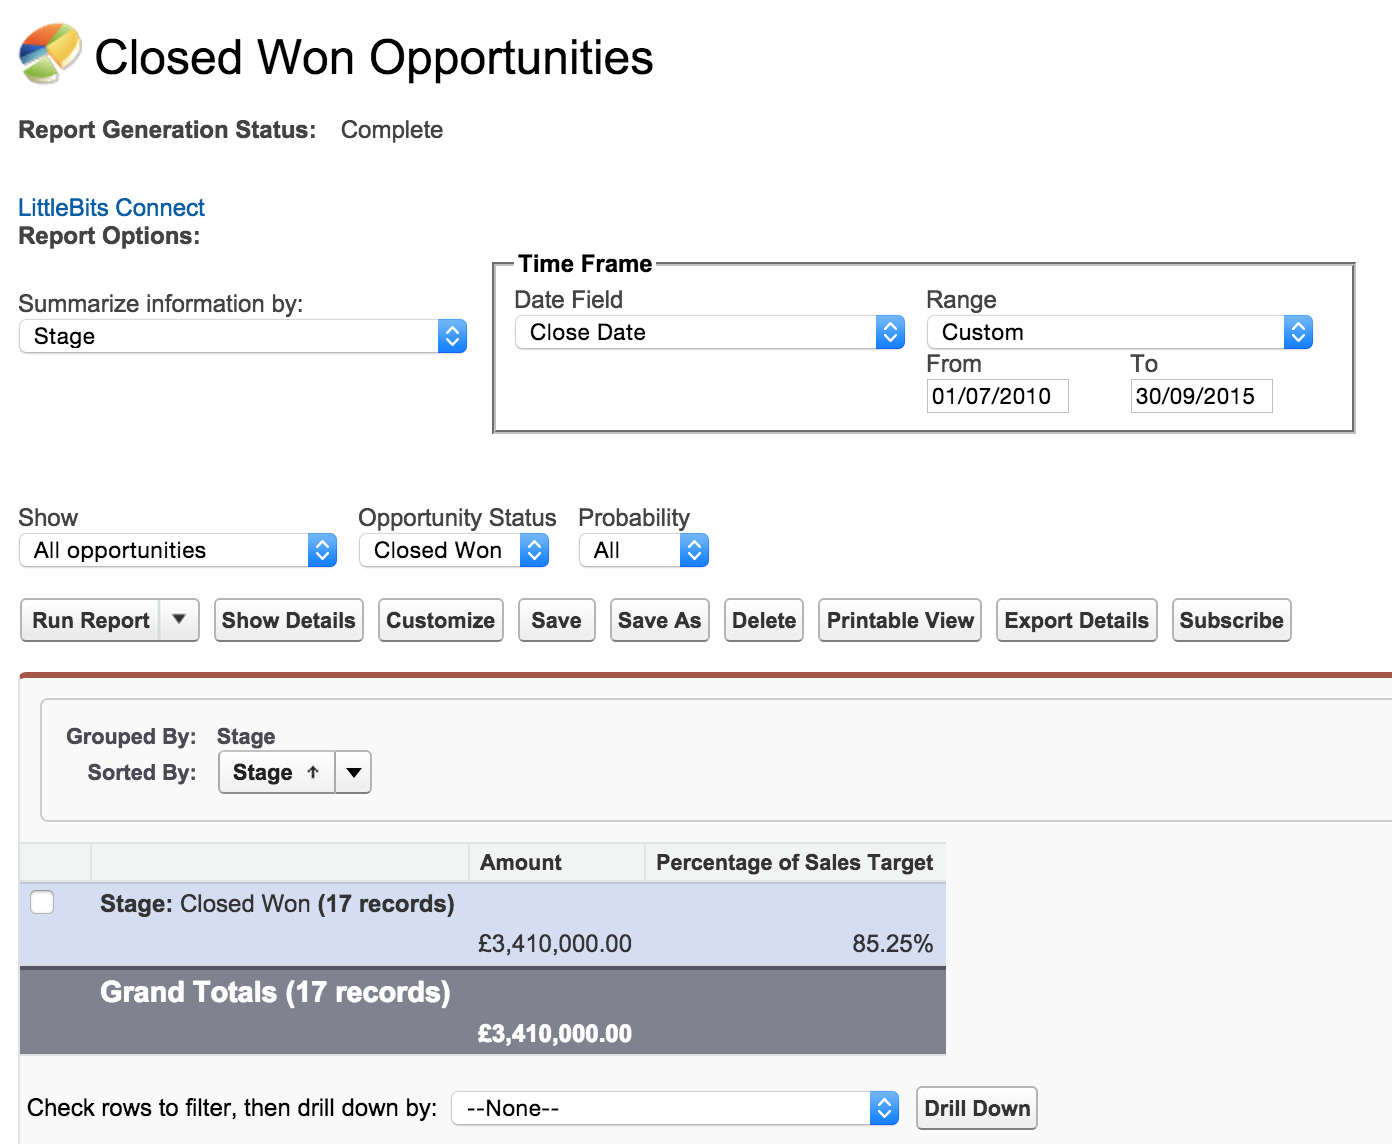
 Salesforce recently introduced a new platform feature which has now


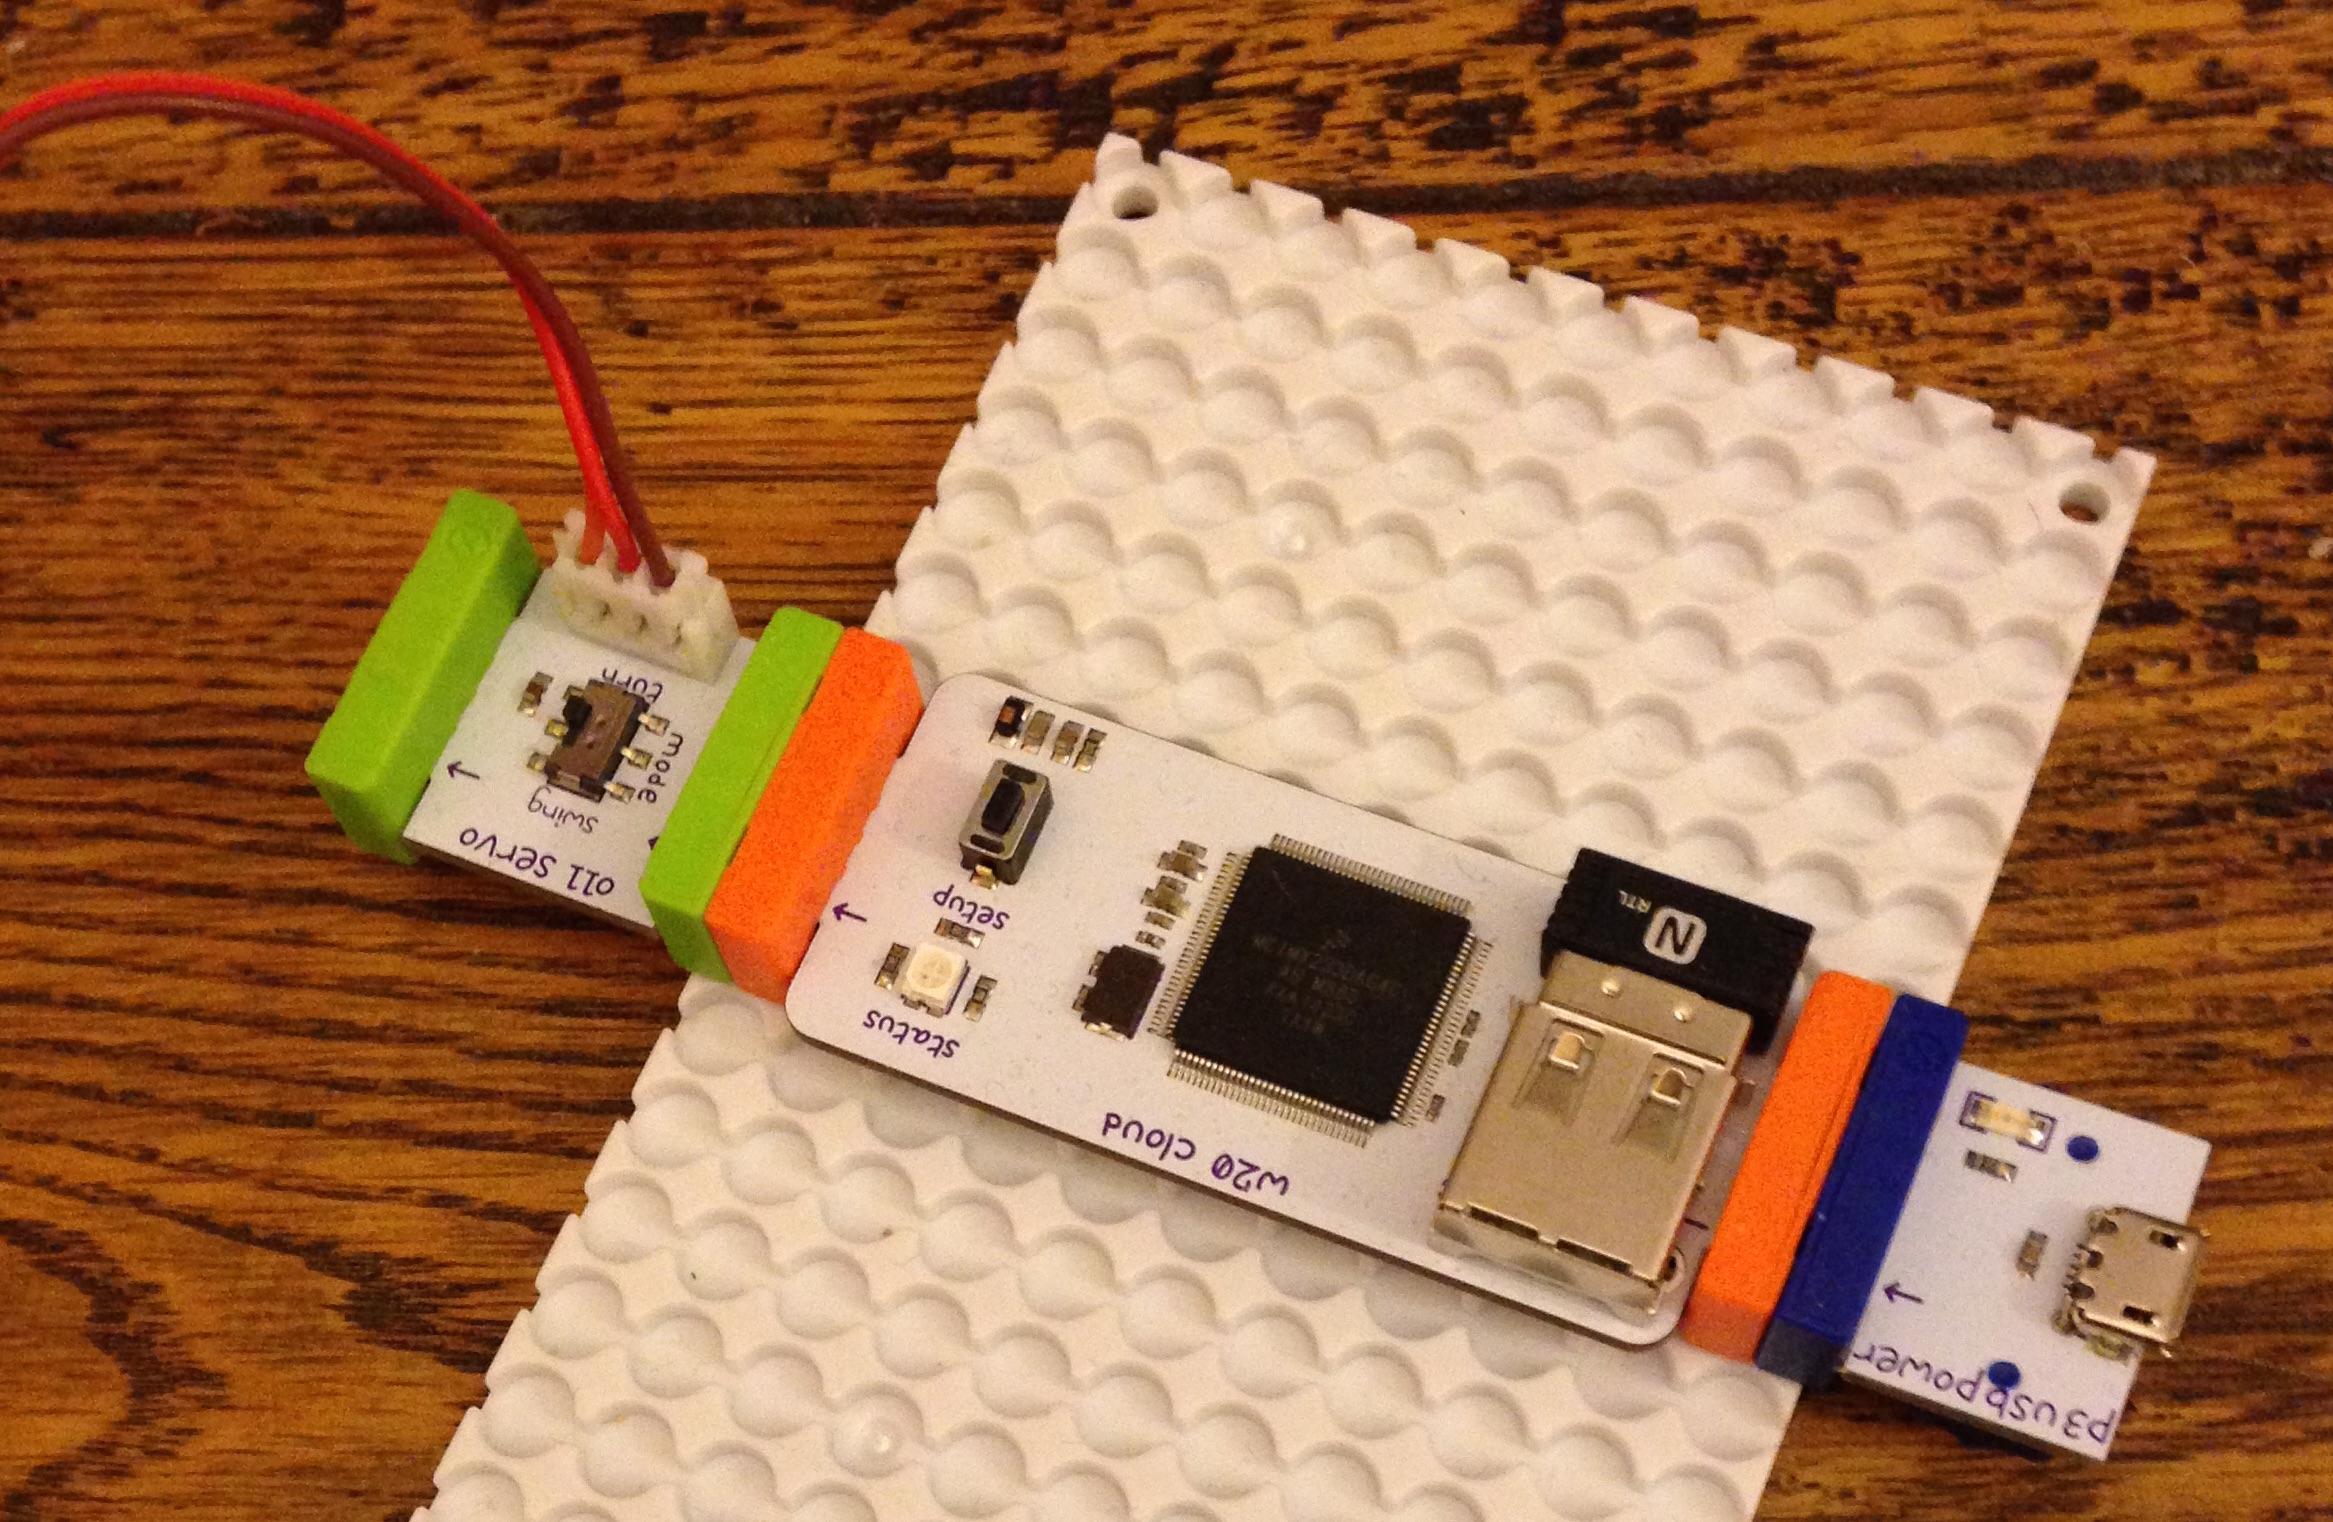
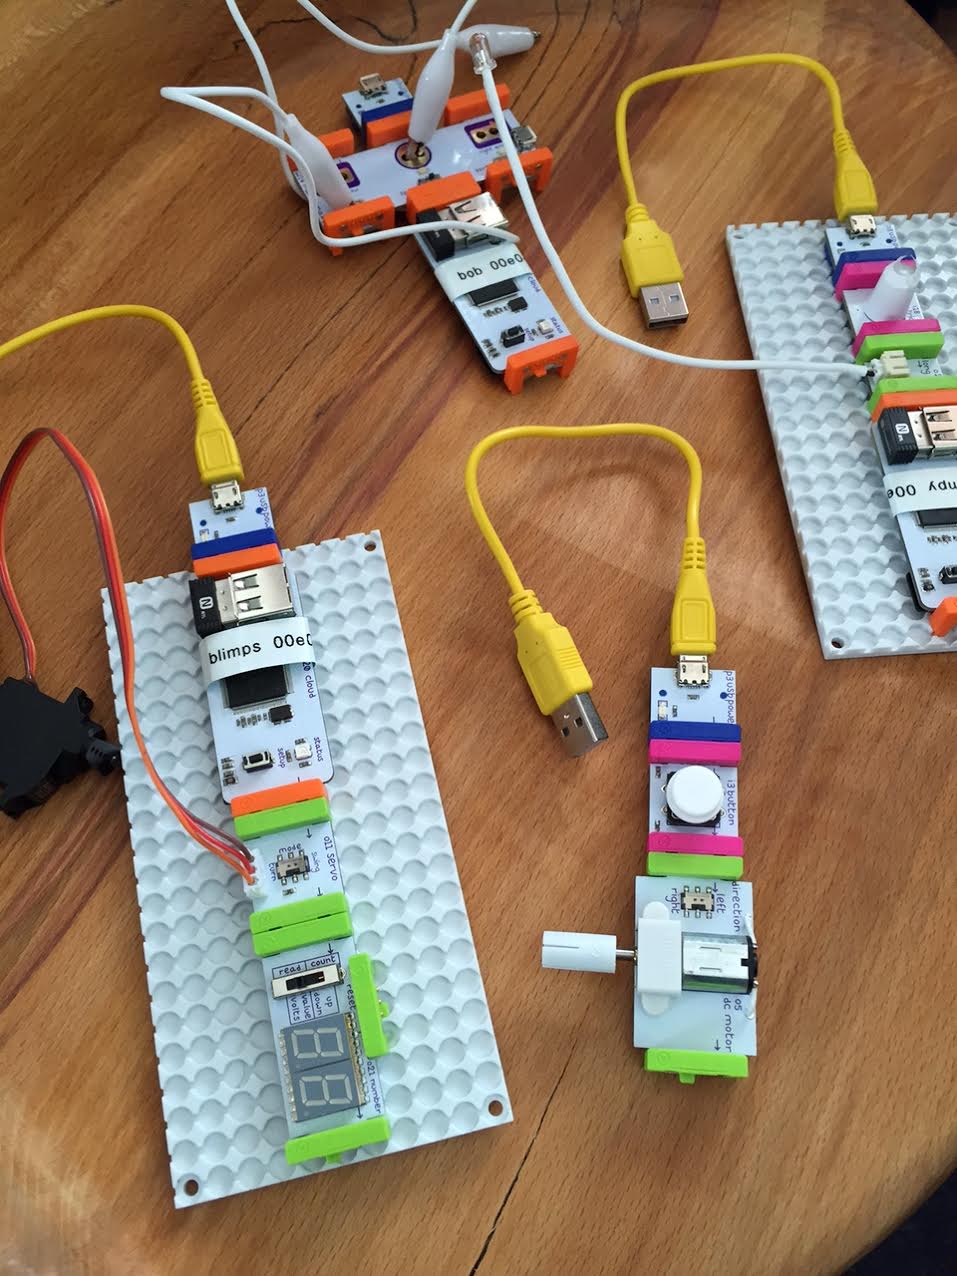
 I have just spent a very enjoyable Saturday morning in my Spring’15 Preview org with a special build of the LittleBits Connector. That leverages the ability for Process Builder to callout to specially annotated Apex code that in turn calls out to the LittleBits Cloud API.
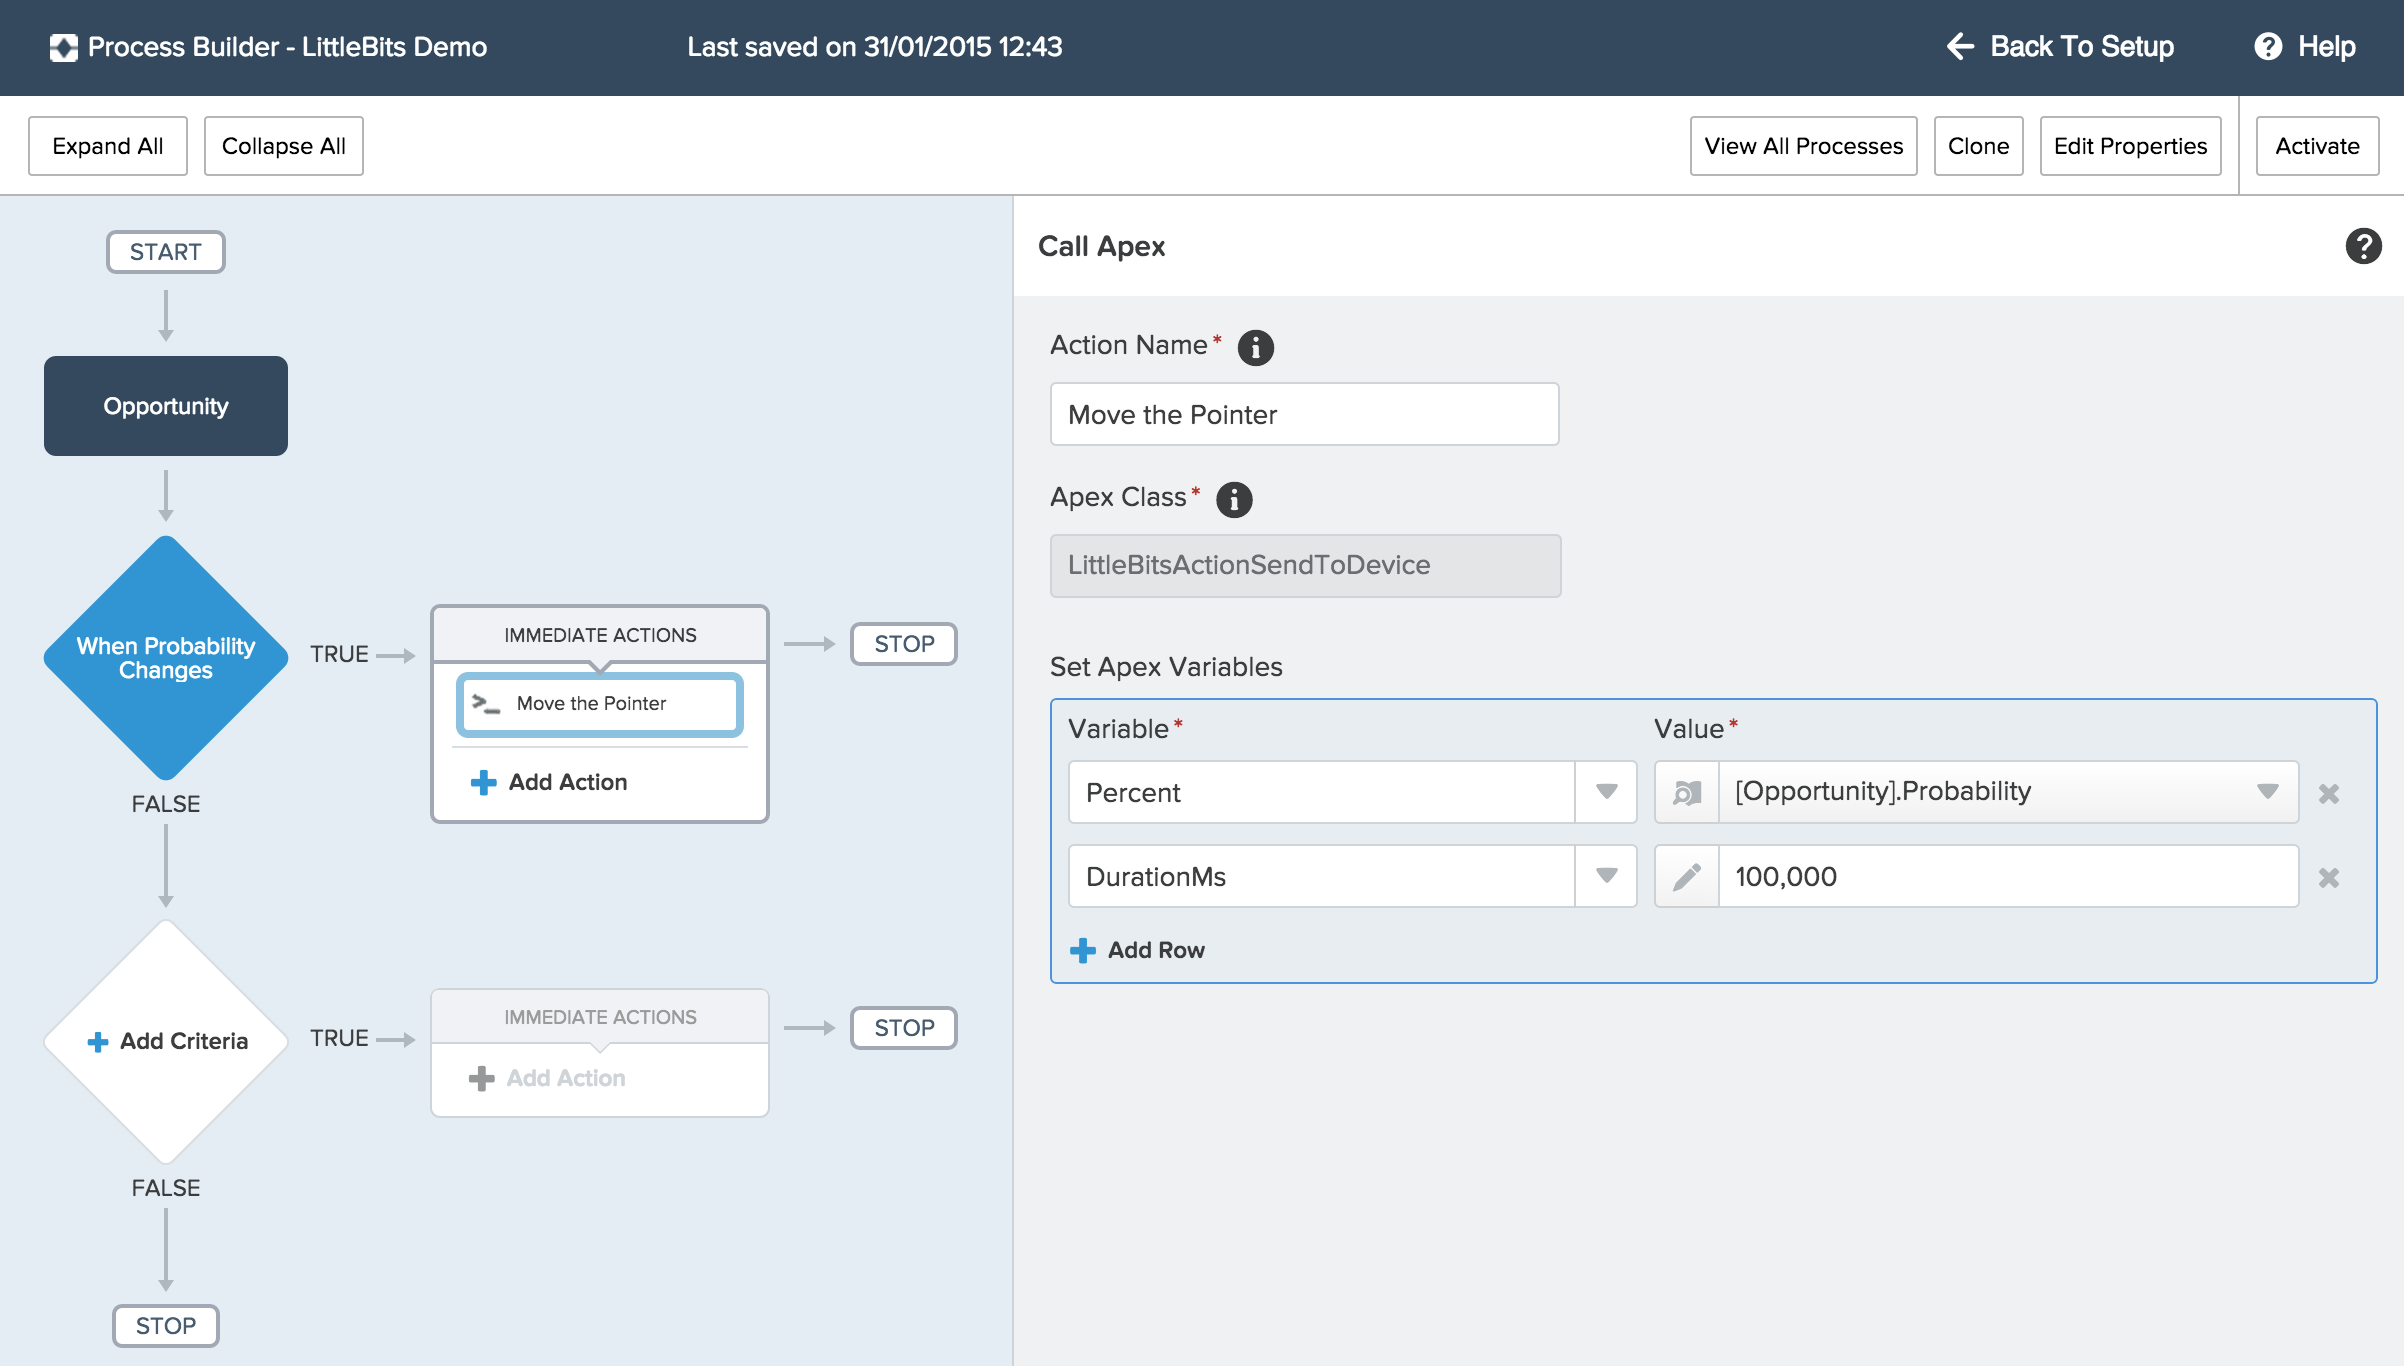

 The heart of the kit is a small computer module, powered by a USB cable (i plugged mine into my external phone battery pack!). It boots from an SD card and uses an onboard USB Wifi adapter to connect itself to the internet (once you’ve connected it to your wifi). After that you send commands to connected outputs to it via a mobile site or set of