As a self confessed API junkie, each time the new Salesforce platform release notes land. I tend to head straight to anything API related, such as sections on REST API, Metadata, Tooling, Streaming, Apex etc etc. This time Spring’17 release seems more packed than ever with API potential for building apps on platform, off platform and combinations of the two! So i thought i would write a short blog highlight what i found and my thoughts on the following…
New or updated API’s in Spring’17…
- Lightning API (Developer Preview)
- External Services (Beta)
- Einstein Predictive Vision Service (Selected Customers Pilot)
- Apex Stub API (GA)
- SObject.getPopulatedFieldsAsMap API (GA)
- Reports and Dashboard REST API Enhancements (GA)
- Composite Resource and SObject Tree REST APIs (GA)
- Enterprise Messaging Platform Java API (GA)
- Bulk API v2.0 (Pilot)
- Tooling API (GA)
- Metadata API (GA)
Lightning API (Developer Preview)
This REST API seems to be UI helper API that wraps a number of smaller already existing REST API’s on the platform. Providing a one stop shop (a single API call) for reading both record data and related record metadata such as layout and theme information. In addition to that it will resolve security before returning the response. If your building your own replacement UI or integrating the platform into a custom UI. This API looks like it could be quite a saving on development costs, compared to the many API calls and client logic that would be required to figure all this out. Reading between the lines its likely its the byproduct of a previously internal API Salesforce themselves have been using for Salesforce1 Mobile already? But thats just a guess on my behalf! The good news if so, is that its likely pretty well battle tested from a stability and use case perspective. The API has its own dedicated Developer Guide if want to read more.
External Services (Beta)
If there is one major fly in the ointment of the #clicksnotcode story so far, it’s been calling API’s. By definition they require a developer to write code to use them, right? Well not anymore! A new feature of delivered via Flow (and likely Process Builder) allows the user to effectively teach Flow about REST API’s via JSON Hyper-Schema (an emerging and very interesting independent specification for describing API’s). Once the user points the new External Services Wizard to an API supporting JSON Hyper Schema it uses the information to generate Apex code for an Invocable Method that makes the HTTP callout. Generating Apex code, is a relatively new approach by Salesforce to a tricky requirement to bring more power to non-developers and one i am also a fan of. It is something they have done before for Transaction Security Policies plugins and of course Force.com Sites. At time of writing i could not find it in my pre-release org, but i am keen to dig in deeper! Read more here.
Einstein Predictive Vision Service (Selected Customers Pilot)
Following the big splash made at Dreamforce 2016 around the new AI capability known as Einstein. The immediate question on mine and many other partner and developers mind was “How do we make use of it from code?”. Spring provides an invite only pilot access to a new REST API around image processing and recognition. No mention yet of an APEX API though. You can read more about the API at in the release notes and in more detailed via the dedicated Metamind “A Salesforce Company” site here. There is also some clearer information on exactly where it popups up in Salesforce products.
Apex Stub API (GA)
As readers of this blog will know, i am big fan of Apex Mocks, an open source Apex mocking library produced by fellow FinancialForce.com employee Paul Hardaker (DevOps Director), and laterally heavily documented and promoted by Jesse Altman and David Frudd (also of FinancialForce). More recently at Dreamforce 2016 they co-presented with Salesforce developers responsible for the Apex Stub API. The reason being is Apex Mocks and Apex Stub API have a very close relationship in bringing enterprise level mocking frameworks to Apex. For more information check out the Dreamforce 2016 recording and this GitHub repo branch in your pre-release org and the official announcement here.
SObject.getPopulatedFieldsAsMap API (GA)
So calling this an “API” is a bit of stretch i know. Since its basically a existing Apex method on the SObject class. The big news though is that a gap in its behaviour has been fixed / filled that makes it more useful. Basically prior to Spring this method would not recognise fields set by code after a record (SObject) was queried. Thus if for example your attempting to implement a generic FLS checking solution using the response from this method, you where left feeling a little disappointed. Thankfully the method now returns all populated fields, regardless if they are populated via the query or later set by code.
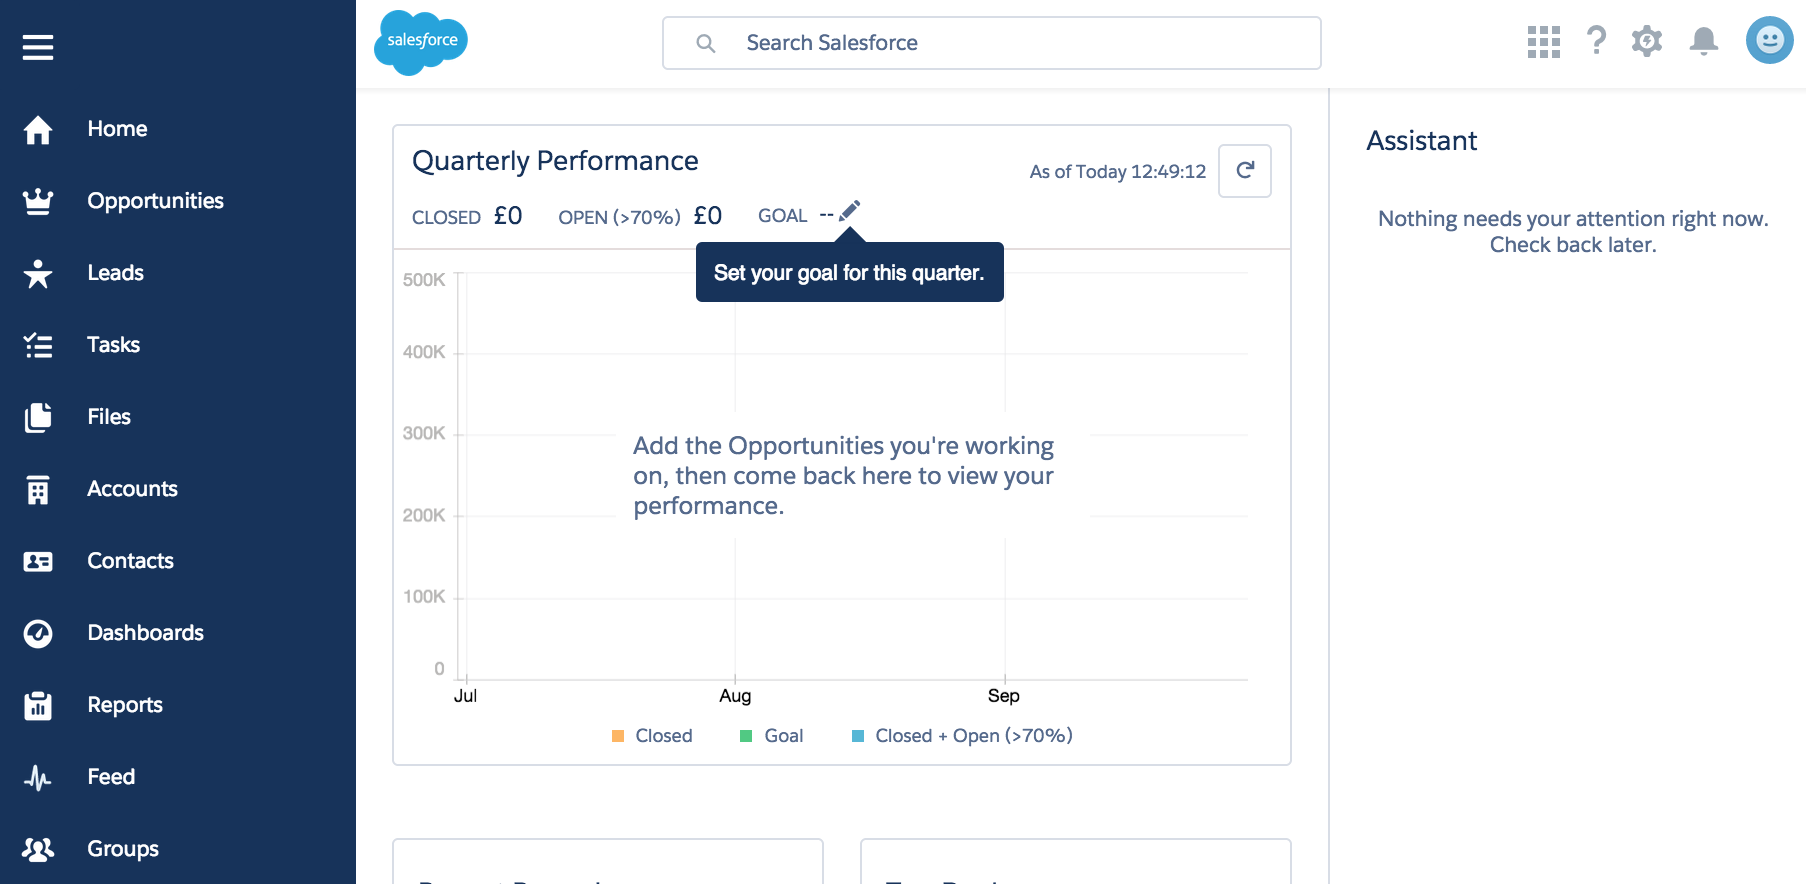
Reports and Dashboard REST API Enhancements (GA)
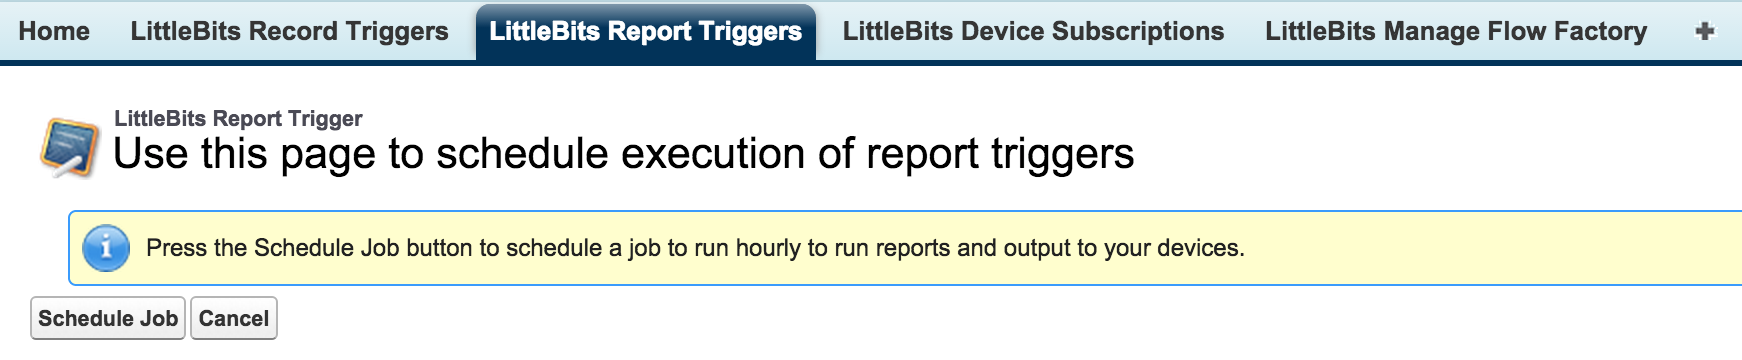
Its now possible to create and delete reports using the Analytics REST API (no mention of the Apex API equivalent and i suspect this wont be supported). Reports are a great way to provide a means for driving data selection for processes you develop. The Analytics API is available in REST and Apex contexts. As well as driving reports from your code, Report Notifications allow users to schedule reports and have actions performed if certain criteria is met. I recently covered the ability to invoke an Apex class and Flow in response to Report Notification in this blog, Supercharing Salesforce Report Subscriptions. In Spring, the Reports REST API can now create notifications.
Composite Resource and SObject Tree REST APIs (GA)
An often overlooked implication of using multiple REST API calls in response to a user action is that if those calls update the database, there is no over arching database transaction. Meaning if the user was to close the page before processing was done, or kill the mobile app or your client code just crashed. It is possible to leave the records in an an invalid state. This is bad for database integrity. Apart from this, making multiple consecutive REST API calls can eat into an orgs 24hr rolling quota.
To address these use cases Salesforce have now released in GA form the composite and tree APIs (which actually this was already GA, how did i miss that?!). The composite resource API does allow you to package multiple CRUD REST API calls into one call and optionally control transaction scope via the AllOrNothing header. Allowing the possibility of committing multiple records in one CRUD API requested. The tree API allows you to create an account with a related set of contacts (for example) in one transaction wrapped REST API call. Basically the REST API is now bulkified! You can read more in the release notes here and in the REST API developers guide here and here.
Enterprise Messaging Platform Java API (GA)
In an increasing realtime on demand world we live in, the Streaming API is critical for keeping hungry users updated. I personally long for its return in a Lightning UI world (i have some thoughts on this involving the new Container Component). In the meantime my exploits thus far have been around Internet of Things and Lego robots! Basically using the Streaming API within a small Java app hosted by the Lego Mindstorms EV3 to control the robot from Salesforce. The implementation of that Java app was i recall tricky in terms of Java libraries needed and the API involved. Salesforce have open sourced a new Java library, much in the spirit of the WSC library, that simplifies access to the Streaming API.
Bulk API v2.0 (Pilot)
Salesforce is overhauling their long standing Bulk REST API. Chances are you have not used it much, as its mostly geared towards data loading tools and integration frameworks (its simply invoked by ticking a box in the Salesforce Data Loader). The first phase of v2.0 changes to this API allow it to support larger CSV files to be uploaded and automatically chunked by the platform without the developer having to split them. Also changing the way limits are imposed, making it more record centric. Read more here.
Tooling API (GA)
Tooling API appears to be taken on new REST API resources that expose more standard aspects of the platform, such as formula functions and operators. For those building alternative UI’s over these features its a welcome alternative to hard coding these lists and having to remember to check / update them each release. Read more here.
Metadata API (GA)
Ironically my favourite API, the Metadata API has undergone mainly typical changes relating to new features elsewhere in the release. So no new methods or general features. I guess given all the great stuff above, i can not feel to sad! Especially with the announcement recently from the Apex PM that the native Apex Metadata API is finally under development, of course safe harbour and no statement yet on dates… but progress!

 One thing that simplifies the process is hosting your skill code through the
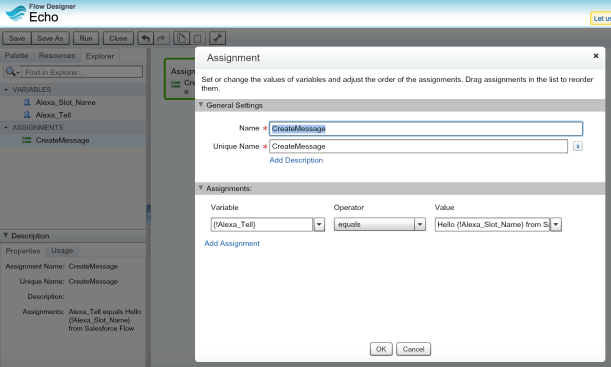
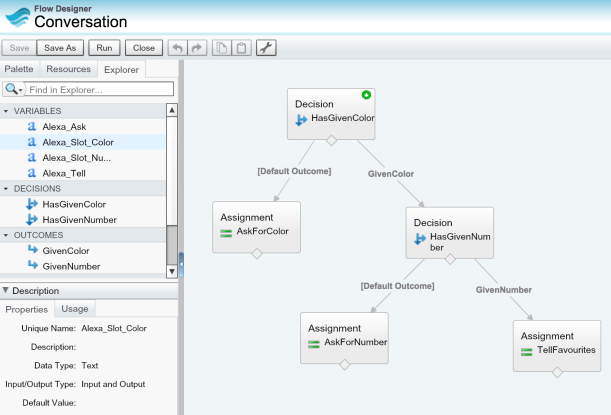
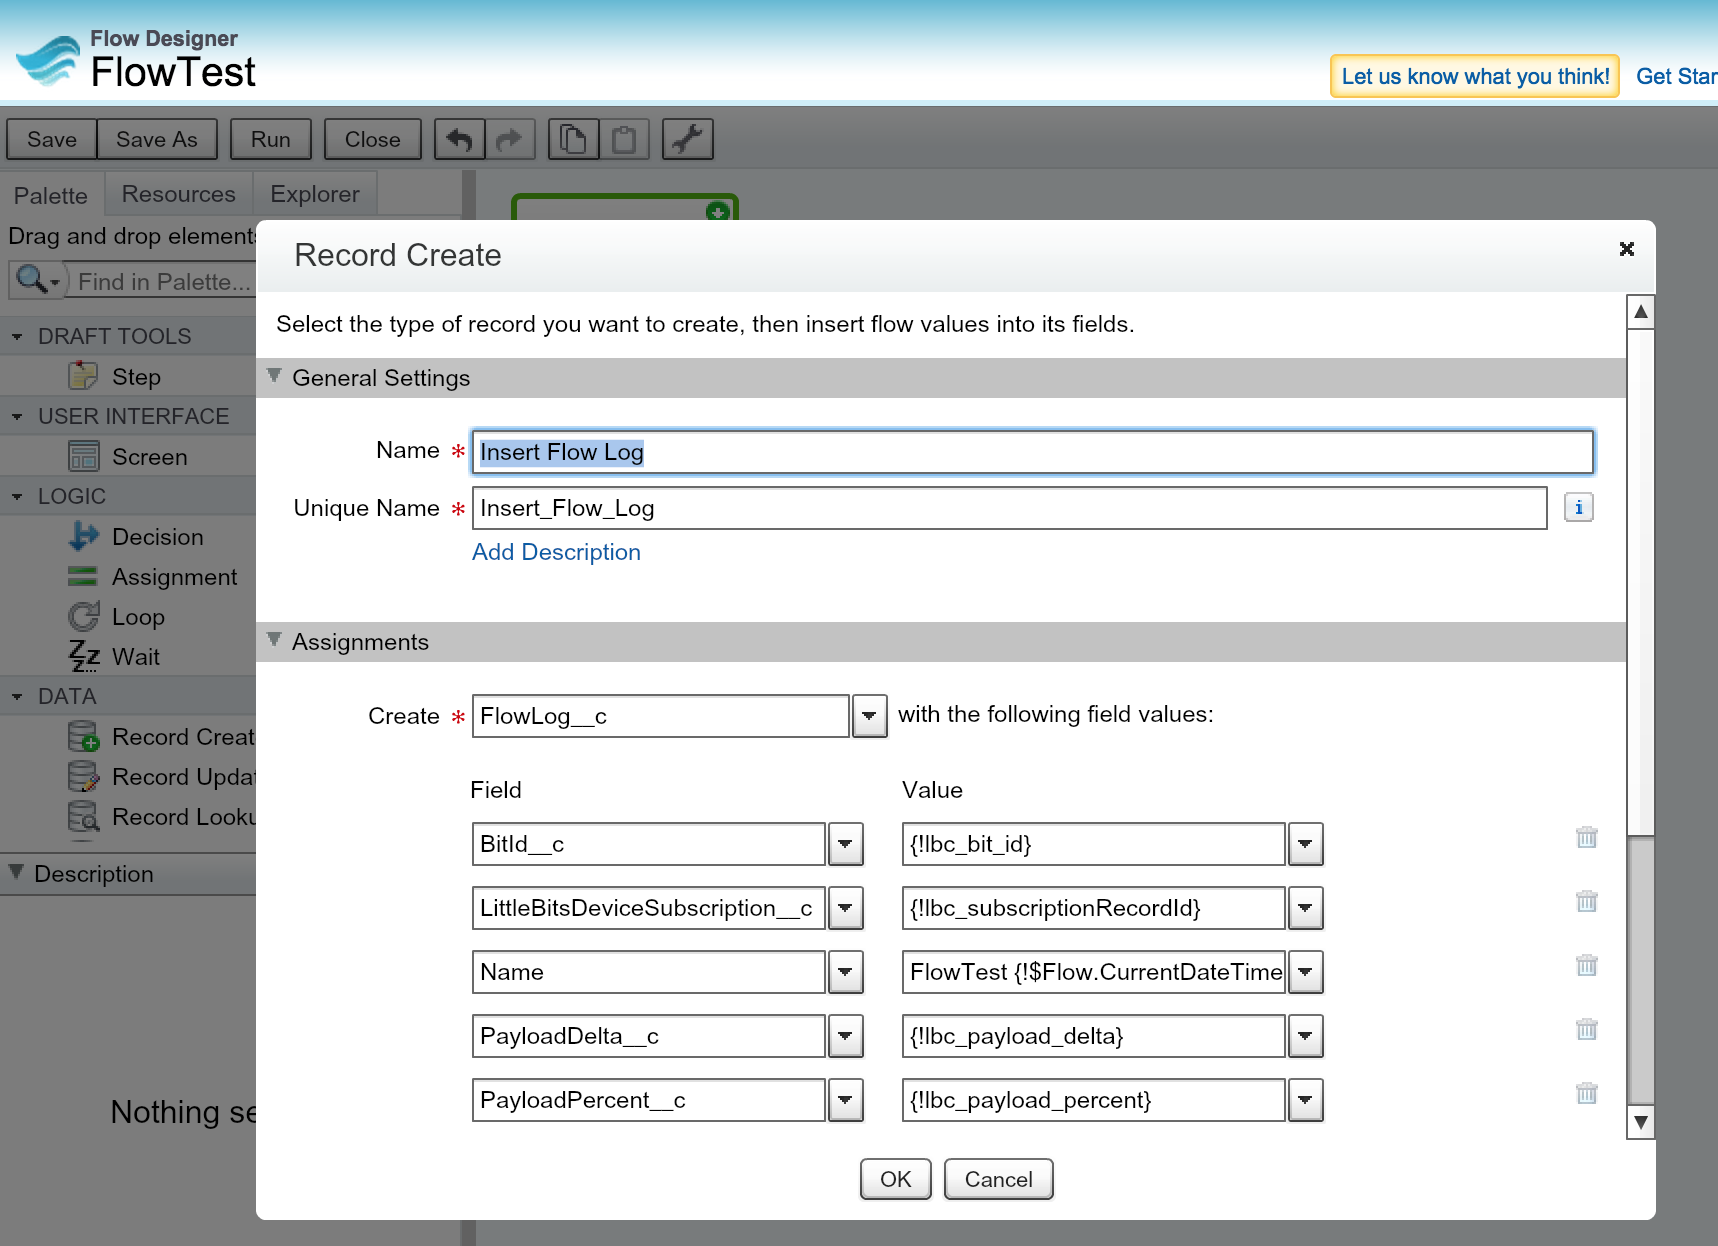
 To code my Skill I went with NodeJS, as i had not done a lot of coding in it and wanted to challenge myself. The other challenge i set myself was to integrate in a generic and extensible way with Salesforce. Thus i wanted to incorporate my old friend Flow!
 The
The 

 Increasingly my Salesforce community time is spent responding to questions, ideas and submissions via
 Immediately i set about to rectify this! With a mission to allow the
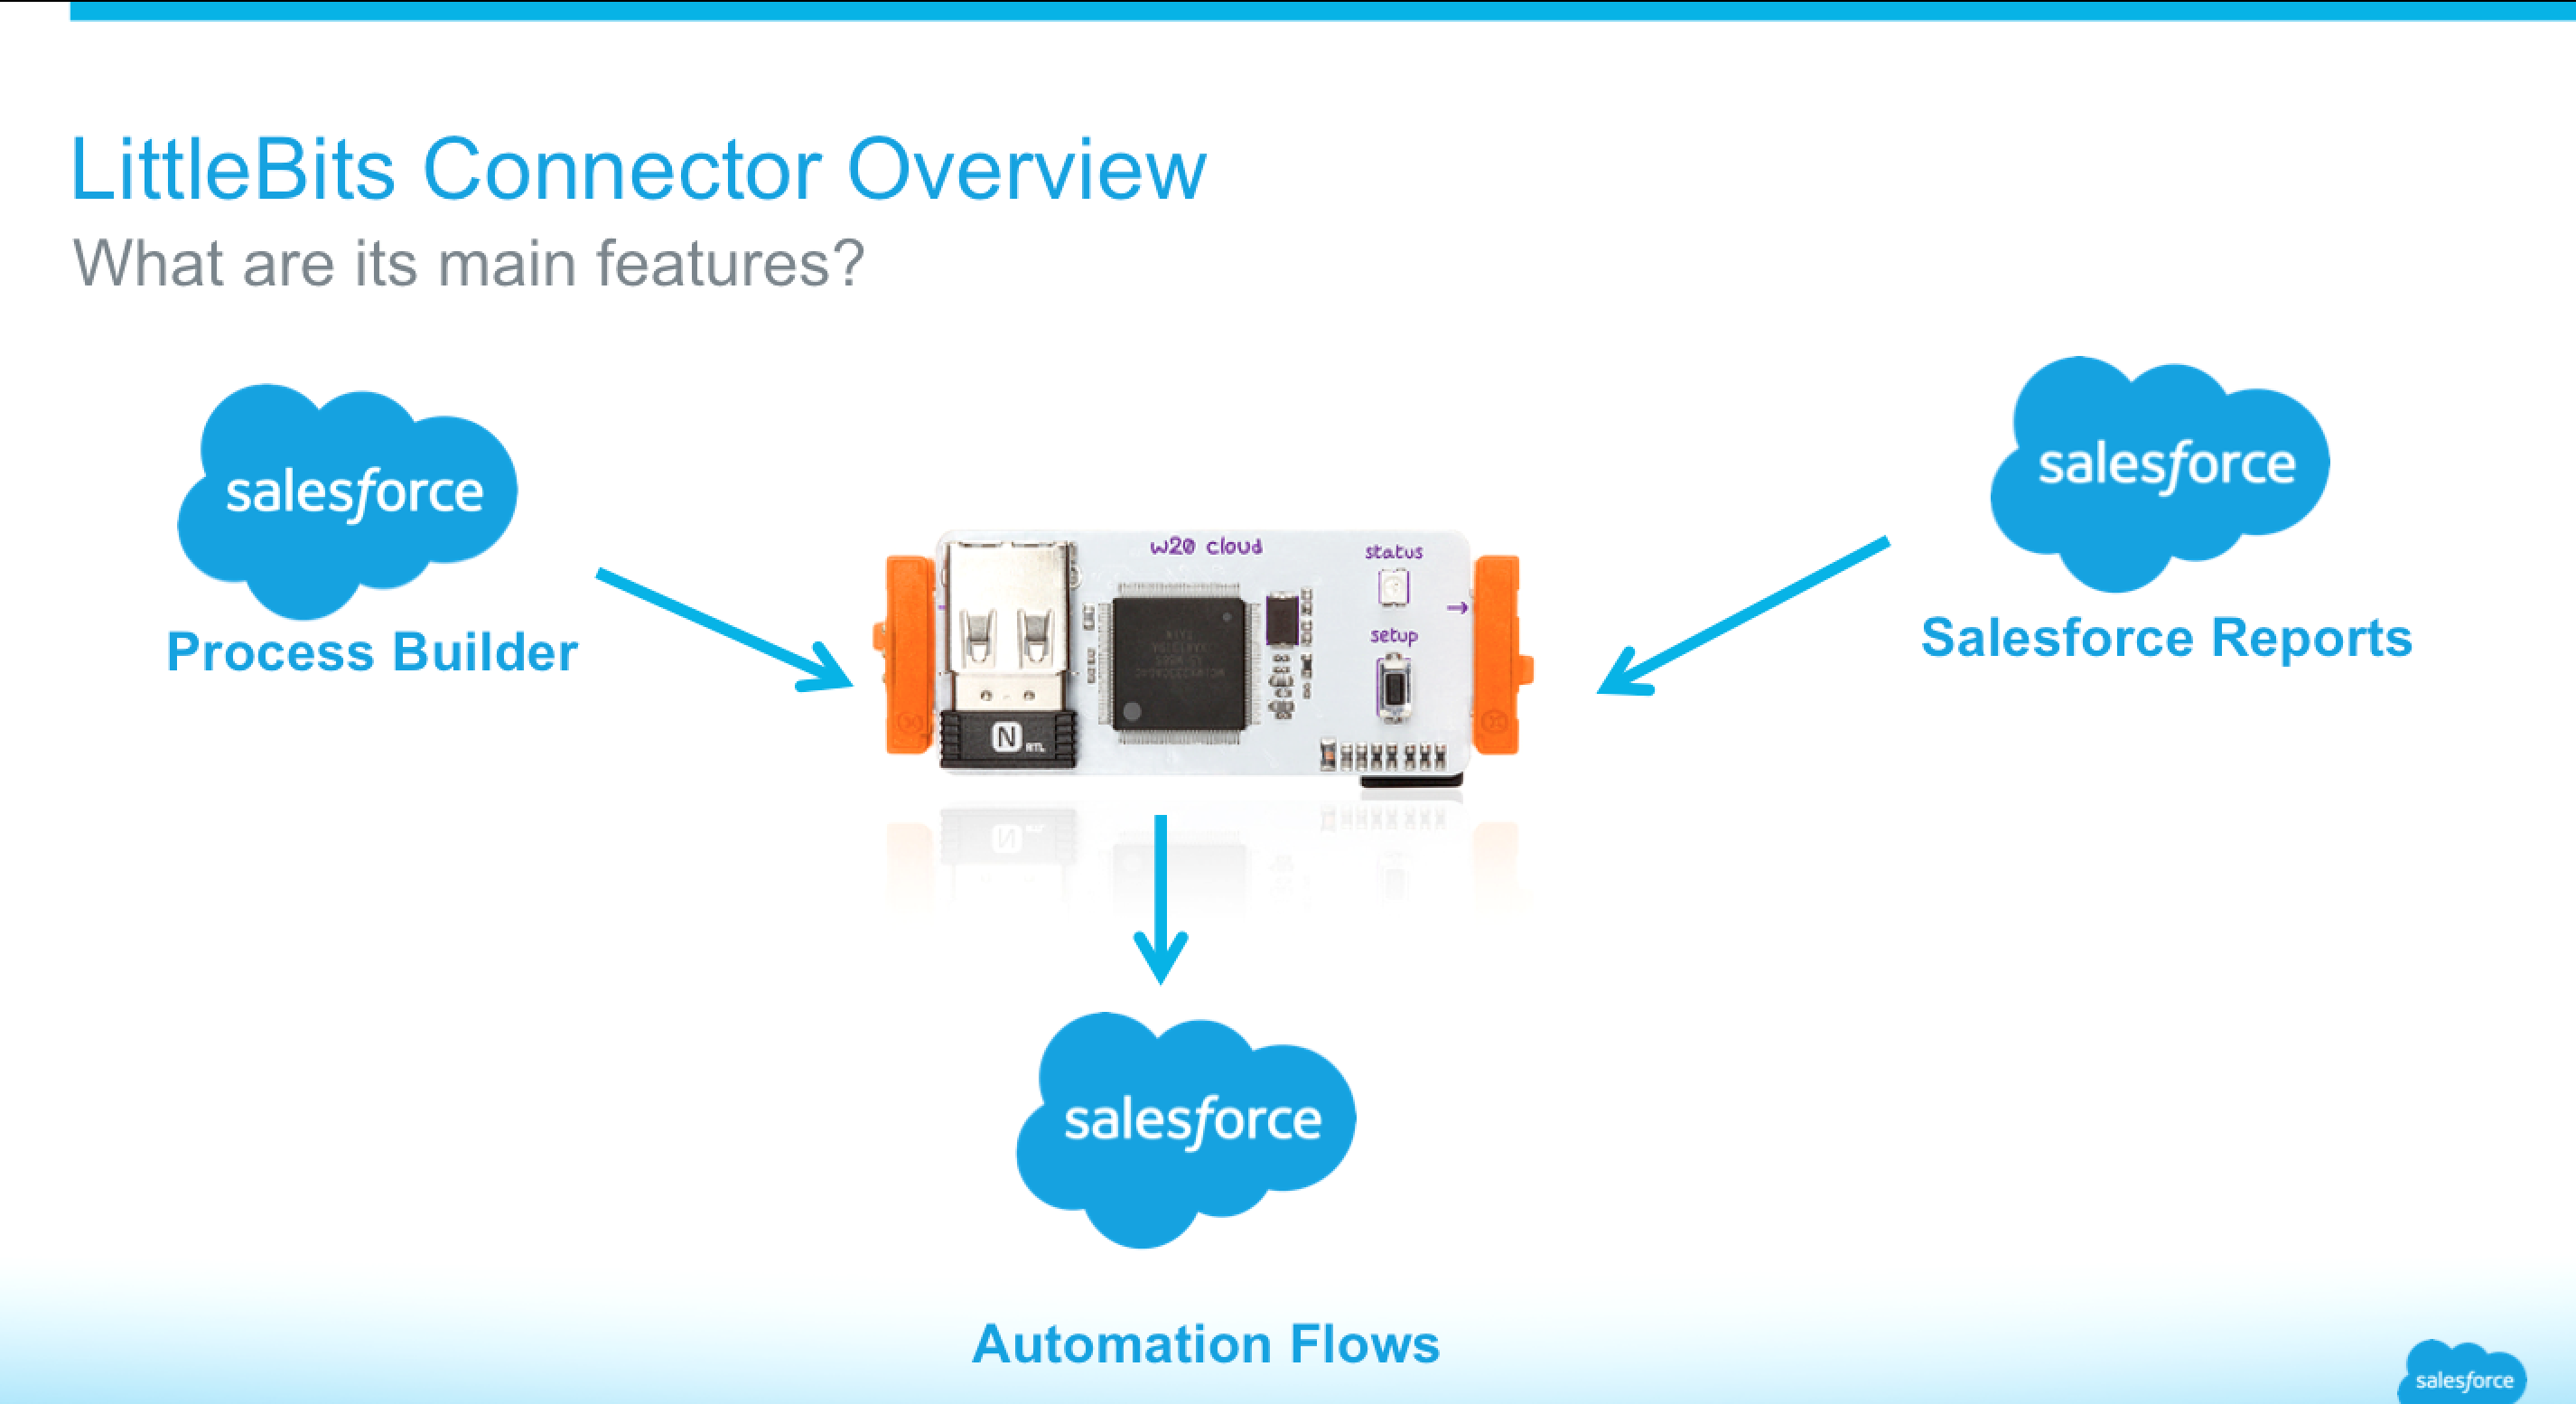
 If you’ve been following my blog, you’ll have already read my earlier
 Fellow Salesforce MVP,
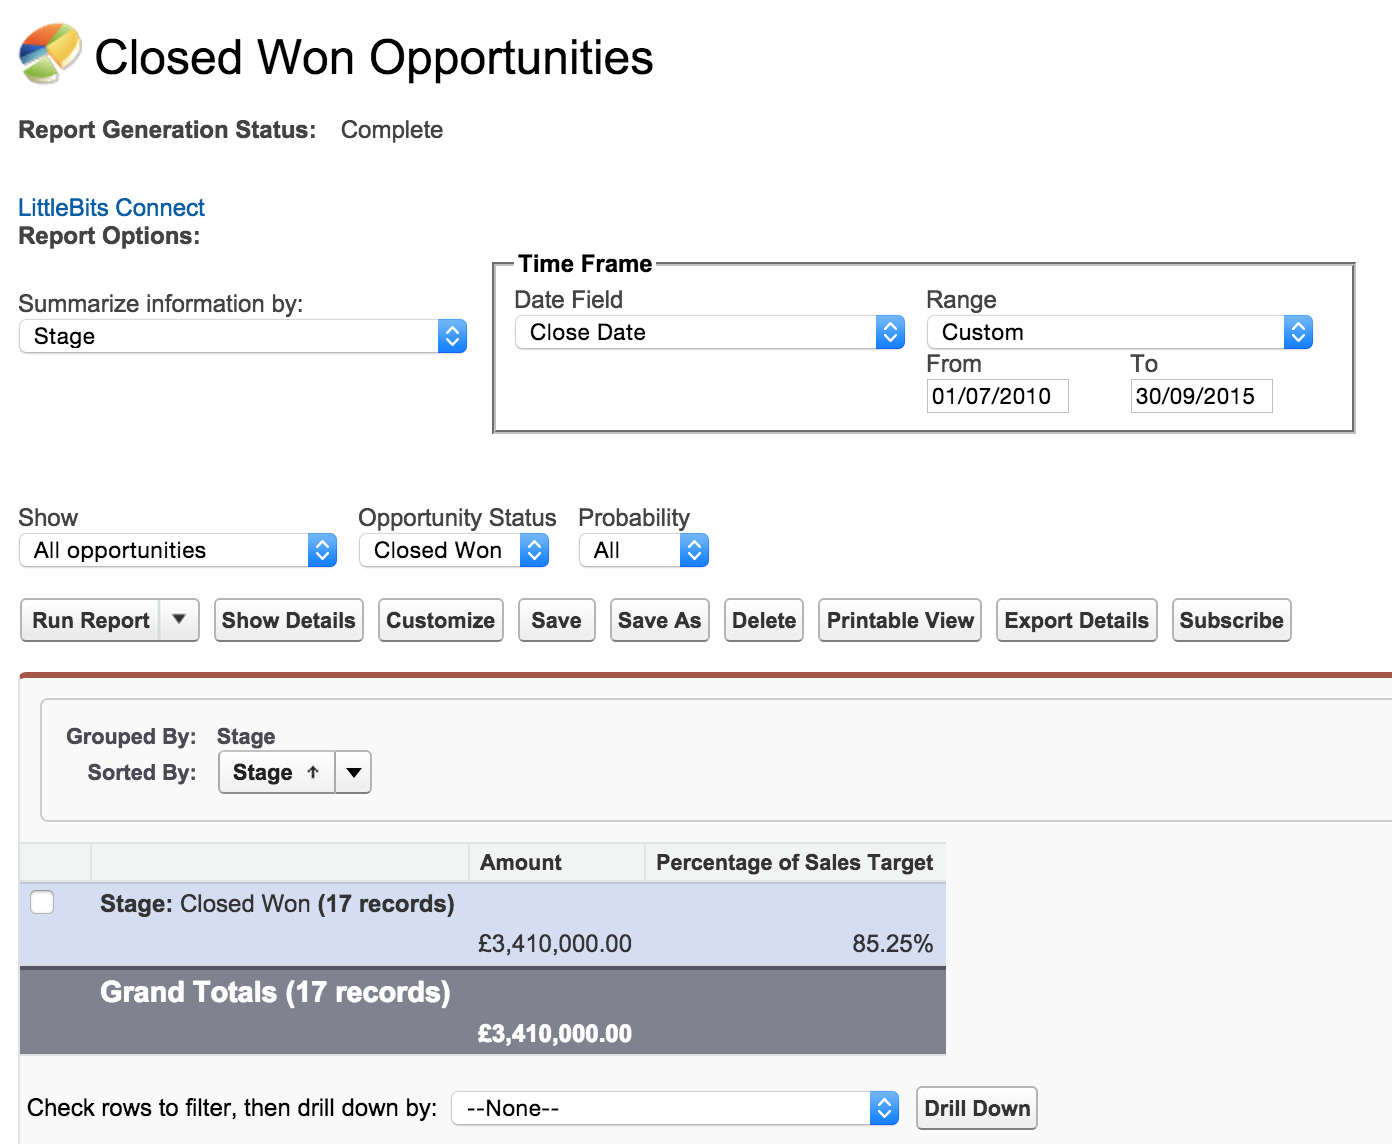

 Salesforce recently introduced a new platform feature which has now


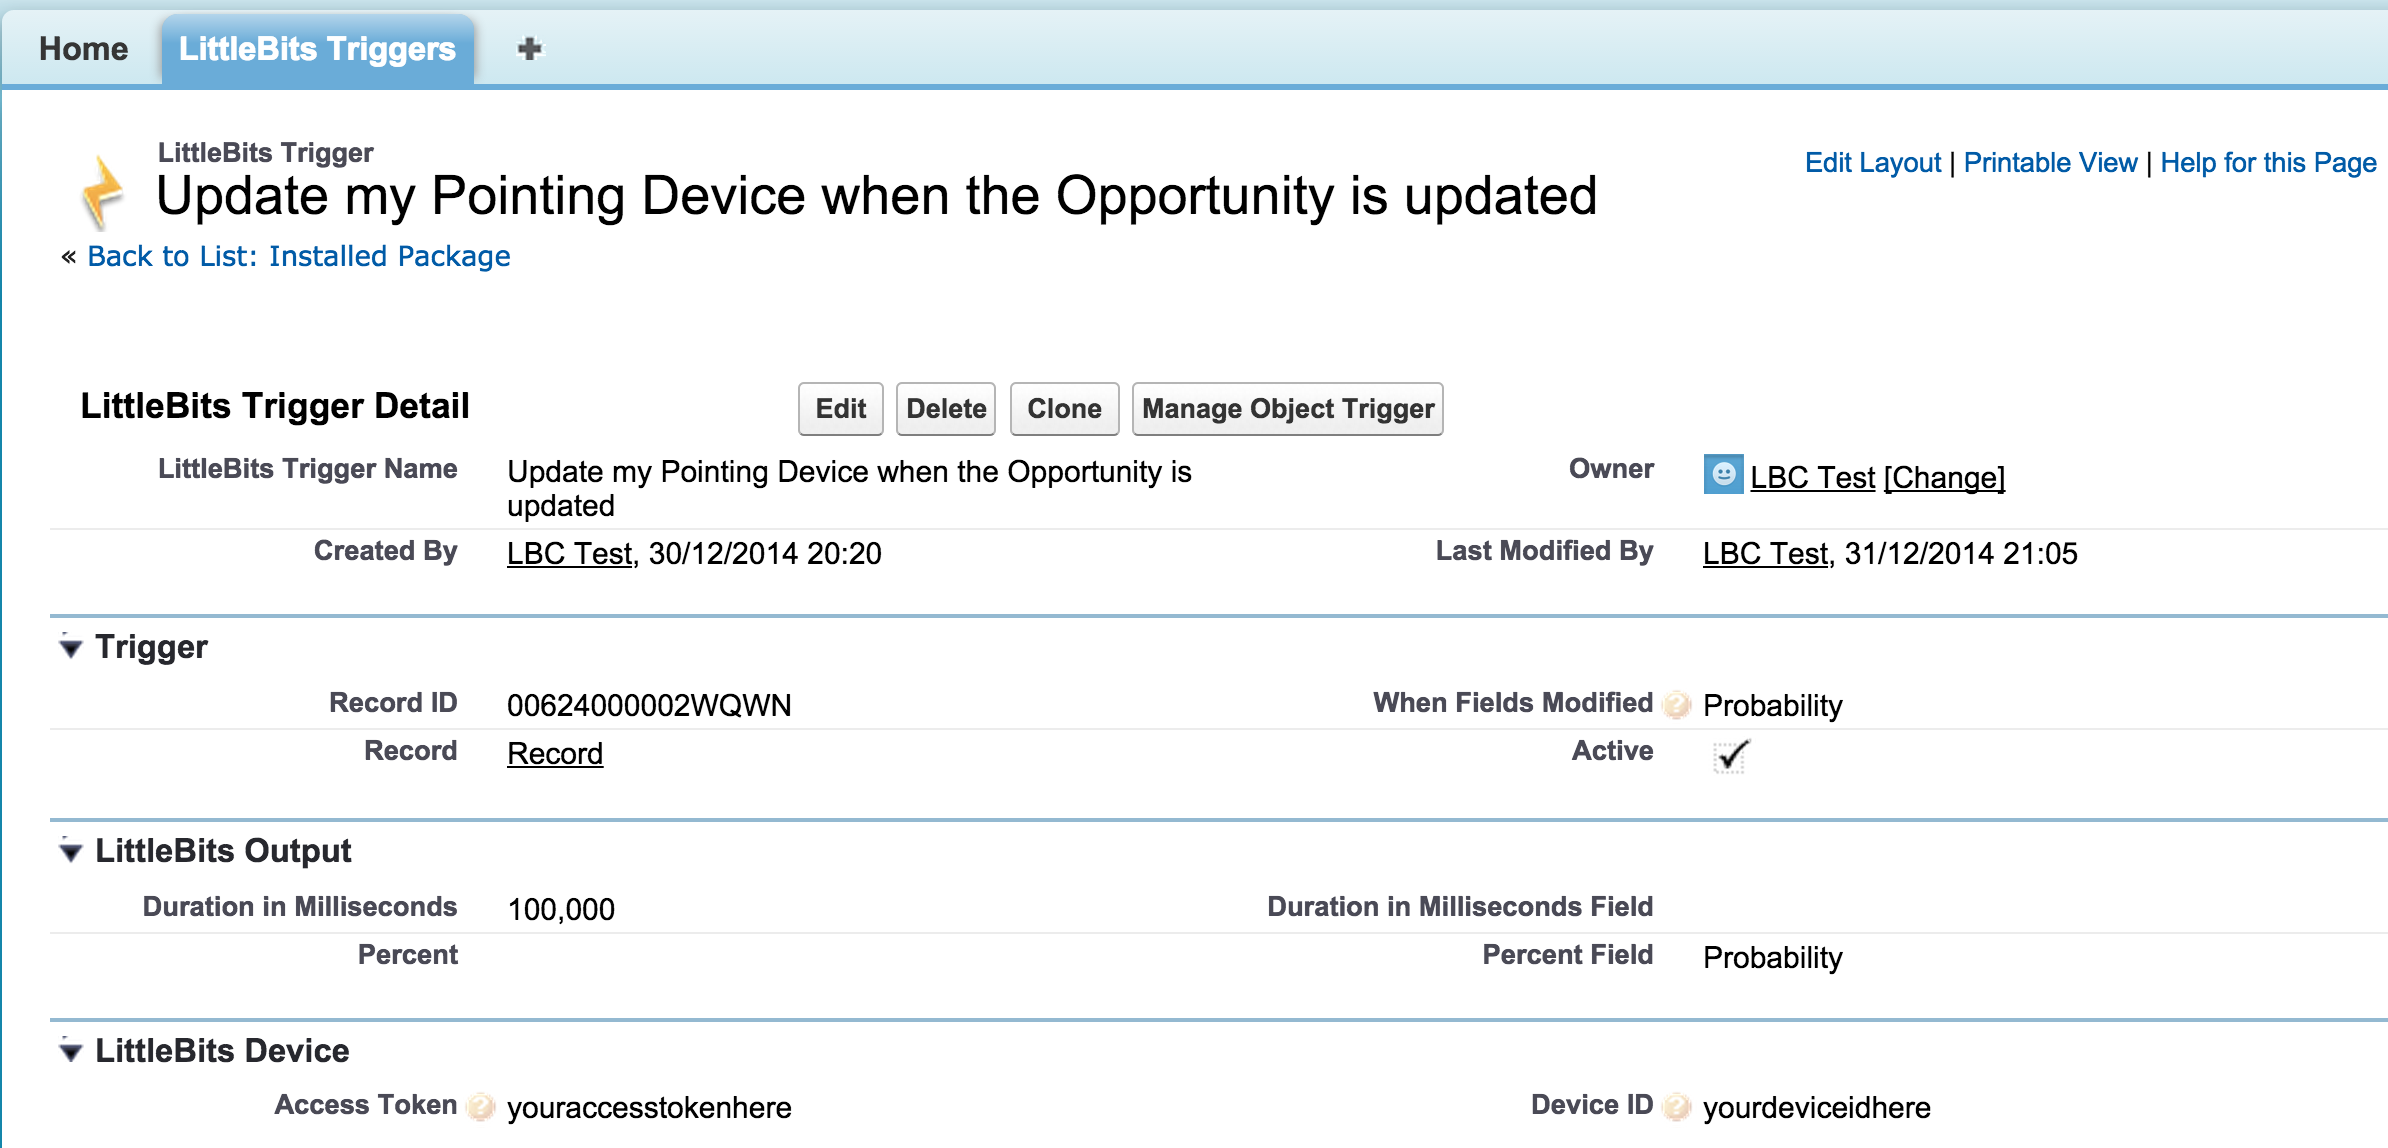
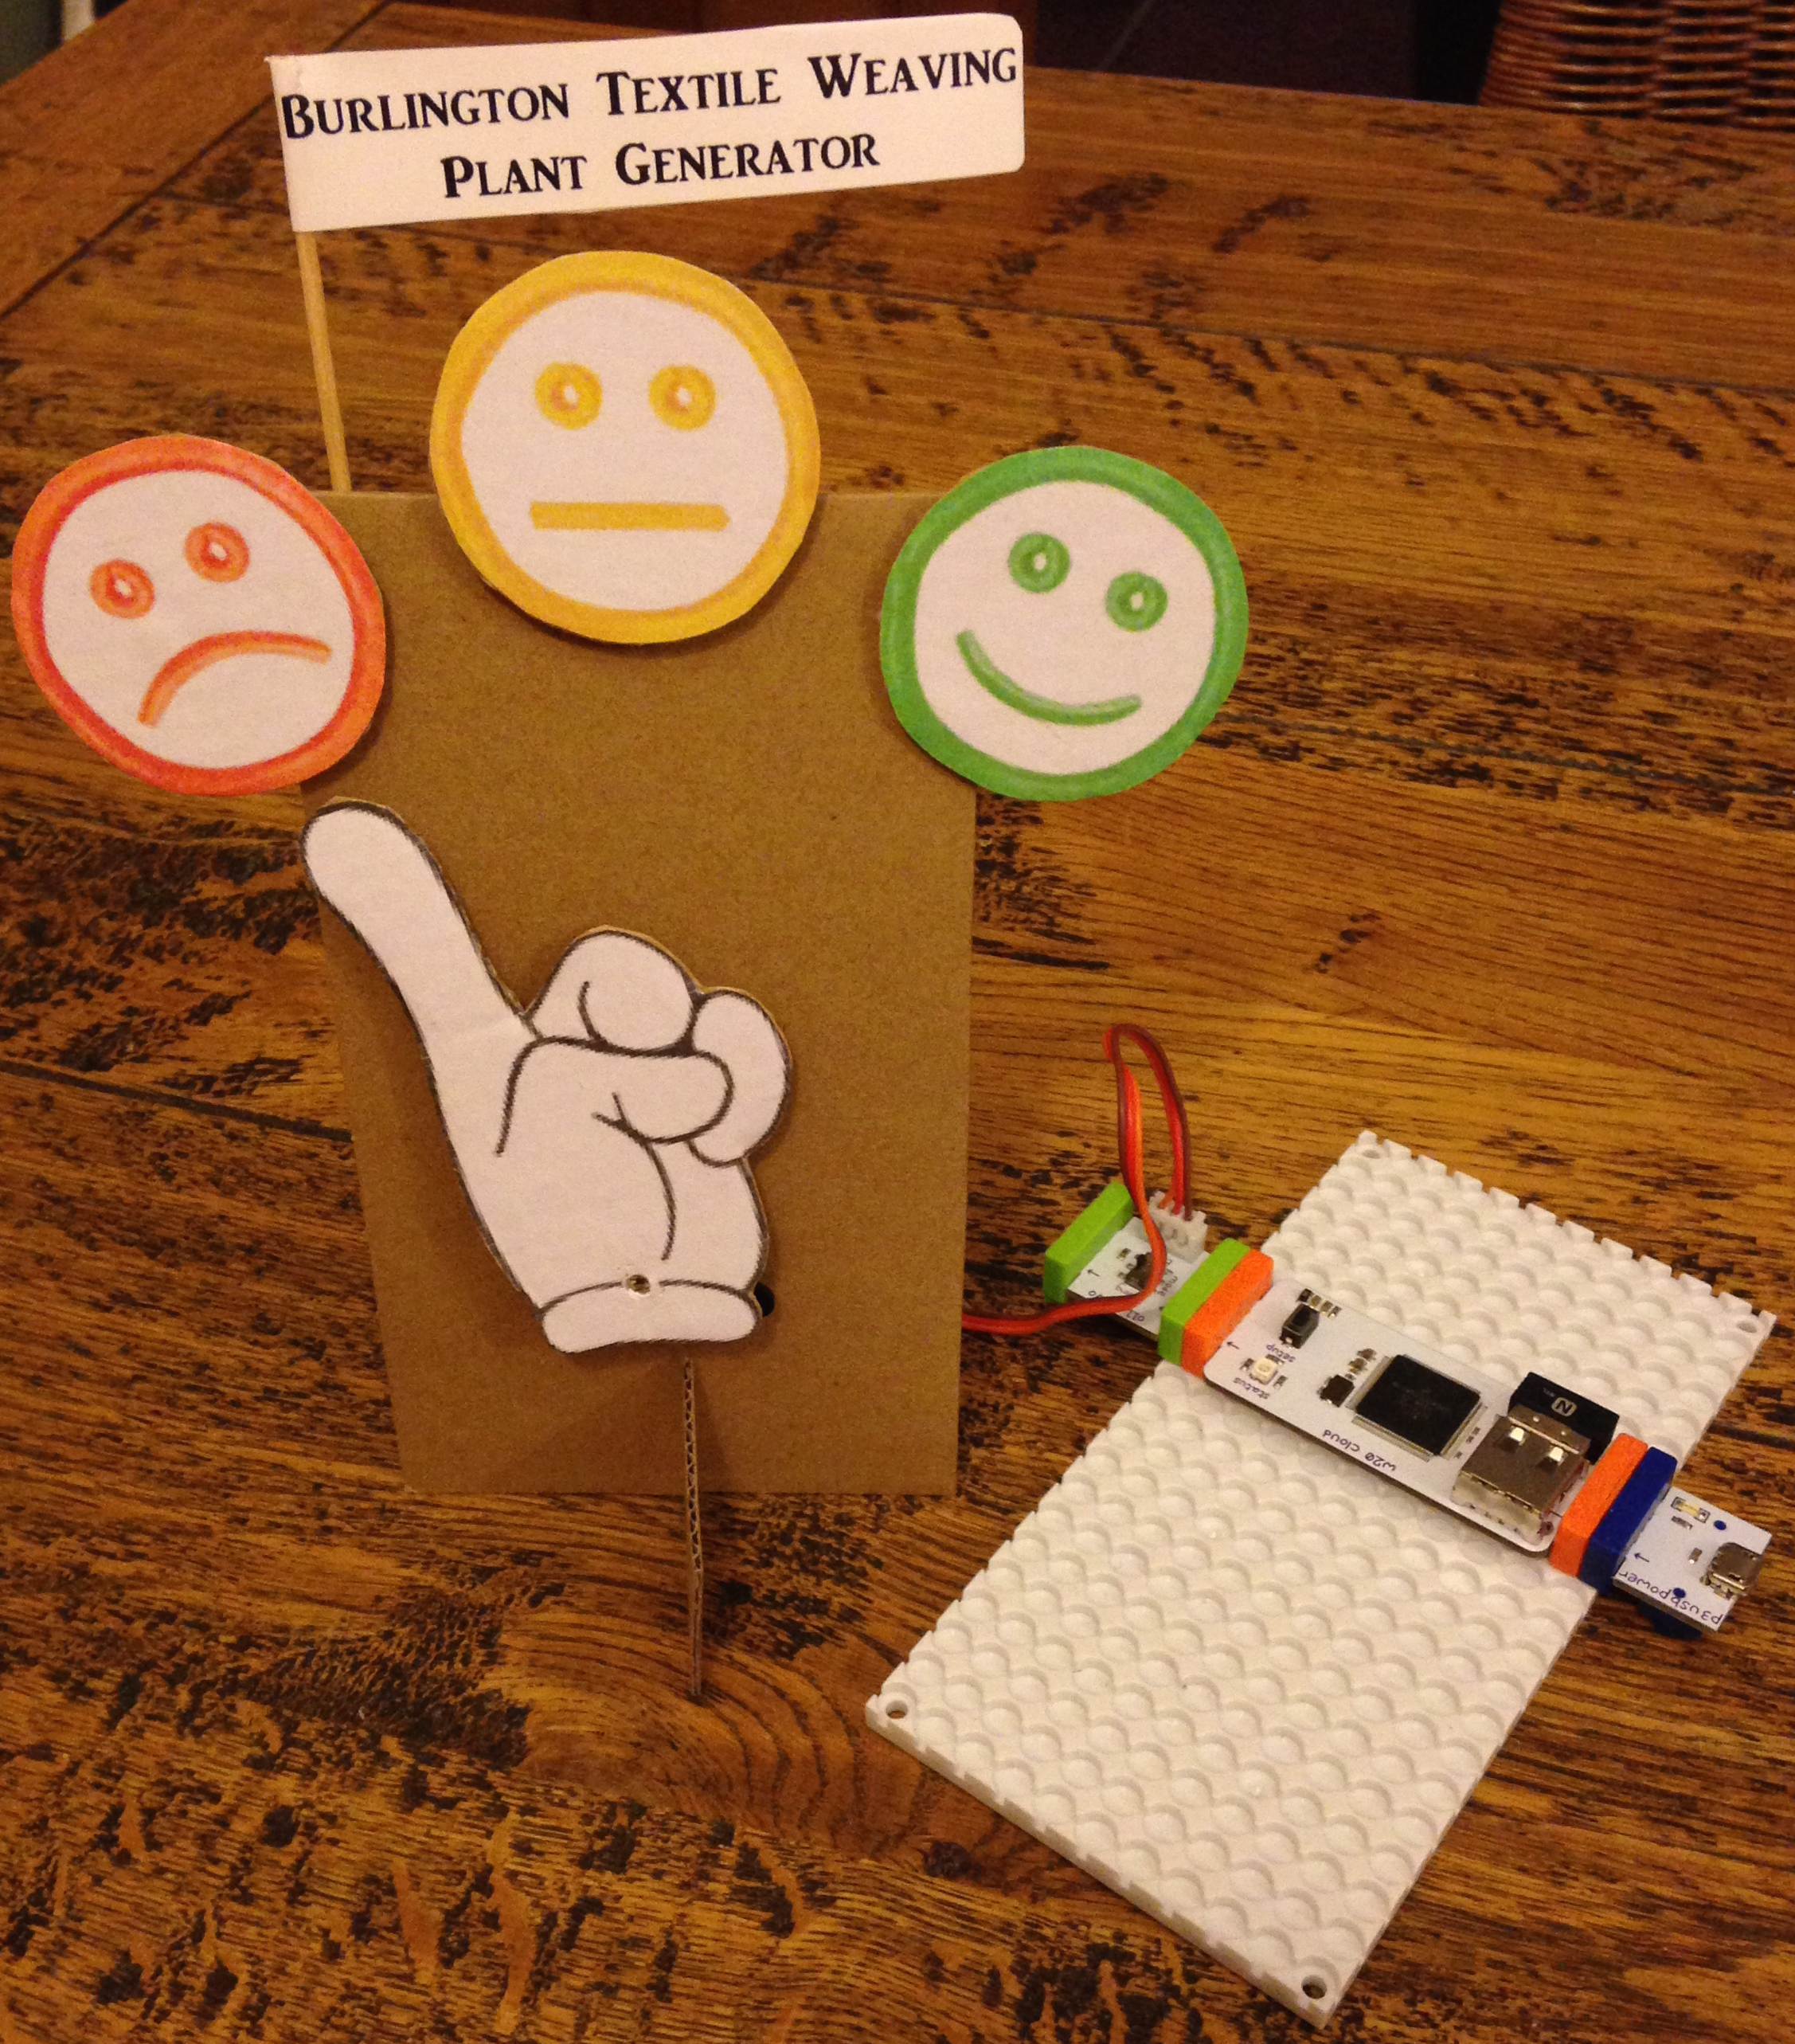
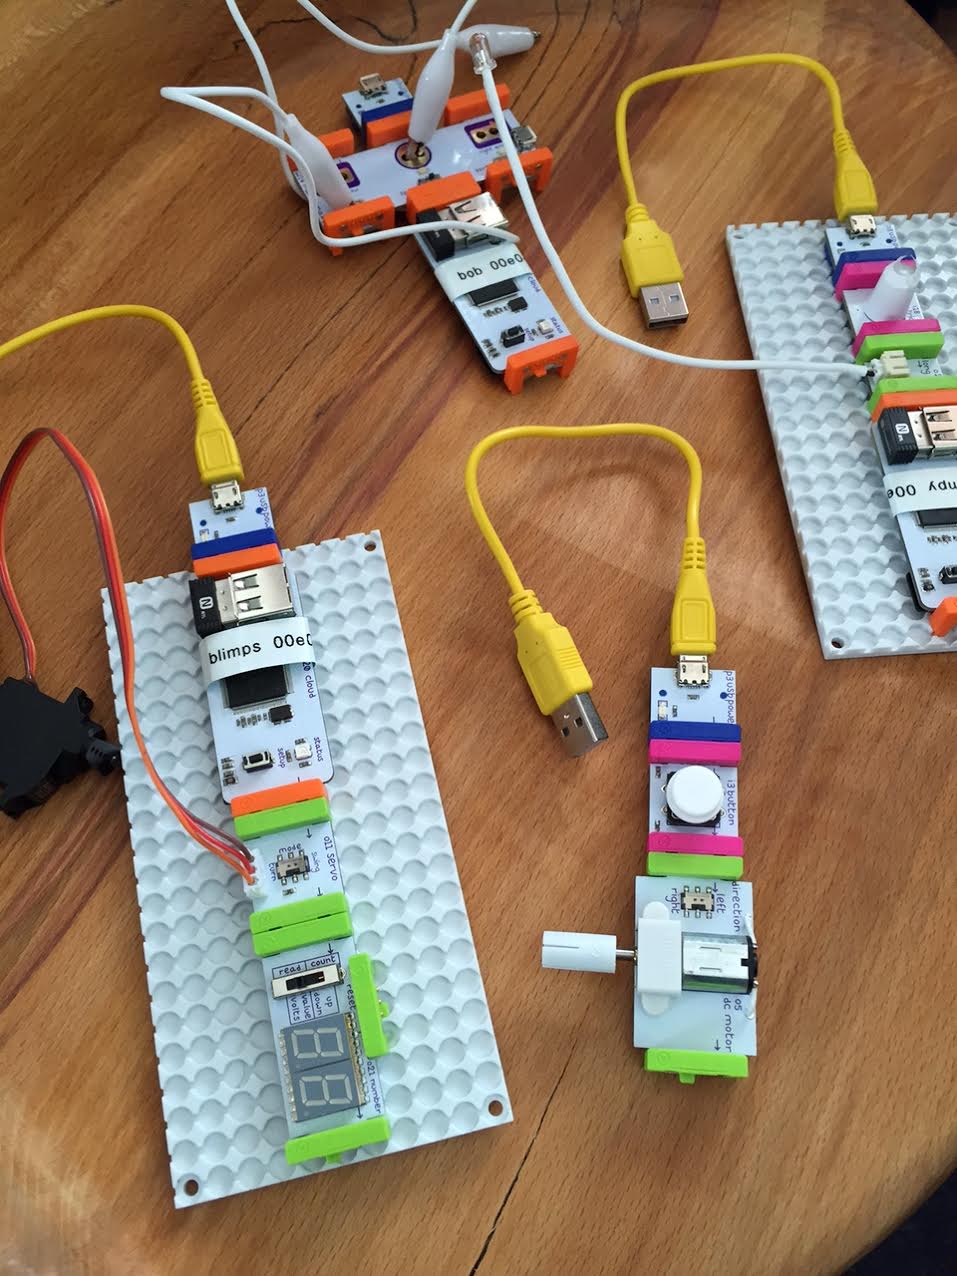
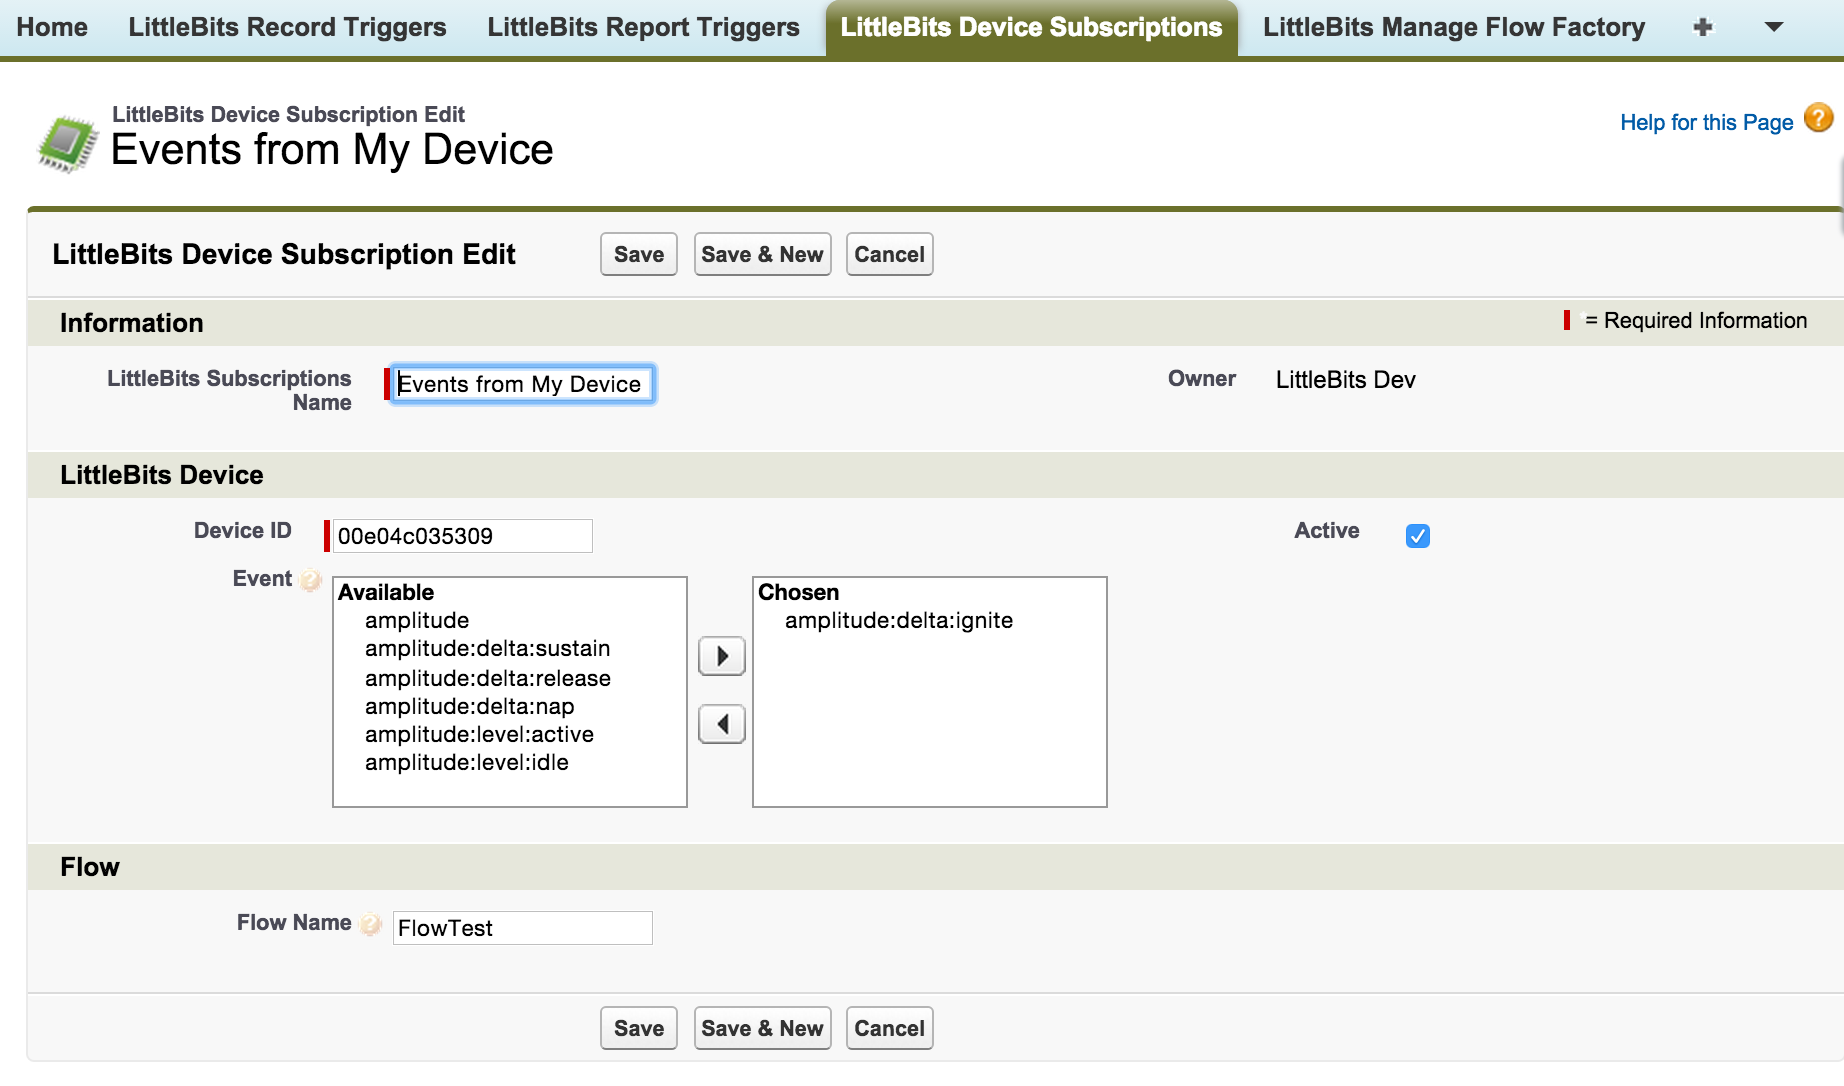
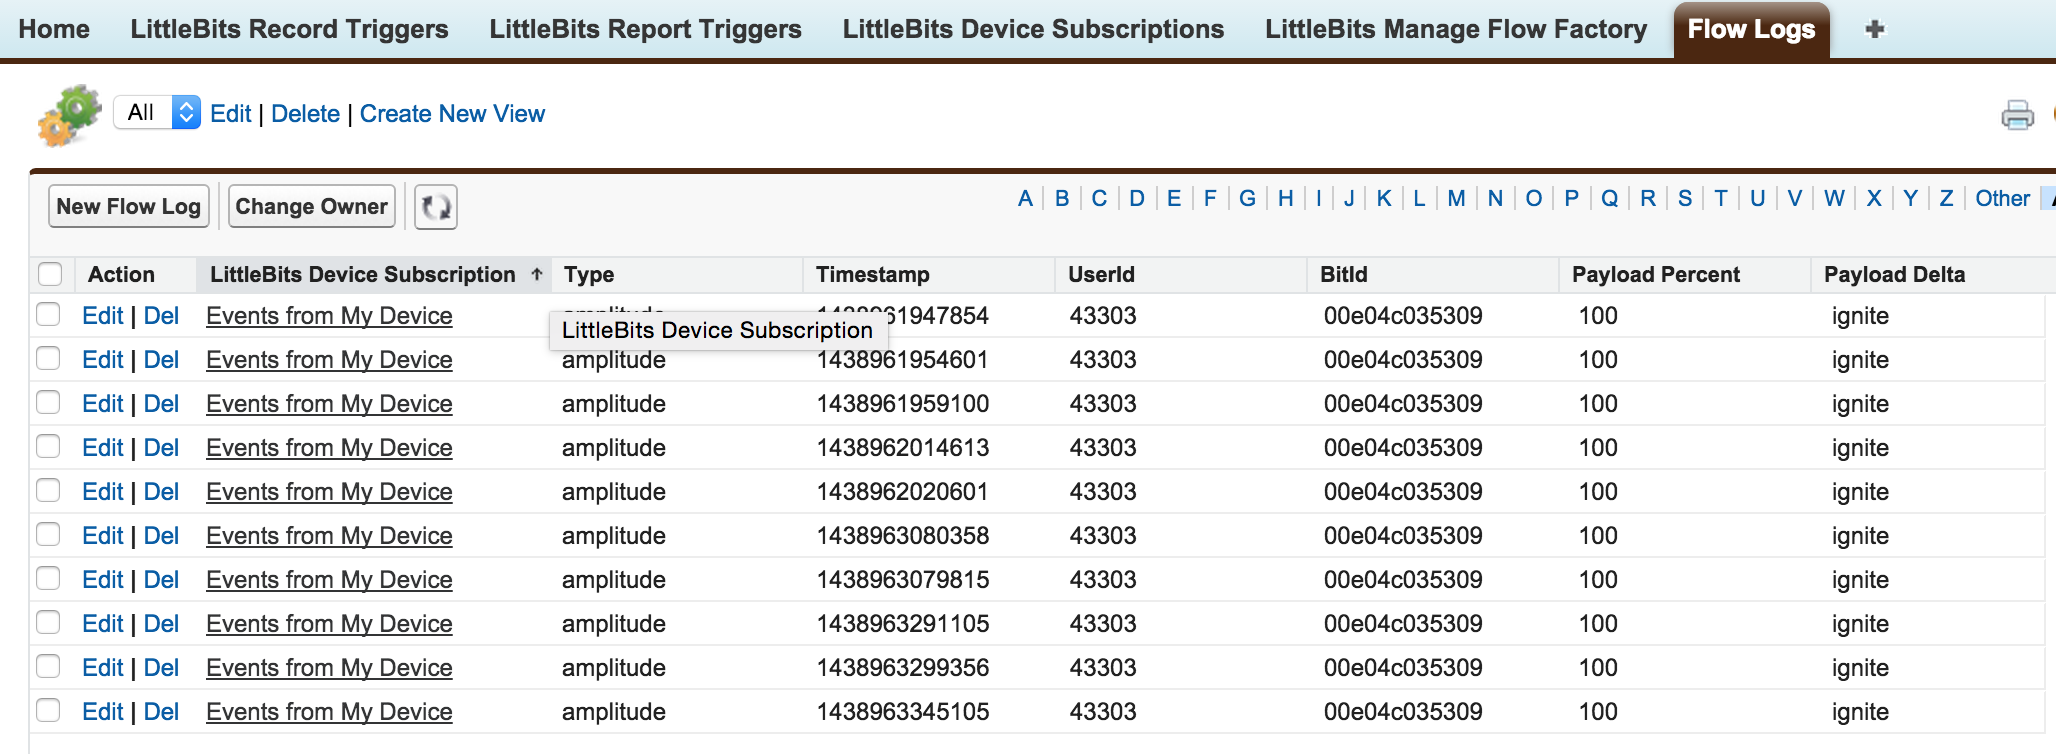
 I have just spent a very enjoyable Saturday morning in my Spring’15 Preview org with a special build of the LittleBits Connector. That leverages the ability for Process Builder to callout to specially annotated Apex code that in turn calls out to the LittleBits Cloud API.
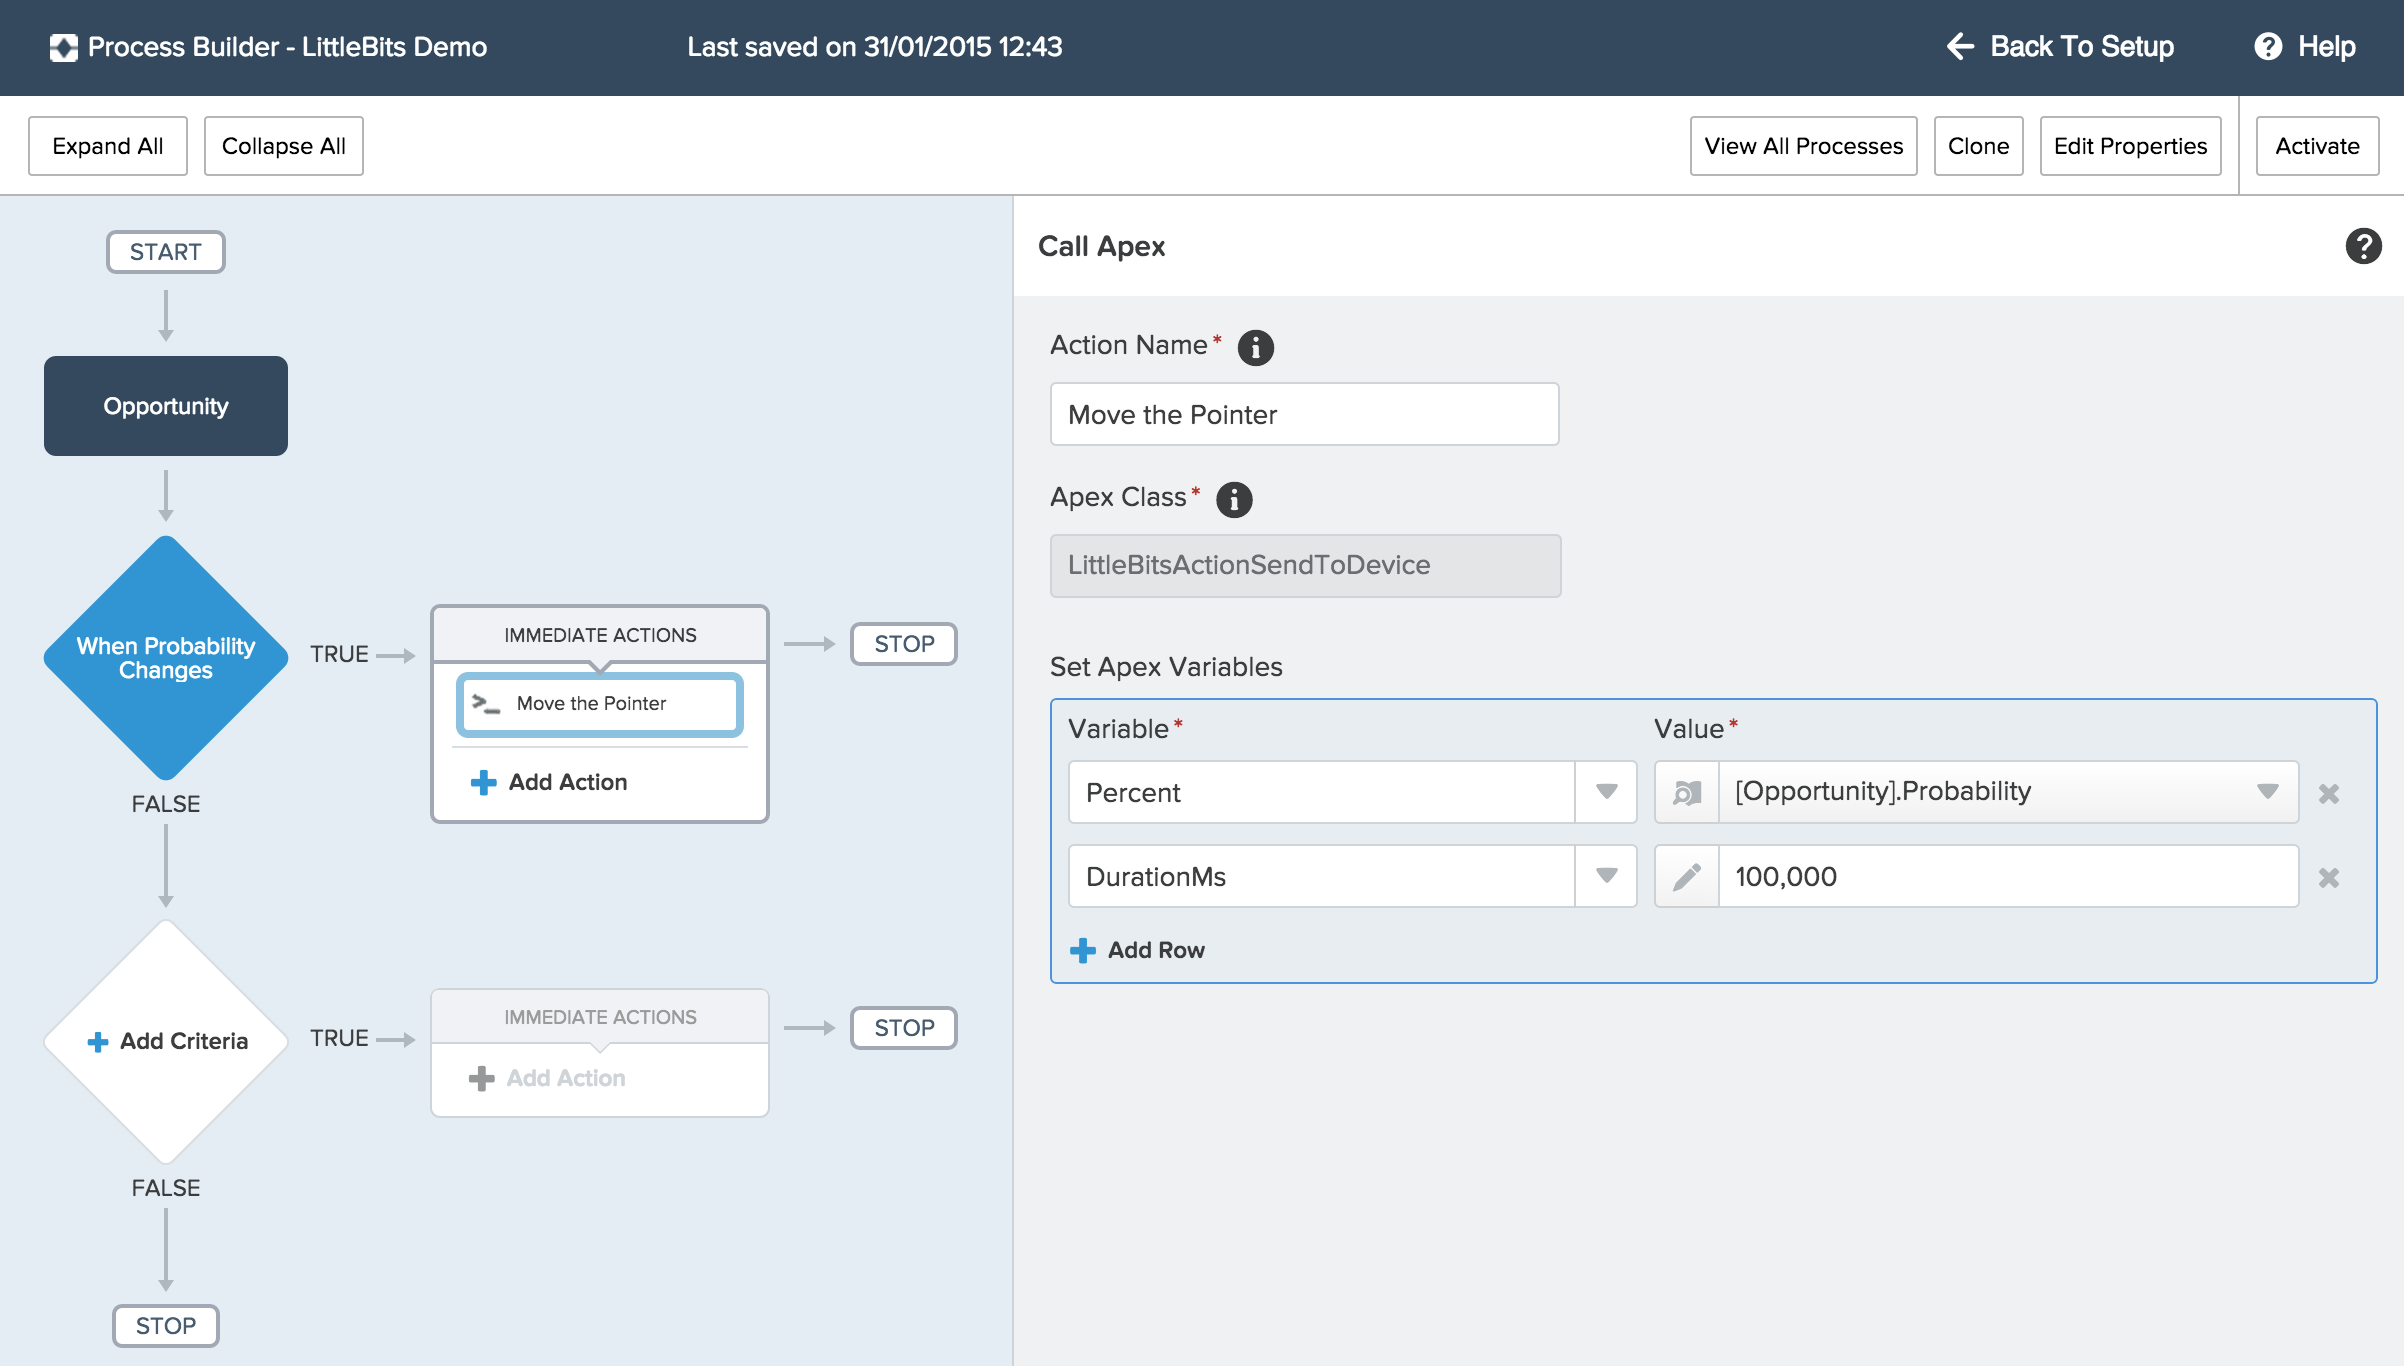

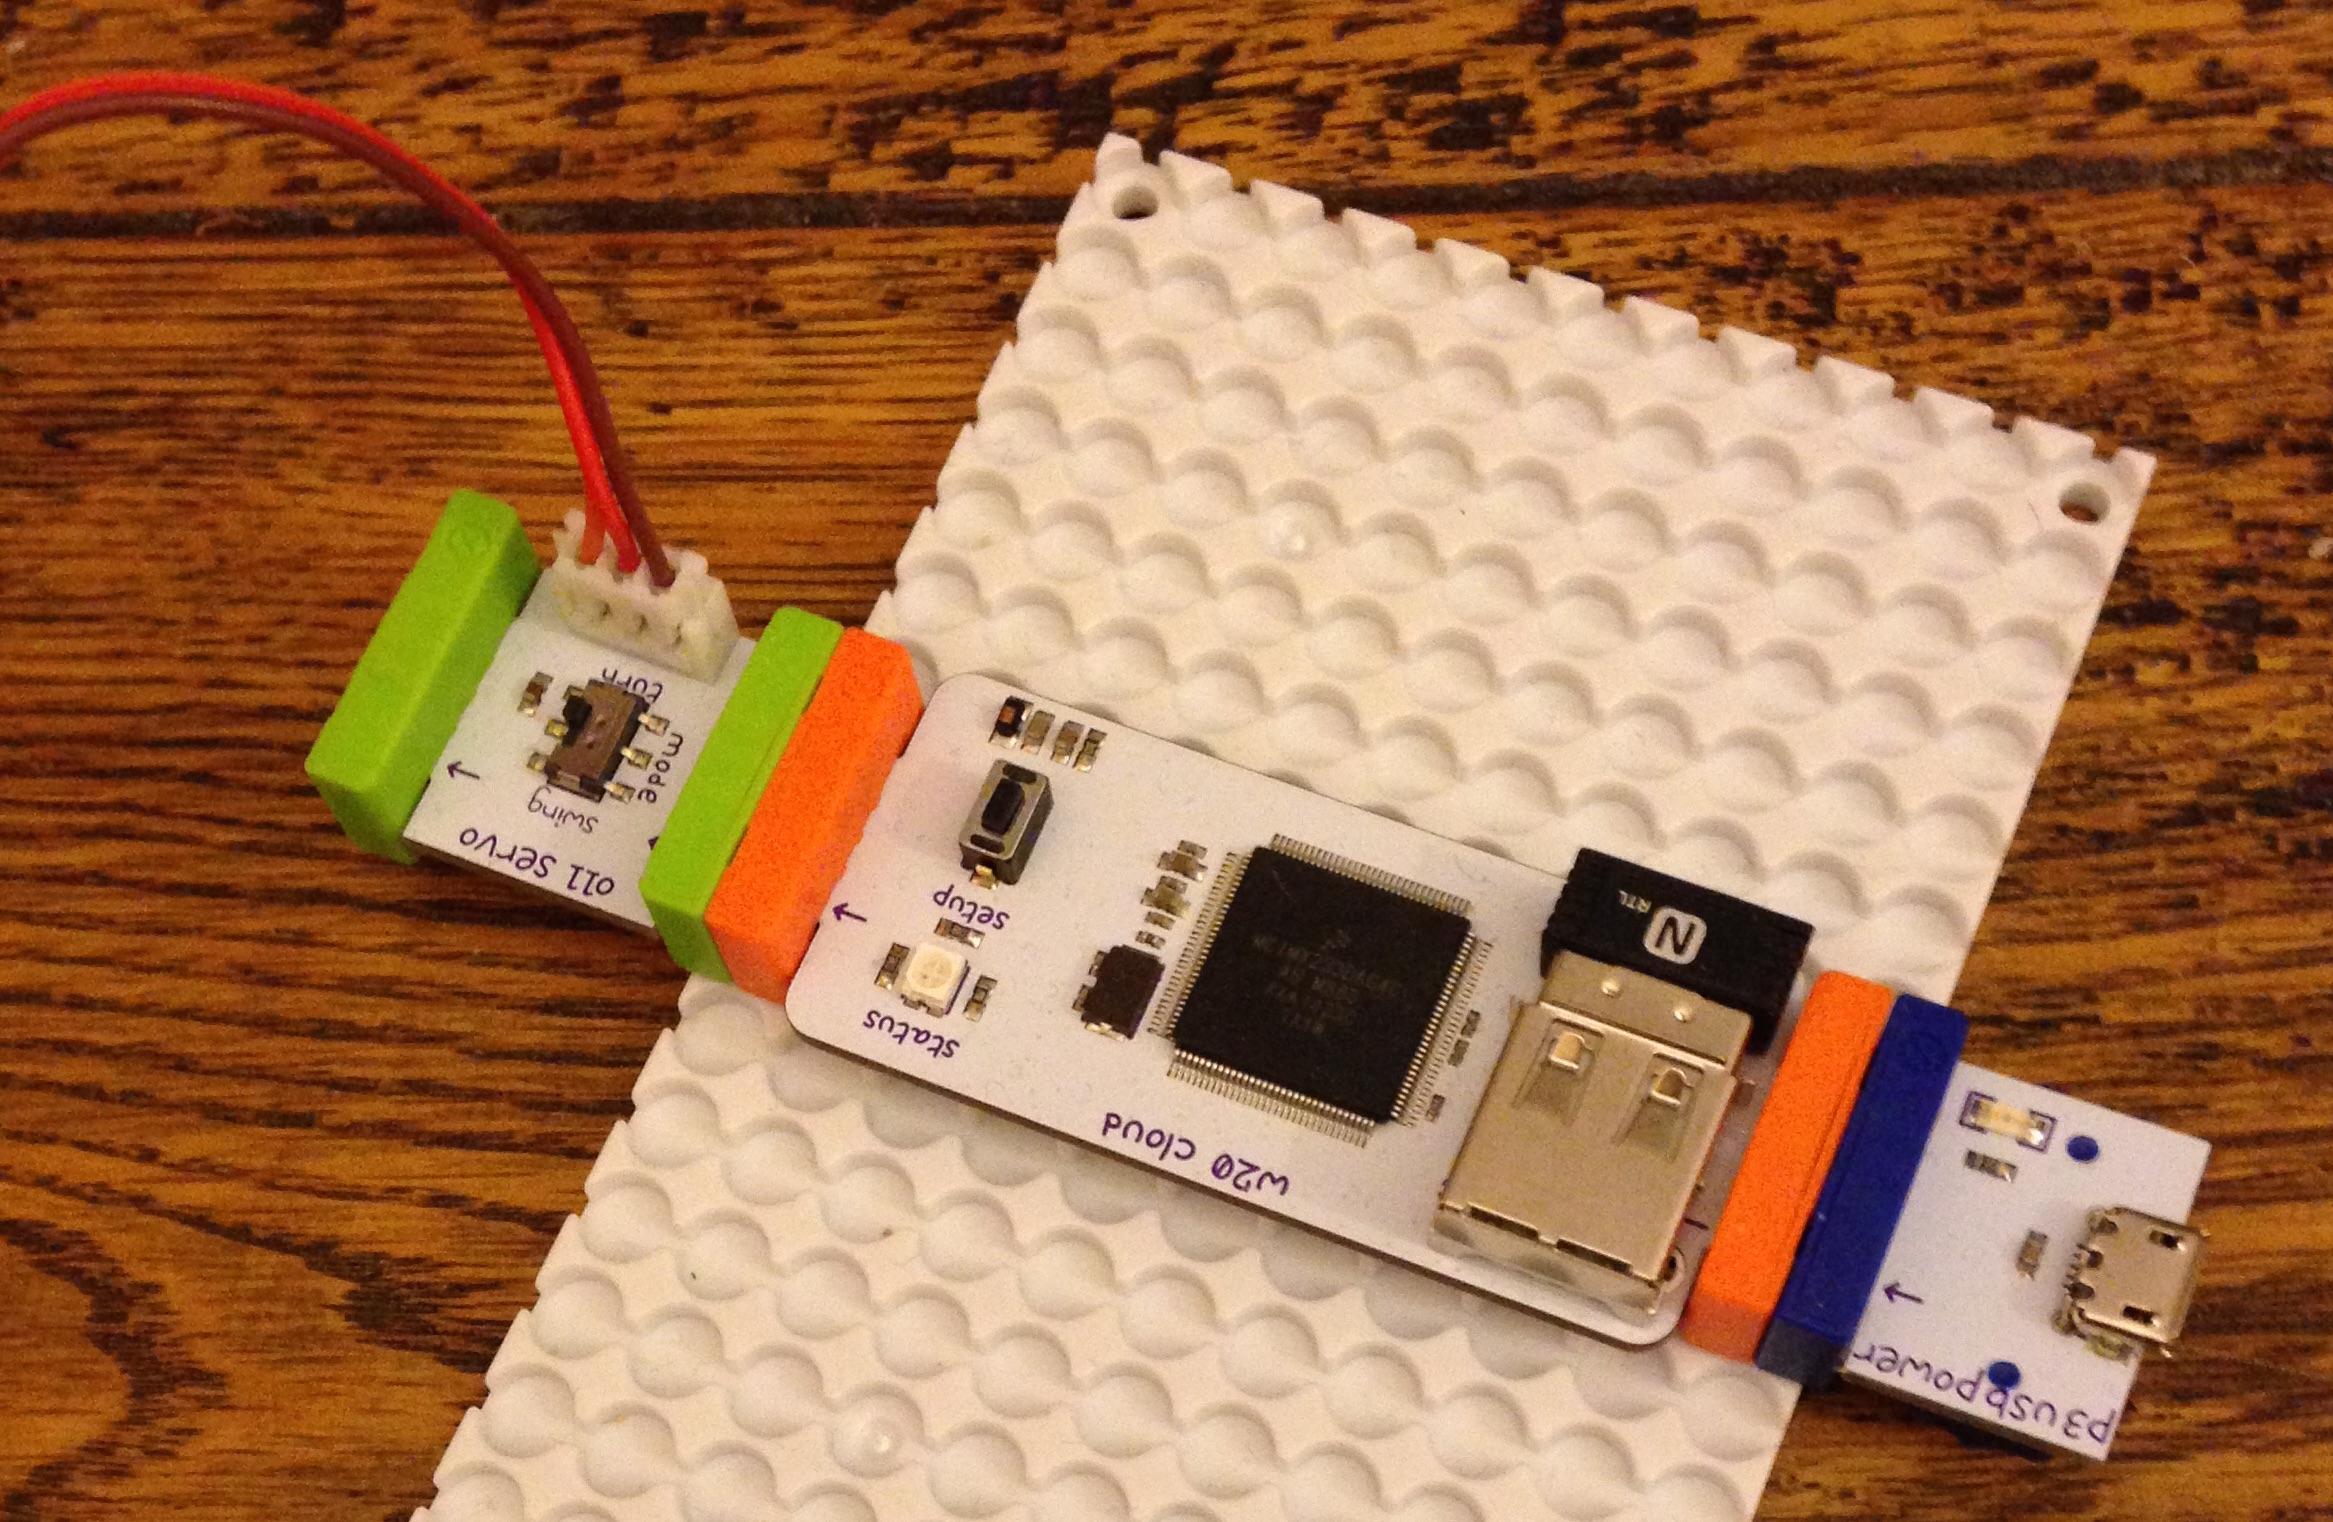
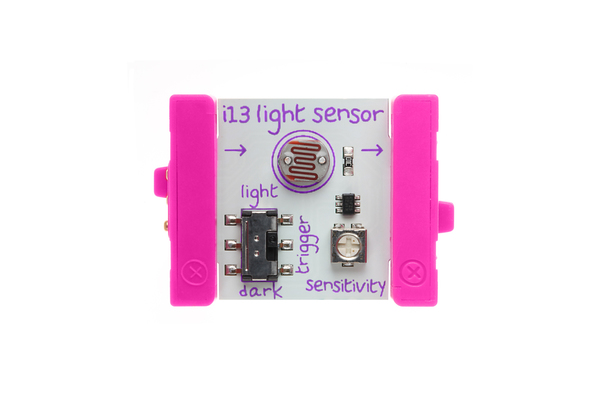
 The heart of the kit is a small computer module, powered by a USB cable (i plugged mine into my external phone battery pack!). It boots from an SD card and uses an onboard USB Wifi adapter to connect itself to the internet (once you’ve connected it to your wifi). After that you send commands to connected outputs to it via a mobile site or set of