We rarely get the luxury these days of knowing everything up front when designing and implementing software, as they say, “it is about the journey not the destination”. And so it is with some business requirements, they can appear well known at first but can often change, and designing ahead in order to embrace this inevitability is what this blog is about. It is also true that a good journey is also best experienced with others working together pooling their respective skills, succeeding and learning together.
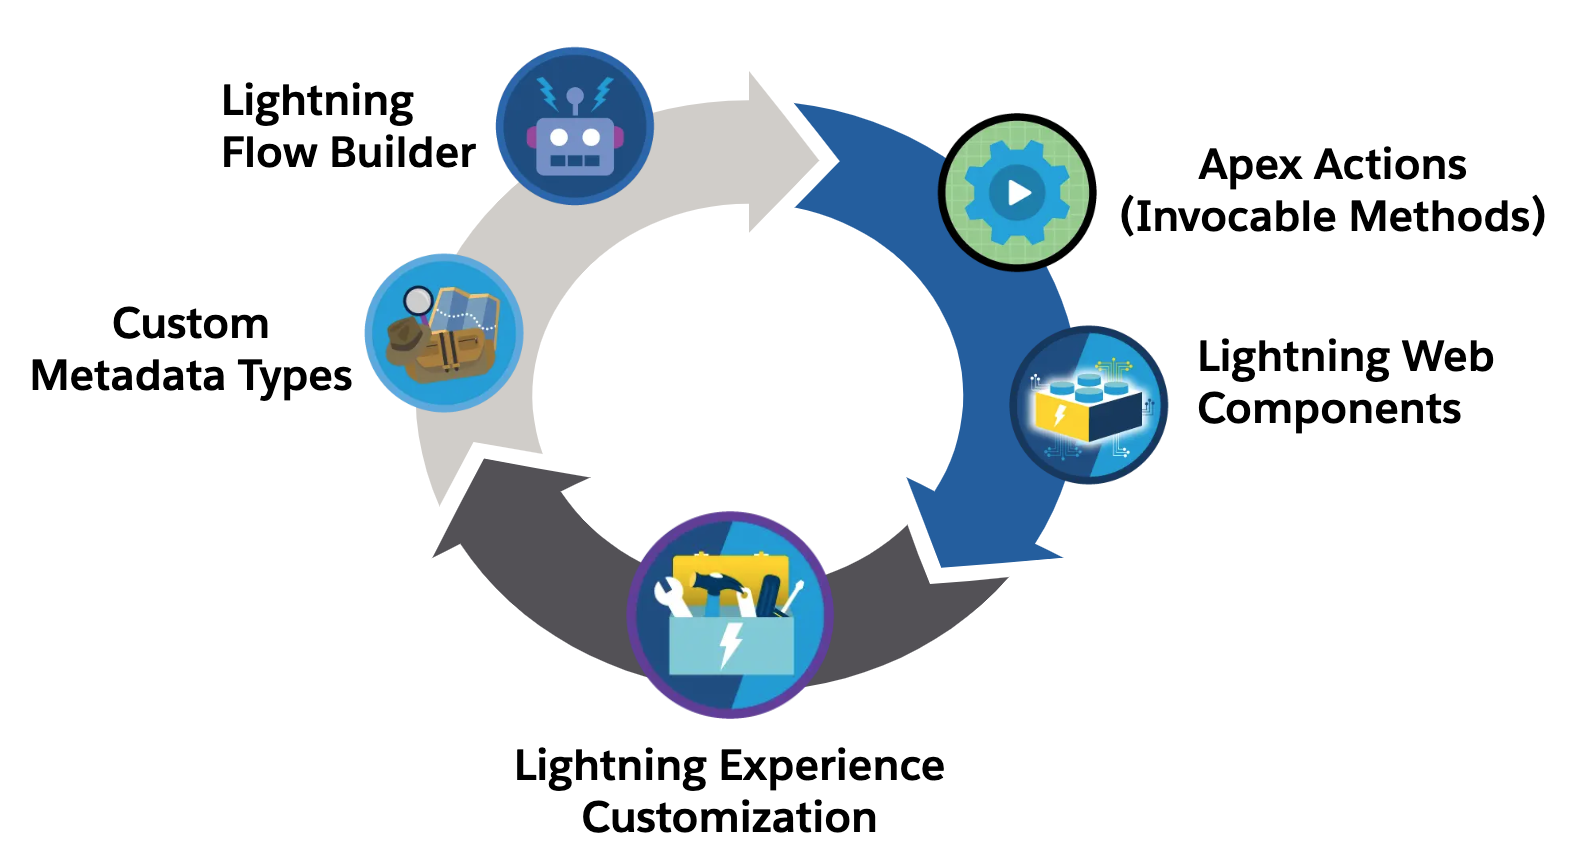
This blog focuses on how to use several platform features such as Apex Invocable Methods, Lightning Flow Builder, Lightning Web Components, Custom Metadata and more, to solve for a given business requirement in a way that allows coders and low code builders to work together. Not only building whats initially needed but optimizing for people and skills when responding to the ongoing changes in business requirements.
Our Business Requirement
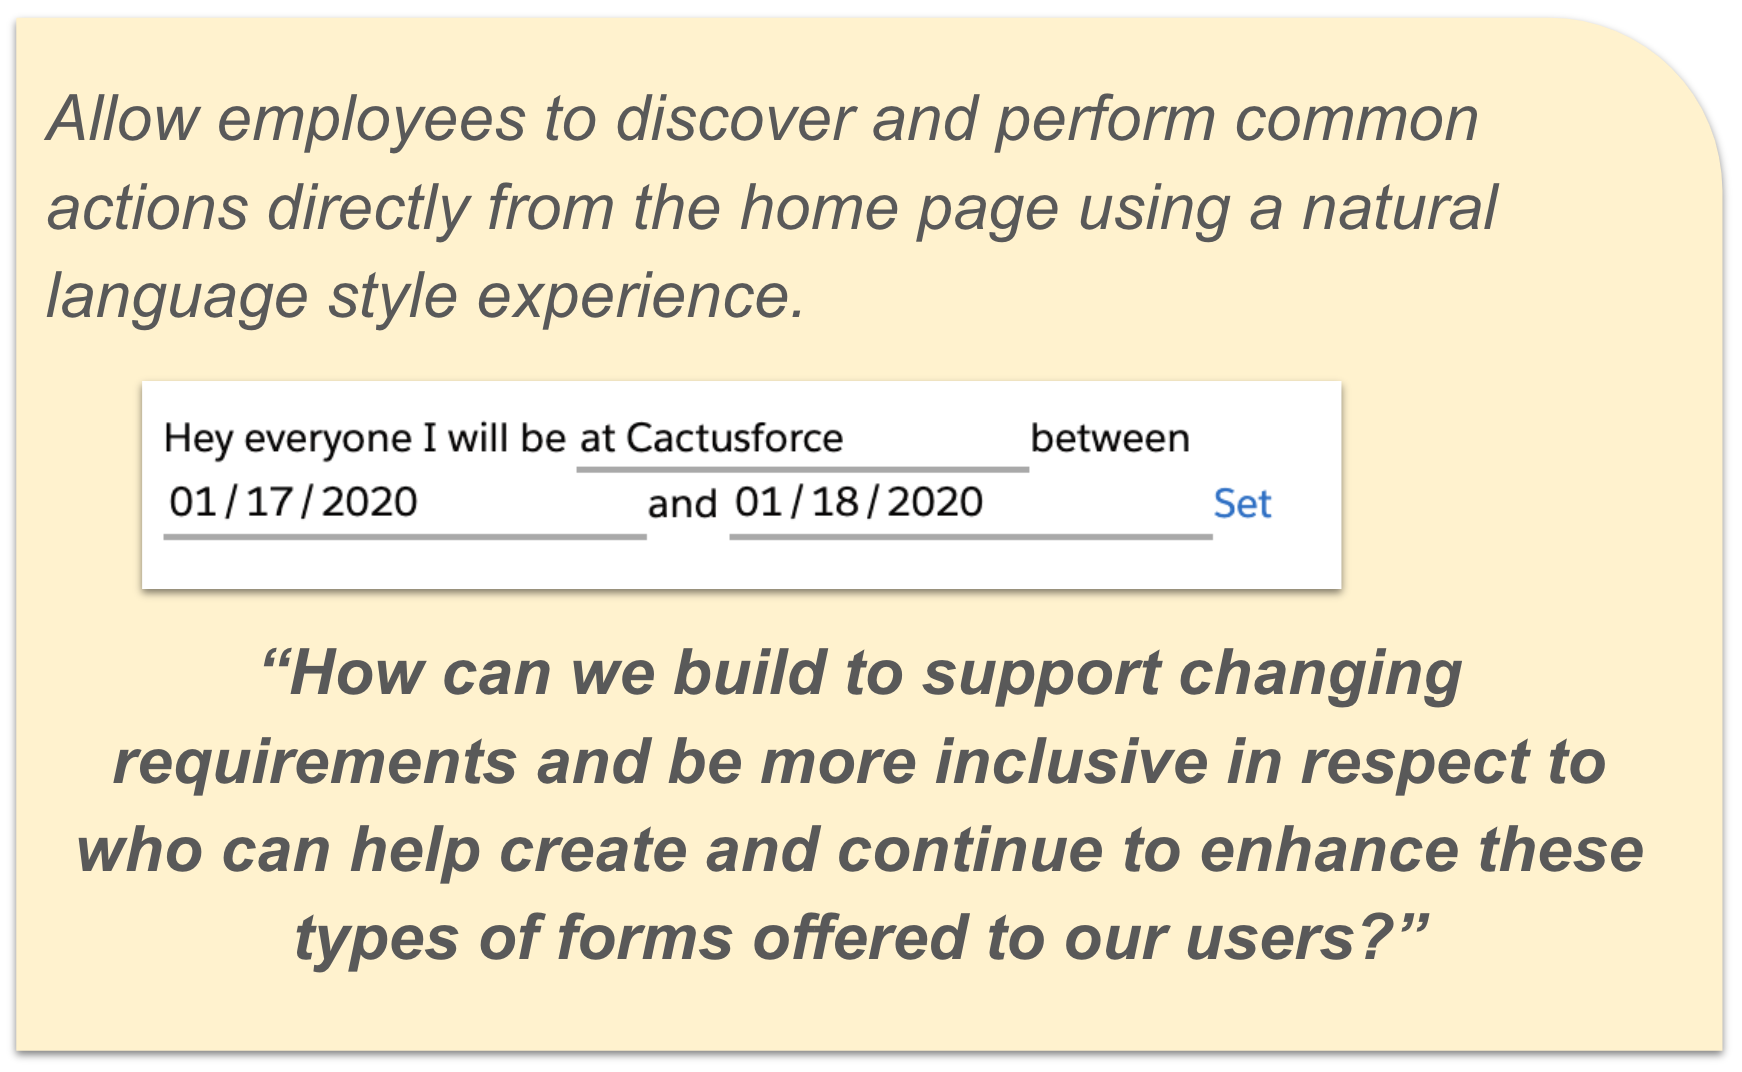
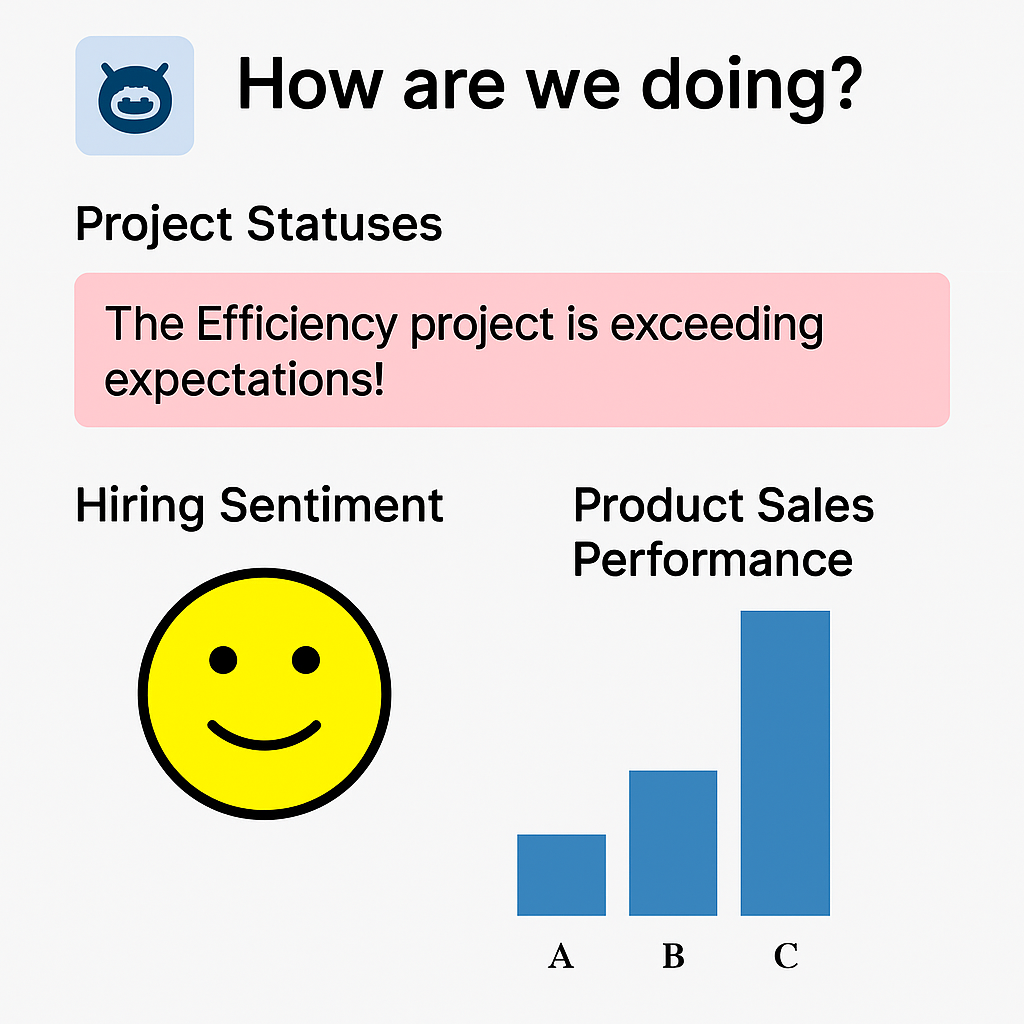
The requirement we are going to use in this blog involves the need for a business to enhance its employee home page with ways in which employees can see contextual actions that are as intuitive to use as reading a sentence and filling in the blanks! The design pattern known as natural language form is a good choice for this. Here is what the the team of coders and declarative builders came up with!
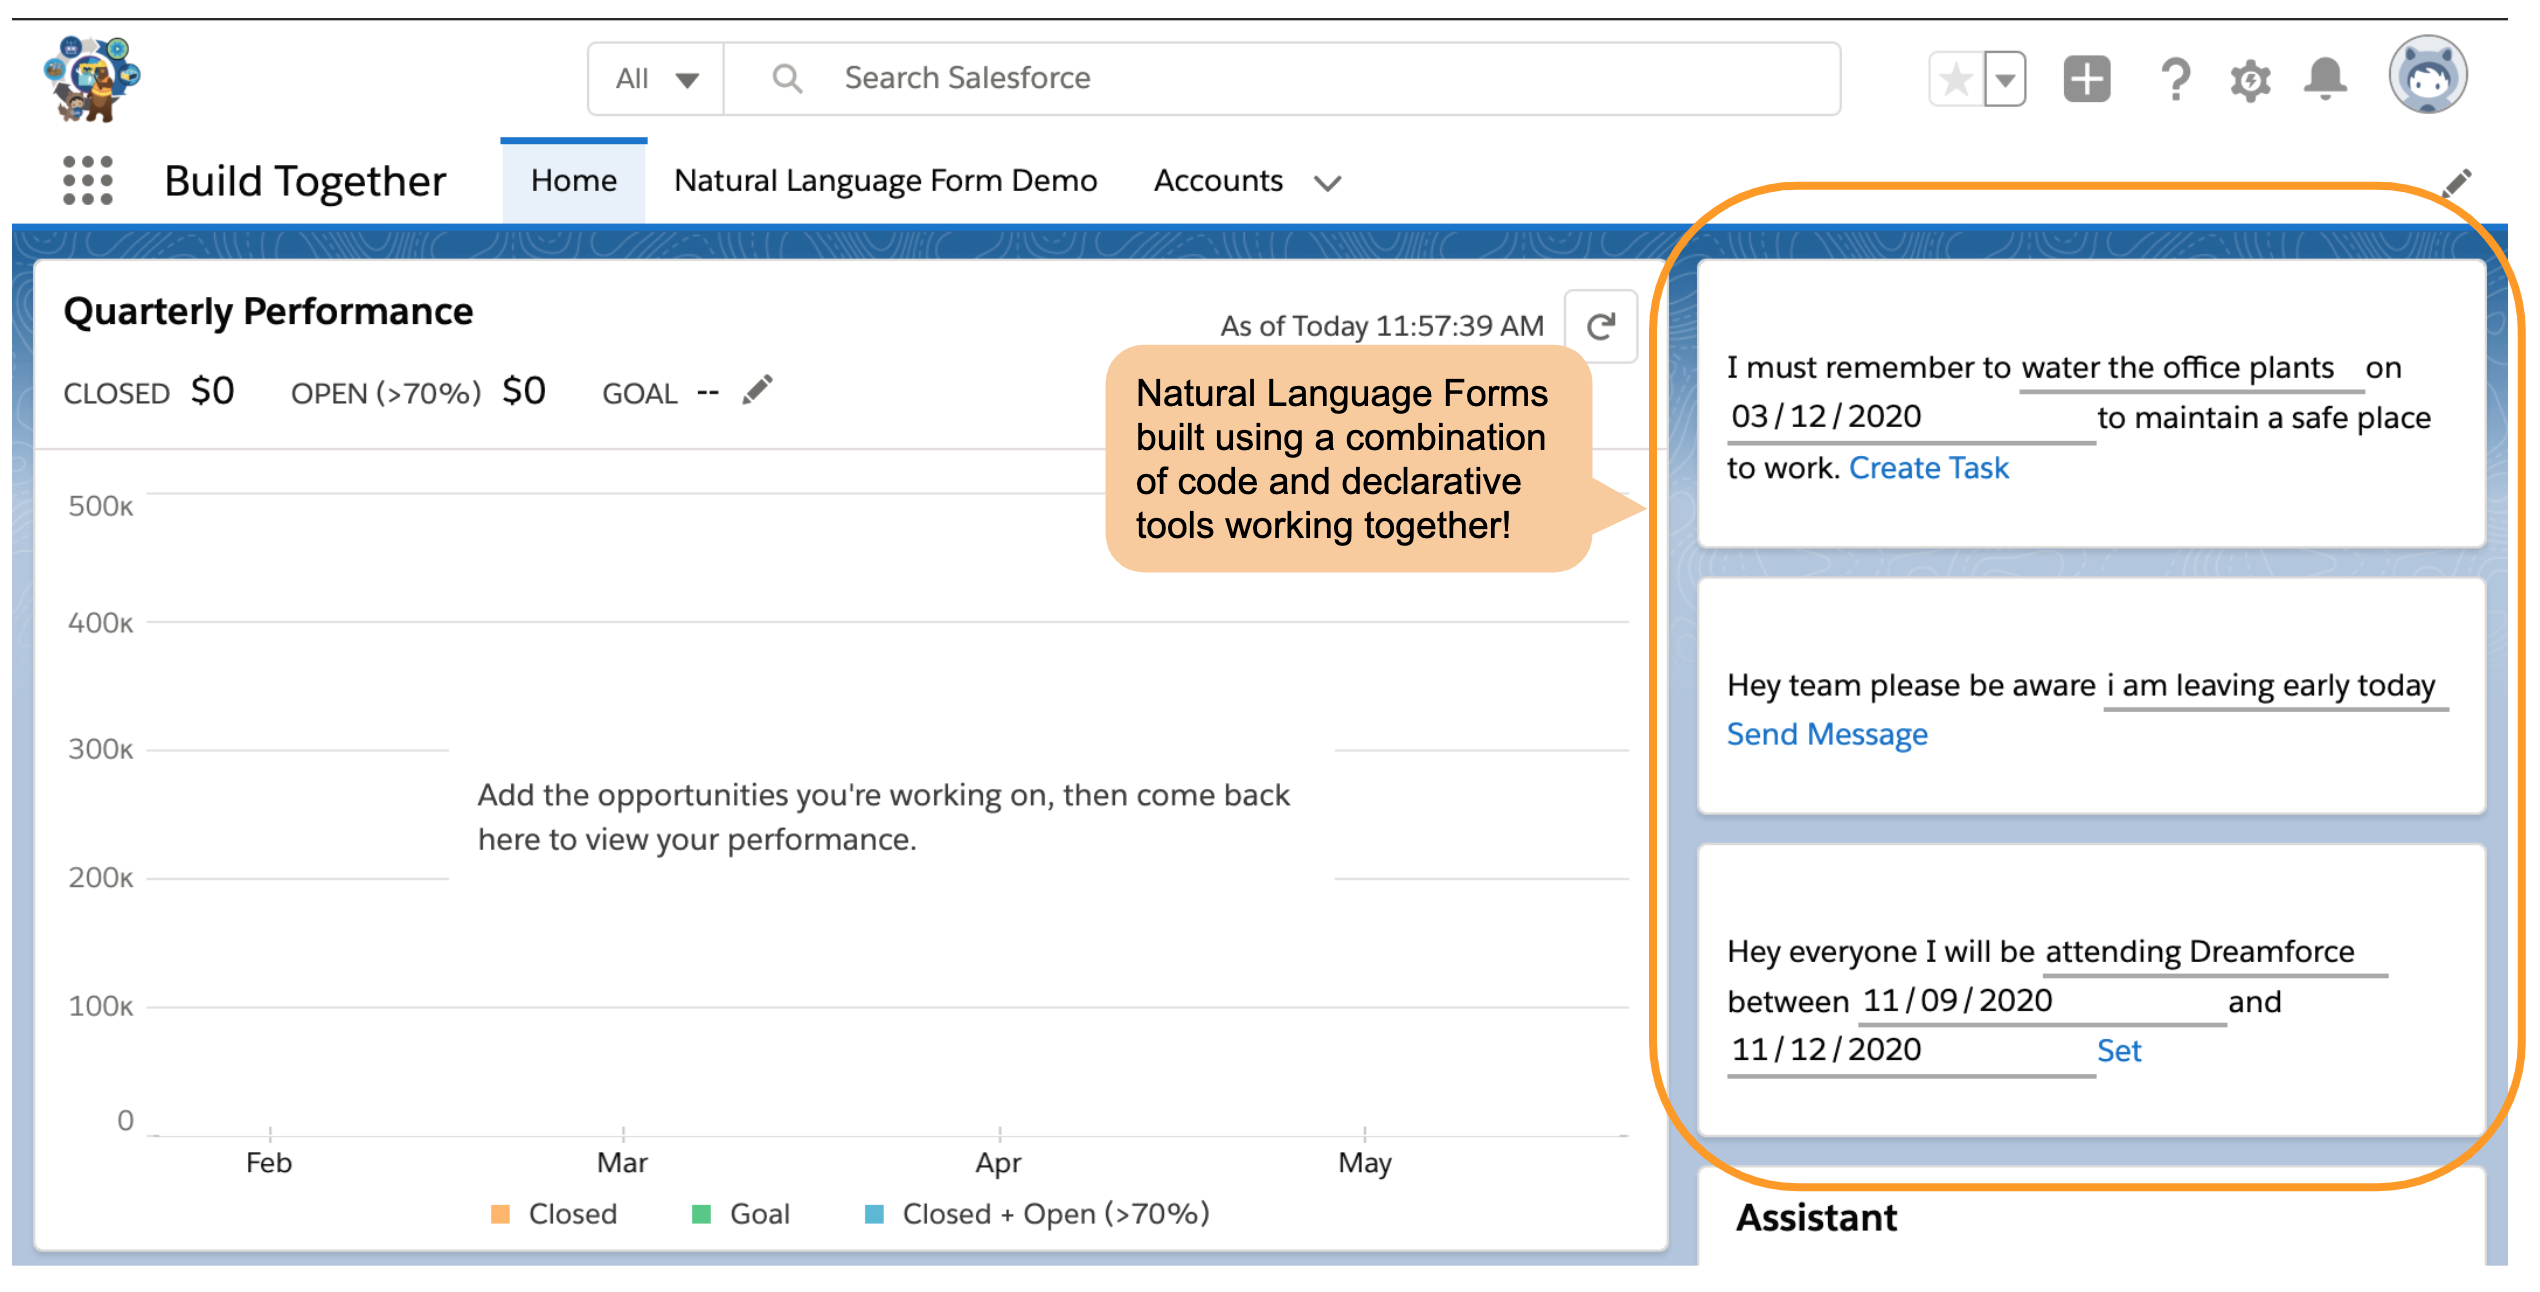
The developers in our scenario sat down with some employees and admins and quickly discovered not all the required natural language forms (NLF’s) are well known and it is very likely once this feature was delivered more NLF’s would come to light. Some employees and admins where keen to help with this problem and thus the developers figured out a way that would allow everyone to build together!
This blog is in two parts that reflects the tasks declarative builders and coder perform. The following sections Declarative Building powered by Code and Powering Declarative Building with Code, each walk through the details and how they combine together. You can also find the full source code here.
Declarative Building powered by Code
First let us explore the building experience from the point of view of builders using the declarative tools and how they are powered by generic Lightning Web Components and Invocable Actions provided by developers.
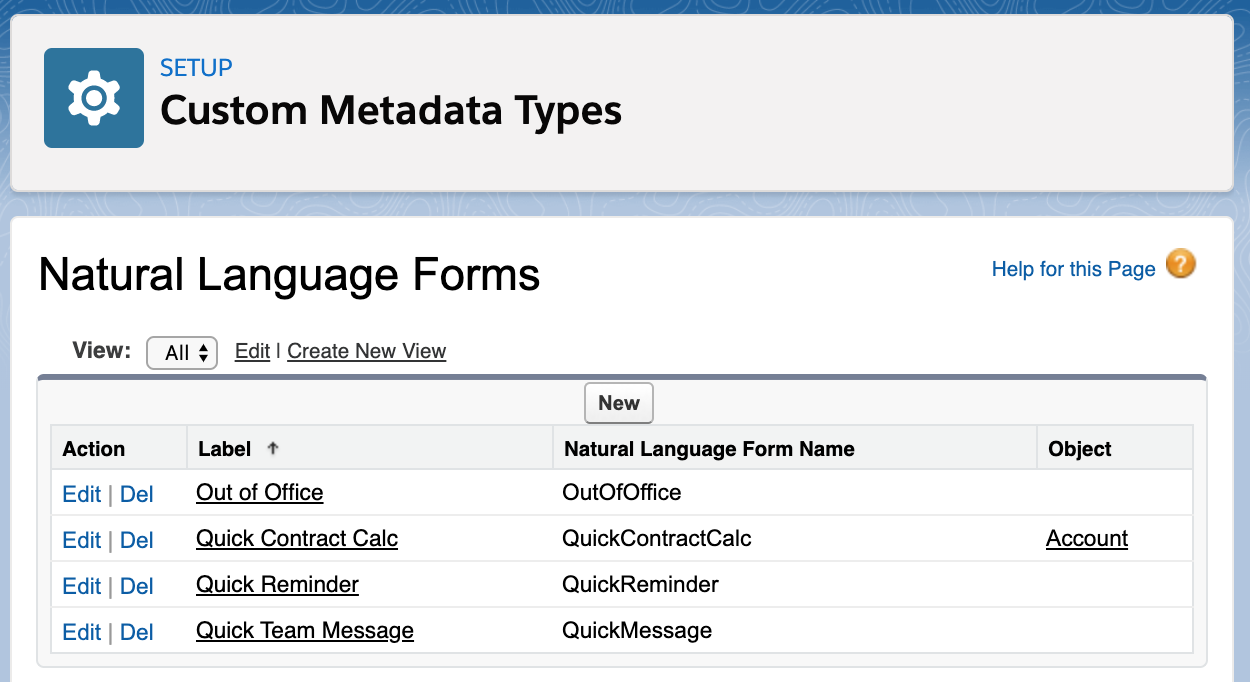
Defining Natural Language Forms with Custom Metadata
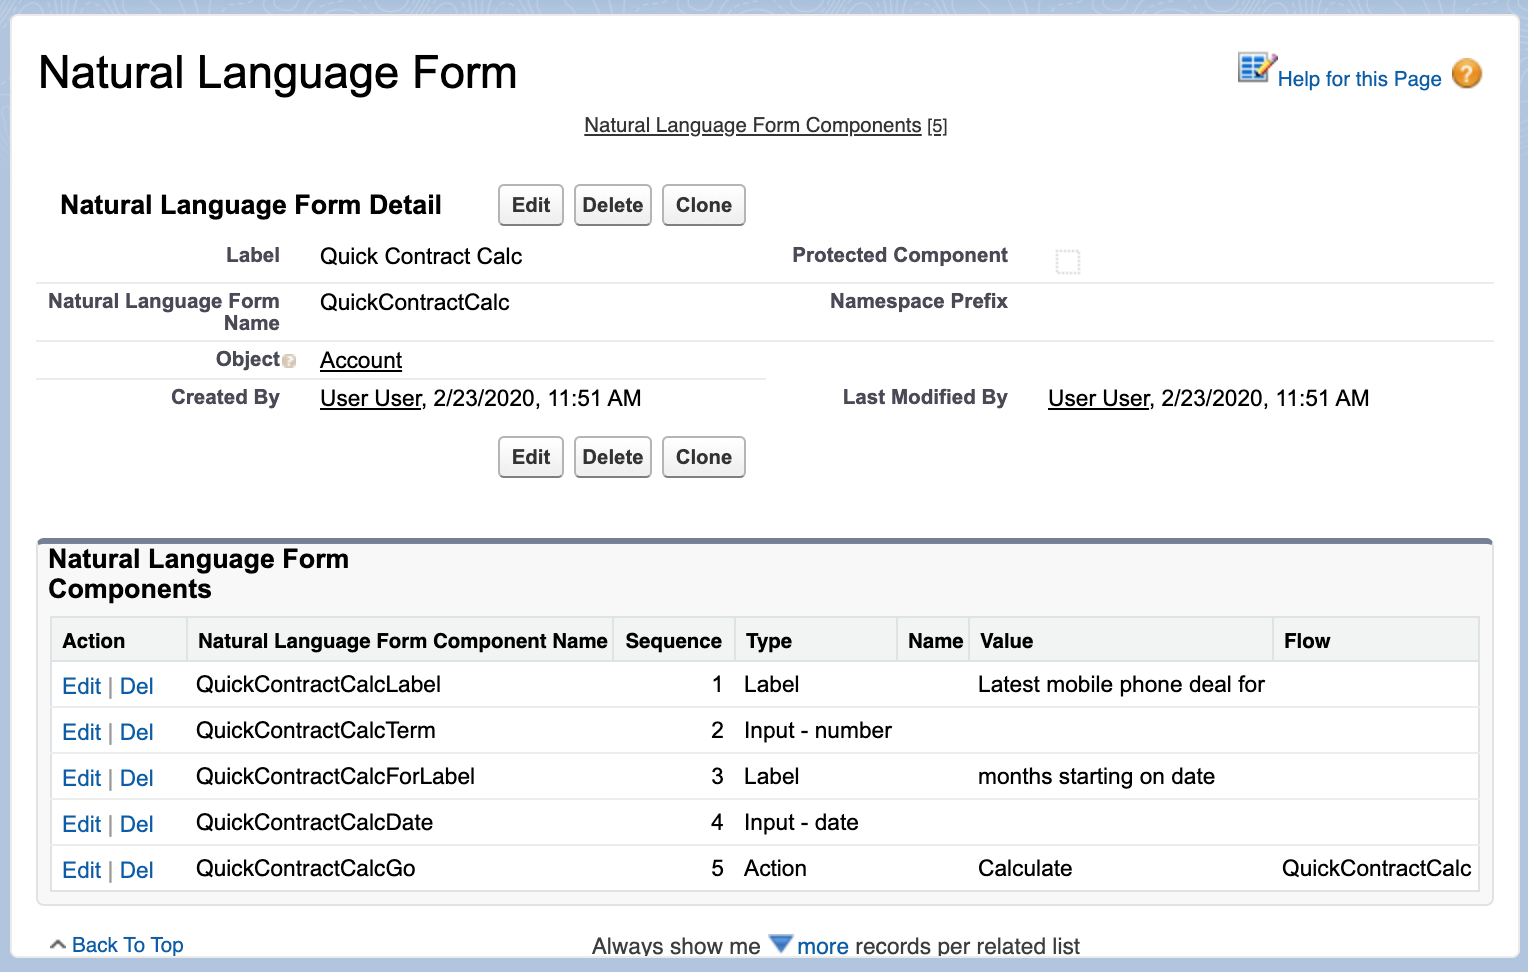
The screenshot below shows a list of NLF’s that have been defined along with an optional object for which they apply, using the ability for custom metadata to be associated by reference with standard and custom object definitions.
If we drill into one of the forms we can see that ability to have Custom Metadata Types reference each other to form a child and parent relationship. The child object in this case describes each of the elements on the form. Note the names of the elements that are used to capture user input, this is important in the next step. Finally there is an element that indicates which Flow will receive the form input.
Responding to Natural Language Forms with Autolaunch Flows
Lightning Flow can be used to drive pure logic in addition to custom user experiences, such flows are called Autolaunch Flows. The Flow named in the above configuration must expose input variables named according to the input element names used in the NLF configuration above. The key variables are shown highlighted below:
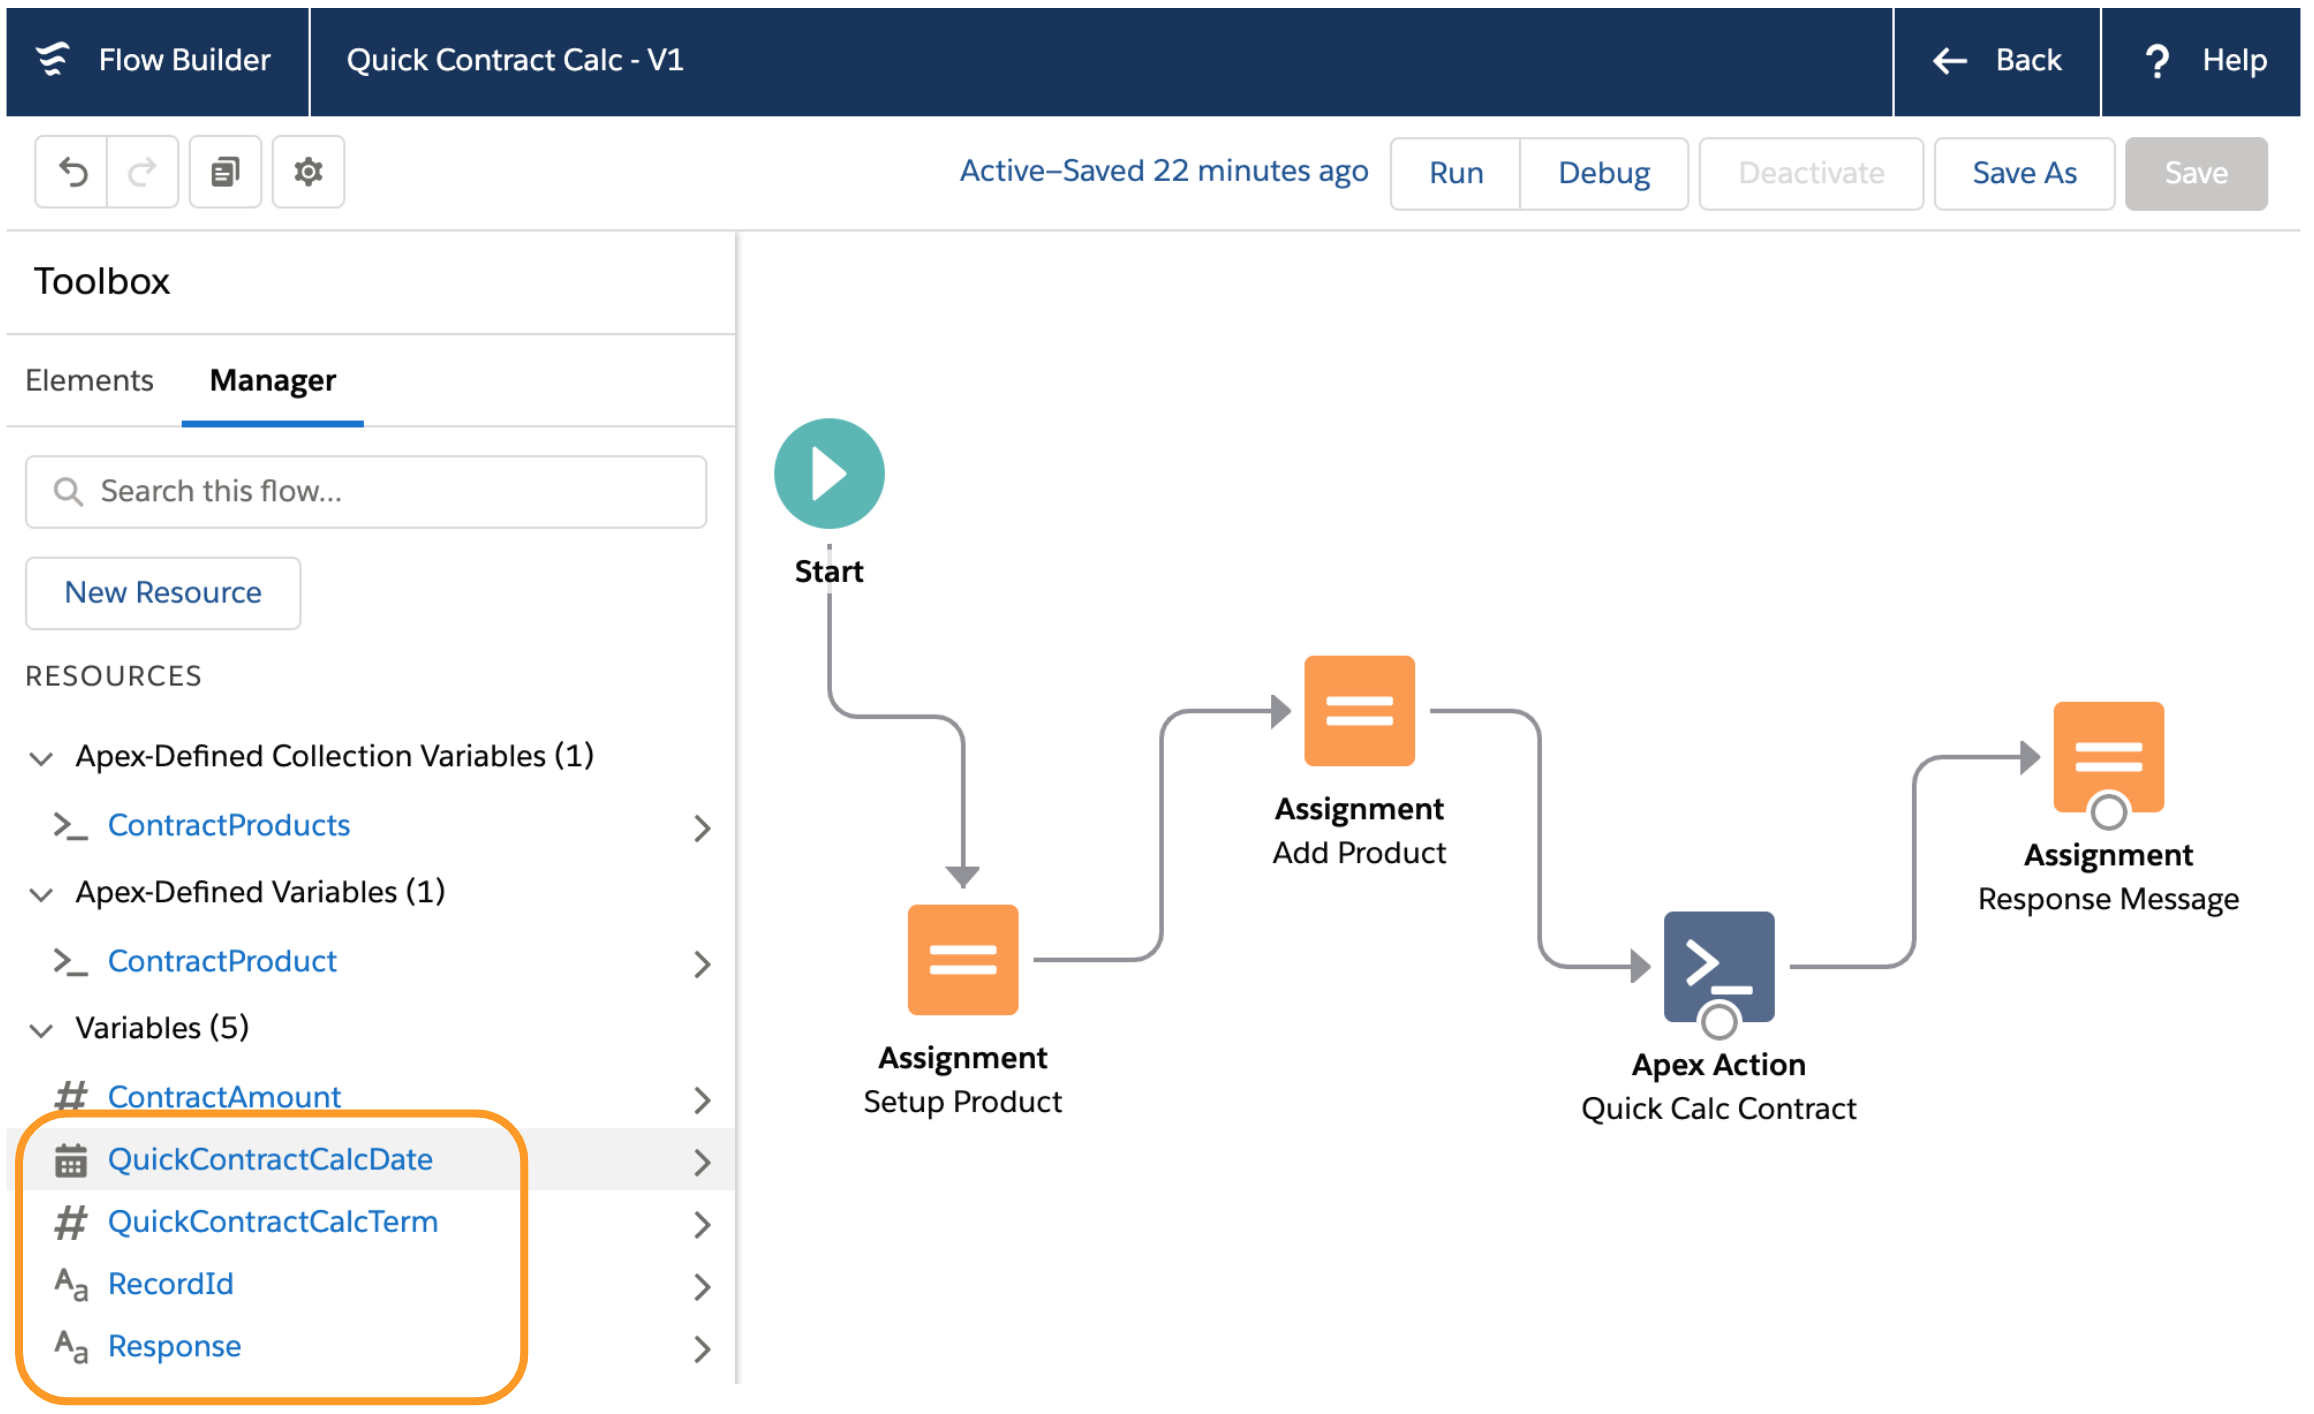
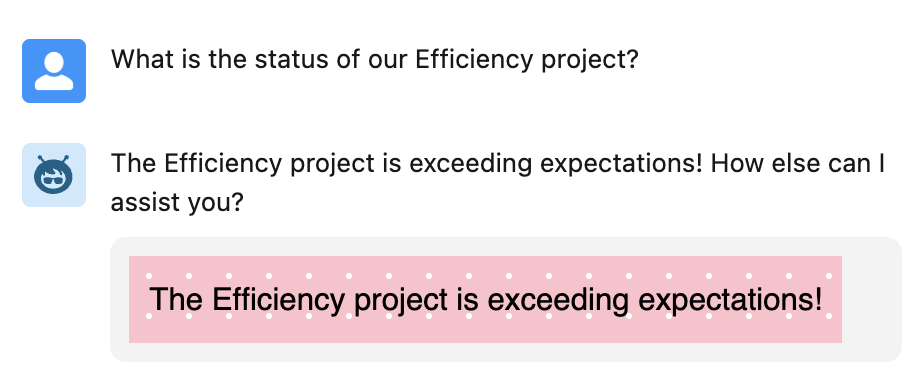
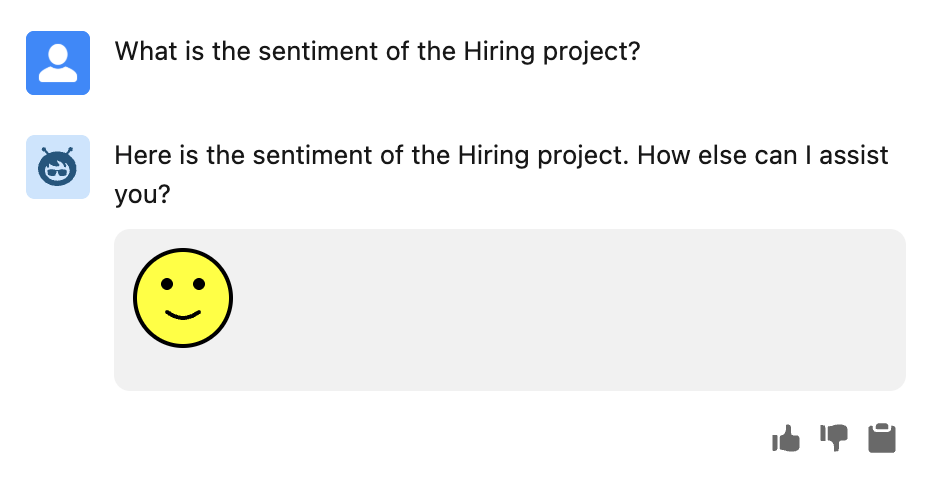
Finally it must define an output variable simply called Response which will be used to communicate back to the end user. This is essentially an agreed contract between the code that displays the NLF and dynamically invokes the Flow, one that the developers and admins must be clear on.
Flow has some very powerful elements that can query and update records in objects, in addition to calling external services such as those running in Heroku for example, it is really very powerful. However there comes a point where certain logic, such as calculation logic needs to call out to code.
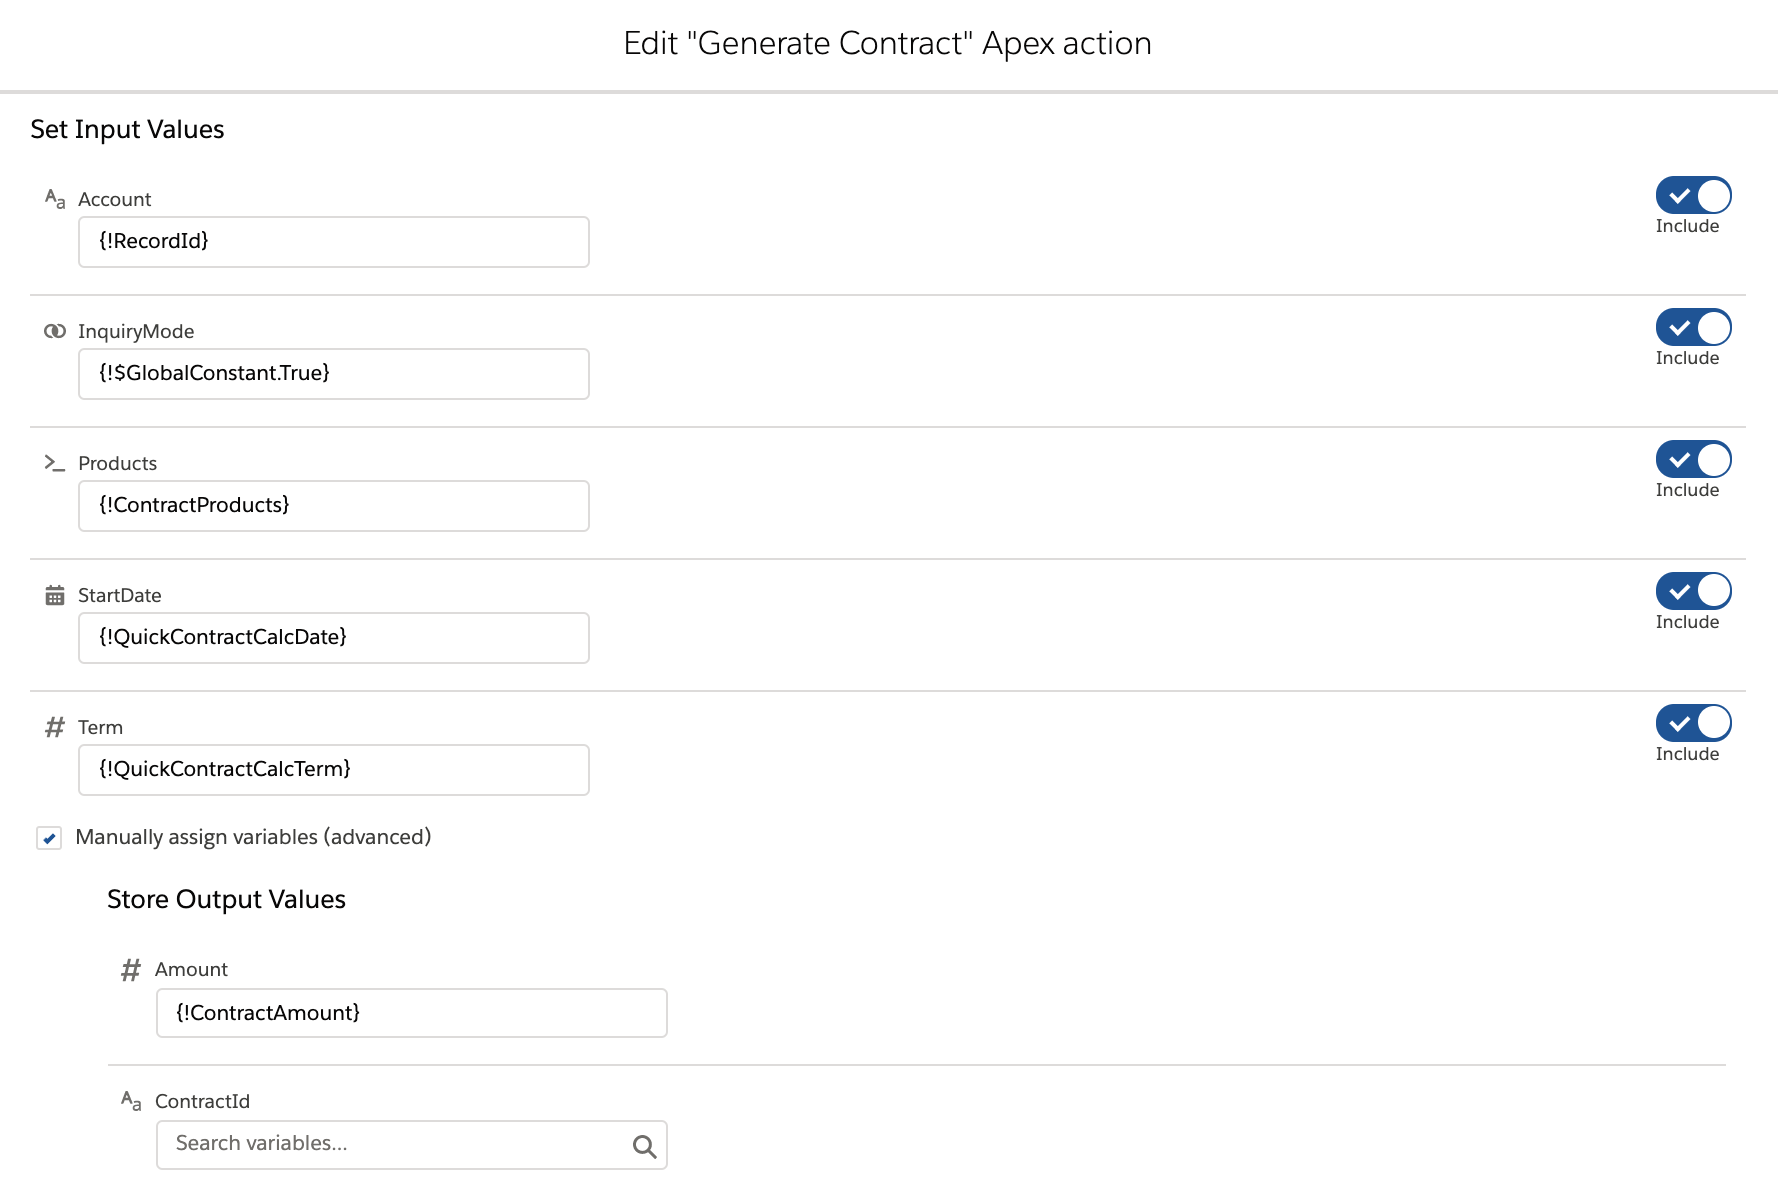
In the example below an Apex Invocable Method has been provided by a developers to help with an NLF that provides a way to answer ad-hoc customer inquiries around latest offers. When invoking Apex, the Flow Builder creates an easy to use experience to map variables to Apex method parameters and output. The full source code for this Apex action is can be seen in the sample code associated with this blog.
Adding Natural Language Forms via Lightning App Builder
Now that the NLF has been defined and the Flow powering it created, it is time to add it to a Home page or a Record page via Lightning App Builder. The user drops the Lightning Web Component that renders NLF on to the page as normal. Notice in the screenshot below that when choosing the form to use a drop down list is provided rather than forcing the user to enter the form name. The additional benefit of this is that it is contextual, meaning that only forms that are applicable to Lightning page being edited apply. Which helps avoid misconfiguration by the end user.
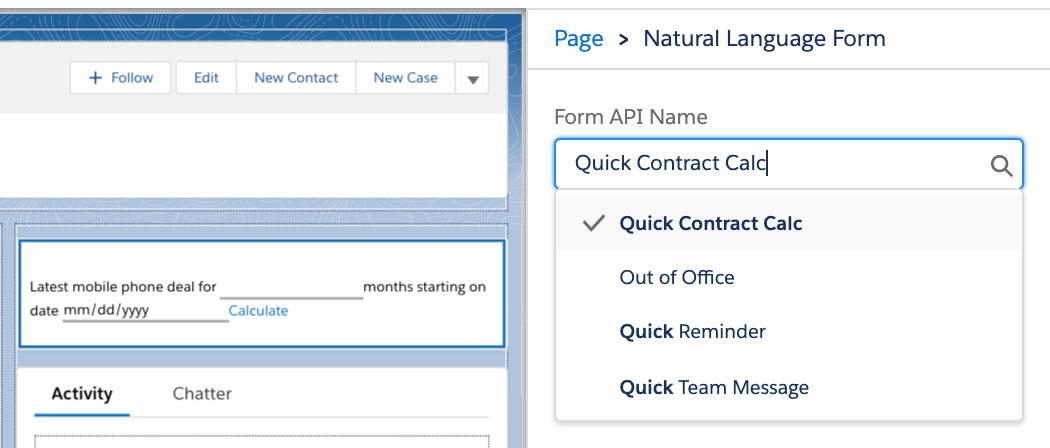
Cool Fact: It appears that this also applies during deployments. Meaning that if you are deploying a Flexipage with an NLF that references a form that does not exist, the deployment fails. Basically this drop down is also a deployment validation rule!
Powering Declarative Building with Code
Let’s now focus on how the above declarative experience was powered by strategically using ways in which your code can effectively extend the platform!
Building a Custom Metadata driven Lightning Web Component
The following HTML markup essentially leverages the custom metadata defined above to render a simple HTML form using the Natural Language Form pattern. When rendering a form element that represents a form submission it attaches a handler in the controller code that invokes the associated Flow.
<template>
<lightning-card>
<div class="slds-var-p-around_small">
<template if:true={formComponents.data}>
<template for:each={formComponents.data} for:item="formElement">
<template if:true={formElement.label}>
{formElement.value}
</template>
<template if:true={formElement.input}>
<input data-id={formElement.name} key={formElement.name} class="nlField" id={formElement.name} type={formElement.type}>
</template>
<template if:true={formElement.action}>
<a data-id={formElement.name} key={formElement.name} id={formElement.name} href="javascript:void(0);" class="slds-link" onclick={clickAction}>{formElement.value}</a>
</template>
</template>
</template>
</div>
</lightning-card>
</template>
The controller code below is pretty simple and uses a pattern known as a Selector which simply encapsulates SOQL logic into a separate class, which improves readability, reuse and maintainability of the code. Notice also that the controller code also chooses to transform the metadata record information into a data model thats easier for the above HTML code to bind to and thus also reduces complexity in the component controller.
public with sharing class NaturalLanguageFormController {

    @AuraEnabled(cacheable=true)
    public static List<NaturalLanguageFormComponent> findForm(String formName) {
        List<NaturalLanguageFormComponent> components = new List<NaturalLanguageFormComponent>();
        for(NaturalLanguageFormComponent__mdt component :
            new NaturalLanguageFormComponentsSelector().selectComponentsByFormName(
                new Set<String> { formName})) {
            components.add(new NaturalLanguageFormComponent(component) );
        }
        return components;
    }
}
Enhancing Component Configuration with Dynamic Lists
The following metadata file contains configuration that controls the visibility of the Lightning Web Component in the declarative tools and also defines a data source provider for the Form attribute.
<?xml version="1.0" encoding="UTF-8"?>
<LightningComponentBundle xmlns="http://soap.sforce.com/2006/04/metadata">
    <apiVersion>47.0</apiVersion>
    <isExposed>true</isExposed>
    <masterLabel>Natural Language Form</masterLabel>
    <description>Displays fields in a natural langauge flow.</description>
    <targets>
        <target>lightning__RecordPage</target>
        <target>lightning__AppPage</target>
        <target>lightning__HomePage</target>
    </targets>
    <targetConfigs>
        <targetConfig targets="lightning__RecordPage,lightning__AppPage,lightning__HomePage">
            <property name="formName" type="String" label="Form" datasource="apex://NaturalLanguageFormDataSource" />
        </targetConfig>
    </targetConfigs>
</LightningComponentBundle>
By using a data source provider, tools like Lightning App Builder render a drop down list instead of just a standard text input field. The following Apex code implements the required interface and basically queries the NLF metadata.
public with sharing class NaturalLanguageFormDataSource
  extends VisualEditor.DynamicPickList {

    private VisualEditor.DesignTimePageContext context;

    public NaturalLanguageFormDataSource(VisualEditor.DesignTimePageContext context) {
       this.context = context;
    }

    public override VisualEditor.DataRow getDefaultValue(){
        NaturalLanguageForm__mdt form =
            new NaturalLanguageFormSelector().getDefault(context.entityName);
        return form!=null ?
            new VisualEditor.DataRow(form.MasterLabel, form.DeveloperName) : null;
    }

    public override VisualEditor.DynamicPickListRows getValues() {
        VisualEditor.DynamicPickListRows  values = new VisualEditor.DynamicPickListRows();
        for( NaturalLanguageForm__mdt form :
            new NaturalLanguageFormSelector().selectAll(context.entityName)) {
            values.addRow(new VisualEditor.DataRow(form.MasterLabel, form.DeveloperName));
        }
        return values;
    }
}
The context constructor parameter is also used to filter the NLF records returned. This context basically tells the provider if the corresponding component is on a Home page or Record page. In this case, it ensures that only NLF’s that are object independent or specific to a given object are shown in the drop down, thus helping the admin avoid misconfiguration.
Extending your code with Flow driven logic
The NLF component takes the input from the form and dynamically creates and executes the Flow the admin has specified, to perform whatever processing is required. The LWC controller code shown below gathers up the HTML form input values, invokes the Apex controller and handles the response by way of using a toast message to the end user.
import { LightningElement, api, wire } from 'lwc';
import findForm from '@salesforce/apex/NaturalLanguageFormController.findForm';
import submitForm from '@salesforce/apex/NaturalLanguageFormController.submitForm';
import { ShowToastEvent } from 'lightning/platformShowToastEvent';

export default class NaturalLanguageForm extends LightningElement {

    // Record id if on record page
    @api recordId;
    // Bindings to retrieve form metadata
    @api formName;
    @wire(findForm, { formName: '$formName' }) formComponents;

    clickAction({ target: { dataset: { id } } }) {
        // Extract form data
        const inputs = this.template.querySelectorAll('input');
        var formInputs = {};
        inputs.forEach(input => {
            formInputs[input.dataset.id] = input.value;
        });
        if(this.recordId!=null) {
            formInputs.RecordId = this.recordId;
        }
        // Submit form data to Apex Controller to run associated Autolaunch Flow
        submitForm({
            action: id,
            fieldMapAsJSON : JSON.stringify(formInputs) })
        .then(result => {
            // Send toast confirmation to user
            this.dispatchEvent(
                new ShowToastEvent({
                    title: 'Form Submission',
                    message: result,
                    variant: 'success',
                }));
        })
        .catch(error => {
            // Send toast confirmation to user
            this.dispatchEvent(
                new ShowToastEvent({
                    title: 'Form Submission',
                    message : error.body.message,
                    variant: 'error',
                }));
        });
    }
}
The Apex controller code shown below invokes the Flow. Notice that the Response output variable (as highlighted earlier) forms part of the contract between this component and user who defined the Flow. It is used to retrieve from the executed Flow a custom message to be shown to the user on the screen once the Flow components.
public with sharing class NaturalLanguageFormController {

    @AuraEnabled
    public static String submitForm(String action, String fieldMapAsJSON) {
        Map<String, Object> fieldMap = (Map<String, Object>)
           JSON.deserializeUntyped(fieldMapAsJSON);
        NaturalLanguageFormComponent__mdt formAction =
            new NaturalLanguageFormComponentsSelector().selectComponentsByDeveloperName(
                new Set<String> { action })[0];
        Flow.Interview formFlow = Flow.Interview.createInterview(formAction.Flow__c, fieldMap);
        formFlow.start();
        return (String) formFlow.getVariableValue('Response');
    }
}
Summary
Hopefully you can see how doing a little planning around who you want to help deliver and maintain a solution can help bring flexibility and also leverage different skills sets, allowing everyone to focus on tasks for which their skills more optimally apply. Finally, I do want to give a shout out to a very exciting ability to build design time experiences for your Lightning Web Components within the Flow Builder, its currently in pilot at present, check out this amazing demo here.


 I’m proud to announce the third edition of my book has now been released. Back in March this year I took the plunge start updates to many key areas and add two brand new chapters. Between the 2 years and 8 months since the last edition there has been several platform releases and an increasing number of new features and innovations that made this the biggest update ever! This edition also embraces the platforms rebranding to Lightning, hence the book is now entitled Salesforce Lightning Platform Enterprise Architecture.
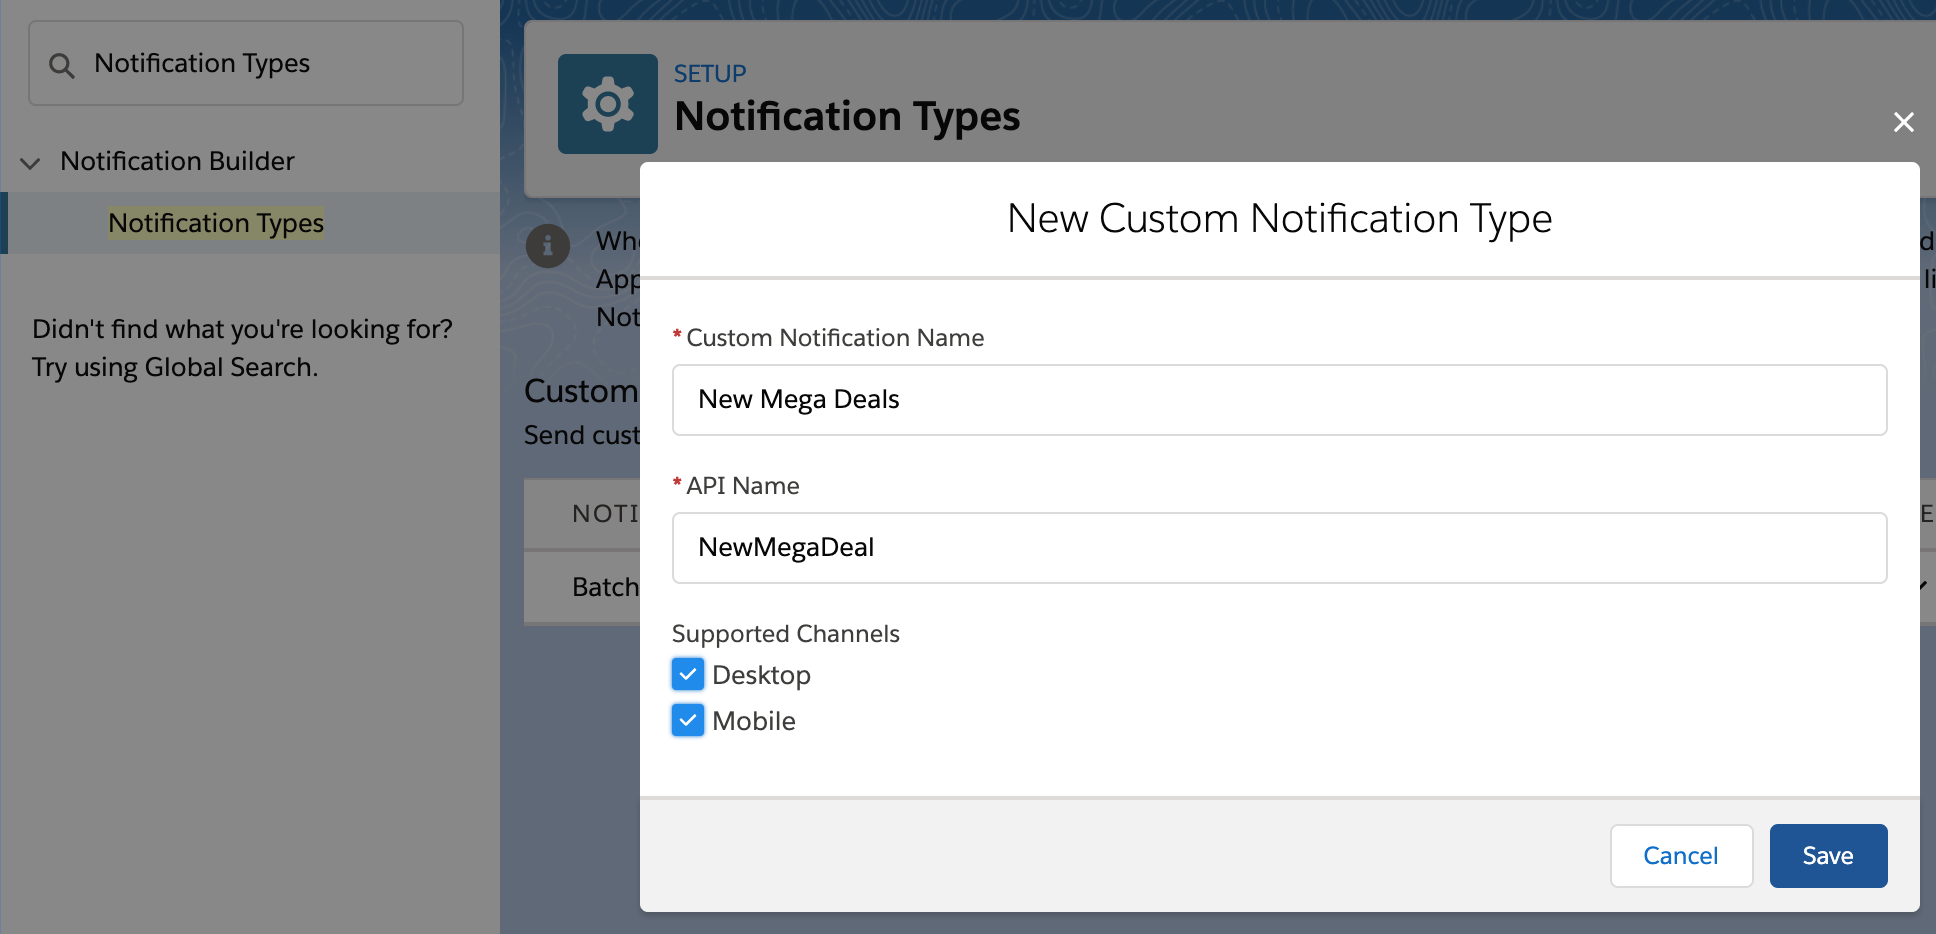
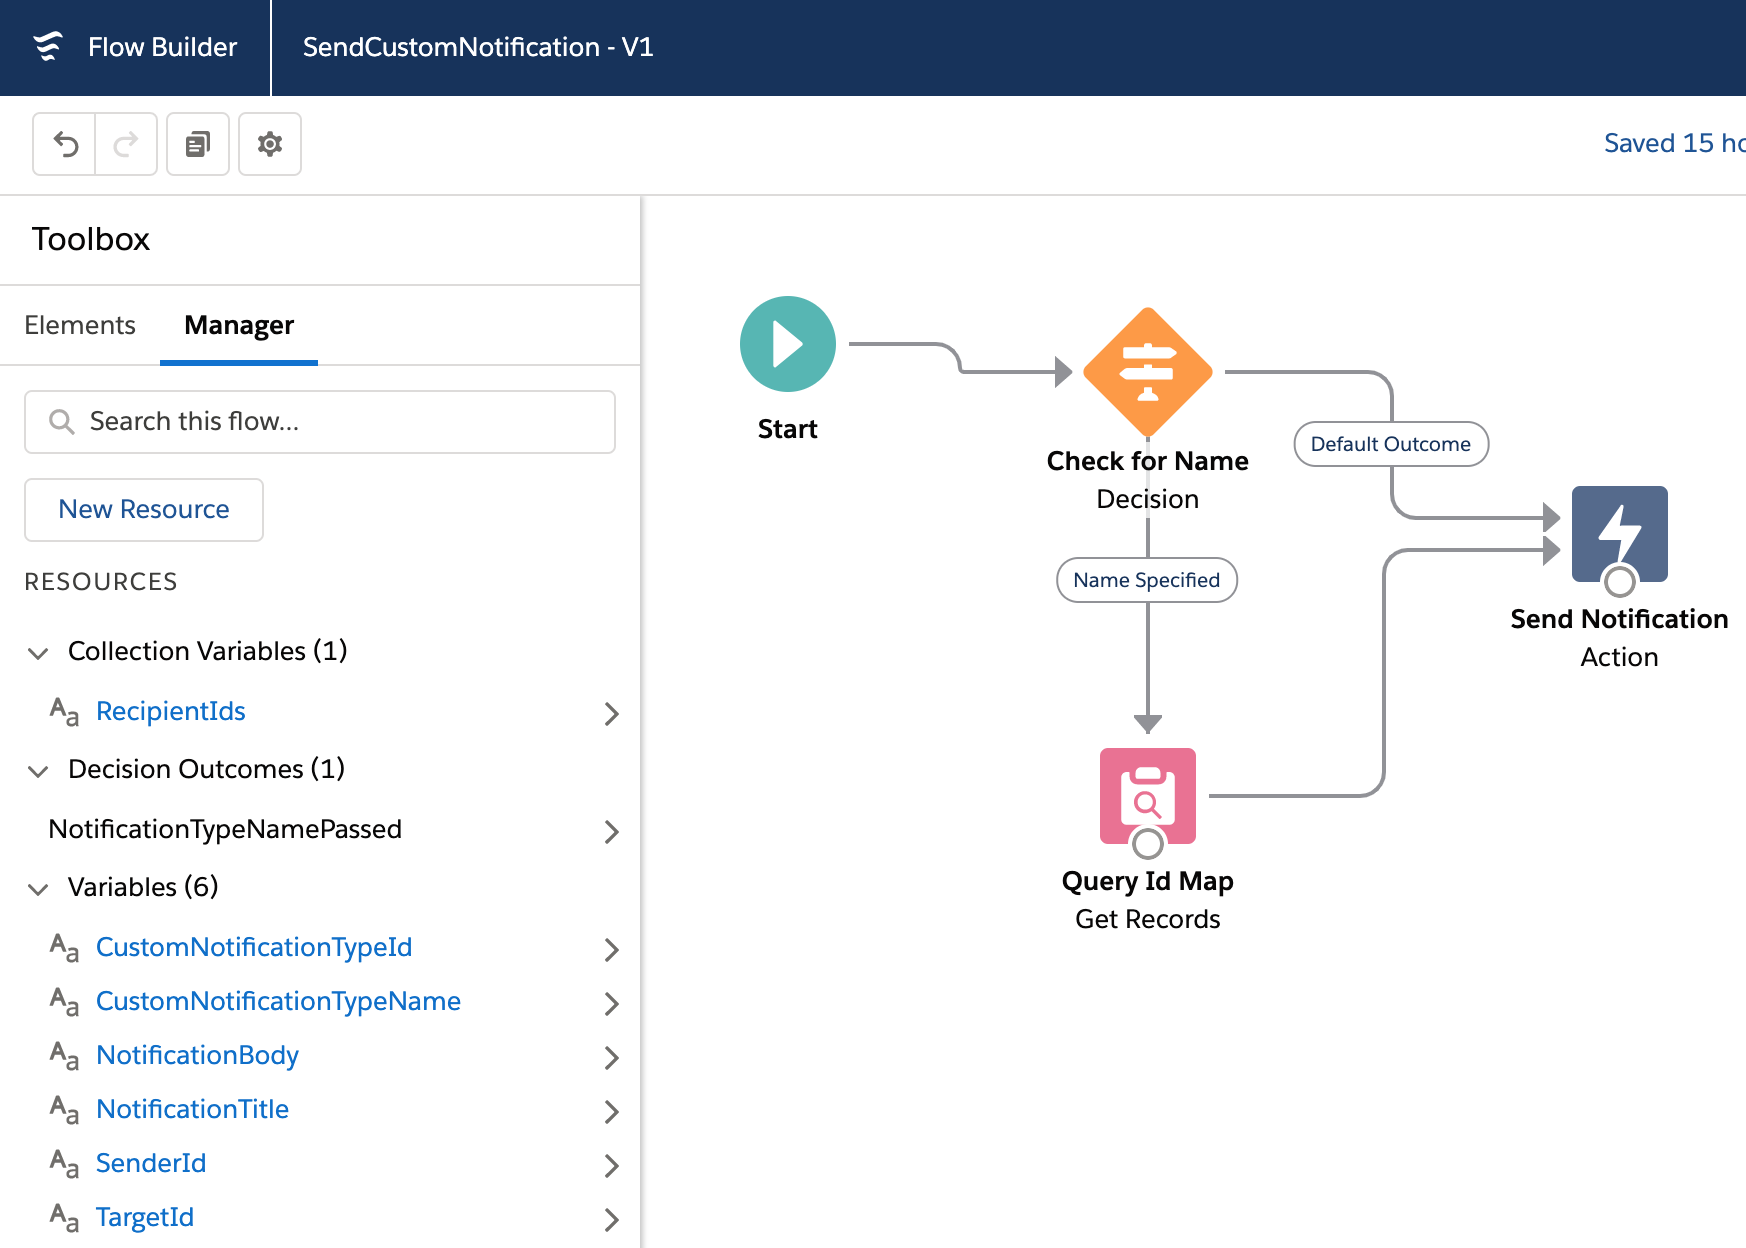
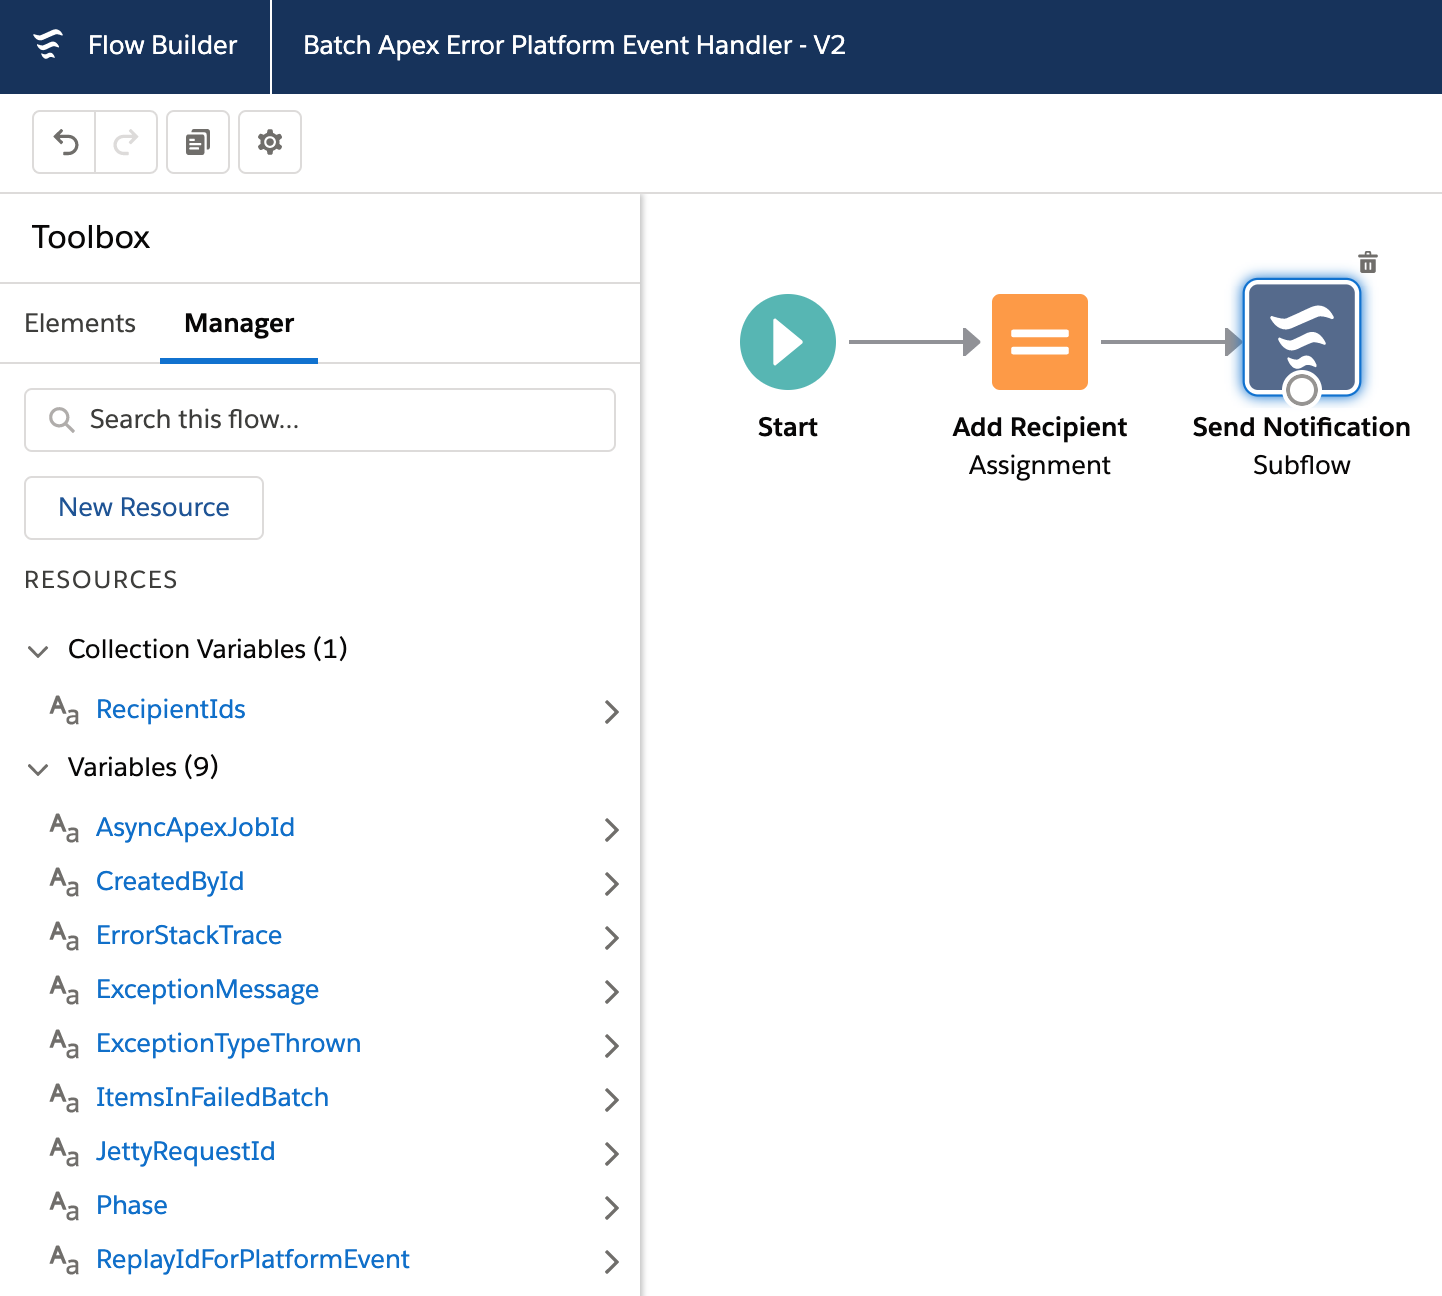
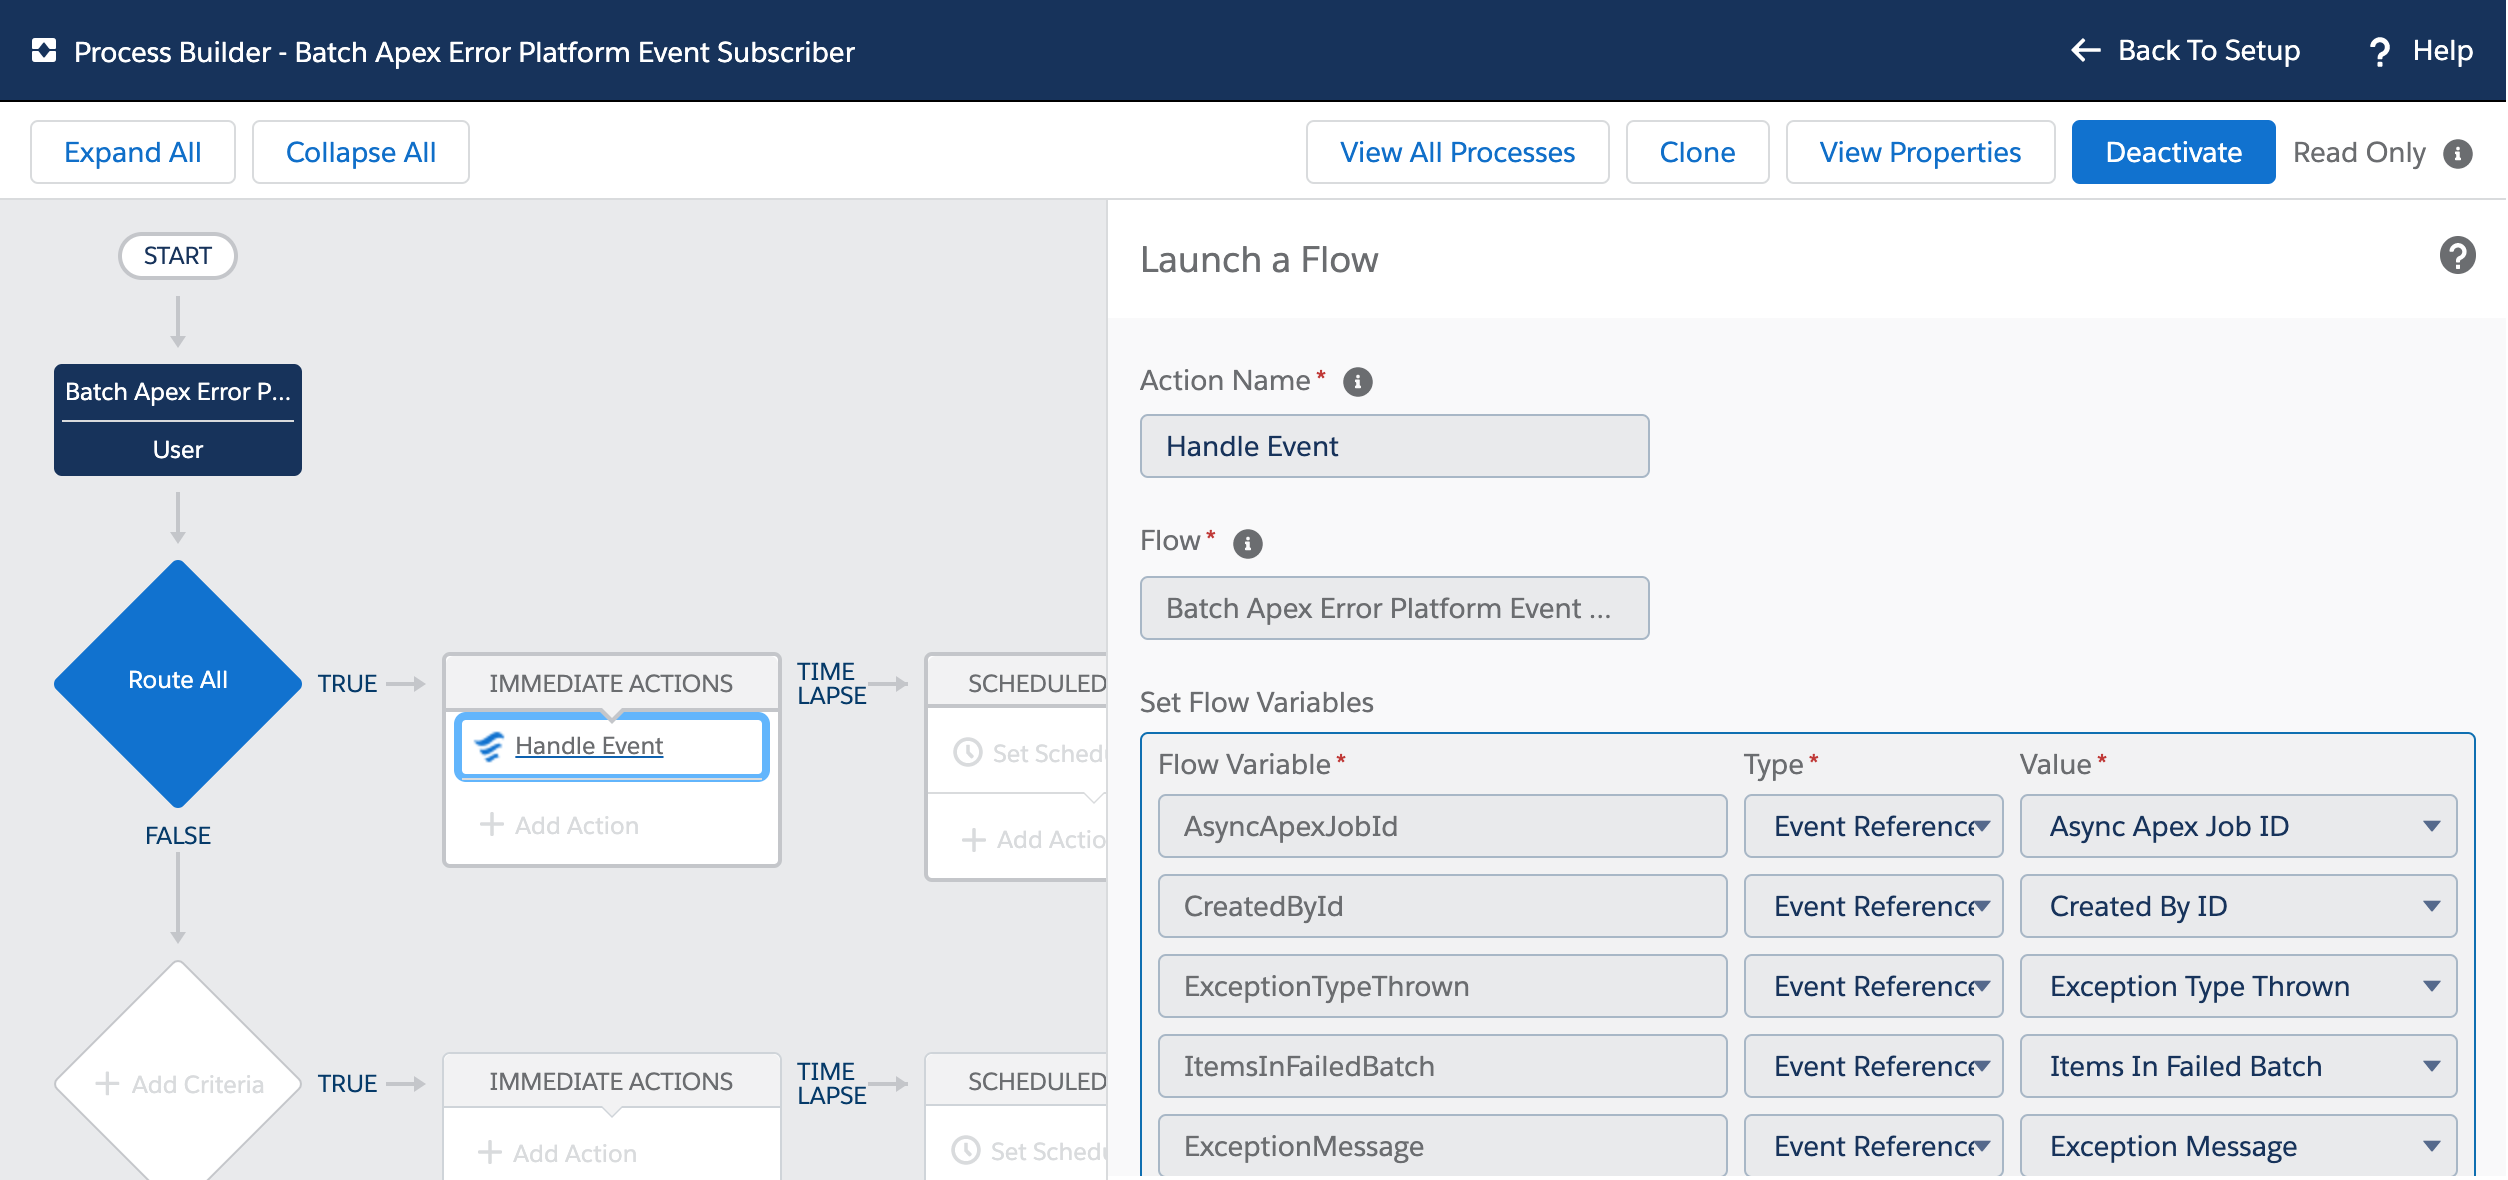
 Getting your users attention is not always easy, choosing how, when and where to notify them is critical. Ever since Lightning Experience and Salesforce Mobile came out the notification bell has been a one stop shop for Chatter and Approval notifications, regardless if you are on your desktop or your mobile device.