Andy in the Cloud

From BBC Basic to Force.com and beyond…


3 Comments

Improving User Response Time with Heroku AppLink

An app is often judged by its features, but equally important is its durability, confidence, and predictability in the tasks it performs – especially as a business grows; without these, you risk frustrating users with unpredictable response times or worse random timeouts. As Apex developers we can reach out to Queuables and Batch Apex for more power – though usage of these can also be required purely to work around the lower interactive governor limits – making programming interactive code more complex. I believe you should still include Apex in your Salesforce architecture considerations – however now we have an additional option to consider! This blog revisits Heroku AppLink and how it can help and without having to move wholesale away from Apex as your primary language!

This blog comes with full source code and setup instructions here.

Why Heroku AppLink?

In my prior blog I covered Five ways Heroku AppLink Enhances Salesforce Development Capabilities – if you have not read that and need a primer please check it out. Heroku AppLink has a flexible points of integration with Salesforce, among those is a way to stay within a flow of control driven by Apex code (or Flow for that matter), yet seamlessly offload certain code execution to Heroku, once complete revert back to Apex control. In contrast to Apex async workloads, this allows code to run immediately and uninterrupted until complete. In this mode there is no competing with Apex CPU, heap, or batch chunking constraints. As a result the overall flow of execution can be simpler to design and completion times are faster, largely only impacted by org data access times (no escaping slow Trigger logic). For the end user and overall business the application scales better, is more predictable and timely – and critically, grows more smoothly in relation to business data volumes.

Staying within Apex flow of control, allows you to leverage existing investments and skills in Apex, while when needed hooking into additional skills and Heroku’s more performant compute layer. All while maintaining the correct flow of the user identity (including their permissions) and critically without leaving the Salesforce (inclusive of Heroku) DX tool chains and overall fully managed services. The following presents two examples, one expanding what can be done in an interactive (synchronous) use case and the second moving to a full background (asynchronous) use case.

Improving Interactive Tasks – Synchronous Invocation

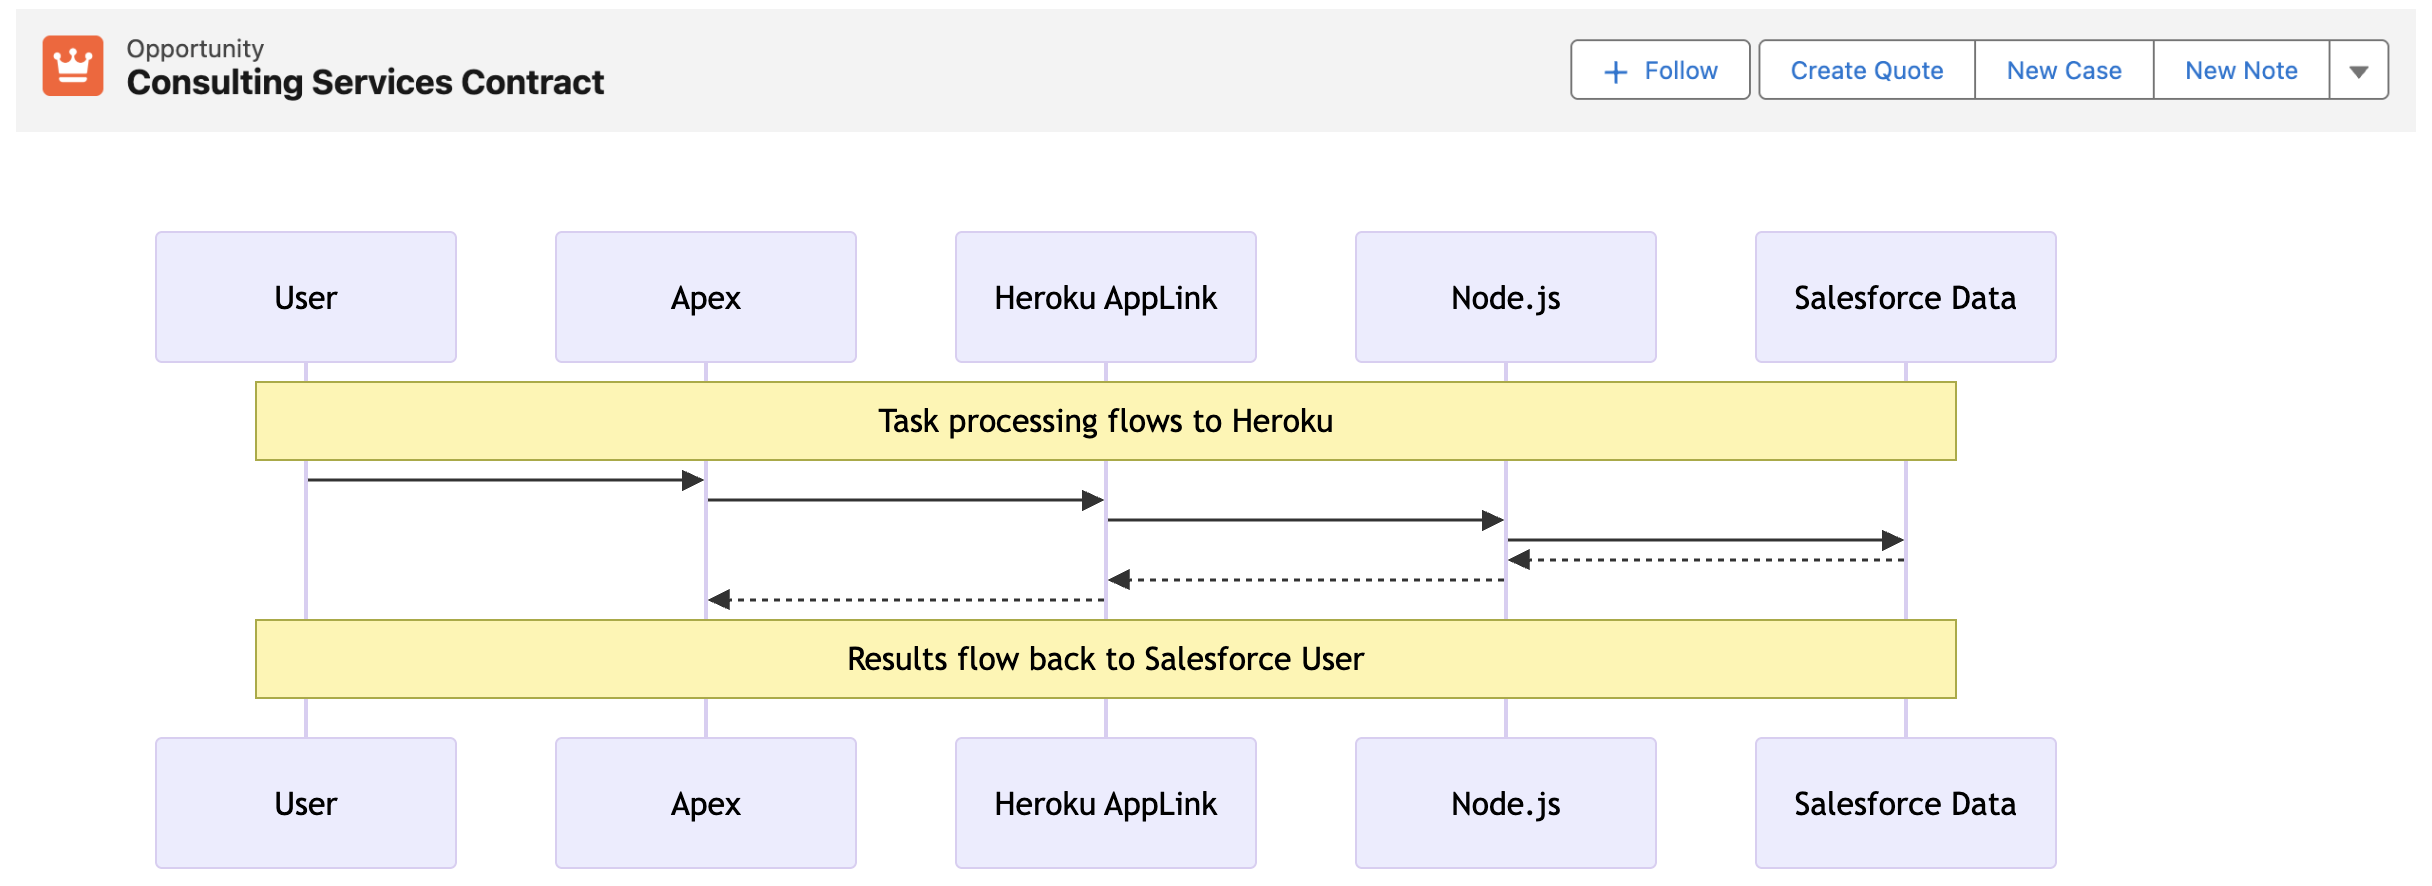
In this interactive (synchronous) example we are converting an Opportunity to a Quote – a task that can, depending on discount rules, size of the opportunity and additional regional tweaks, become quite compute heavy – sometimes in Apex hitting CPU or Heap limits. The sequence diagram below illustrates the flow of control from the User, through Apex, Heroku and back again. As always full code is supplied, but for now lets dig into the key code snippets below.

We start out with an Apex Controller that is attached to the “Create Quote” LWC button on the Opportunity page. This Apex Controller calls the Heroku AppLink exposed conversion logic (in this case written in Node.js – more on this later) – and waits for a response before returning control back to Lighting Experience to redirect the user to the newly created Quote. As you can see the HerokuAppLink namespace contains dynamically generated types for the service.

    @AuraEnabled(cacheable=false)
    public static QuoteResponse createQuote(String opportunityId) {
        try {
            // Create the Heroku service instance
            HerokuAppLink.QuoteService service = new HerokuAppLink.QuoteService();            
            // Create the request
            HerokuAppLink.QuoteService.createQuote_Request request = 
               new HerokuAppLink.QuoteService.createQuote_Request();
            request.body = new HerokuAppLink.QuoteService_CreateQuoteRequest();
            request.body.opportunityId = opportunityId;    
            // Call the Heroku service
            HerokuAppLink.QuoteService.createQuote_Response response = 
               service.createQuote(request);            
            if (response != null && response.Code200 != null) {
                QuoteResponse quoteResponse = new QuoteResponse();
                quoteResponse.opportunityId = opportunityId;
                quoteResponse.quoteId = response.Code200.quoteId;
                quoteResponse.success = true;
                quoteResponse.message = 'Quote generated successfully';                
                return quoteResponse;
            } else {
                throw new AuraHandledException('No response received from quote service');
            }            
        } catch (HerokuAppLink.QuoteService.createQuote_ResponseException e) {
            // Handle specific Heroku service errors
            // ...
        } catch (Exception e) {
            // Handle any other exceptions
            throw new AuraHandledException('Error generating quote: ' + e.getMessage());
        }
    }

The Node.js logic (show below) to convert the quote uses the Fastify library to expose the code via a HTTP endpoint (secure by Heroku AppLink). In the generateQuote method the Heroku AppLink SDK is used to access the Opportunity records and create the Quote records – notably in one transaction via its Unit Of Work interface. Again it is important to note that none of this requires handling authentication thats all done for you – just like Apex – and just like Apex (when you apply USER _MODE) – the SOQL and DML has permissions applied.

// Synchronous quote creation
  fastify.post('/createQuote', {
    schema: createQuoteSchema,
    handler: async (request, reply) => {
      const { opportunityId } = request.body;
      try {
        const result = await generateQuote({ opportunityId }, request.salesforce);
        return result;
      } catch (error) {
        reply.code(error.statusCode || 500).send({
          error: true,
          message: error.message
        });
      }
    }
  });
//
// Generate a quote for a given opportunity
// @param {Object} request - The quote generation request
// @param {string} request.opportunityId - The opportunity ID
// @param {import('@heroku/applink').AppLinkClient} client - The Salesforce client
// @returns {Promise<Object>} The generated quote response
//
export async function generateQuote (request, client) {
  try {
    const { context } = client;
    const org = context.org;
    const dataApi = org.dataApi;
    // Query Opportunity to get CloseDate for ExpirationDate calculation
    const oppQuery = `SELECT Id, Name, CloseDate FROM Opportunity WHERE Id = '${request.opportunityId}'`;
    const oppResult = await dataApi.query(oppQuery);
    if (!oppResult.records || oppResult.records.length === 0) {
      const error = new Error(`Opportunity not found for ID: ${request.opportunityId}`);
      error.statusCode = 404;
      throw error;
    }    
    const opportunity = oppResult.records[0].fields;
    const closeDate = opportunity.CloseDate;
    // Query opportunity line items
    const soql = `SELECT Id, Product2Id, Quantity, UnitPrice, PricebookEntryId FROM OpportunityLineItem WHERE OpportunityId = '${request.opportunityId}'`;
    const queryResult = await dataApi.query(soql);
    if (!queryResult.records.length) {
      const error = new Error(`No OpportunityLineItems found for Opportunity ID: ${request.opportunityId}`);
      error.statusCode = 404;
      throw error;
    }
    // Calculate discount based on hardcoded region (matching createQuotes.js logic)
    const discount = getDiscountForRegion('NAMER'); // Use hardcoded region 'NAMER'
    // Create Quote using Unit of Work
    const unitOfWork = dataApi.newUnitOfWork();
    // Add Quote
    const quoteName = 'New Quote';
    const expirationDate = new Date(closeDate);
    expirationDate.setDate(expirationDate.getDate() + 30); // Quote expires 30 days after CloseDate
    const quoteRef = unitOfWork.registerCreate({
      type: 'Quote',
      fields: {
        Name: quoteName, 
        OpportunityId: request.opportunityId,
        Pricebook2Id: standardPricebookId,
        ExpirationDate: expirationDate.toISOString().split('T')[0],
        Status: 'Draft'
      }
    });
    // Add QuoteLineItems
    queryResult.records.forEach(record => {
      const quantity = parseFloat(record.fields.Quantity);
      const unitPrice = parseFloat(record.fields.UnitPrice);
      // Apply discount to QuoteLineItem UnitPrice (matching createQuotes.js exactly)
      const originalUnitPrice = unitPrice;
      const calculatedDiscountedPrice = originalUnitPrice != null 
                                        ? originalUnitPrice * (1 - discount)
                                        : originalUnitPrice; // Default to original if calculation fails
      unitOfWork.registerCreate({
        type: 'QuoteLineItem',
        fields: {
          QuoteId: quoteRef.toApiString(),
          PricebookEntryId: record.fields.PricebookEntryId,
          Quantity: quantity,
          UnitPrice: calculatedDiscountedPrice
        }
      });
    });
    // Commit all records in one transaction
    try {
      const results = await dataApi.commitUnitOfWork(unitOfWork);
      // Get the Quote result using the reference
      const quoteResult = results.get(quoteRef);
      if (!quoteResult) {
        throw new Error('Quote creation result not found in response');
      }
      return { quoteId: quoteResult.id };
    } catch (commitError) {
      // Salesforce API errors will be formatted as "ERROR_CODE: Error message"
      const error = new Error(`Failed to create quote: ${commitError.message}`);
      error.statusCode = 400; // Bad Request for validation/data errors
      throw error;
    }
  } catch (error) {
    // ...
  }
}

This is a secure way to move from Apex to Node.js and back. Note certain limits still apply: callout timeout is 120 seconds max (applicable when calling Heroku per above) – additionally, the Node.js code is leveraging the Salesforce API, so API limits still apply. Despite the 120 seconds timeout, you get practically unlimited CPU, heap, and the speed of the latest industry language runtimes – in the case of Java – compilation to the machine code level if needed!

The decision to use AppLink here really depends on identifying the correct bottle neck; if some Apex logic is bounded (constrained to grow) by CPU, memory, execution time, or even language, then this is a good approach consider – without going off doing integration plumbing and risking security. For example, if you’re doing so much processing in memory you’re hitting Apex CPU limits – then even with the 120-second callout limit to Heroku – the alternative Node.js (or other lang) code will likely run much faster – keeping you in the simpler synchronous mode for longer as your compute and data requirements grow.

Improving Background Jobs – Asynchronous Invocation

When processing needs to operate over a number of records (user selected or filtered) we can apply the same expansion of the Apex control flow – by having Node.js do the heavy lifting in the middle and then once complete passing control back to Apex to complete user notifications, logging, or even further non-compute heavy work. The diagram shows two processes; the first is the user interaction, in this case, selecting the records that Apex passes over to Heroku to enqueue a job to handle the processing. Heroku compute is your org’s own compute, so will begin execution immediately and run until it’s done. Thus, in the second flow, we see the worker taking over, completing the task, and then using an AppLink Apex callback, sending control back to the org where a user notification is sent.

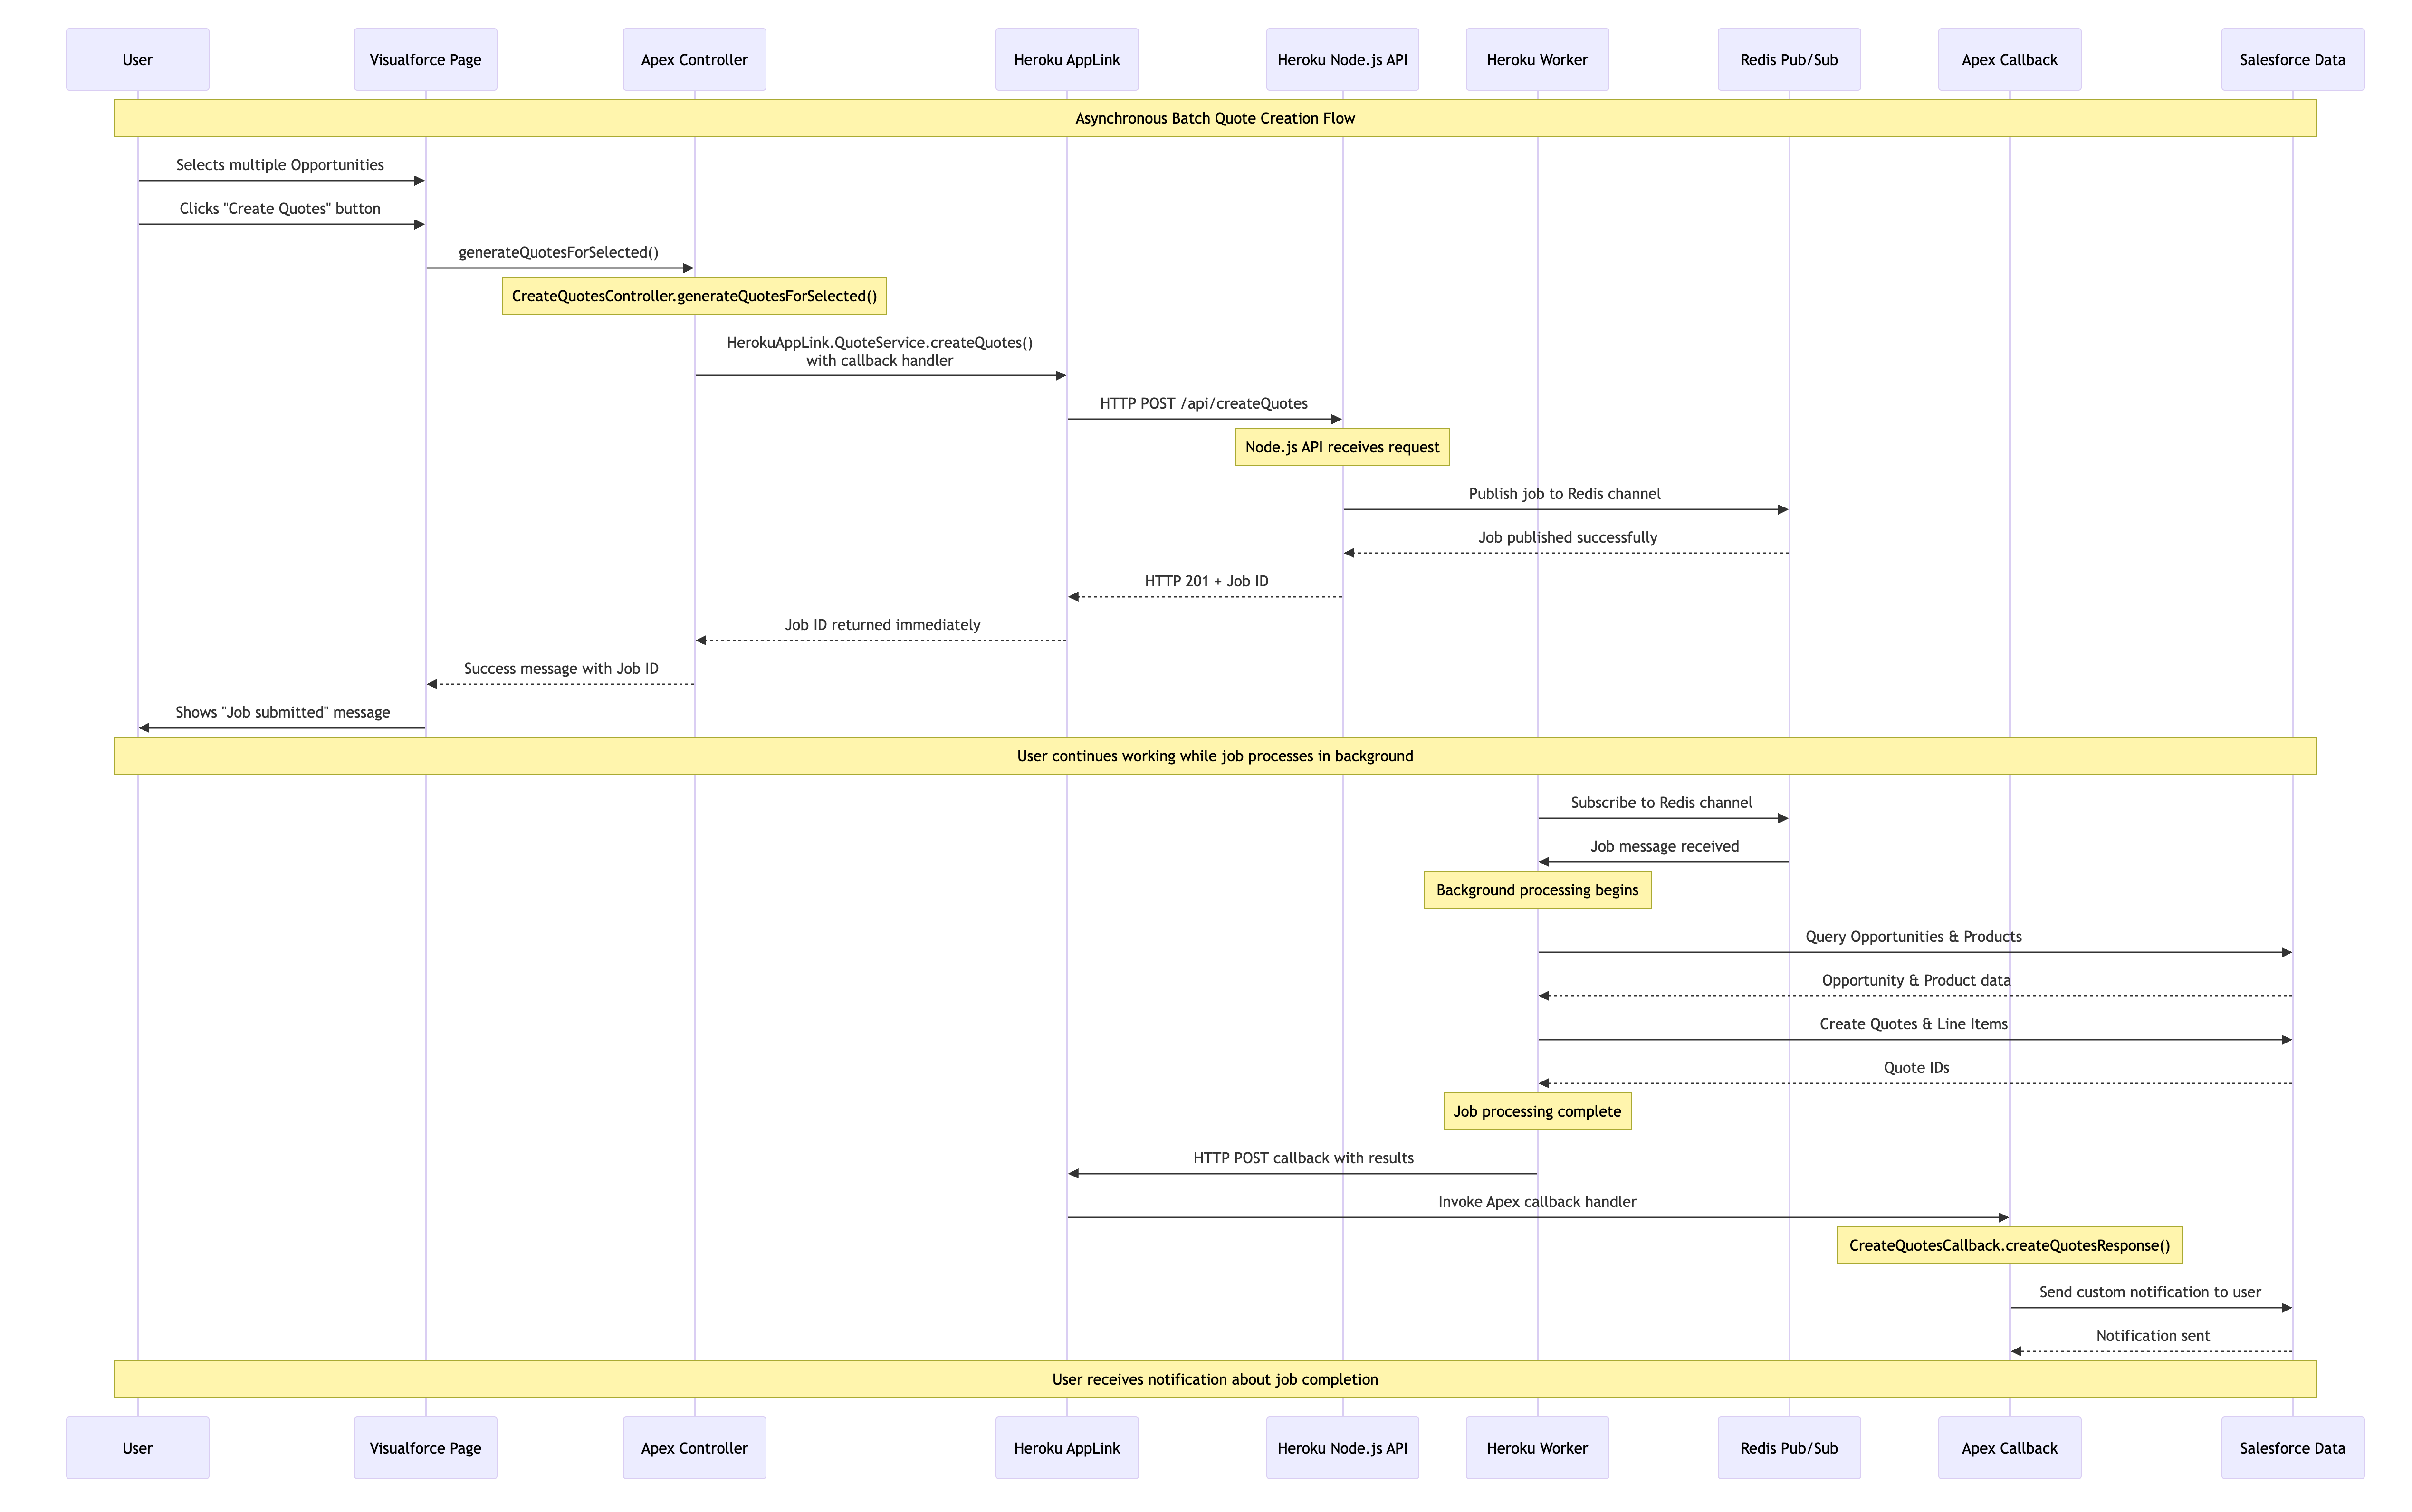
In this example we have the Create Quotes button that allows the user to select which Opportunities to be converted to Quotes. The Apex Controller shown below takes the record Ids and passes those over to Node.js code for processing in Heroku – however in this scenario it also passes an Apex class that implements a callback interface – more on this later. Note you can also invoke via Apex Scheduled jobs or other means such as Change Data Capture.

    public PageReference generateQuotesForSelected() {
        try {
            // Get the selected opportunities
            List<Opportunity> selectedOpps = (List<Opportunity>) this.stdController.getSelected();
            // Extract opportunity IDs
            List<String> opportunityIds = new List<String>(selectedOpps.keySet());
            // Call the Quotes service with an Apex callback
            try {
                HerokuAppLink.QuoteService service = new HerokuAppLink.QuoteService();
                HerokuAppLink.QuoteService.createQuotes_Request request = new HerokuAppLink.QuoteService.createQuotes_Request();
                request.body = new HerokuAppLink.QuoteService_CreateQuotesRequest();
                request.body.opportunityIds = opportunityIds;                
                // Create callback handler for notifications
                CreateQuotesCallback callbackHandler = new CreateQuotesCallback();                
                // Set callback timeout to 10 minutes from now (max 24hrs)
                DateTime callbackTimeout = DateTime.now().addMinutes(10);                
                // Call the service with callback
                HerokuAppLink.QuoteService.createQuotes_Response response = 
                   service.createQuotes(request, callbackHandler, callbackTimeout);                
                if (response != null && response.Code201 != null) {
                    // Show success message
                    // ....
            } catch (HerokuAppLink.QuoteService.createQuotes_ResponseException e) {
                // Handle specific service errors
                // ...
            }            
        } catch (Exception e) {
            // Show error message
            //  ...
        }        
        return null;
    }

Note: You may have noticed the above Apex Controller is that of a Visualforce page controller and not LWC! Surprisingly it seems (as far as I can see) this is still the only way to implement List View buttons with selection. Please do let me know of other native alternatives. Meanwhile the previous button is a modern LWC based button, but this is only supported on detail pages.

As before you can see Fastify used to expose the Node.js code invoked from the Apex controller – except that it is returning immediately to the caller (your Apex code) rather than waiting for the work to complete. This is because the work has been spun off in this case into another Heroku process known as a Worker. This pattern means that control returns to the Apex Controller and to the user immediately while the process continues in the background. Note that the callbackURL is automatically supplied by AppLink you just need to retain it for later.

// Asynchronous batch quote creation
  fastify.post('/createQuotes', {
    schema: createQuotesSchema,
    handler: async (request, reply) => {
      const { opportunityIds, callbackUrl } = request.body;
      const jobId = crypto.randomUUID();
      const jobPayload = JSON.stringify({
        jobId,
        jobType: 'quote',
        opportunityIds,
        callbackUrl
      });
      try {
        // Pass the work to the worker and respond with HTTP 201 to indicate the job has been accepted
        const receivers = await redisClient.publish(JOBS_CHANNEL, jobPayload);
        request.log.info({ jobId, channel: JOBS_CHANNEL, payload: { jobType: 'quote', opportunityIds, callbackUrl }, receivers }, `Job published to Redis channel ${JOBS_CHANNEL}. Receivers: ${receivers}`);
        return reply.code(201).send({ jobId }); // Return 201 Created with Job ID
      } catch (error) {
        request.log.error({ err: error, jobId, channel: JOBS_CHANNEL }, 'Failed to publish job to Redis channel');
        return reply.code(500).send({ error: 'Failed to publish job.' });
      }
    }
  });

The following Node.js is running in the Heroku Worker and performs the same work as the example above, querying Opportunities and using the Unit Of Work to create the Quotes. However in this case when it completes it calls the Apex Callback handler. Note that you can support different types of callbacks – such as an error state callback.

/**
 * Handles quote generation jobs.
 * @param {object} jobData - The job data object from Redis.
 * @param {object} logger - A logger instance.
 */
async function handleQuoteMessage (jobData, logger) {
  const { jobId, opportunityIds, callbackUrl } = jobData;
    try {
    // Get named connection from AppLink SDK
    logger.info(`Getting 'worker' connection from AppLink SDK for job ${jobId}`);
    const sfContext = await sdk.addons.applink.getAuthorization('worker');      
    // Query Opportunities 
    const opportunityIdList = opportunityIds.map(id => `'${id}'`).join(',');
    const oppQuery = `
      SELECT Id, Name, AccountId, CloseDate, StageName, Amount,
             (SELECT Id, Product2Id, Quantity, UnitPrice, PricebookEntryId FROM OpportunityLineItems)
      FROM Opportunity
      WHERE Id IN (${opportunityIdList})
    // ... 
    logger.info(`Processing ${opportunities.length} Opportunities`);
    const unitOfWork = dataApi.newUnitOfWork();
    // Create the Quotes and commit Unit Of Work
    // ...
    const commitResult = await dataApi.commitUnitOfWork(unitOfWork);
    // Callback to Apex Callback class
    if (callbackUrl) {
      try {
        const callbackResults = {
          jobId,
          opportunityIds,
          quoteIds: Array.from(quoteRefs.values()).map(ref => {
            const result = commitResult.get(ref);
            return result?.id || null;
          }).filter(id => id !== null),
          status: failureCount === 0 ? 'completed' : 'completed_with_errors',
          errors: failureCount > 0 ? [`${failureCount} quotes failed to create`] : []
        };
        const requestOptions = {
          method: 'POST',
          body: JSON.stringify(callbackResults),
          headers: { 'Content-Type': 'application/json' }
        };
        const response = await sfContext.request(callbackUrl, requestOptions);
        logger.info(`Callback executed successfully for Job ID: ${jobId}`);
      } catch (callbackError) {
        logger.error({ err: callbackError, jobId }, `Failed to execute callback for Job ID: ${jobId}`);
      }
    }
  } catch (error) {
    logger.error({ err: error }, `Error executing batch for Job ID: ${jobId}`);
  }
}

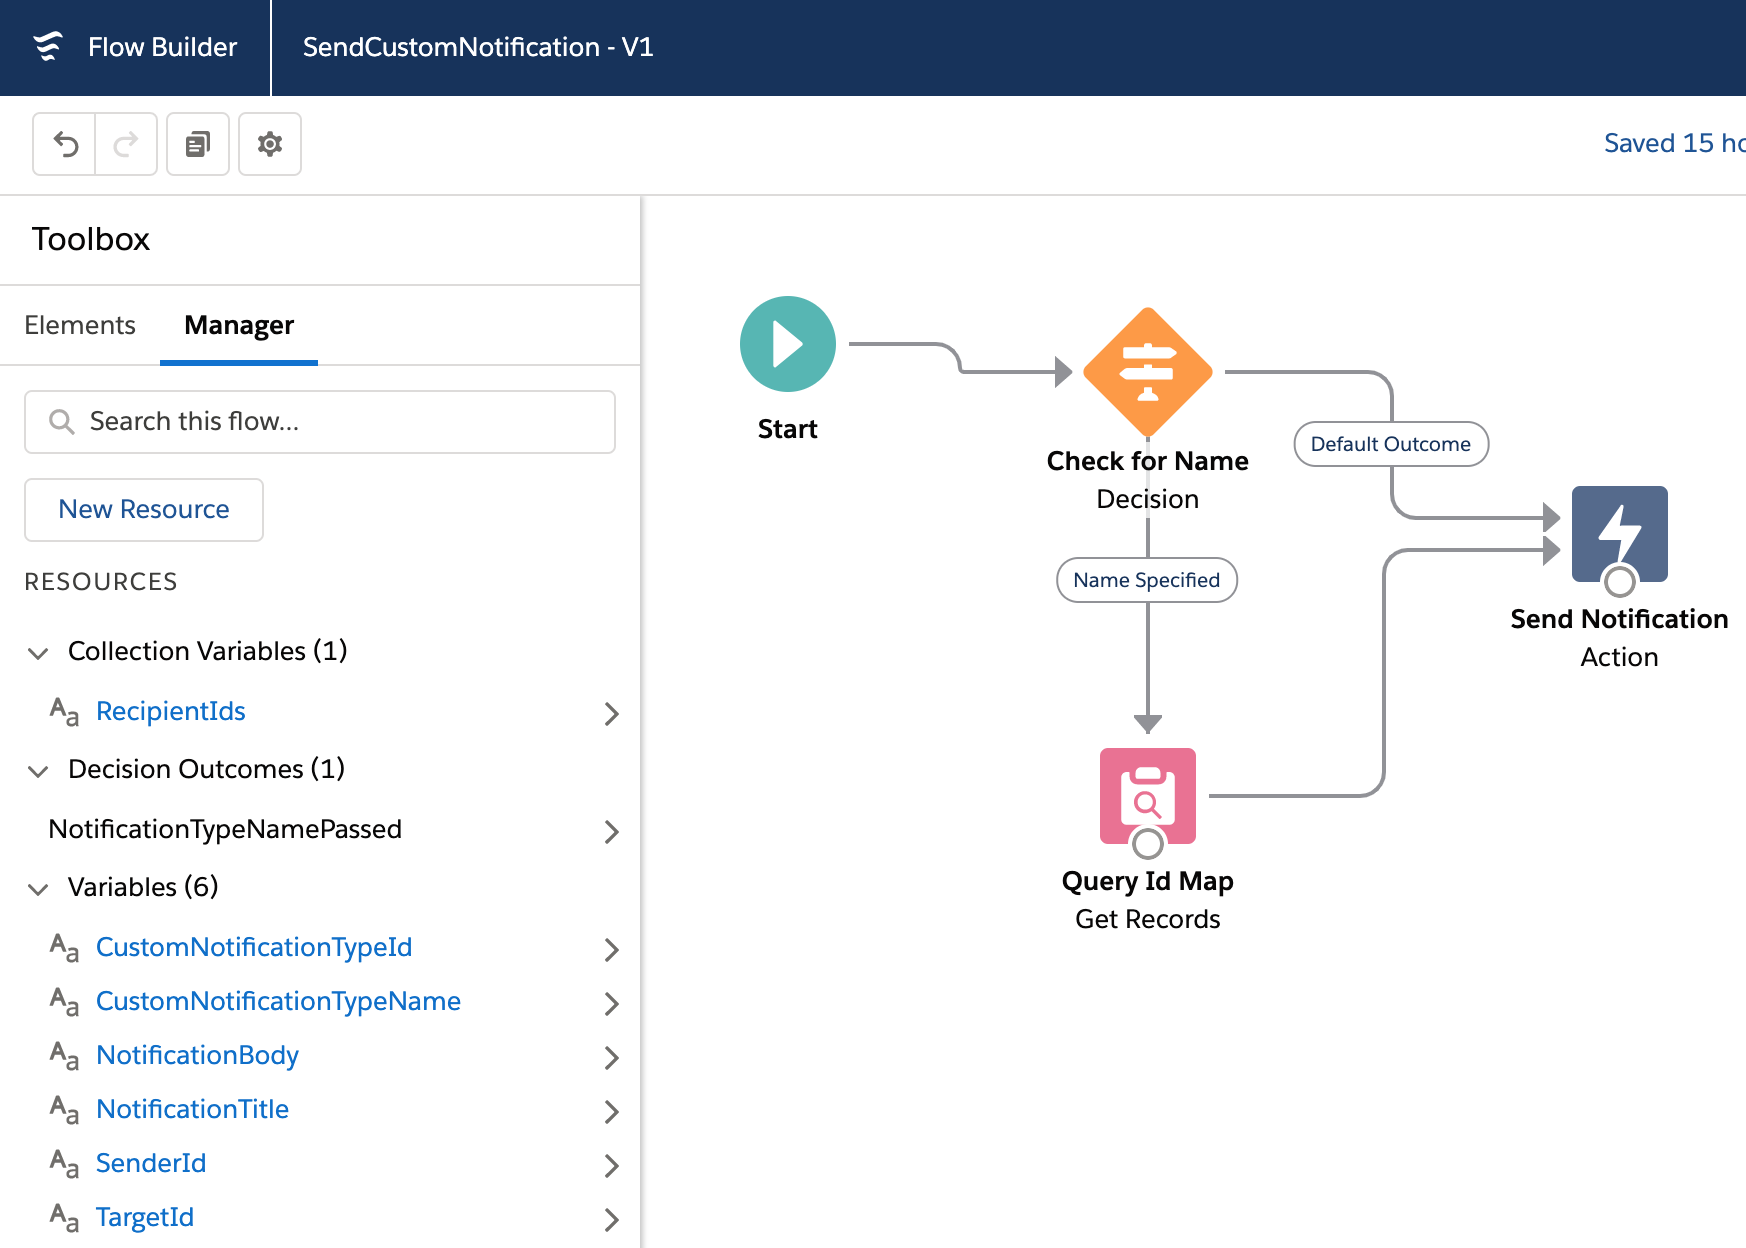
Finally the following code shows us what the CreateQuotesCallback Apex Callback (provided in the Apex controller logic) is doing. For this example its using the custom notifications to notify the user via UserInfo.getUserId(). It can do this because it is running as the original user that started the work. Also meaning that if it needed to do any further SOQL or DML these run in context of the correct user. Also worth noting that handler is bulkified – indicating that Salesforce will likely batch up callbacks if they arrive in close timing.

/**
 * Apex Callback handler for createQuotes asynchronous operations
 * Extends the generated AppLink callback interface to handle responses
 */
public class CreateQuotesCallback 
      extends HerokuAppLink.QuoteService.createQuotes_Callback {

    /**
     * Handles the callback response from the Heroku worker
     * Sends a custom notification to the user with the results
     */
    public override void createQuotesResponse(List<HerokuAppLink.QuoteService.createQuotes_createQuotesResponse_Callback> callbacks) {
        // Send custom notification to the user
        for (herokuapplink.QuoteService.createQuotes_createQuotesResponse_Callback callback : callbacks) {
            if (callback.response != null && callback.response.body != null) {
                Messaging.CustomNotification notification = new Messaging.CustomNotification();
                notification.setTitle('Quote Generation Complete');
                notification.setNotificationTypeId(notificationTypeId);                
                String message = 'Job ' + callback.response.body.jobId + ' completed with status: ' + callback.response.body.status;
                if (callback.response.body.quoteIds != null && !callback.response.body.quoteIds.isEmpty()) {
                    message += '. Created ' + callback.response.body.quoteIds.size() + ' quotes.';
                }
                if (callback.response.body.errors != null && !callback.response.body.errors.isEmpty()) {
                    message += ' Errors: ' + String.join(callback.response.body.errors, ', ');
                }                                
                notification.setBody(message);
                notification.setTargetId(UserInfo.getUserId());                    
                notification.send(new Set<String>{ UserInfo.getUserId() });
            }
        }
    }
}

Configuration and Monitoring

In general the Node.js code runs as the user invoking the actions – which is very Apex like and gives you confidence your code only does what the user is permitted. There is also an elevation mode thats out the scope of this blog – but is covered in the resources listed below. The technical notes section in the README covers an exception to running as the user – whereby the asynchronous Heroku worker logic is running as a named user. Note that the immediate Node.js logic and Apex Callbacks both still run as the invoking user so if needed you can do “user mode” work in those contexts. You can read more about the rational for this this in the README for this project.

Additionally there are subsections in the README that cover the technical implementation of Heroku AppLink asynchronous callbacks. Configuration for Heroku App Async Callbacks provides the OpenAPI YAML structure required for callback definitions, including dynamic callback URLs and response schemas that Salesforce uses to generate the callback interface. Monitoring and Other Considerations explains AppLink’s External Services integration architecture, monitoring through the BackgroundOperation object, and the 24-hour callback validity constraint with Platform Event alternatives for extended processing times or in progress updates.

Summary

As always I have shared the code, along with a more detailed README file on how to set the above demos up for yourself. This is just one of many ways to use Heroku AppLink, others are covered in the sample patterns here – including using Platform Events to trigger Heroku workers and transition control back to Apex or indeed Flow. This Apex Callback pattern is unique to using Heroku AppLink with Apex and is not yet that deeply covered in the official docs and samples – you can also find more information about this feature by studying the general External Services callback documentation.

Finally, the most important thing here is that this is not a DIY integration like you may have experienced in the past – though I omitted here the CLI commands (you can see them in the README) – Salesforce and Heorku are taking on a lot more management now. And overall this is getting more and more “Apex” like with user mode context explicitly available to your Heroku code. This blog was inspired by feedback on my last blog, so please keep it coming! There is much more to explore still – I plan to get more into the DevOps integration side of things and explore ways to automate the setup using the AppLink API.

Meanwhile, enjoy some additional resources!


7 Comments

Apex Process Orchestration and Monitoring with Platform Events

When it comes to implementing asynchronous workloads in Apex developers have a number of options such as Batch Apex and Queueable, each can be driven by user or system driven actions. This blog focuses on some of the more advanced aspects of implementing async workloads using Platform Events and Apex.

In comparison to other approaches, implementing asynchronous workloads using Platform Events offers two unique features. The first helps you better dynamically calibrate and manage resources based on data volumes to stay within limits, while the second feature provides automatic retry capabilities when errors occur. Lastly I want to highlight an approach I used to add some custom realtime telemetry to the workload using Platform Events.

Side Note: Before getting into the details, the goal of this blog is not to say one async option is better than another, rather to highlight the above features further so you can better consider your options. I also include a short comparison at the end of this blog with Batch Apex.

Business Scenario

Lets imagine the following scenario to help illustrate the use of the features described below:

  • Business Process
    Imagine that your business is processing Invoice generation on the platform and that the Orders that drive this arrive and are updated constantly.
  • Continuous Processing
    In order to avoid backlogs or spikes of invoices being processed, you want to maintain a continuous flow of the overall process. For this you create a Platform Event called Generate Invoice. This event can easily be sent by an admin / declarative builders who have perhaps setup some rules on the Orders object using Process Builder.
  • Resource Management
    Orders arrive in all shapes and sizes, meaning the processing required to generate Invoices can also vary when you consider variables such as number of order lines, product regional discounts, currencies and tax rules etc. Processing each one at time per execution context is an obvious way to maximize use of available resources and is certainly an option, but if resources allow, processing multiple invoices in one execution context is more efficient.

Below is what the Generate Invoice Platform Event looks like, it simply has a reference to the Order Id (though it could equally reference an External Id on the Order object).

For the purposes of this blog we are not focusing on how the events are sent / published. You can publish events using programatic API’s on or off platform or using one of the platforms declarative tools, there are in fact many ways to send events. For this blog we will just use a basic Apex snippet to generate the events as shown below.

List<GenerateInvoice__e> events = new List<GenerateInvoice__e>();
for(Order order : 
       [select Id from Order 
          where Invoiced__c != true 
          order by OrderNumber asc]) {
   events.add(new GenerateInvoice__e(OrderId__c = order.Id));
}
EventBus.publish(events);        

Here is a basic Apex handler for the above Platform Event that delegates the processing to another Apex class:

trigger GenerateInvoiceSubscriber on GenerateInvoice__e (after insert) {
    Set<Id> orderIds = new Set<Id>();
    for (GenerateInvoice__e event : Trigger.New) {
        orderIds.add(event.OrderId__c);
    }
    OrderService.generateInvoices(orderIds);
}

Processing Chunks of Events and Handling Retries

The following diagram highlights how a more advanced version of the above Apex handler can be used to optimally work within the limits to process chunks of Orders based on their size/complexity and also retry those that result in some errors along the way.

In order to orchestrate things this way you need to use some Apex API’s in your handler logic to let the platform know a few things. At the end of this blog I also share how I added telemetry to better visualize this along with a video. So don’t worry at this juncture if its not 100% clear how what you are seeing below is possible, just keep reading and watching!

Controlling how many Events are passed to your handler

Imagine the above code snippet published 1000 events. The platform docs state that it can pass up to a maximum of 2000 events to an Apex event handler at once, meaning the above will be invoked once. If you have been on the platform a while you will know that 200 (not 2000) is common number used to expressed a minimum number of records you should use when testing Apex Triggers and general bulkkification best practice. So why 2000 in the case of platform event handlers? Well the main aim of the platform is to drain the Platform Event message queue quickly and so it attempts to give the handler as much as possible, just in case it can process it.

As we have set out in our scenario above, Orders can be quite variable in nature and thus while a batch of 1000 orders with only a few order lines might be possible within the execution limits, include few orders in that batch with 100’s or a few thousand line items and its more likely you will hit CPU or heap limits. Fortunately, unlike Batch Apex, you get to control the size of each individual chunk. This is done by effectively giving some of the 1000 block of events passed to your handler back to the platform to pass back in a separate handler invocation where the limits are reset.

Below is some basic code that illustrates how you might go about pre-scanning the Orders to determine complexity (by number of lines) and thus dynamically calibrating how many of the events your code can really process within the limits. The orderIds list that is passed to the service class is reset with the orders that can be processed. The key part here is the use of the setResumeCheckpoint method that tells the platform where to resume from after this handler has completed its processing.

trigger GenerateInvoiceSubscriber on GenerateInvoice__e (after insert) { 

    // Determine number overall order lines to process 
    //   vs maximum within limits (could be config)
    Integer maxLines = 40000;
    Set<Id> orderIds = new Set<Id>();
    for (GenerateInvoice__e event : Trigger.New) {
        orderIds.add(event.OrderId__c);
    }
    Map<Id, Integer> lineCountByOrderId = 
        new OrdersSelector().selectLineCountById(orderIds);

    // Bulkify events passed to the OrderService
    orderIds = new Set<Id>();
    Integer lineCount = 0;
    for (GenerateInvoice__e event : Trigger.New) {
        orderIds.add(event.OrderId__c);
        EventBus.TriggerContext.currentContext().setResumeCheckpoint(event.ReplayId);
        lineCount = lineCount + lineCountByOrderId.get(event.OrderId__c);
        if(lineCount>maxLines) { 
            break;
        }
    }

    OrderService.generateInvoices(orderIds);
}

You can read more about this approach in the formal documentation here.

Implementing Retry Logic

There are a number of reasons errors can occur when your handler code is running. For errors that represent transient situations, such as timeouts and row locks for example, you would normally have to ask the user to retry (via email or notification) or utilize a dynamically scheduled job to retry. With Platform Event handlers in Apex, when the system RetryableException is thrown the Platform will automatically retry a batch events after period of time, up to 9 times (the batch sizes may vary between attempts). It is generally recommended that you do not let your code retry above 6, since when the maximum is reached the platform deactivates the handler/trigger.

The following code is basic illustration of how to use this facility and track the number of retries before reaching the max. In this example if the soft maximum is reached the events are effectively just lost in this case or if needed you can write them to a staging custom object for resubmission or just simply have some code such as the above scan for unprocessed Orders and resubmit events.

    // Invoke OrderService, support retries
    try {
        OrderService.generateInvoices(orderIds);
    } catch (Exception e) {
        // Only retry so many times, before giving up (thus avoid disabling the trigger)
        if (EventBus.TriggerContext.currentContext().retries < 6) {
            throw new EventBus.RetryableException(e.getMessage());
        }
        // In this case its ok to let the events drain away... 
        //   since new events for unprocessed Orders can always be re-generated
    }    

Using Platform Events to monitor activity

I used Platform Events to publish telemetry about the execution of the above handlers, by creating another Platform Event called Subscriber Telemetry and used a Lightning Web Component to monitor the events in realtime. Because Platform Events can be declared as being outside the standard Apex Transaction they are sent immediately using the “Publish Immediately” setting, they are sent even if an error occurs.

To publish to this event I simply added the following snippet of code to the top of my handler.

// Emit telemetry
EventBus.publish(
    new SubscriberTelemetry__e(
        Topic__c = 'GenerateInvoice__e', 
        ApexTrigger__c = 'GenerateInvoiceSubscriber',
        Position__c = 
           [select Position from EventBusSubscriber
              where Topic = 'GenerateInvoice__e'][0].Position,
        BatchSize__c = Trigger.new.size(),
        Retries__c = EventBus.TriggerContext.currentContext().retries,
        LastError__c = EventBus.TriggerContext.currentContext().lastError));

The following video shows me clicking a button to publish a batch of 1000 events, then monitoring the effects on my chunking logic and retry logic. The video actually includes me fixing some data errors in order to highlight the retry capabilities. The errors shown are contrived by some deliberately bad code to illustrate the retry logic, hence the fix to the Order records looks a bit odd, so please ignore that. Finally note that the platform chose to send my handler 83 events first then larger chunks thereafter, but in other tests I got 1000 events in the first chunk.

Batch Apex vs Platform Events

Batch Apex also provides a means to orchestration sequentially the processing of records in chunks, so I thought I would end here with a summary of some of the other differences. As you can see one of the key ones to consider is the user identity the code runs as. This is not impossible to workaround in the platform event handler case, but requires some coding to explicitly set the OwnerId field on records if that information is important to you. Overall though I do feel that Platform Events offers some useful options for switching to a more continuous mode of operation vs batch, so long as your aware of the differences this might be a good fit for you.

Side Note: For Apex Queueable handlers you will soon have the option to implement so called Transaction Finalizers that allow you to implement retry or logging logic.


57 Comments

Getting your users attention with Custom Notifications

customnotificationsummaryGetting your users attention is not always easy, choosing how, when and where to notify them is critical. Ever since Lightning Experience and Salesforce Mobile came out the notification bell has been a one stop shop for Chatter and Approval notifications, regardless if you are on your desktop or your mobile device.

In beta release at time of writing is a new platform feature known as Notification Manager that allows you to send your own custom notifications to your users for anything your heart desires from the very same locations, even on a users mobile device! This blog dives into this feature and how you can integrate it into your creations regardless if you are a admin click coder, Apex developer or REST API junkie.

Getting Started

The first thing you need to do is define a new Notification Type under the Setup menu. This is a simple process that involves giving it a name and deciding what channels you want the notification to go out on, currently user desktop and mobile devices.

notificationstypes

Once this has been done you can use the new Send Custom Notification action in Process Builder or Flow. This allows you to define the title and body of your notification, along with the target recipients (users, groups, queues and more) along the target record that determines the record the user sees when they click/tap the notification. The following screenshot shows an example of such an Action in Process Builder:-

opportunitycustomnotification

notificationoppty.png

Basically that is all there is to it! You will have in a few clicks empowered yourself with the ability to reach out to not only your users desktop but the actual mobile device notification experience on each of the their mobile devices!  You didn’t have to learn how to write a mobile app, figure out how to do mobile notifications, register things with Google or Apple. I am honestly blown away at how easy and powerful this is!

So it is pretty easy to to send notifications this way from Process Builder processes driven by record updates from the user and also reference field values to customize the notification text. However in the ever expanding world of Platform Events, how do we send custom notifications based on Platform Events?

Sending Custom Notifications for Batch Apex Job Failures

One of my oldest and most popular blog posts discussed design best practices around Batch Apex jobs. One of the considerations it calls out is how important it is to route errors that occur in the background back to the user. Fast forward a bit to this blog, where I covered the new BatchApexError Platform Event as a means to capture and route batch errors (even uncatchable exceptions) in near realtime. It also describes strategy to enabled users to retry failed jobs. What it didn’t really solve, is letting them know something had gone wrong without them checking a custom tab. Let’s change that!

Process Builder is now able to subscribe to the standard BatchApexErrorEvent and thus enables you as an admin to apply filter and routing logic on failed batch jobs. When combined with custom notifications those errors can now be routed to users devices and/or desktops in realtime. While Process Builder can subscribe to events it does have some restrictions on what it can do with the event data itself. Thus we are going to call an autolaunch Flow from Process Builder to actually handle the event and send the custom notification from within Flow. If you are reading this wondering if your Apex code can get in on the action, the answer is yes (ish), more on this later though. The declarative solution utilizes one Process Builder process and two Flows. The separation of concerns between them is shown in the diagram below:-

batchapexeventtonotificationarch

Let’s work from the bottom to the top to understand why I decided to split it up this way. Firstly, SendCustomNotification is a Sub Flow (callable by other Flows) and is a pretty simple wrapper around the new Send Custom Notification action shown above. You can take a closer look at this later through the sample code repository here.

SendCustomNotification

Next the BatchApexErrorPlatformEventHandler Flow defines a set of input variables that are populated from the Process Builder process. These variables match the fields and types per the definition of the Batch Apex Error Event here. The only other thing it does is add the Id of the user that generated the event (aka the user who submitted the failed job) to the list of recipients passed to the SendCustomNotification sub flow above. This could also be a Group Id if you wanted to send the notification further.

batchapexeventhandlerflow.png

Lastly, in the screenshot below you see the Process Builder that subscribes to the Batch Apex Error Event and maps the event field values to the input variables exposed from BatchApexErrorPlatformEventHandler Flow via the EventReference. The example here is very simple, but you can now imagine how you can add other filter criteria to this process that allows you to inspect which Batch Apex job failed and route and/or adjust messaging in the notifications accordingly, all done declaratively of course!

batchapexerrorfrompb.png

NOTE: It is not immediately apparent in all cases that you can access the event fields from Process Builder, since the documentation states them as not supported within formulas. I want to give a shout out to Alex Edelstein PM for Flow for clarifying that it is possible! Check out his amazing blog around all things Flow here. Finally note that Process Builder requires an Object to map the incoming event to. In this case I mapped to a User record using the CreatedById field on the event.

Sending Custom Notifications from Code

The Send Custom Notification action is also exposed via the Salesforce Action REST API defined here (hint hint for Doug Ayers Mass Action tool to support it). You can of course attempt to call this REST API via Apex as well. While there is currently no native Apex Action API, it turns out calling the above SendCustomNotification Flow from Apex works pretty well meanwhile. I have written a small wrapper around this technique to make it a little more elegant to perform from Apex and it also serves to abstract away this hopefully temporary workaround for Apex developers.

new CustomNotification()
    .type('MyNotificationType')
    .title('Fun Custom Notification')
    .body('Custom Notifications are Awesome!')
    .sendToCurrentUser();

The following Apex code results in this notification appearing on your device!

funfromapexnotification.png

This CustomNotification helper class is included in the sample code for this blog and leverages another class I wrote that wraps the native Apex Flow API. I used this wrapper because it allowed me to mock the actual Flow invocation since there is no way as far as I can see to assert the notification was actually sent.

NOTE: When sending custom notifications via declarative tools and/or via code I did confirm in my testing that they are included in the current transaction. Also I recommend you always avoid calling Flow in loops in your Apex code, instead make your Flows take list variables (aka try to bulkify Flows called from Apex). Though not shown in the Apex above, the wrapped Flow takes a list of recipients.

Summary

You can find all the code for this blog in sample code repository here. So there you have it, custom mobile and desktop notifications sent from Process Builder, Flow, Apex and REST API. Keep in mind of course at time of writing this is a Beta feature and thus read the clause in the documentation carefully. Now go forth and start thinking of all the areas you can enable with this feature!

P.S. Check out another new cool feature called Lightning In-App Guidance.


7 Comments

User Notifications with the Utility Bar API

utilityprogress
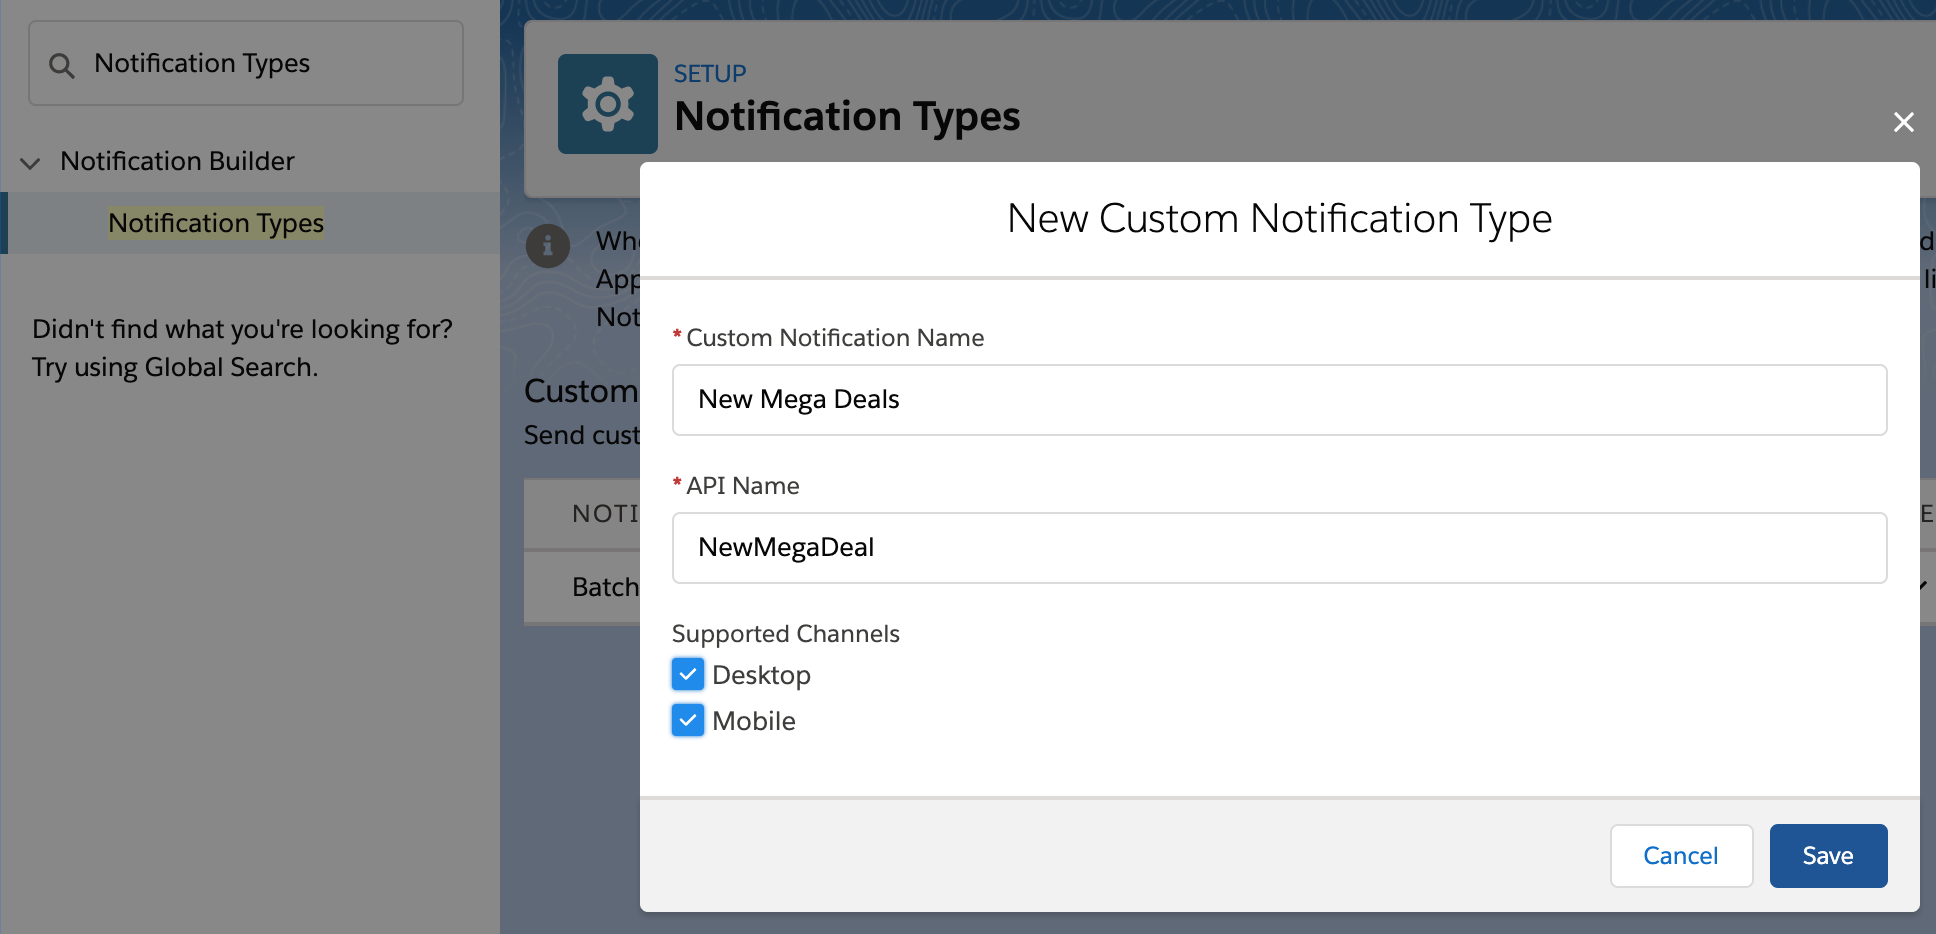
In this blog, I want to highlight a couple of great UI features provided by the Utility Bar in Lightning Experience. These are relatively new and accessed only via the Utility Bar API, so are not immediately accessible. This blog is based on code and material I prepared for Dreamforce 2017. However, I did not have time to dig into the code during that session so this blog provides that opportunity. My session also covered other cool features in Lightning Experience, such as the amazing App Console mode!

Enabling and Understanding the Utility Bar API
The utility bar API is enabled at a component level though it does have access to the whole utility bar. You can specify the lightning:utilityBarAPI component in any component, regardless if its in the utility bar or not. This component will not display anything but it does have a very useful selection of methods!

<lightning:utilityBarAPI aura:id="utilitybar"/>

In your component code you simple access it like any other component.

var utilityAPI = cmp.find("utilitybar");

Once you have access to an instance of the component you can call any of its methods. All methods take a utilityId parameter. Although if you call it within the context of a component running in the utility bar you can omit this parameter and the API will discover it for you. All the methods take a single JavaScript object with properties representing the parameters to the method.

utilityAPI.setPanelHeaderLabel({ label: "My Label" });

One interesting design aspect of these methods is they do not respond immediately, all responses are returned via a callback. To do this the API uses the JavaScript Promises pattern. Fortunately, its a pretty easy convention to pick up and use. It is worth taking the time to understand, it has fast become defacto callback approach.

Providing Notifications

notificationdemo

There are many occasions that you want to notify the user of something that’s happened since they last logged in or during login as a result of some background process. The setUtilityHighlighted method is a good way to drive such notifications.

You can, of course, evaluate on initialize of your component, but it’s worth considering using Platform Events, it’s really easy to send them from your Apex code or Process Builder and you can easily integrate my Streaming API component to respond to the event. The code below is a very simple isolated example using browser timers, but it helps illustrate the API and give you a basis to build one.

<lightning:button 
   class="slds-m-around_medium" 
   label="{! v.readNotification ? 'Mark as Read' : 'Wait' }" 
   onclick="{!c.demoNotifications}"/>
<aura:if isTrue="{!v.readNotification}">
   <ui:message title="Confirmation"severity="info">
      This is a confirmation message.</ui:message>
</aura:if>
    demoNotifications: function (cmp, event) {
		var utilityAPI = cmp.find("utilitybar"); 
        var readNotification = cmp.get('v.readNotification');
        if(readNotification == true) {
			utilityAPI.setUtilityHighlighted({ highlighted : false });                        
            cmp.set('v.readNotification', false);
        } else {
            utilityAPI.minimizeUtility();                            
            setTimeout($A.getCallback(function () {
                utilityAPI.setUtilityHighlighted({ highlighted : true });            
				cmp.set('v.readNotification', true);
            }), 3000);                    
        }
    }, 

Providing Progress Updates

progressdemo

By using a combination of setUtilityLabel and setUtilityIcon you can create an eye-catching progress updating effect. This sample is a pretty simple browser timer based example. However, you could again use Platform Events to send events as part of a Batch Apex execution to update on progress or just poll the AsyncApexJob object.

 <lightning:button 
    class="slds-m-around_medium" 
    label="{! v.isProgressing ? 'Stop' : 'Start' }" 
    onclick="{!c.demoProgressIndicator}"/>
 <lightning:progressBar 
    value="{! v.progress }" size="large" />
demoProgressIndicator: function (cmp, event) {
    var utilityAPI = cmp.find("utilitybar"); 
    if (cmp.get('v.isProgressing')) {
        // stop
        cmp.set('v.isProgressing', false);
        cmp.set('v.progress', 0);
        cmp.set('v.progressToggleIcon', false);
        clearInterval(cmp._interval);
        utilityAPI.setUtilityLabel({ label : 'Utility Bar API Demo' });                    
        utilityAPI.setUtilityIcon({ icon : 'thunder' } );                                    
    } else {
        // start
        cmp.set('v.isProgressing', true);
        utilityAPI.minimizeUtility();        
        cmp._interval = setInterval($A.getCallback(function () {
            var progresToggleIcon = 
               cmp.get('v.progressToggleIcon') == true ? false : true;
            var progress = cmp.get('v.progress');
            cmp.set('v.progress', progress === 100 ? 0 : progress + 1);
            cmp.set('v.progressToggleIcon', progresToggleIcon);
            utilityAPI.setUtilityLabel(
                { label : 'Utility Bar API Demo (' + progress + '%)' });        
            utilityAPI.setUtilityIcon(
                { icon : progresToggleIcon == true ? 'thunder' : 'spinner' });
        }), 400);
    }
}

Summary

There is still plenty to dig into in the code samples from the session. You can also deploy the sample code into an org and try out some of the other interactive API demos. Enjoy!

utildemo


7 Comments

Ideas for Apex Enterprise Patterns Dreamforce 2013 Session!

ideaguy

Update: Dreamforce is over for another year! Thanks to everyone who supported me and came along to the session. Salesforce have now uploaded a recording of the session here and can find the slides here.

As part of this years Dreamforce 2013 event I will be once again running a session on Apex Enterprise Patterns, following up on my recent series of developer.force.com articles. Here is the current abstract for the session, comments welcome!

Building Strong Foundations: Apex Enterprise Patterns “Any structure expected to stand the test of time and change, needs a strong foundation! Software is no exception, engineering your code to grow in a stable and effective way is critical to your ability to rapidly meet the growing demands of users, new features, technologies and platform features. You will take away architect level design patterns to use in your Apex code to keep it well factored, easier to maintain and obey platform best practices. Based on a Force.com interpreation of Martin Fowlers Enterprise Architecture Application patterns and the practice of Separation of Concerns.” (Draft)

I’ve recently started to populated a dedicated Github repository that contains only the working sample code (with the library code in separate repo). So that i can build out a real working sample application illustrating in practical way the patterns in action. It already covers a number of features and use cases such as…

  • Layering Apex logic by applying Separation of Concerns
  • Visualforce controllers and the Service Layer
  • Triggers, validation, defaulting and business logic encapsulation via Domain layer
  • Applying object orientated programming inheritance and interfaces via Domain layer
  • Managing DML and automatic relationship ‘stitching’ when inserting records via Unit Of Work pattern
  • Factoring, encapsulating and standardising SOQL query logic via Selector layer

The following are ideas I’ll be expanding on in the sample application in preparation for the session…

  • Batch Apex and Visualforce Remoting (aka JavaScript callers) and the Service Layer
  • Apex testing without SOQL and DML via the Domain Layer
  • Exposing a custom application API, such as REST API or Apex API via Service Layer
  • Reuse and testing SOQL query logic in Batch Apex context via Selector Layer
  • Rich client MVC frameworks such as AngularJS and Service Side SOC

What do you think and what else would you like to see and discuss in this session?

Feel free to comment on this blog below, tweet me, log it on Github or however else you can get in touch.


12 Comments

Batch Worker, Getting more done with less work…

Batch Apex has been around on the platform for a while now, but I think its fair to say there is still a lot of mystery around it and with that a few baked in assumptions. One such assumption I see being made is that its driven by the database, specifically the records within the database determine the work to be done.

construction_workerAs such if you have some work you need to get done that won’t fit in the standard governors and its not immediately database driven, Batch Apex may get overlooked in favour of @future which on the surface feels like a better fit as its design is not database linked in anyway .  Your code is just an annotation away to getting the addition power it needs! So why bother with the complexities of Batch Apex?

Well for starters, Batch Apex gives you an ID to trace the work being done and thus the key to improving the user experience while the user waits. Secondly, if any of your parameters are lists or arrays to such methods, your already having to consider again scalability. Yes, you say, but its more fiddly than @future isn’t it?

In this blog I’m going to explore a cool feature of the Batch Apex that often gets overlooked. Using it to implement a worker pattern giving you the kind of usability @future offers with the additional scalability and traceability of Batch Apex without all the work. If your not interested in the background, feel free to skip to the Batch Worker section below!

IMPORTANT NOTE: The alternative approach described here is not designed as a replacement to using Batch Apex against the database using QueryLocator. Using QueryLocator gives access to 50m records, where as the Iterator usage only 50k. Thus the use cases for the Batch Worker are more aligned with smaller jobs perhaps driven by end user selections or stitching together complex chunks of work together.

Well I didn’t know that! (#WIDKT)

First lets review something you may not have realised about implementing Batch Apex. The start method can return either a QueryLocator or something called Iterable. You can implement your own iterators, but what is actually not that clear is that Apex collections/lists implement Iterator by default!

Iterable<String> i = new List<String> { 'A', 'B', 'C' };

With this knowledge, implementing Batch Apex to iterate over a list is now as simple as this…

public with sharing class SimpleBatchApex implements Database.Batchable<String>
{
	public Iterable<String> start(Database.BatchableContext BC)
	{
		return new List<String> { 'Do something', 'Do something else', 'And something more' };
	}

	public void execute(Database.BatchableContext info, List<String> strings)
	{
		// Do something really expensive with the string!
		String myString = strings[0];
	}

	public void finish(Database.BatchableContext info) { }
}

// Process the String's one by one each with its own governor context
Id jobId = Database.executeBatch(new SimpleBatchApex(), 1);

The second parameter of the Database.executeBatch method is used to determine how many items from the list are pass to each execute method invocation made by the platform. To get the maximum governors per item and match that of a single @future call, this is set 1.  We can also implement Batch Apex with a generic data type know as Object. Which allows you to process different types or actions in one job, more about this later.

public with sharing class GenericBatchApex implements Database.Batchable<Object>
{
	public Iterable<Object> start(Database.BatchableContext BC) { }

	public void execute(Database.BatchableContext info, List<Object> listOfAnything) { }

	public void finish(Database.BatchableContext info) { }
}

A BatchWorker Base Class

The above simplifications are good, but I wanted to further model the type of flexibility @future gives without dealing with the Batch Apex mechanics each time. In designing the BatchWorker base class used in this blog i wanted to make its use as easy as possible. I’m a big fan of the fluent API model and so if you look closely you’ll see elements of that here as well. You can view the full source code for the base class here, its quite a small class though, extending the concepts above to make a more generic Batch Apex implementation.

First lets take another look at the string example above, but this time using the BatchWorker base class.

public with sharing class MyStringWorker extends BatchWorker
{
	public override void doWork(Object work)
	{
		// Do something really expensive with the string!
		String myString = (String) work;
	}
}

// Process the String's one by one each with its own governor context
Id jobId =
	new MyStringWorker()
            .addWork('Do something')
            .addWork('Do something else')
            .addWork('And something more')
            .run()
            .BatchJobId;

Clearly not everything is as simple as passing a few strings, after all @future methods can take parameters of varying types. The following is a more complex example showing a ProjectWorker class. Imagine this is part of a Visualforce controller method where the user is presented a selection of projects to process with a date range.

	// Create worker to process the project selection
	ProjectWorker projectWorker = new ProjectWorker();
		
	// Add the work to the project worker
	for(SelectedProject selectedProject : selectedProjects)		
		projectWorker.addWork(startDate, endDate, selectedProject.projectId);
			
	// Start the workder and retain the job Id to provide feedback to the user
	Id jobId = projectWorker.run().BatchJobId;		

Here is how the ProjectWorker class has been implemented, once again it extends the BatchWorker class. But this time it provides its own addWork method which takes the parameters as you would normally describe them. Then internally wraps them up in a worker data class. The caller of the class, as you’ve seen above is is not aware of this.

public with sharing class ProjectWorker extends BatchWorker
{	
	public ProjectWorker addWork(Date startDate, Date endDate, Id projectId)
	{
		// Construct a worker object to wrap the parameters		
		return (ProjectWorker) super.addWork(new ProjectWork(startDate, endDate, projectId));
	}
	
	public override void doWork(Object work)
	{
		// Parameters
		ProjectWork projectWork = (ProjectWork) work;
		Date startDate = projectWork.startDate;
		Date endDate = projectWork.endDate;
		Id projectId = projectWork.projectId;		
		// Do the work
		// ...
	}
	
	private class ProjectWork
	{
		public ProjectWork(Date startDate, Date endDate, Id projectId)
		{
			this.startDate = startDate;
			this.endDate = endDate;
			this.projectId = projectId;
		}
		
		public Date startDate;
		public Date endDate;
		public Id projectId;
	}
}

As a final example, recall the fact that Batch Apex can process a list of generic data types. The BatchProcess base class uses this to permit the varied implementations above. It can also be used to create a worker class that can do more than one thing. The equivalent of implementing two @future methods, accept that its managed as one job.

public with sharing class ProjectMultiWorker extends BatchWorker 
{
	// ...

	public override void doWork(Object work)
	{
		if(work instanceof CalculateCostsWork)
		{
			CalculateCostsWork calculateCostsWork = (CalculateCostsWork) work;
			// Do work 
			// ...					
		}
		else if(work instanceof BillingGenerationWork)
		{
			BillingGenerationWork billingGenerationWork = (BillingGenerationWork) work;
			// Do work
			// ...		
		}
	}
}

// Process the selected Project 
Id jobId = 
	new ProjectMultiWorker()
		.addWorkCalculateCosts(System.today(), selectedProjectId)
		.addWorkBillingGeneration(System.today(), selectedProjectId, selectedAccountId)
		.run()
		.BatchJobId;

Summary

Hopefully I’ve provided some insight into new ways to access the power and scalability of Batch Apex for use cases which you may not have previously considered or perhaps used less flexible @future annotation. Keep in mind that using Batch Apex with Iterators does reduce the number of items it can process to 50k, as apposed to the 50m when using database query locator. At the end of the day if you have more than 50k work items, your probably wanting to go down the database driven route anyway. I’ve shared all the code used in this article and some I’ve not shown in this Gist.

Post Credits
Finally, I’d like to give a nod to an past work associate of mine, Tony Scott, who has taken this type of approach down a similar path, but added process control semantics around it. Check out his blog here!