The Apex Metadata API has now been updated to reflect the Metadata API from Winter’15, which means a host of new component types, including the topic on everyones lips, Lightning! Though sadly, my demo around this will have to wait as I hit a platform issue i’ve sent to Salesforce Support to help me with.
This library continues to be incredibly popular, i can get between 1 to 4 questions a week asking how to accomplish certain goals, via my blog and/or issues raised on the GitHub repository. So I’m really pleased to continue to support it and keep it fresh! One day we will get native support for this, but until that day I’ll press on….
A lot of questions i get are around the Apex Metadata API, though almost all are really about using the Metadata API itself regardless of the calling language. So i thought i’d focus this blog on sharing some of the ways i’ve tackled unlocking the secrets of the mighty Metadata API. While the following tips and tricks are given in the context of Apex, some will work just fine in other languages consuming this API.
1. Do I have to download the Metadata API WSDL?
You don’t, just use the MetadataService.cls and its MetadataServiceTest.cls directly in your org. The point of this library is to avoid you having to go through the process of creating and manipulating the generated code from the Salesforce WSDL to Apex tool (the output of which is not directly useable). So unless you find i’m slacking and have not updated the library to the latest version of the platform, your good to go with the latest one in the repository!
2. How do I create X using the Metadata API?
The Apex Metadata API consists of many hundreds of classes within the MetadataService.cls file. Some represent top level Metadata components (items in your org), such as CustomObject, some are child components such as CustomField, others are simply class types referenced by these. Knowing which is which is important to know where to start, as only those classes that represent Metadata components can be used with the CRUD operations.
The easiest way to determine this is to first open the Metadata API documentation and look at the list of components here. The documentation also has a really good topic on how to spot the fact that classes will extend Metadata, if so they represent Metadata component classes you can use with the CRUD operations. As the topic suggests, despite the library having already used the WSDL, it is still worth downloading for reference purposes. While I try to make the Apex code match this extension concept it may not always be possible (Folders are a current gap).
So for example we see that Layout looks like this in the WSDL….
<xsd:complexType name="Layout">
    <xsd:complexContent>
        <xsd:extension base="tns:Metadata">
            <xsd:sequence>
                <xsd:element name="customButtons" minOccurs="0" maxOccurs="unbounded" type="xsd:string"/>
                <xsd:element name="customConsoleComponents" minOccurs="0" type="tns:CustomConsoleComponents"/>
                <xsd:element name="emailDefault" minOccurs="0" type="xsd:boolean"/>
                <xsd:element name="excludeButtons" minOccurs="0" maxOccurs="unbounded" type="xsd:string"/>
                <xsd:element name="feedLayout" minOccurs="0" type="tns:FeedLayout"/>
                <xsd:element name="headers" minOccurs="0" maxOccurs="unbounded" type="tns:LayoutHeader"/>
                <xsd:element name="layoutSections" minOccurs="0" maxOccurs="unbounded" type="tns:LayoutSection"/>
                <xsd:element name="miniLayout" minOccurs="0" type="tns:MiniLayout"/>
                <xsd:element name="multilineLayoutFields" minOccurs="0" maxOccurs="unbounded" type="xsd:string"/>
                <xsd:element name="quickActionList" minOccurs="0" type="tns:QuickActionList"/>
                <xsd:element name="relatedContent" minOccurs="0" type="tns:RelatedContent"/>
                <xsd:element name="relatedLists" minOccurs="0" maxOccurs="unbounded" type="tns:RelatedListItem"/>
                <xsd:element name="relatedObjects" minOccurs="0" maxOccurs="unbounded" type="xsd:string"/>
                <xsd:element name="runAssignmentRulesDefault" minOccurs="0" type="xsd:boolean"/>
                <xsd:element name="showEmailCheckbox" minOccurs="0" type="xsd:boolean"/>
                <xsd:element name="showHighlightsPanel" minOccurs="0" type="xsd:boolean"/>
                <xsd:element name="showInteractionLogPanel" minOccurs="0" type="xsd:boolean"/>
                <xsd:element name="showKnowledgeComponent" minOccurs="0" type="xsd:boolean"/>
                <xsd:element name="showRunAssignmentRulesCheckbox" minOccurs="0" type="xsd:boolean"/>
                <xsd:element name="showSolutionSection" minOccurs="0" type="xsd:boolean"/>
                <xsd:element name="showSubmitAndAttachButton" minOccurs="0" type="xsd:boolean"/>
                <xsd:element name="summaryLayout" minOccurs="0" type="tns:SummaryLayout"/>
            </xsd:sequence>
        </xsd:extension>
    </xsd:complexContent>
</xsd:complexType>
And looks like this in MetadataService.cls…
    public class Layout extends Metadata {
        public String type = 'Layout';
        public String fullName;
        public String[] customButtons;
        public MetadataService.CustomConsoleComponents customConsoleComponents;
        public Boolean emailDefault;
        public String[] excludeButtons;
        public MetadataService.FeedLayout feedLayout;
        public String[] headers;
        public MetadataService.LayoutSection[] layoutSections;
        public MetadataService.MiniLayout miniLayout;
        public String[] multilineLayoutFields;
        public MetadataService.QuickActionList quickActionList;
        public MetadataService.RelatedContent relatedContent;
        public MetadataService.RelatedListItem[] relatedLists;
        public String[] relatedObjects;
        public Boolean runAssignmentRulesDefault;
        public Boolean showEmailCheckbox;
        public Boolean showHighlightsPanel;
        public Boolean showInteractionLogPanel;
        public Boolean showKnowledgeComponent;
        public Boolean showRunAssignmentRulesCheckbox;
        public Boolean showSolutionSection;
        public Boolean showSubmitAndAttachButton;
        public MetadataService.SummaryLayout summaryLayout;
    }
Next find the page for this Metadata type in the Metadata API documentation, in this case Layout is here. Force.com is a complex platform at times, and the number of fields can be quite bewildering. So what i usual do is one or both of the following tricks.
Firstly, when you scroll down to the bottom of the documentation topics, there is usually an example of the component in XML form. Secondly I sometimes use my favourite tool, Force.com or MavensMate to download the component in file form from my org to generate my own example, useful if the documentation example is to basic for your needs. Basically the XML form in either case, matches exactly the data structures and values you need to provide in Apex.
For example the Layout example looks like this…
<Layout xmlns="http://soap.sforce.com/2006/04/metadata">
    <layoutSections>
        <editHeading>true</editHeading>
        <label>System Information</label>
        <layoutColumns>
            <layoutItems>
                <behavior>Readonly</behavior>
                <field>CreatedById</field>
            </layoutItems>
            <layoutItems>
                <behavior>Required</behavior>
                <field>Name</field>
            </layoutItems>
        </layoutColumns>
        <layoutColumns>
            <layoutItems>
                <behavior>Readonly</behavior>
                <field>LastModifiedById</field>
            </layoutItems>
        </layoutColumns>
        <style>TwoColumnsTopToBottom</style>
    </layoutSections>
    <summaryLayout>
        <masterLabel>Great Name</masterLabel>
        <sizeX>4</sizeX>
        <sizeY>2</sizeY>
        <summaryLayoutItems>
            <posX>0</posX>
            <posY>0</posY>
            <field>Name</field>
        </summaryLayoutItems>
    </summaryLayout>
</Layout>
Note you will need to set the fullName field as well, to understand how to format this for your Metadata component refer to the following Q&A items for more discussion. The equivalent Apex code would look like this…
		MetadataService.Layout layout = new MetadataService.Layout();
		layout.fullName = 'Test__c-My Layout';
		layout.layoutSections = new List<MetadataService.LayoutSection>();
		MetadataService.LayoutSection layoutSection = new MetadataService.LayoutSection();
		layoutSection.editHeading = true;
		layoutSection.label = 'System Information';
		layoutSection.style = 'TwoColumnsTopToBottom';
		layoutSection.layoutColumns = new List<MetadataService.LayoutColumn>();
		MetadataService.LayoutColumn layoutColumn = new MetadataService.LayoutColumn();
		layoutColumn.layoutItems = new List<MetadataService.LayoutItem>();
		MetadataService.LayoutItem layoutItem1 = new MetadataService.LayoutItem();
		layoutItem1.behavior = 'Readonly';
		layoutItem1.field = 'CreatedById';
		layoutColumn.layoutItems.add(layoutItem1);
		MetadataService.LayoutItem layoutItem2 = new MetadataService.LayoutItem();
		layoutItem2.behavior = 'Required';
		layoutItem2.field = 'Name';
		layoutColumn.layoutItems.add(layoutItem2);
		layoutSection.layoutColumns.add(layoutColumn);
		layout.layoutSections.add(layoutSection);
		layout.summaryLayout = new MetadataService.SummaryLayout();
		layout.summaryLayout.masterLabel = 'Great name';
		layout.summaryLayout.sizeX = 4;
		layout.summaryLayout.sizeY = 2;
		layout.summaryLayout.summaryLayoutStyle = 'Default';
		layout.summaryLayout.summaryLayoutItems = new List<MetadataService.SummaryLayoutItem>();
		MetadataService.SummaryLayoutItem summaryLayoutItem = new MetadataService.SummaryLayoutItem();
		summaryLayoutItem.posX = 0;
		summaryLayoutItem.posY = 0;
		summaryLayoutItem.field = 'Name';
		layout.summaryLayout.summaryLayoutItems.add(summaryLayoutItem);
		List<MetadataService.SaveResult> results =
			service.createMetadata(
				new MetadataService.Metadata[] { layout });
Note that this is a complex class with many other class types needed to expressed sections etc for the layout. All of these classes will be in the MetadataService.cls class as inner classes. Have this file open as you work your way through mapping the XML structure to the Apex one, so that you can see the field names and their Apex class types. Alternatively you can also have the WSDL open, as the names of the schema types will also match those in Apex.
3. How do I update X using the Metadata API?
Unlike records, you don’t always have to have read the Metadata component in order to update it. Nor do have to complete all the fields, just the ones you want to update. For example the following will update the labels on a Custom Object, but will not for example result in the Description, Custom Help or other Custom Object information being cleared just because you didn’t set them. Quite handy!
MetadataService.CustomObject customObject = new MetadataService.CustomObject();
customObject.fullName = 'Test__c';
customObject.pluralLabel = 'Update Labels';
customObject.nameField = new MetadataService.CustomField();
customObject.nameField.type_x = 'Text';
customObject.nameField.label = 'Test Record Upsert';
customObject.deploymentStatus = 'Deployed';
customObject.sharingModel = 'ReadWrite';
List<MetadataService.UpsertResult> results =
  service.upsertMetadata(
    new MetadataService.Metadata[] { customObject });
As always though, there are some exceptions to this rule, which are sadly not documented. Fortunately if you’ve not set certain fields required for an update (and some don’t often make sense) the API is pretty good at telling you which ones you need. At this point however your probably going to want to know what the existing field values are, thus you will need to read the Metadata component, set the fields your wanting to update and then update it. You will of course want read a Metadata component if you want to add to a list of things, such as a PickList.
// Read Custom Field
MetadataService.CustomField customField =
  (MetadataService.CustomField) service.readMetadata('CustomField',
     new String[] { 'Lead.picklist__c' }).getRecords()[0];

// Add pick list values
metadataservice.PicklistValue two = new metadataservice.PicklistValue();
two.fullName= 'second';
two.default_x=false;
metadataservice.PicklistValue three = new metadataservice.PicklistValue();
three.fullName= 'third';
three.default_x=false;
customField.picklist.picklistValues.add(two);
customField.picklist.picklistValues.add(three);

// Update Custom Field
handleSaveResults(
   service.updateMetadata(
      new MetadataService.Metadata[] { customField })[0]);
4. How do I know the Full Name of the Metadata Component?
Metadata components are not referenced using Id’s, they use their Full Name. This can be a little tricky to track down sometimes, especially when it is a component such as a Layout that arrived in the org via a managed package, which means the Full Name will likely need to include the applicable namespace qualification, in some cases more than once!
The first thing i do is use the Developer Workbench to confirm the Full Name.

MetadataService.Report report =
   (MetadataService.Report) service.readMetadata('Report',
      new String[] { 'MyFolder/MyReport' }).getRecords()[0];
As one of the users of the API found out, this can sometimes not give you an accurate result however. So the one known gotcha being Layouts, where the Full Name needs to be qualified twice with the Namespace. For example to retrieve a Layout installed with my DLRS managed package the following code would be required.
Note the dlrs namespace prefix is applied to both the Custom Object name portion of the Layout name, as well as the Layout name itself. In this case i still used the Developer Workbench approach above to get most of the name, then applied this now known adjustment to get it to work. The follow reads a packaged layout.
MetadataService.Layout layout =
   (MetadataService.Layout) service.readMetadata('Layout',
      new String[] { 'dlrs__LookupRollupSummaryLog__c-dlrs__Lookup Rollup Summary Log Layout' }).getRecords()[0];
5. Why does readMetadata not thrown an exception?
The previous examples have been using the readMetadata operation. This operation will not throw any exception if any of the full names given to it are invalid (as in the custom object does not exist). Instead empty records will be returned. For example the following illustrates that even with an invalid custom object Full Name a Metadata record is still returned, but the Full Name is null. So the advice here is to check the FullName for being none null before you trust the contents of information returned from readMetadata…
MetadataService.CustomObject customObject =
   (MetadataService.CustomObject) service.readMetadata('CustomObject',
      new String[] { 'DoesNotExist__c' }).getRecords()[0];
System.assertEquals(customObject.FullName, null);
6. Error ‘x’ is not a valid value for the enum ‘y’
While the Metadata API WSDL does contain a list of valid values for fields, the generated Apex code does not result in Enum’s being created for them sadly. As such you have to know the correct String value to set. This can often be determined from the documentation of course (though i have found a few typos in the docs in the past). So if your still struggling, check the WSDL enumeration to confirm you’ve got the correct value.
For example in the WSDL…
<xsd:complexType name="WebLink">
    <xsd:complexContent>
        <xsd:extension base="tns:Metadata">
            <xsd:sequence>
                ...
                <xsd:element name="displayType" type="tns:WebLinkDisplayType"/>
                ...
            </xsd:sequence>
        </xsd:extension>
    </xsd:complexContent>
</xsd:complexType>
<xsd:simpleType name="WebLinkDisplayType">
    <xsd:restriction base="xsd:string">
        <xsd:enumeration value="link"/>
        <xsd:enumeration value="button"/>
        <xsd:enumeration value="massActionButton"/>
    </xsd:restriction>
</xsd:simpleType>
Then in Apex code…
MetadataService.WebLink webLink = new MetadataService.WebLink();
webLink.fullName = 'Test__c.googleButton';
webLink.availability = 'online';
webLink.displayType = 'button';
7. How can I create or update Apex code?
The only way to create or update an Apex class or Trigger is to use the deploy operation, take a look at the Deploy demo in the library here for more information. I have also used this approach in my DLRS tool here. You can also use the Tooling API if you desire, however this only works in DE orgs, it cannot be used in a Production org. Currently the only way i know to create an Apex class or Trigger in Production is to use the deploy operation.
8. Retrieving Profile or Permission Set Information
You can retrieve a PermissionSet using the readMetadata as follows…
MetadataService.MetadataPort service = createService();
MetadataService.PermissionSet ps = (MetadataService.PermissionSet)
  service.readMetadata('PermissionSet', new String[] { 'Test' }).getRecords()[0];
The following code reads the Administrator Profile.
MetadataService.MetadataPort service = createService();
MetadataService.Profile admin = (MetadataService.Profile)
  service.readMetadata('Profile', new String[] { 'Admin' }).getRecords()[0];
Finally, also worth considering if your querying only, is that you can use SOQL to query the Permission Set objects directly, scroll down to the bottom of this topic to see the object model diagram.
Summary
I hope these will help future Metadata API coders with some of the more obscure behaviours and tasks they need to perform. You can also read more about the Metadata API operations here. If you’ve read all this and still find yourself scratching your head please feel free to raise an issue on the GitHub repository here and I’ll try to help!

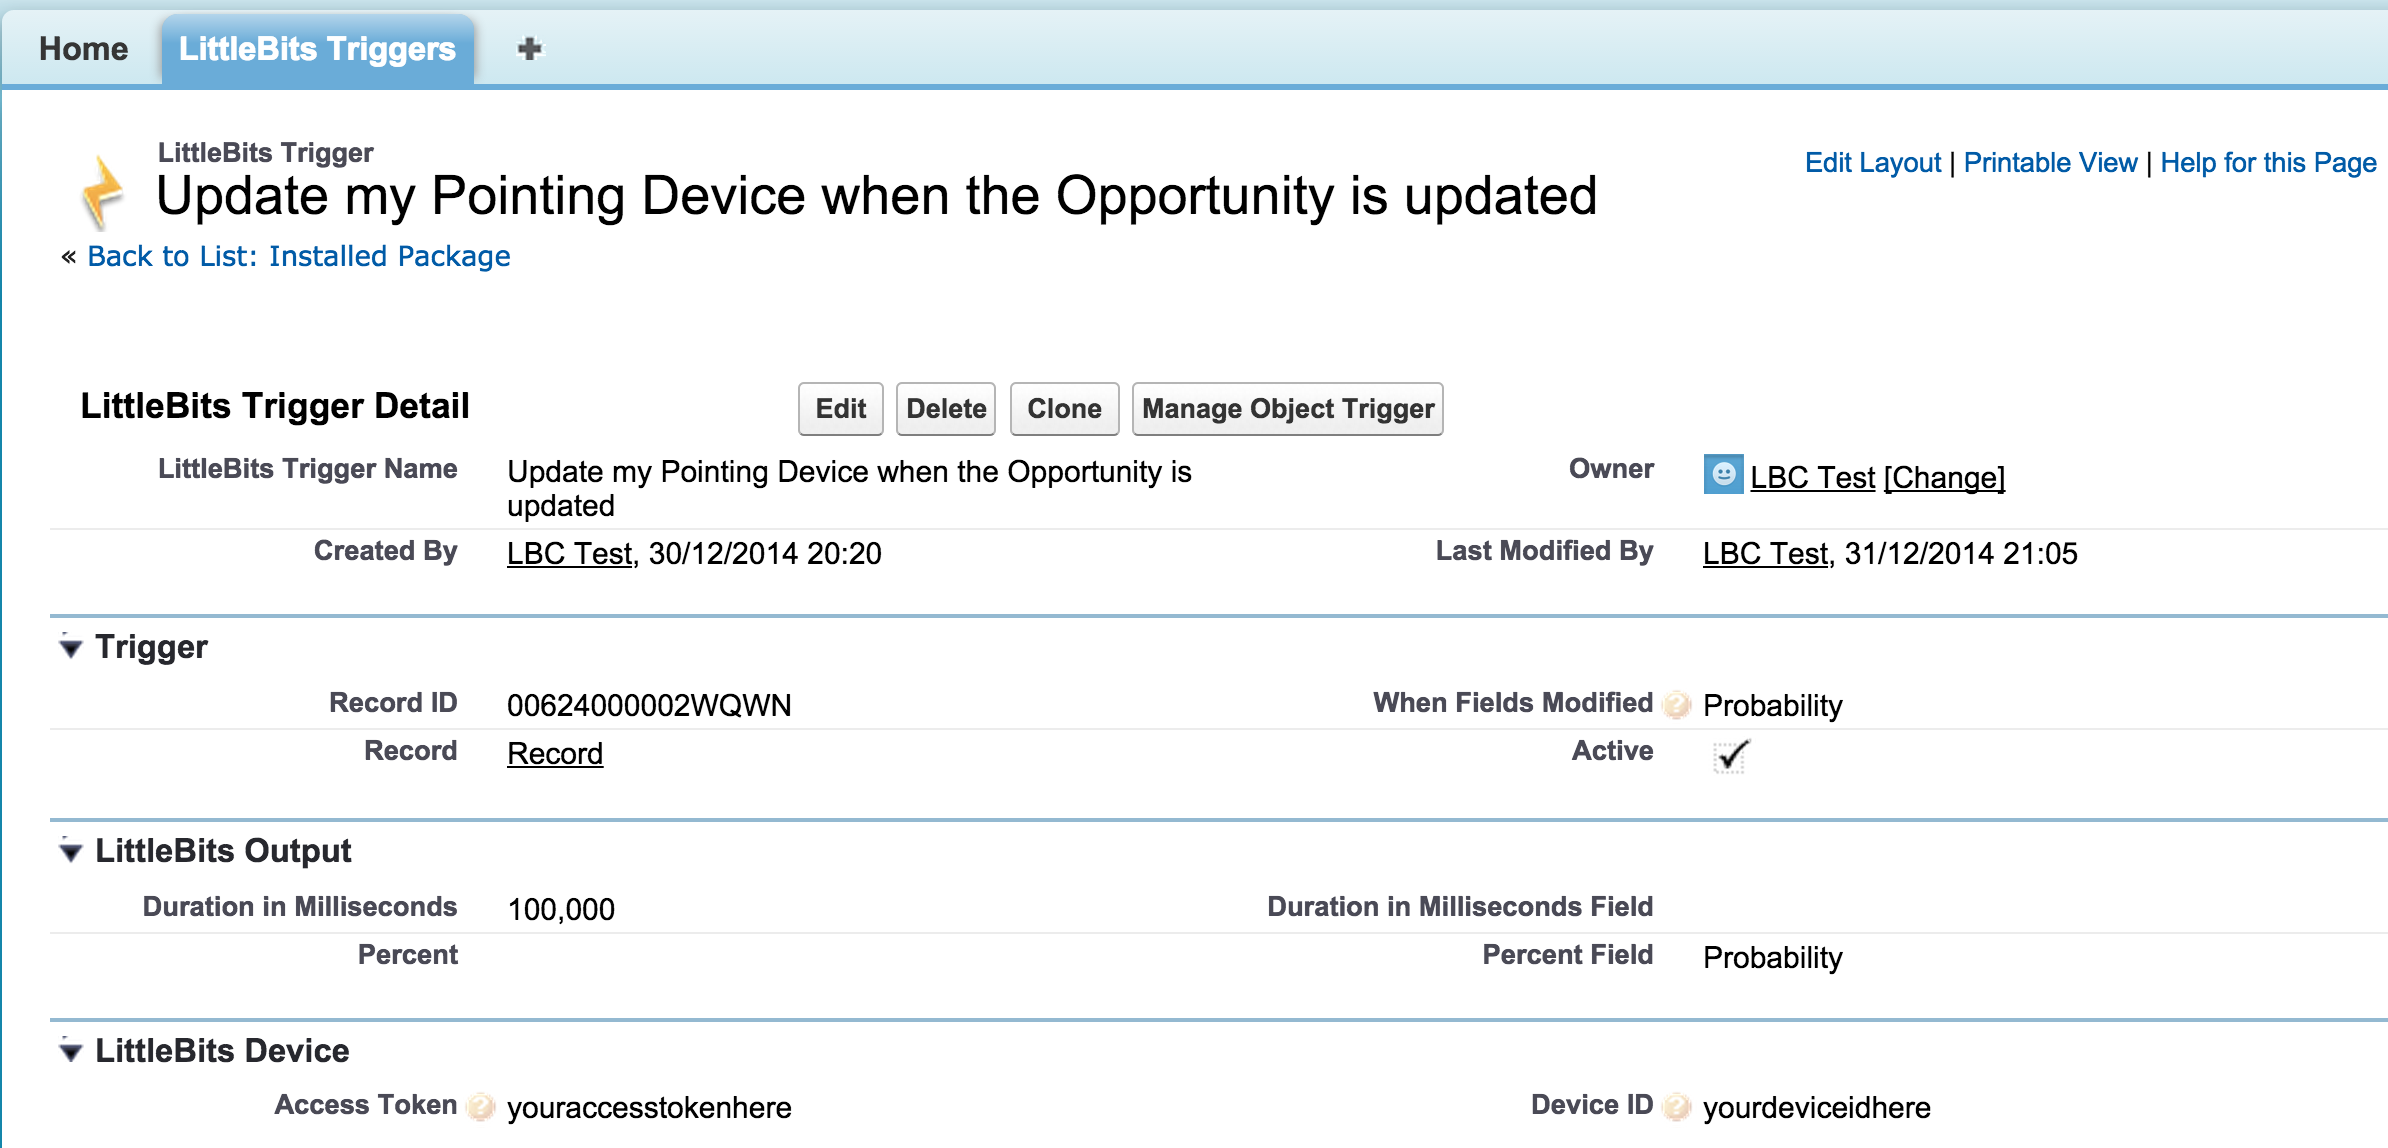
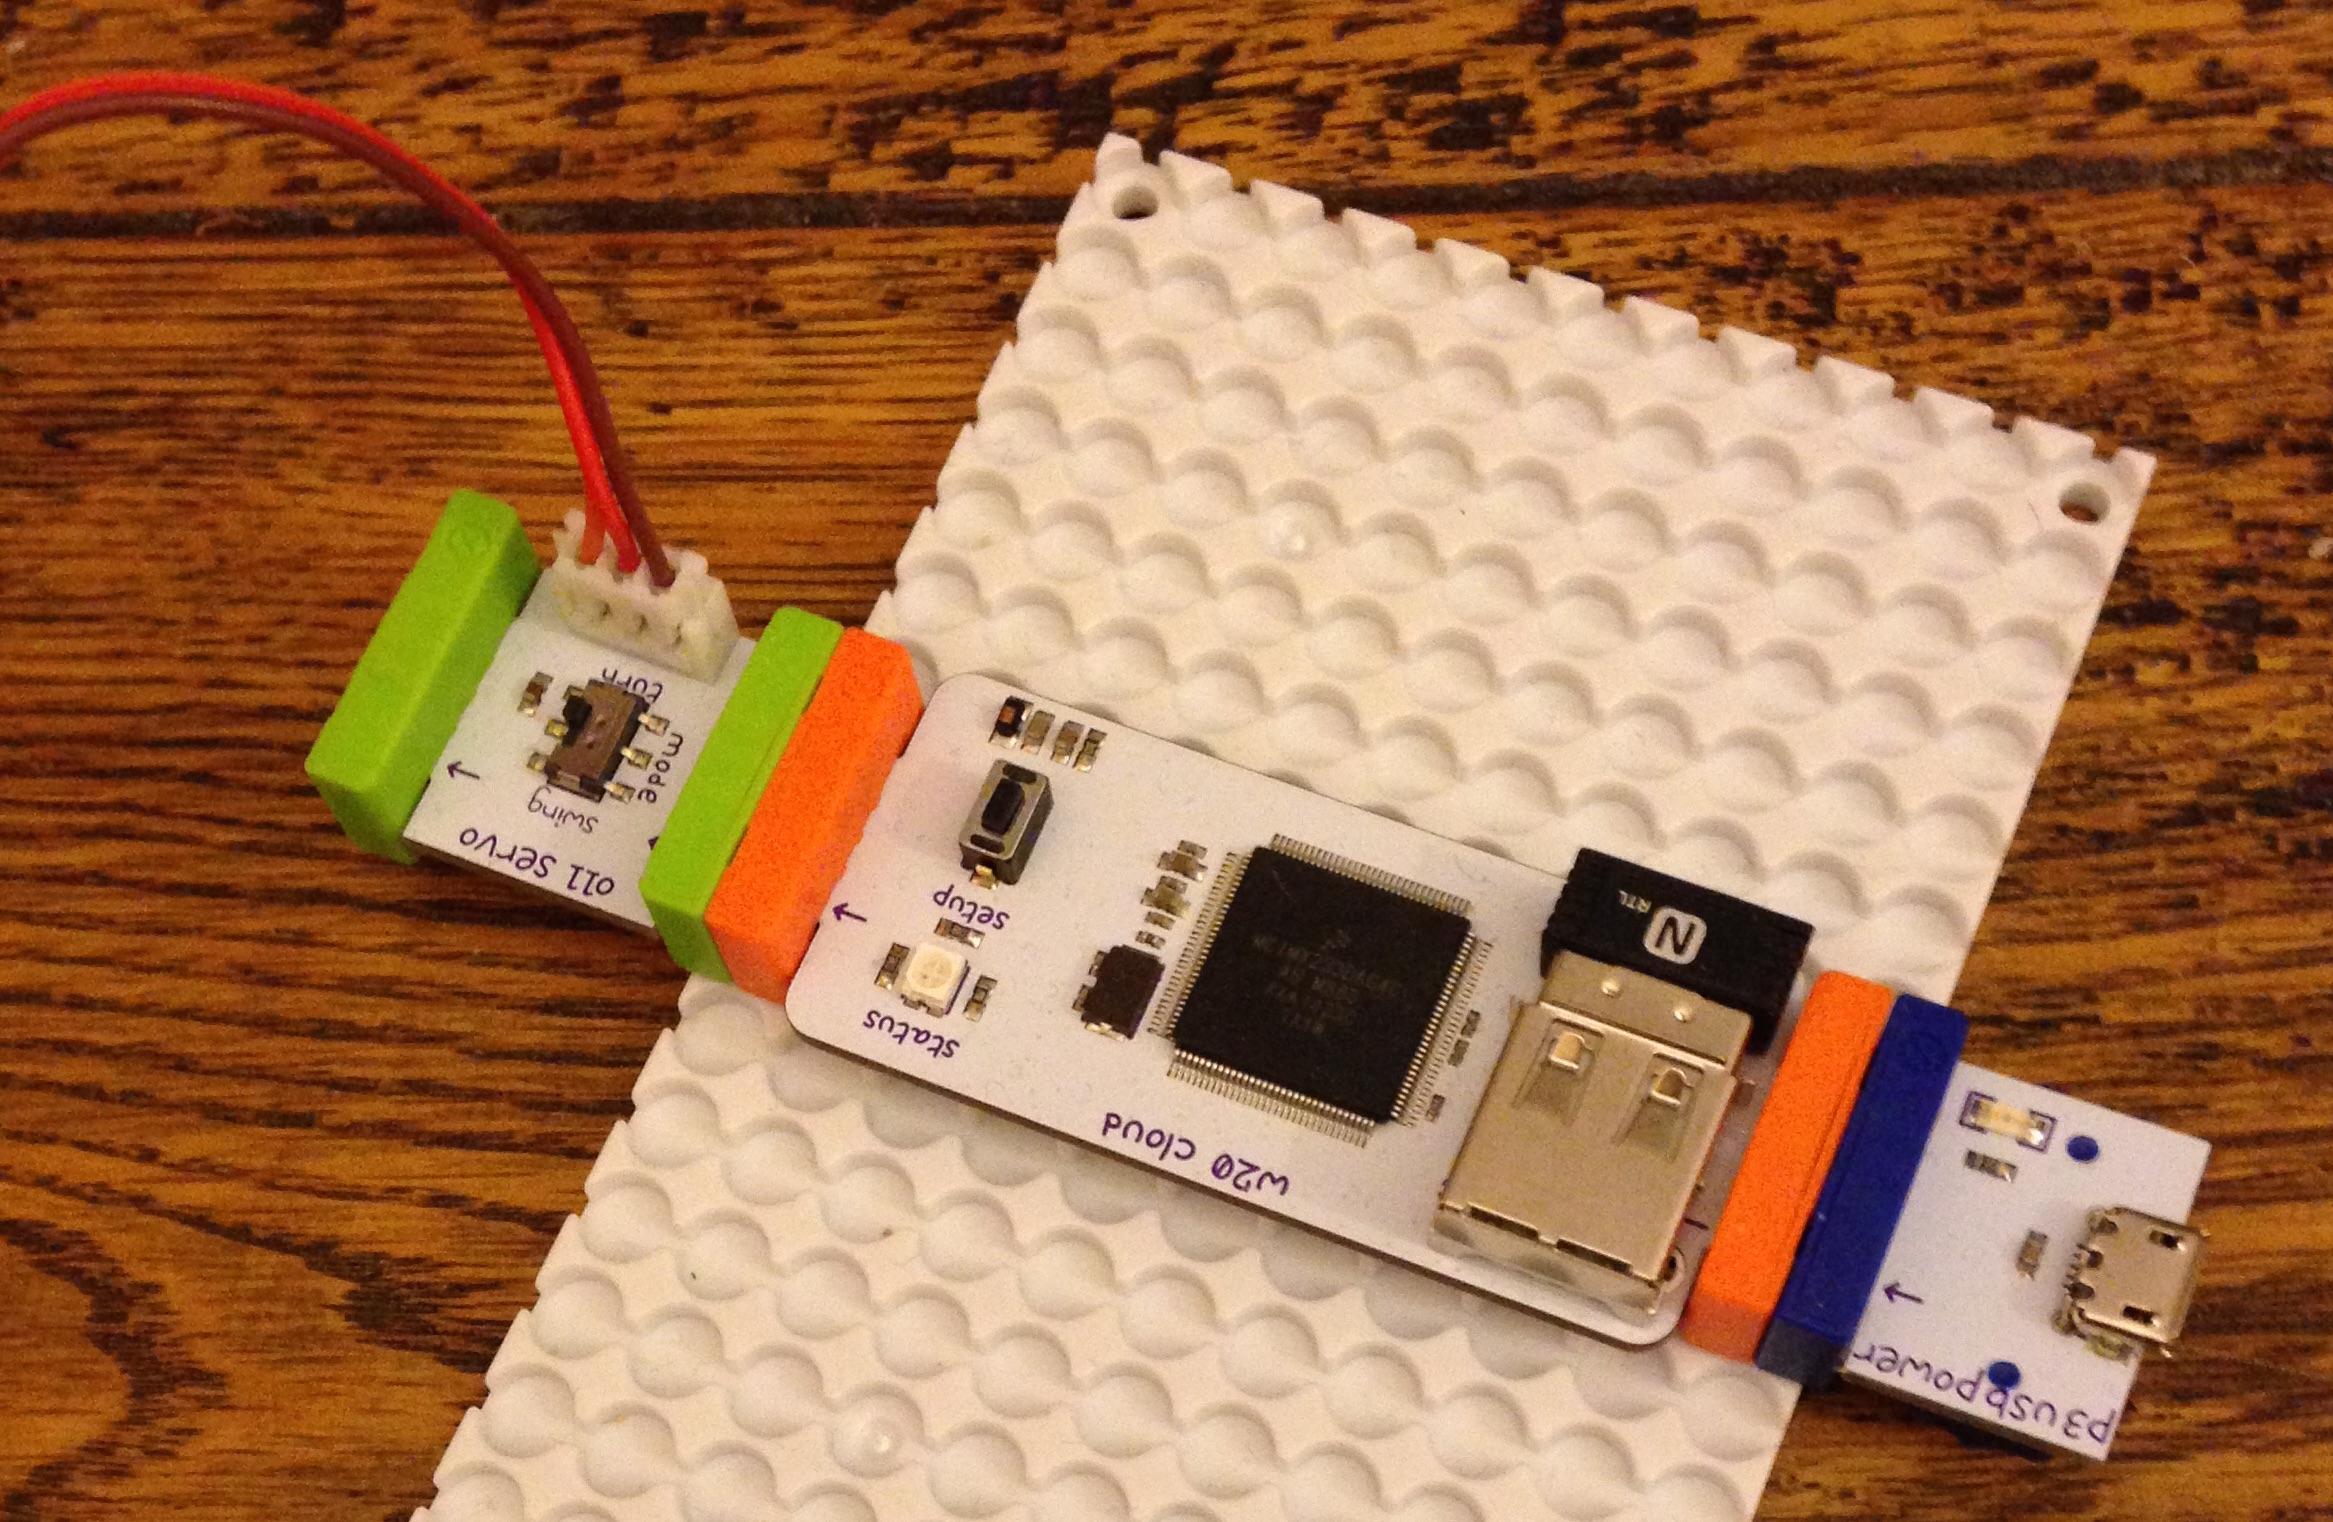
 When Salesforce sent me a LittleBits Cloud Starter Kit as Christmas present i once again set about connecting it to my favourite cloud platform! This blog introduces two new GitHub repos and a brand new installable package to allow you to take full advantage of the snap-not-solder that LittleBits electronics brings with the Salesforce clicks-not-code design model! So if your not an electronics whiz or coder, you really don’t have any excuses for not getting involved! LittleBits provides over 60 snap together components, to build automated fish feeders, to home security systems and practically anything else you can imagine!
 The heart of the kit is a small computer module, powered by a USB cable (i plugged mine into my external phone battery pack!). It boots from an SD card and uses an onboard USB Wifi adapter to connect itself to the internet (once you’ve connected it to your wifi). After that you send commands to connected outputs to it via a mobile site or set of LittleBits Cloud API’s provided. So far i have focused on sending commands to the outputs (in my case i connected the servo motor), however as i write this i’m teaming up with Cory Cowgill who has also starting working with his kit from an inputs perspective (e.g. pressing on a button on the device).