Andy in the Cloud

From BBC Basic to Force.com and beyond…


3 Comments

The Third Edition

bookI’m proud to announce the third edition of my book has now been released. Back in March this year I took the plunge start updates to many key areas and add two brand new chapters. Between the 2 years and 8 months since the last edition there has been several platform releases and an increasing number of new features and innovations that made this the biggest update ever! This edition also embraces the platforms rebranding to Lightning, hence the book is now entitled Salesforce Lightning Platform Enterprise Architecture.

You can purchase this book direct from Packt or of course from Amazon among other sellers.  As is the case every year Salesforce events such as Dreamforce and TrailheaDX this book and many other awesome publications will be on sale. Here are some of the key update highlights:

  • Automation and Tooling Updates
    Throughout the book SFDX CLI, Visual Studio Code and 2nd Generation Packaging are leverage. While the whole book is certainly larger, certain chapters of the book actually reduced in size as steps previously reflecting clicks where replaced with CLI commands! At one point in time I was quite a master in Ant Scripts and Marcos, they have also given way to built in SFDX commands.
  • User Interface Updates
    Lightning Web Components is a relative new kid on the block, but benefits greatly from its standards compliance, meaning there is plenty of fun to go around exploring industry tools like Jest in the Unit Testing chapter. All of the books components have been re-written to the Web Component standard.
  • Big Data and Async Programming
    Big data was once a future concern for new products, these days it is very much a concern from the very start. The book covers Big Objects and Platform Events more extensibility with worked examples, including ingest and calculations driven by Platform Events and Async Apex Triggers. Event Driven Architecture is something every Lightning developer should be embracing as the platform continues to evolve around more and more standard platforms and features that leverage them.
  • Integration and Extensibility
    A particularly enjoyed exploring the use of Platform Events as another means by which you can expose API’s from your packages to support more scalable invocation of your logic and asynchronous plugins.
  • External Integrations and AI
    External integrations with other cloud services are a key part to application development and also the implementation of your solution, thus one of two brand new chapters focuses on Connected Apps, Named Credentials, External Services and External Objects, with worked examples of existing services or sample Heroku based services. Einstein has an ever growing surface area across Salesforce products and the platform. While this topic alone is worth an entire book, I took the time in the second new chapter, to enumerate Einstein from the perspective of the developer and customer configurations. The Formula1 motor racing theme continued with the ingest of historic race data that you can run AI over.
  • Other Updates
    Among other updates is a fairly extensive update to the CI/CD chapter which still covers Jenkins, but leverages the new Jenkins Pipeline feature to integrate SFDX CLI. The Unit Testing chapter has also been extended with further thoughts on unit vs integration testing and a focus on Lightening Web Component testing.

The above is just highlights for this third edition, you can see a full table of contents here. A massive thanks to everyone involving for providing the inspiration and support for making this third edition happen! Enjoy!


21 Comments

Simplified API Integrations with External Services

Salesforce are on a mission to make accessing off platform data and web services as easy as possible. This helps keep the user experience optimal and consistent for the user and also allows admins to continue to leverage the platforms tools such as Process Builder and Flow, even if the data or logic is not on the platform.

Starting with External Objects, they added the ability to see and also update data stored in external databases. Once setup, users can manipulate external records without leaving Salesforce, by staying within the familiar UI’s. With External Services, currently in Beta, they have extended this concept to external API services.

UPDATE: The ASCIIArt Service covered in this blog has since been updated to use the Swagger schema standard. However this blog is still a very useful introduction to External Services. Once you have read it, head on over to this blog!

In this blog lets first focus on the clicks-not-code steps you can repeat in your own org, to consume a live ASCII Art web service API i have exposed publicly. The API is simple, it takes a message and returns it in ASCII art format. The following steps result in a working UI to call the API and update a record.

ExternalServicesDemo.png

After the clicks not code bit i will share how the API was built, whats required for compatibility with this feature and how insanely easy it is to develop Web Services in Heroku using Nodejs. So lets dive in to External Services!

Building an ASCII Art Converter in Lightning Experience and Flow

The above solution was built with the following configurations / components. All of which are accessible under the LEX Setup menu (required for External Services) and takes around 5 minutes maximum to get up and running.

  1. Named Credential for the URL of the Web Service
  2. External Service for the URL, referencing the Named Credential
  3. Visual Flow to present a UI, call the External Service and update a record
  4. Lightning Record Page customisation to embed the Flow in the UI

I created myself a Custom Object, called Message, but you can easily adapt the following to any object you want, you just need a Rich Text field to store the result in. The only other thing you need to know of course is the web service URL.

https://createasciiart.herokuapp.com

Can i use External Services with any Web Service then?

In order to build technologies that simplify what are normally things developers have to interpret and code manually. Web Service APIs must be documented in a way that External Services can understand. In this Beta release this is the Interagent schema standard (created by Heroku as it happens).  Support for the more broadly adopted Swagger / OpenId will be added in the Winter release (Safe Harbour).

For my ASCII Art service above, i authored the Interagent schema based on a sample the Salesforce PM for this feature kindly shared, more on this later. When creating the External Service in moment we will provide a schema to this service.

https://createasciiart.herokuapp.com/schema

Creating a Named Credential

From the setup menu search for Named Credential and click New. This is a simple Web Service that requires no authentication. Basically provide only the part of the above URL that points to the Web Service endpoint.

ESNamedCred.png

Creating the External Service

Now for the magic! Under the Setup menu (only in Lightning Experience) search for Integrations and start the wizard. Its a pretty straight forward process, of selecting the above Named Credential, then telling it the URL for the schema. If thats not exposed by the service you want to use, you can paste a Schema in directly (which lets a developer define a schema yourself if one does not already exist).

esstep1.png

esstep2.png

Once you have created the External Service you can review the operations it has discovered. Salesforce uses the documentation embedded in the given schema to display a rather pleasing summary actually.

esstep3.png

So what just happened? Well… internally the wizard wrote some Apex code on your behalf and implemented the Invocable Method annotations to enable that Apex code to appear in tools like Process Builder (not supported in Beta) and Flow. Pretty cool!

Whats more interesting for those wondering, is you cannot actually see this Apex code, its there but some how magically managed by the platform. Though i’ve not confirmed, i would assume it does not require code coverage.

Update: According to the PM, in Winter’18 it will be possible “see” the generated class from other Apex classes and thus reuse the generated code from Apex as well. Kind of like a Api Stub Generator.

Creating a UI to call the External Service via Flow

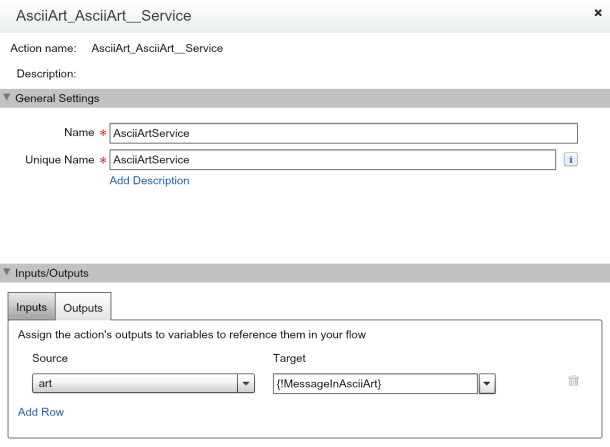
This simple Flow prompts the user for a message to convert, calls the External Service and updates a Rich Text field on the record with the response. You will see in the Flow sidebar the generated Apex class generated by the External Service appears.

esflow

The following screenshots show some of the key steps involved in setting up the Flow and its three steps, including making a Flow variable for the record Id. This is later used when embedding the Flow in Lightning Experience in the next step.

esflow1

RecordId used by Flow Lightning Component

esflow2

Assign the message service parameter

esflow3

Assign the response to variable

esflow4

Update the Rich Text field

TIP: When setting the ASCII Art service response into the field, i wrapped the value in the HTML elements, pre and code to ensure the use of a monospaced font when the Rich Text field displayed the value.

Embedding the Flow UI in Lightning Experience

Navigate to your desired objects record detail page and select Edit Page from the cog in the top right of the page to open the Lightning App Builder. Here you can drag the Flow component onto the page and configure it to call the above flow. Make sure to map the Flow variable for the record Id as shown in the screenshot, to ensure the current record is passed.

esflowlc.png

Thats it, your done! Enjoy your ASCII Art messages!

Creating your own API for use with External Services

Belinda, the PM for this feature was also kind enough to share the sample code for the example shown in TrailheaDX, from which the service in this blog is based. However i did wanted to build my own version to do something different from the credit example. Also extend my personal experience with Heroku and Nodejs more.

The NodeJS code for this solution is only 41 lines long. It runs up a web server (using the very easy to use hapi library), and registers a couple of handlers. One handler returns the statically defined schema.json file, the other implements the service itself. As side note, the joi library is an easy way add validation to the service parameters.

var Hapi = require('hapi');
var joi = require('joi');
var figlet = require('figlet');

// initialize http listener on a default port
var server = new Hapi.Server();
server.connection({ port: process.env.PORT || 3000 });

// establish route for serving up schema.json
server.route({
  method: 'GET',
  path: '/schema',
  handler: function(request, reply) {
    reply(require('./schema'));
  }
});

// establish route for the /asciiart resource, including some light validation
server.route({
  method: 'POST',
  path: '/asciiart',
  config: {
    validate: {
      payload: {
        message: joi.string().required()
      }
    }
  },
  handler: function(request, reply) {
    // Call figlet to generate the ASCII Art and return it!
    const msg = request.payload.message;
    figlet(msg, function(err, data) {
        reply(data);
    });
  }
});

// start the server
server.start(function() {
  console.log('Server started on ' + server.info.uri);
});

I decided i wanted to explore the diversity of whats available in the Nodejs space, through npm. To keep things light i chose to have a bit of fun and quickly found an ASCIIArt library, called figlet. Though i soon discovered that npm had a library for pretty much every other use case i came up with!

Finally the hand written Interagent schema is also shown below and is reasonably short and easy to understand for this example. Its not all that well documented in layman’s terms as far as i can see. See my thoughts on this and upcoming Swagger support below.

{
  "$schema": "http://interagent.github.io/interagent-hyper-schema",
  "title": "ASCII Art Service",
  "description": "External service example from AndyInTheCloud",
  "properties": {
    "asciiart": {
      "$ref": "#/definitions/asciiart"
    }
  },
  "definitions": {
    "asciiart": {
      "title": "ASCII Art Service",
      "description": "Returns the ASCII Art for the given message.",
      "type": [ "object" ],
      "properties": {
        "message": {
          "$ref": "#/definitions/asciiart/definitions/message"
        },
        "art": {
          "$ref": "#/definitions/asciiart/definitions/art"
        }
      },
      "definitions": {
        "message": {
          "description": "The message.",
          "example": "Hello World",
          "type": [ "string" ]
        },
        "art": {
          "description": "The ASCII Art.",
          "example": "",
          "type": [ "string" ]
        }
      },
      "links": [
        {
          "title": "AsciiArt",
          "description": "Converts the given message to ASCII Art.",
          "href": "/asciiart",
          "method": "POST",
          "schema": {
            "type": [ "object" ],
            "description": "Specifies input parameters to calculate payment term",
            "properties": {
              "message": {
                "$ref": "#/definitions/asciiart/definitions/message"
              }
            },
            "required": [ "message" ]
          },
          "targetSchema": {
            "$ref": "#/definitions/asciiart/definitions/art"
          }
        }
      ]
    }
  }
}

Finally here is the package.json file that brings the whole node app together!

{
  "name": "asciiartservice",
  "version": "1.0.0",
  "main": "server.js",
  "dependencies": {
    "figlet": "^1.2.0",
    "hapi": "~8.4.0",
    "joi": "^6.1.1"
  }
}

Other Observations and Thoughts…

  • Error Handling.
    You can handle errors from the service in the usual way by using the Fault path from the element. The error shown is not all that pretty, but then in fairness there is not really much of a standard to follow here.
    eserrorflow.pngeserror.png
  • Can a Web Service called this way talk back to Salesforce?
    Flow provides various system variables, one of which is the Session Id. Thus you could pass this as an argument to your Web Service. Be careful though as the running user may not have Salesforce API access and this will be a UI session and thus will be short lived. Thus you may want to explore another means to obtain an renewable oAuth token for more advanced uses.
  • Web Service Callbacks.
    Currently in the Beta the Flow is blocked until the Web Service returns, so its good practice to make your service short and sweet. Salesforce are planning async support as part of the roadmap however.
  • Complex Parameters.
    Its unclear at this stage how complex a web service can be supported given Flows limitations around Invocable Methods which this feature depends on.
  • The future is bright with Swagger support!
    I am really glad Salesforce are adding support for Swagger/OpenID, as i really struggled to find good examples and tutorials around Interagent. Really what is needed here is for the schema and code to be tied more closely together, like this!UPDATE: See my other blog entry covering Swagger support

Summary

Both External Objects and External Services reflect the reality of the continued need for integration tools and making this process simpler and thus cheaper. Separate services and data repositories are for now here to stay. I’m really pleased to see Salesforce doing what it does best, making complex things easier for the masses. Or as Einstein would say…Everything should be made as simple as possible, but no simpler.

Finally you can read more about External Objects here and here through Agustina’s and laterally Alba’s excellent blogs.


17 Comments

Introduction to the Platform Action API

shutterstock_159003926.jpg

Actions are Salesforce’s general term for tasks users can perform either through buttons throughout various UI’s on desktop, mobile, tablet etc or in fact via non-UI processes such those built via via Process Builder or Automation Flows.

Actions are about “getting things done” in Salesforce. They encapsulate a piece of logic that allows a user to perform some work, such as sending email. When an action runs, it saves changes in your organization by updating the database. More here.

Over the years we’ve had many terms and ways to define these. Custom Button and Custom Link are perhaps the most obvious ones, which i’ve covered here in the past. Quick Actions (previously Publisher Actions) and more recently we’ve had Action Link‘s, which i covered in a past blog. Then of course the Standard Buttons, Edit, Delete, Follow, Submit for Approval etc provided by the platform. Such actions appear in various places Record layouts, List Views, Related Lists, Chatter and more recently Flexi Pages (aka Lighting Pages).

You might wonder then, if you had the task as developer to build your own UI or tool that wanted to expose some or all of the above actions, it would be quite a challenge to find them all. Indeed in some cases you may have had to resort to URL hacking to invoke some of them. Well worry not no longer, Salesforce’s clever architects now have you covered! Enter a new virtual SObject known as PlatformAction! Before we get onto what exactly virtual means, lets review some Actions and some SOQL queries…

Consider this Account Record detail page in the Classic (or Aloha) UI

PlatformActionAccount.png

Note down your record ID and use it in a query like the one below…

SELECT DeviceFormat, Label, Type, Section,
       ActionTarget, ActionTargetType, ActionListContext
  FROM PlatformAction
  WHERE ActionListContext = 'Record' AND
        SourceEntity = '001B000000D2V0n' AND
        Section = 'Page' AND
        DeviceFormat = 'Aloha'

In Developer Console you should see something like this…

PlatformActionQueryResults1.png

Pretty cool huh!? Check out the ActionTarget field, for the Standard Button records, thats the URL you can place on your UI’s to invoke that action, simple as that! Better still this is a supported way to get it, no more URL hacking! Now lets add a couple of Custom Buttons and re-run the query…

PlatformActionAcount2.png

We now see CustomButton records appear…

PlatformActionQueryResults2.png

This next query reveals actions shown on a List View. I did note Custom List View buttons that require record selection did not appear however. I suspect this is due to them requiring more than a simple HTTP GET URL to invoke.

SELECT DeviceFormat, Label, Type, Section,
       ActionTarget, ActionTargetType, ActionListContext
  FROM PlatformAction
  WHERE ActionListContext = 'ListView' AND
        SourceEntity = 'Account' AND
        Section = 'Page' AND
        DeviceFormat = 'Aloha'

Other observations..

  • Prior to Summer’16 (out in preview as i write this), Apex SOQL was not supported, only REST API SOQL. This is due to a limitation with the internally applied LIMIT keyword. This has now been resolved in Summer’16, so Apex SOQL now works!
  • SourceEntity can also be given an SObject API name, e.g. SourceEntity = ‘Account’, the result here are object level buttons, like New or those you add to the MRU page.
  • DeviceFormat field value matters, if you leave it off, it defaults to Phone. Thus some actions will be missing from those in Desktop (Lightning Experience) or Aloha (Classic). I eventually found Custom Buttons using Visualforce pages that didn’t have the Lightning Supported checkbox set didn’t appear when querying with the Phone device type for example.
  • User context matters, actions returned are user and configuration sensitive, meaning the record itself, record type and associated layout all contribute to the actions returned. Custom Buttons for example need to be on the relevant layout.
  • Label and Icon information, there are also fields that allow you to render appropriate labels and icons for the actions.
  • Related List actions, you can also retrieve actions shown on related lists, search for RelatedList in the help topic here.
  • Describe actions? You will notice some actions have an ActionTargetType of Describe? These are invoked via an API, something i will cover in later blog.

So lets discuss the “virtual SObject” bit!?!

Your probably wondering what a virtual SObject is?

Well my best guess is its an SObject that is not backed by physical data in the Salesforce database. If you check the documentation you’ll see fields just like any other object and it supports SOQL (with some limitations). My thinking is the records for this object are dynamically generated on demand by doing all the heavy lifting internally to scan all the various historic places where actions have been defined.

Thank you Salesforce architects, this is now my #1 coolest Salesforce API!

Whats next?

  • For starters, no more URL hacking of those standard pages, no excuses now!
  • Helper class or Visualforce and/or Lighting component for actions?
  • Explore the Force.com Actions Developer Guide


24 Comments

Extending Lightning Process Builder and Visual Workflow with Apex

MyProcessBuilderI love empowering as many people to experience the power of Salesforce’s hugely customisable and extensible platform as possible. In fact this platform has taught me that creating a great solution is not just about designing how we think a solution would be used, but also about empowering how others subsequently use it in conjunction with the platform, to create totally new use cases we never dream off! If your not thinking about how what your building sits “within” the platform your not fully embracing the true power of the platform.

So what is the next great platform feature and what has it go to do with writing Apex code? Well for me its actually two features, one has been around for a while, Visual Workflow, the other is new and shiny and is thus getting more attention, Lightning Process Builder. However as we will see in this blog there is a single way in which you can expose your finely crafted Apex functionality to users of both tools. Both of them have their merits and in fact can be used together for a super charged clicks not code experience!

IMPORTANT NOTE: Regardless if your developing building a solution in a Sandbox or as part of packaged AppExchange solution, you really need to understand this!

What is the difference between Visual Workflow and Lightning Process Builder?

At first sight these two tools look to achieve similar goals, letting the user turn a business process into steps to be executed one after another applying conditional logic and branching as needed.

One of the biggest challenges i see with the power these tools bring is educating users on use cases they can apply. While technically exposing Apex code to them is no different, its important to know some of the differences between how they are used when talking to people about how to best leverage them with your extensions.

  • UI based Processes. Here the big difference is that mainly, where Visual Workflow is concerned its about building user interfaces that allow users to progress through your steps through a wizard style UI, created by the platform for you based on the steps you’ve defined. Such UI’s can be started when the end user clicks on a tab, button or link to start the Visual Workflow (see my other blogs).
    VisualFlowUI
  • Record based Processes. In contrast Process Builder is about steps you define that happen behind the scenes when users are manipulating records such as Accounts, Opportunities an in fact any Standard or Custom object you choose. This also includes users of Salesforce1 Mobile and Salesforce API’s. As such Process Builder actually has more of an overlap with the capabilities of classic Workflow Rules.
    ProcessBuilderActions
  • Complexity. Process Builder is more simplistic compared to Flow, that’s not to say Flow is harder to use, its just got more features historically, for variables, branching and looping over information.
  • Similarities. In terms of the type steps you can perform within each there are some overlaps and some obvious differences, for example there are no UI related steps in Process Builder, yet both do have some support for steps that can be used to create or update records. They can both call out to Apex code, more on this later…
  • Power up with both! If you look closely at the screenshot above, you’ll see that Flows, short for Visual Workflow, can be selected as an Action Type within Process Builder! In this case your Flow cannot contain any visual steps, only logic steps, since Process Builder is not a UI tool. Such Flows are known as Autolaunched Flows (previously known as ‘Headless Flows’), you can read more here. This capability allows you to model more complex business processes in Process Builder.

You can read more details on further differences here from Salesforce.

What parts of your code should you expose?

Both tools have the ability to integrate at a record level with your existing custom objects, thus any logic you’ve placed in Apex Triggers, Validation Rules etc is also applied. So as you read this, your already extending these tools! However such logic is of course related to changes in your solutions record data. What about other logic?

  • Custom Buttons, Visualforce Buttons, If you’ve developed a Custom Button or Visualforce page with Apex logic behind it you may want to consider if that functionality might also benefit from being available through these tools. Allowing automation and/or alternative UI’s to be build without the need to involve a custom Visualforce or Apex development or changes to your based solution.
  • Share Calculations and Sub-Process Logic, You may have historically written a single peace of Apex code that orchestrates in a fixed a larger process via a series of calculations in a certain order and/or chains together other Apex sub-processes together. Consider if by exposing this code in a more granular way, would give users more flexibility in using your solution in different use cases. Normally this might require your code to respond to a new configuration you build in. For example where they wish to determine the order your Apex code is called, if parts should be omitted or even apply the logic to record changes on their own Custom Objects.

Design considerations for Invocable Methods

Now that we understand a bit more about the tools and the parts of your solution you might want to consider exposing, lets consider some common design considerations in doing so. The key to exposing Apex code to these tools is leveraging a new Spring’15 feature known as Invocable Methods. Here is an example i wrote recently…

global with sharing class RollupActionCalculate
{
	/**
	 * Describes a specific rollup to process
	 **/
	global class RollupToCalculate {

		@InvocableVariable(label='Parent Record Id' required=true)
		global Id ParentId;

		@InvocableVariable(label='Rollup Summary Unique Name' required=true)
		global String RollupSummaryUniqueName;

		private RollupService.RollupToCalculate toServiceRollupToCalculate() {
			RollupService.RollupToCalculate rollupToCalculate = new RollupService.RollupToCalculate();
			rollupToCalculate.parentId = parentId;
			rollupToCalculate.rollupSummaryUniqueName = rollupSummaryUniqueName;
			return rollupToCalculate;
		}
	}

	@InvocableMethod(
		label='Calculates a rollup'
		description='Provide the Id of the parent record and the unique name of the rollup to calculate, you specificy the same Id multiple times to invoke multiple rollups')
	global static void calculate(List<RollupToCalculate> rollupsToCalculate) {

		List<RollupService.RollupToCalculate> rollupsToCalc = new List<RollupService.RollupToCalculate>();
		for(RollupToCalculate rollupToCalc : rollupsToCalculate)
			rollupsToCalc.add(rollupToCalc.toServiceRollupToCalculate());

		RollupService.rollup(rollupsToCalc);
	}
}

NOTE: The use of global is only important if you plan to expose the action from an AppExchange package, if your developing a solution in a Sandbox for deployment to Production, you can use public.

As those of you following my blog may have already seen, i’ve been busy enabling my LittleBits Connector and Declarative Lookup Rollup Summary packages for these tools. In doing so, i’ve arrived at the following design considerations when thinking about exposing code via Invocable Methods.

  1. Design for admins not developers. Methods appear as ‘actions’ or ‘elements’ in the tools. Work with a few admins/consultants you know to sense check what your exposing make sense to them, a method name or purpose from a developers perspective might not make as much sense to an admin. 
  2. Don’t go crazy with the annotations! Salesforce has made it really easily to expose an Apex method via simple Apex annotations such as @InvocableMethod and @InvocableVariable. Just because its that easy doesn’t mean you don’t have to think carefully about where you apply them. I view Invocable Methods as part of your solutions API, and treat them as such, in terms of separation of concerns and best practices. So i would not apply them to methods on controller classes or even service classes, instead i would apply them to dedicate class that delegates to my service or business layer classes. 
  3. Apex class, parameter and member names matter. As with my thoughts on API best practices, establish a naming convention and use of common terms when naming these. Salesforce provides a REST API for describing and invoking Invocable Methods over HTTP, the names you use define that API. Currently both tools show the Apex class name and not the label, so i would derive some kind of way to group like actions together, i’ve chosen to follow the pattern [Feature]Action[ActionName], e.g. LittleBitsActonSendToDevice, so all actions for a given feature in your application at least group together. 
  4. Use the ‘label’ and ‘description’ annotation attributes. Both the @InvocableMethod and @InvocableVariable annotations support these, the tools will show your label instead of your Apex variable name in the UI. The Process Builder tool currently as far as i can see does not presently use the parameter description sadly (though Visual Workflow does) and neither tool the method description. Though i would recommend you define both in case in future releases that start to use it.
    • NOTE: As this text is end user facing, you may want to run it past a technical author or others to look for typos, spelling etc. Currently, there does not appear to be a way to translate these via Translation Workbench.


  5. Use the ‘required’ attribute. When a user adds your Invocable Method to a Process or Flow, it automatically adds prompts in the UI for parameters marked as required.
    	global class SendParameters {
    		@InvocableVariable(
                       Label='Access Token'
                       Description='Optional, if set via Custom Setting'
                       Required=False)
    		global String AccessToken;
    		@InvocableVariable(
                      Label='Device Id' Description='Optional, if set via Custom Setting'
                      Required=False)
            global String DeviceId;
    		@InvocableVariable(
                       Label='Percent'
                       Description='Percent of voltage sent to device'
                       Required=True)
            global Decimal Percent;
    		@InvocableVariable(
                       Label='Duration in Milliseconds'
                       Description='Duration of voltage sent to device'
                       Required=True)
            global Integer DurationMs;
    	}
    
        /**
         * Send percentages and durations to LittleBits cloud enabled devices
         **/
        @InvocableMethod(Label='Send to LittleBits Device' Description='Sends the given percentage for the given duration to a LittleBits Cloud Device.')
        global static void send(List<SendParameters> sendParameters) {
        	System.enqueueJob(new SendAsync(sendParameters));
    	}
    

    Visual Workflow Example
    FlowParams

    Lightning Process Builder Example
    ProcessBuilderParams


  6. Bulkification matters, really it does! Play close attention to the restrictions around your method signature when applying these annotations, as described in Invocable Method Considerations and Invocable Variables Considerations. One of the restrictions that made me smile was the insistence on the compiler requiring parameters be list based! If you recall this is also one of my design guidelines for the Apex Enterprise Patterns Service layer. Basically because it forces the developer to think about the bulk nature of the platform. Salesforce have thankfully enforced this, to ensure that when either of these tools call your method with multiple parameters in bulk record scenarios your strongly reminded to ensure your code behaves itself! Of course if your delegating to your Service layer, as i am doing in the examples above, this should be a fairly painless affair to marshall the parameters across.
    • NOTE: While you should of course write your Apex tests to pass bulk test data and thus test your bulkification code. You can also cause Process Builder and Visual Workflow to call your method with multiple parameters by either using List View bulk edits, Salesforce API or Anonymous Apex to perform a bulk DML operation on the applicable object. 
  7. Separation of Concerns and Apex Enterprise Patterns. As you can see in the examples above, i’m treating Invocable Actions as just another caller of the Service layer (described as part of the Apex Enterprise Patterns series). With its own concerns and requirements.
    • For example the design of the Service method signatures is limited only by the native Apex language itself, so can be quite expressive. Where as Invocable Actions have a much more restricted capability in terms of how they define themselves, we want to keep these two concerns separate.
    • You’ll also see in my LittleBits action example above, i’m delegating to the Service layer only after wrapping it in an Async context, since Process Builder calls the Invocable Method in the Trigger context. Remember the Service layer is ‘caller agnostic’, thus its not its responsibility to implement Aysnc on the callers behalf.
    • I have also taken to encapsulating the parameters and marshalling of these into the Service types as needed, thus allowing the Service layer and Invocable Method to evolve independently if needed.
    • Finally as with any caller of the Service layer i would expect only one invocation and to create a compound Service (see Service best practices) if more was needed, as apposed to calling multiple Services from the one Invocable Method.


  8. Do I need to expose a custom Apex or REST API as well? So you might be wondering that since we now have a way to call Apex code declaratively and in fact via the Standard Salesforce REST API (see Carolina’s exploits here). Would you ever still consider exposing a formal Apex or REST API (as described here)? Well here are some of my current thoughts on this, things are still evolving so i stress these are still my current thoughts…
    • The platform provides as REST API generated from you Invocable Method annotations, so aesthetically and functionally may look different from what you might consider a true RESTful API, in addition will fall under a different URL path to those you defined via the explicit Apex REST annotations.
    • If your data structures of your API are such that they don’t fall within those defined by Invocable Methods (such as Apex types referencing other Apex types, use of Maps, Enums etc..) then you’ll have to expose the Service anyway as an Apex API.
    • If your parameters and data structures are no more complex then those required for an Invocable Method, and thus would be identical to those of the Apex Service you might consider using the same class. However keep in mind you can only have one Invocable Method per class, and Apex Services typically have many methods related to the feature or service itself. Also while the data structure may match today, new functional requirements may stress this in the future, causing you to reinstate a Service layer, or worse, bend the parameters of your Invocable Methods.
    • In short my current recommendation is to continue to create a full expressive Service driven API for your solutions and treat Invocable Methods as another API variant.


Hopefully this has given you some useful things to think about when planning your own use of Invocable Methods in the future. As this is a very new area of the platform, i’m sure the above will evolve further over time as well.