Andy in the Cloud

From BBC Basic to Force.com and beyond…


17 Comments

Introduction to the Platform Action API

shutterstock_159003926.jpg

Actions are Salesforce’s general term for tasks users can perform either through buttons throughout various UI’s on desktop, mobile, tablet etc or in fact via non-UI processes such those built via via Process Builder or Automation Flows.

Actions are about “getting things done” in Salesforce. They encapsulate a piece of logic that allows a user to perform some work, such as sending email. When an action runs, it saves changes in your organization by updating the database. More here.

Over the years we’ve had many terms and ways to define these. Custom Button and Custom Link are perhaps the most obvious ones, which i’ve covered here in the past. Quick Actions (previously Publisher Actions) and more recently we’ve had Action Link‘s, which i covered in a past blog. Then of course the Standard Buttons, Edit, Delete, Follow, Submit for Approval etc provided by the platform. Such actions appear in various places Record layouts, List Views, Related Lists, Chatter and more recently Flexi Pages (aka Lighting Pages).

You might wonder then, if you had the task as developer to build your own UI or tool that wanted to expose some or all of the above actions, it would be quite a challenge to find them all. Indeed in some cases you may have had to resort to URL hacking to invoke some of them. Well worry not no longer, Salesforce’s clever architects now have you covered! Enter a new virtual SObject known as PlatformAction! Before we get onto what exactly virtual means, lets review some Actions and some SOQL queries…

Consider this Account Record detail page in the Classic (or Aloha) UI

PlatformActionAccount.png

Note down your record ID and use it in a query like the one below…

SELECT DeviceFormat, Label, Type, Section,
       ActionTarget, ActionTargetType, ActionListContext
  FROM PlatformAction
  WHERE ActionListContext = 'Record' AND
        SourceEntity = '001B000000D2V0n' AND
        Section = 'Page' AND
        DeviceFormat = 'Aloha'

In Developer Console you should see something like this…

PlatformActionQueryResults1.png

Pretty cool huh!? Check out the ActionTarget field, for the Standard Button records, thats the URL you can place on your UI’s to invoke that action, simple as that! Better still this is a supported way to get it, no more URL hacking! Now lets add a couple of Custom Buttons and re-run the query…

PlatformActionAcount2.png

We now see CustomButton records appear…

PlatformActionQueryResults2.png

This next query reveals actions shown on a List View. I did note Custom List View buttons that require record selection did not appear however. I suspect this is due to them requiring more than a simple HTTP GET URL to invoke.

SELECT DeviceFormat, Label, Type, Section,
       ActionTarget, ActionTargetType, ActionListContext
  FROM PlatformAction
  WHERE ActionListContext = 'ListView' AND
        SourceEntity = 'Account' AND
        Section = 'Page' AND
        DeviceFormat = 'Aloha'

Other observations..

  • Prior to Summer’16 (out in preview as i write this), Apex SOQL was not supported, only REST API SOQL. This is due to a limitation with the internally applied LIMIT keyword. This has now been resolved in Summer’16, so Apex SOQL now works!
  • SourceEntity can also be given an SObject API name, e.g. SourceEntity = ‘Account’, the result here are object level buttons, like New or those you add to the MRU page.
  • DeviceFormat field value matters, if you leave it off, it defaults to Phone. Thus some actions will be missing from those in Desktop (Lightning Experience) or Aloha (Classic). I eventually found Custom Buttons using Visualforce pages that didn’t have the Lightning Supported checkbox set didn’t appear when querying with the Phone device type for example.
  • User context matters, actions returned are user and configuration sensitive, meaning the record itself, record type and associated layout all contribute to the actions returned. Custom Buttons for example need to be on the relevant layout.
  • Label and Icon information, there are also fields that allow you to render appropriate labels and icons for the actions.
  • Related List actions, you can also retrieve actions shown on related lists, search for RelatedList in the help topic here.
  • Describe actions? You will notice some actions have an ActionTargetType of Describe? These are invoked via an API, something i will cover in later blog.

So lets discuss the “virtual SObject” bit!?!

Your probably wondering what a virtual SObject is?

Well my best guess is its an SObject that is not backed by physical data in the Salesforce database. If you check the documentation you’ll see fields just like any other object and it supports SOQL (with some limitations). My thinking is the records for this object are dynamically generated on demand by doing all the heavy lifting internally to scan all the various historic places where actions have been defined.

Thank you Salesforce architects, this is now my #1 coolest Salesforce API!

Whats next?

  • For starters, no more URL hacking of those standard pages, no excuses now!
  • Helper class or Visualforce and/or Lighting component for actions?
  • Explore the Force.com Actions Developer Guide


7 Comments

Disabling Trigger Events in Apex Enterprise Patterns

Iautobat.jpeg‘m proud to host my first guest bloggerChris Mail or Autobat as he is known on GitHub. Take it away Chris….

How to put the safety on…

Being an architect in a professional services organisation is a funny game. Each project is either a shiny new Salesforce instance without a fingerprint on it or an unknown vault of code and configuration that we must navigate through.

I have been using the fflib pattern now for some time, and more of our teams are adopting it for our programs of work. My latest addition is something that an architect might wonder why we need; the ability to turn off triggers via a simple interface on all domains.

In an ever growing complex environment, perhaps multiple projects over time delivering iterative enhancements I was noticing a common piece of code being developed within the Domain layer. It looked something along the lines of this:

public override void onAfterInsert()
{
    // if this is set we are already in a loop and want to exit!
    if(bProhibitAfterInsertTrigger)
    {
        return;
    }
    // down here we do something, maybe insert an Account!
}

While small and inconspicuous it allowed our code base to become inconsistent as there was no control over the exposure of these controlling flags and worse, we were repeating ourselves in every domain!

The solution was simple, a fluent style API within fflib_SObjectDomain. Any code can now simply set the control flags for any domain class:

fflib_SObjectDomain.getTriggerEvent(YourDomain.class).disableAll(); // dont fire anything
fflib_SObjectDomain.getTriggerEvent(YourDomain.class).disableAllBefore();
fflib_SObjectDomain.getTriggerEvent(YourDomain.class).disableAllAfter();

fflib_SObjectDomain.getTriggerEvent(YourDomain.class).disableBeforeInsert();
fflib_SObjectDomain.getTriggerEvent(YourDomain.class).disableBeforeUpdate();
fflib_SObjectDomain.getTriggerEvent(YourDomain.class).disableBeforeDelete();

fflib_SObjectDomain.getTriggerEvent(YourDomain.class).disableAfterInsert();
fflib_SObjectDomain.getTriggerEvent(YourDomain.class).disableAfterUpdate();
fflib_SObjectDomain.getTriggerEvent(YourDomain.class).disableAfterDelete();
fflib_SObjectDomain.getTriggerEvent(YourDomain.class).disableAfterUndelete();

To enable, just call the inverse e.g. .enableAfterInsert(); etc.

While not every code base will need to use these flags, they allow you to control quickly and easily your trigger execution with a single line of code that all your development team can reuse and follow.


20 Comments

GitHub Salesforce Deploy Tool Lightning Edition

A recent discussion on Twitter around sharing Salesforce configuration between admins has motivated me to revisit this tool. Before getting into anything major (watch this space). I decided to get back into the tools code by addressing a few outstanding maintenance tasks, enhancements and bug fixes, as well as treating it to a face lift!

LightningGitHubSFDeploy.png

As some of you may have noticed the tool has now adopted the Salesforce Lightning Design System look and feel. This new version is not just cosmetic, its also addressed some key enhancements and bug fixes…

LightningGitHubSFDeploy2.png

In keeping with the Lightning principles, this release makes the Deploy to Salesforce button (example shown below), even easier to place in your repository README files with less configuration required. The button will now automatically detect the GitHub repository. Which is useful if you Fork a repository into your own account or rename it, you no longer need to change the README file. The button code is now also smaller.

LightningGitHubSFDeployButton.png

IMPORTANT NOTE: This only works if your placing the button code in a GitHub README file. If your planning on using the button on a blog, article or wiki etc tick Use Specified Owner and Repository checkbox to have the specified repository details encoded into the button code as before.

This release has now also addressed issues preventing use with repositories that have Reports or Lightning Components in them. So you can now use the tool to deploy your favourite open source Lightning Components!

Finally if you have any private repositories, an improvement around the error handling in this area has also been made. Thanks to some great code contributions from Moti Korets and  Nathan Kramer for the whole GitHub private repository support! Thanks guys!


6 Comments

Monitoring Record Activity via Data Replication API’s

ReplicateAPI.pngYou might be thinking having started to read this blog that the primary use case of Data Replication API’s is to provide replication, well yes and no! No in a sense it won’t replicate your data for you, it actually won’t even return your data. What it will do is tell you what record Id’s have been updated or deleted within a certain time frame. What happens next is up to you, you don’t even have to do any replication if you don’t want to!

As someone who loves to keep things as native as possible, when answering this StackExchange post, i found it quite cool to find that this API is actually available to Apex developers! The API consist of two Database class methods getUpdated and getDeleted. The former returns new and updated records, its up to you to decide if its a new record or existing depending on if you’ve seen the record Id before or not.

Note: The process around these API’s is explained in more detail in the SOAP Developers Guide, so its worth reading this along with the Apex Developers Guide references. The general polling process is described here and limits and considerations here.

The API’s could not be easier to use, the following shows how to pull a list of record Id’s for updates made to records for a given object in the last hour.

Database.GetUpdatedResult r =
  Database.getUpdated(
    'MyObject__c', Datetime.now().addHours(-1), Datetime.now());
LastDateCovered.png

Salesforce documentation relating to the latestDateCovered field

Neither methods appear to consume any query or DML governor limits, though as noted above have some limits of their own. The GetUpdatedResult (described in more detail in the SOAP API documentation) contains a latestDateCovered field. This value should be retained and used in subsequent getUpdated calls.

Its unclear what Salesforce means by safety in the documentation, though the note relating to long running batch processes does make sense. This aspect highlights a key difference between attempting to query whats changed yourself based on the audit fields. The getDeleted method also works in the same way.

Its worth considering these API’s as a possible and lighter alternative to using Apex Triggers or UI’s to invoke custom behaviour when records are manipulated. Unlike Triggers you don’t know the specific changes, though Field Audit information could be queried if needed.

So be it a replication to another cloud via an Apex HTTP Callout or simply monitoring record activity into some org wide stats. Having Apex support allows you to keep things native via an Apex Schedule job to poll this API as often as you wish. With the advent of External Objects aka Lightning Connect other native possibilities start to present themselves…


26 Comments

Rollups and Cross Object Formula Fields

I’m constantly amazed at the number of varied use cases folks in the Chatter Group are applying to the Declarative Lookup Rollup Summary tool these days. This short blog highlights a particular use case that seems to be on the increase. To resolve it i reached out for additional help in the solution from Process Builder, this is the story…

Background: What causes a Rollup to recalculate?

The default behaviour of the rollup tool is to look for changes to the field your rolling up on, the one specified in the Field to Aggregate field. In addition you can list other fields for it to look at via the Relationship Criteria Fields field, which as the name suggests is also important information if you’ve used rollup criteria. However its also important if the field your rolling up on is a Formula field. In the case of formula field rollups the platform doesn’t inform the tools Apex Trigger of changes to these. So it cannot directly monitor such fields and to resolve this must instead be told explicitly about the fields that are referenced by the formula expression. So far so good…

Challenge: Rollups over Cross Object Formulas?

A challenge however arises if you’re wanting to do a realtime rollup based on a formula field that references fields from a related record, a cross object formula! In this case how does the rollup tool know when changes are made to related records?

One solution to this is to switch to schedule mode by clicking the Schedule Calculate button on the rollup. For realtime rollups, its potentially feasible to enhance the tool to deploy triggers to related objects and bubble up knowledge of field changes to the cause a recalculate of the rollup on the child object… However before we resort to more code (even in the tool) lets see what we can do with the declarative tools we have already today…

Example Use Case

The following schema diagram shows a simplified mockup of a such a challenge i helped a community member out with in the tools Chatter Group.

FormulaRollupUseCase.png

Here is the scenario assumptions and break down…

  • For whatever existing reasons the above is NOT a Master Detail relationship
  • Rollup needed is to Sum the Quote Line Item > Amount into the Quote > Total field.
  • The Quote Line Item > Amount field is a Formula field, which is a cross object formula pointing to the related Widget > Total field.
  • The Widget > Total field is itself a Formula field, in this simplified case adding up the values of Widget > A + Widget > B + Widget > C.
  • Whenever changes to the Widget > A, Widget > B or Widget > C fields are made we want the Quote > Total field to be recalculated.

Here’s the rollup summary definition between Quote and Quote Line Item

ForumlaRollupDLRS.png

While the above works if you use Calculate (one off full recalculate) or Schedule Calculate (daily full recalculate) buttons. Our issue arises in the general use of the Realtime mode. Since the tools triggers see nothing of the changes users make to the Widget fields above, realtime changes are not reflected on the Quote > Total rollup. This is due to the aforementioned reason, since we are using a cross object formula.

NOTE: The Calculate Mode pick list also has a Schedule option, this is a more focused background recalculate, only recalculating effected records since the last run, rather than Schedule Calculate button which is a full recalculate every night. So be aware if your using this mode that the problem and solution being described here also applies to Calculate Mode when set to Schedule as well. As it uses the same field monitoring approach to queue records up for scheduled recalculation.

If your fine without realtime rollups go ahead and use the Schedule Calculate button and at 2am each morning the Quote > Total amount will catchup with any changes made to the Widget fields that effected it, job done!

Solution: Shadow Fields and Process Builder

So when considering the solution, i did consider another rollup between the Widget and Quote Line Item to start to resolve this, thinking i could then put the result in field that the Quote Line Item > Quote  rollup would see change. However this was quickly proved a poor consideration as the relationship between Widget and Quote Line Item in this use case is the wrong way round, as Quote Line Item is the child in this case, doh! In other use cases, i have had success in using nested rollups to get more complex use cases to fly!

Shadow Field?

AmountShadowField
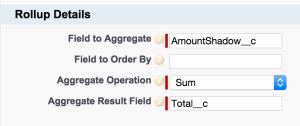
Either way i knew i had to have some kind of physical field other than a Formula field on the Quote Line Item object to notify the rollup tool of a change that would trigger a recalculate of the Quote > Total. I called this field Amount (Shadow) in this case, i also left it off my layout.

NOTE: I’ve made the assumption here that for whatever reason the existing cross object Formula field has to stay for other reasons, if thats not a problem for you, simply recreate Quote Line Item > Amount as a physical field and as you read the rest of this blog consider this your shadow field.

I then changed my rollup definition to reference the Amount Shadow field instead.

ChangesToRollup

NOTE: If you managed to switch the field type of your Amount field from a Formula to a physical Number field as noted above you don’t need to do this of course.

Process Builder to update your Field to Aggregate

Next i turned to Process Builder to see if i could get it populate the above Amount (Shadow) field on Quote Line Item, as users made changes to Widget fields. Leveraging the child parent relationship between Quote Line Item and Widget. Here is the setup i used to complete the solution!

FormulaRollupProessBuilder1.png

FormulaRollupProessBuilder2.png

FormulaRollupProessBuilder3.png

Summary

Its worth noting that if the relationship between Quote Line Item and Quote was Master Detail, you can effectively now of course use standard platform Rollup Summary Fields without needing the rollup tool at all. You may think me bias here, but not at all, i’d much rather see a fully native solution any day!

Regardless if this use cases fits yours or not, hopefully this blog has given you some other useful inspiration for further rollup and Process Builder combo deals! Enjoy!


2 Comments

Packaging and Installing Rollups

Since v2.0 of the Declarative Rollup Tool, it is now possible to use Custom Metadata to store rollup configurations. Not only does this make it easy to transfer those you have setup in Sandbox via Change Sets, you can also use Salesforce packaging to capture those you’ve created and install them over and over into other orgs, like a reusable Change Set!

InstallRollups

Create and set up your Packaging Org

To do this, you need a Developer Edition org from Salesforce, this will act as your master org for your common rollup definitions. Here you can install the rollup tool package itself as minimum. Then also create common fields or objects used by your rollups if you wish. You can also install any other packages, such as the NPSP packages. Basically prepare and test everything here as you would normally in Sandbox or Production.

DESignup

Creating your Package

Under the Setup menu navigation to Create and then Packages. Create a new Package with an appropriate name. Click Add to components, components are anything from Custom Objects, Fields, Apex Triggers and Apex Tests to the Rollup definitions themselves. As a minimum you will need to add the following components for rollups.

  • Apex Classes for the rollup/s (starting dlrs)
  • Apex Triggers for the rollup/s (starting dlrs)
  • Lookup Rollup Summary definition/s

The platform adds a few other dependent things as you can see in the screenshot below, but don’t worry about these. You should have something like this…

PackagingRollups

Tip: After creating your rollups, go to Setup and Custom Metadata, and find your rollup definition, edit it and locate the Protected checkbox, then hit Save (at present this checkbox is not shown in the custom UI for rollups). This checkbox prevents users or other admins from changing your rollup definition once installed. You also need to use the managed package route though, as described below.

Choosing Unmanaged or Managed Packages

This choice depends on if you want to manage several updates / releases to your rollups over time, adding or updating as you improve things. An umanaged package is basically like just installing a template of your rollups, once installed thats it, they are no longer linked to your package. If however you want to install updates to them and/or stop people from editing your rollups (see protected mode above), you want a managed package.

Setting a namespace for your Managed Package

If you decided you only want an unmanaged package, skip this bit. Otherwise on the Packages page, under Setup then Create. Click Edit button and follow the prompts to enter a namespace, this is a short mnemonic that describes your package, like a unique ID. Once set it cannot be changed. Next find your Package detail and click Edit, selecting the Managed checkbox on hitting Save.

Uploading your Rollup Package!

PackagesRollups

This process basically builds your installer, by actually placing a copy of what you’ve done in the AppExchange servers. All be it as a private listing. This gives you an install link to use over and over as much as you like. Install it in the sandbox and production as needed.

Click on your package and then the Upload button, give it a name and version of your choose. Be sure to select the Release mode, in most cases for this packaged content worrying about Beta vs Release mode is not a concern. Press Upload and wait.

PackageUpload.png

RollupPackageSummary

Rinse and Repeat?

Keep in mind if you went with the managed package route. You can go back to your packaging org, make some improvements, add more rollups etc, then repeat the upload process to get a new version of your package. Simply then go to any existing org with your prior release installed and upgrade.

NOTE: To ensure your rollup definitions are upgraded they must be marked as protected. If you don’t care about this and only want new rollups to be added, retaining subscriber (installed org) changes, don’t worry about Protected rollups.


3 Comments

Apex Sharing and applying to Apex Enterprise Patterns

Apex Sharing can be a bit of mystery to new developers as well as seasoned ones from other platforms. This blog is not for those wanting to understand sharing as such, there are plenty of excellent articles and Salesforce docs on that. Here i wanted to talk about how first I came to understand it and how it fits into Apex Enterprise Patterns.

I recall one really basic thing that took me by surprise was the name, Sharing? Of course this is an end user based way of describing what as an engineer, I effectively understood as row level security. I was also blown away to know that this applied in and outside of code, for example when reporting is used, very cool! Row level security is certainly for me a more accurate way to describe it and certainly helps when i have been talking to others new to the platform but have experience on other platforms.

The second thing that i learn is that in order to control it, it is required to be considered in the way one annotates code at design time. And less so about a default runtime or a configured at runtime context. Since sharing is not enabled by default in Apex (except for Anonymous Apex contexts), it needs to be enabled via opt-in by the developer. Salesforce helps remind us of this through tools like the Salesforce Security Scanner and best practices here, well worth a read.

You may have noticed that the Apex Enterprise Patterns classes providing implementations of your Service layer always have with sharing specified. This sets the default context for all code, in the Domain, Selector or other classes that are executed from then on to run in this mode. Such classes do not need to and should not generally need to qualify any with sharing or without sharing keywords either.

global with sharing class OpportunitiesService 
{		
	global static void applyDiscounts(<ID> opportunityIds, Decimal discountPercentage)
	{
		// This code and any it calls runs as 'with sharing'
	}
}

So what happens if you really want to run without sharing (great article here on reasons for this)? Do you apply it to your Domain or Selector class definition? Well actually neither, since not all the code in these classes may warrant sharing being disabled for example. What i prefer to do is keep the execution of running in this mode as short and contained as possible, to avoid any other inadvertent execution of other code running in this mode.

The basic approach is to leverage an inner class that contains just the code that needs to run without sharing. Typically this code would run in the Selector layer, though can be used elsewhere inside a service method implementation or domain class method. The point is its scoped to a method or specific execution path.

public class OpportunitiesSelector extends fflib_SObjectSelector
{
    public List<Opportunity> selectById(Set<Id> idSet) {
        // This method simply runs in the sharing context of the caller
        // ...
        return opportunities;
    }

    public List<OpportunityInfo> selectOpportunityInfo(Set<Id> idSet) {	
        // Explicitly run the query in a 'without sharing' context
        return new SelectOpportunityInfo().selectOpportunityInfo(this, idSet);
    }

    private without sharing class SelectOpportunityInfo {
        public List<OpportunitiesSelector.OpportunityInfo> 
                 selectOpportunityInfo(OpportunitiesSelector selector, Set<Id> idSet) {
            // Execute the query as normal
            // ...
           return opportunityInfos;				
        }
    }
}

So do we still need it specify with sharing elsewhere? Well yes, controllers for sure is still good practice, indeed Selectors can end up being called from these. I personally also consider any class that is invoked as an Apex entry point, such as Invocable Methods, Batch Apex, Scheduled Apex etc in this category.

If your following a service orientated design most of these entry points delegate to the Service layer, so it feels like your doubling up at times, but thats no bad thing when security is concerned. Finally keep in mind, if you choose to expose your Service layer as an API, it feels equally important to ensure the default sharing mode is enabled regardless of what mode the caller is running in.

The general approach here, is enable sharing, then make the code, developer and business/solution analyst justify why it needs to be switched off for a system level operation that requires it. If you put aside the Apex Enterprise Patterns, this is in fact not that different from the general guideline of having with sharing on all your controllers, the main difference here is by putting it on your service layer, your ensuring not just your controller entry points are covered.


86 Comments

Visual Flow with List View and Related List Buttons

Last years blog Clicks not Code with Visual Flow Custom Buttons has continued to be quite well received, so i thought i would explore what more could be done and address a few questions that have come up since. This blog does make some assumptions that you are already familiar with the approach from my previous blog.

This time i want to focus on using Visual Flows with list Custom Buttons, such buttons can be placed on List View layouts and Related List sections on Detail layouts. Salesforce also provides a means for the user to select specific records to process. These buttons apply to both Salesforce Classic and Salesforce Lighting Experience.

AccountFlowListView

As before we are keeping in the spirit of Clicks not Code, well with a little bit of reusable Visualforce code. But don’t worry you can easily copy and paste to adapt with a few changes. Critically with this approach you don’t need to resort to JavaScript based Custom Buttons, which will no longer be supported in Lighting Experience.

Handling Record Lists from Custom Buttons

First things first, ensure you have created a SObjectCollection variable in your Flow and ensured its designated as Input. For this blog we are simply going to display a step in the UI for each selected record. Using the Loop and Screen elements. One thing to keep track of is the fields your referencing within the Flow, in this case i’m using Account Name and Annual Amount.

SelectedAccountsFlow

List View Custom Button Example

Lets get started with a Custom Button on the Account List View. When adding a List Custom Button you have two choices, do you want the user to be able to select records or not? If not, then your button will pass all the records in the List View (currently limited to 2000).

So if when creating your Custom Button you plan to select the Display Checkboxes (for Multi-Record Selection) option. Then create the following Visualforce page, changing the object name and list of fields accordingly. This will ensure selected records are passed to your Flow.

<apex:page standardController="Account" tabStyle="Account" recordSetVar="AllAccounts" >
    <!-- Add below each field you reference in your Flow -->    
    <apex:repeat value="{!AllAccounts}" var="row" rendered="false">
        {!row.Name}
        {!row.AnnualRevenue}
    </apex:repeat>
    <!-- Runs your Flow -->    
    <flow:interview name="SelectedAccounts" 
          finishLocation="{!URLFOR($Action.Account.Tab, $ObjectType.Account)}">
        <apex:param name="SelectedRows" value="{!Selected}"/>
    </flow:interview>
</apex:page>

IMPLEMENTATION NOTE: If you want to avoid bothering with changes between lines 3-6, simply re-query the records in the Flow using the Fast Lookup element. Thought it’s less efficient this way since your not leveraging the query made by Visualforce.

If you don’t want the ability for the users to select records and want all records, the main difference to the above is a change to the line 10, passing in the AllAccounts binding.

    <!-- Runs your Flow -->    
    <flow:interview name="SelectedAccounts" 
          finishLocation="{!URLFOR($Action.Account.Tab, $ObjectType.Account)}">
        <apex:param name="SelectedRows" value="{!AllAccounts}"/>
    </flow:interview>

Don’t forget to add your button to the List View layout, select some records and give it a try!

SelectedAccountRow

Related List Custom Button Example

In this case the Visualforce page is much the same, accept that of course your placing the associated button on the Layout of the parent object by editing the applicable related list section. The following example shows a button on the Opportunities related list on the Account object.

<apex:page standardController="Opportunity" tabStyle="Opportunity" recordSetVar="AllOpportunities">
    <!-- Add below each field you reference in your Flow -->
    <apex:repeat value="{!AllOpportunities}" var="row" rendered="false">
        {!row.Name}
        {!row.Amount}
    </apex:repeat>
    <!-- Runs your Flow -->
    <flow:interview name="SelectedOpportunities" 
          finishLocation="{!$CurrentPage.parameters.retURL}">
        <apex:param name="SelectedRows" value="{!Selected}"/>
    </flow:interview>    
</apex:page>

RelatedListFlowButton

IMPLEMENTATION NOTE: Note that the above Visualforce page code uses a URL parameter retURL, which is not available in Lighting Experience. It still works, but leaves the user on the finish page.

Summary

For more information on passing values to Flows using Visualforce check out the docs here. With the exception of the retURL hack above, i’m pleased to see support in Classic and Lighting Experience. Though the later, has yet to obtain support for providing the record selection support, so only the all records use case is available.

At present Visual Flow styling does not quite look at home either in Lightning Experience, which made me wonder about trying SLDS styling with Flow’s CSS customisation abilities (i will let everyone known how successful this is!)…

AccountFlowListViewLEX

FlowInLEX

Finally both these approaches will also work equally well with Automation Flows (aka Headless Flows), just in case, as with the example in my earlier blog you just want to do some kind of calculations without prompting the user.