In my previous blog i covered an exciting new integration tool from Salesforce, which consumes API’s that have a descriptor (or schema) associated with them. External Services allows point and click integration with API’s. The ability for Salesforce to consume API’s complying with API schema standards is a pretty huge step forward. Extending its ability to integrate with ease in a way that is in-keeping with its low barrier to entry development and clicks not code mantra.
At the time of writing my previous blog, only Interagent schema was supported by External Services. However as of the Winter’18 release this is no longer the case. In this blog i will explore the more widely adopted Swagger / Open API 2.0 standard, using Node.js and Heroku and External Services. As bonus topic, i will also touch on using Swagger Code Generator with Apex!
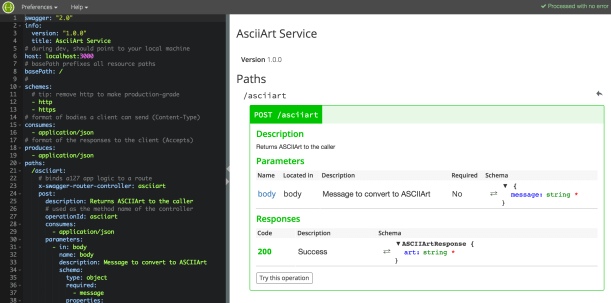
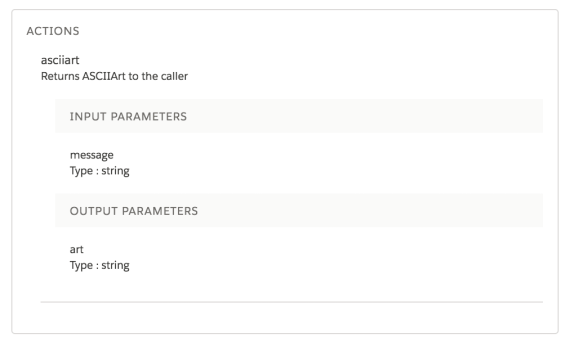
One of the many benefits of supporting the Swagger / Open API standard is the ability to generate documentation for it. The following screenshot shows the API schema on the left and generated documentation on the right. What is also very cool about this, is the Try this operation button. Give it a try for yourself now!
Whats the difference between Swagger and Open API 2.0? This was a question i asked myself and thought i would cover the answer here. Basically as at, Swagger v2.0, there is no difference, the Open API Initiative is a rebranding, born out of the huge adoption Swagger has seen since its creation. This move means its future is more formalised and seems to have more meaningful name. You can read more about this amazing story here.
Choosing your methodology for API development
The schema shown above might look a bit scary and you might well want to just get writing code and think about the schema when your ready to share your API. This is certainly supported and there are some tools that support generation of the schema via JSDoc comments in your code or via your joi schema here (useful for existing API’s).
However to really embrace an API first strategy in your development team i feel you should start with the requirements and thus the schema first. This allows others in your team or the intended recipients to review the API before its been developed and even test it out with stub implementations. In my research i was thus drawn to Swagger Node, a tool set, donated by ApiGee, that embraces API-design-first. Read more pros and cons here. It is also the formal Node.js implementation associated with Swagger.
The following describes the development process of API-design-first.
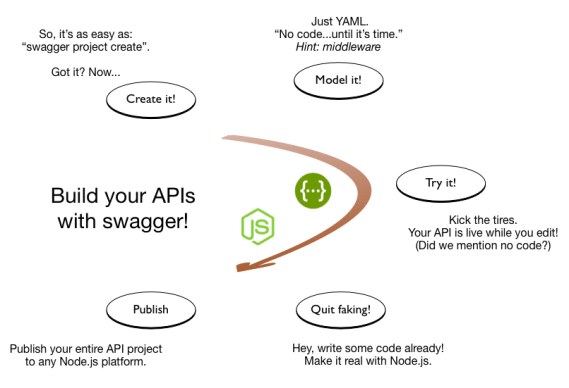
(ref: Swagger Node README)
Developing Open API’s with “Swagger Node”
Swagger Node is very easy to get started with and is well documented here. It supports the full API-design-first development process show in the diagram above. The editor (also shown above) is really useful for getting used to writing schemas and the UI is dynamically refreshed, including errors.
The overall Node.js project is still pretty simple (GitHub repo here), now consisting of three files. The schema is edited in YAML file format (translated to JSON when served up to tools). The schema for the ASCIIArt service now looks like the following and is pretty self describing. For further documentation on Swagger / Open API 2.0 see here.
https://createasciiart.herokuapp.com/schema/
swagger: "2.0"
info:
  version: "1.0.0"
  title: AsciiArt Service
# during dev, should point to your local machine
host: localhost:3000
# basePath prefixes all resource paths
basePath: /
#
schemes:
  # tip: remove http to make production-grade
  - http
  - https
# format of bodies a client can send (Content-Type)
consumes:
  - application/json
# format of the responses to the client (Accepts)
produces:
  - application/json
paths:
  /asciiart:
    # binds a127 app logic to a route
    x-swagger-router-controller: asciiart
    post:
      description: Returns ASCIIArt to the caller
      # used as the method name of the controller
      operationId: asciiart
      consumes:
        - application/json
      parameters:
        - in: body
          name: body
          description: Message to convert to ASCIIArt
          schema:
            type: object
            required:
              - message
            properties:
              message:
                type: string
      responses:
        "200":
          description: Success
          schema:
            # a pointer to a definition
            $ref: "#/definitions/ASCIIArtResponse"
  /schema:
    x-swagger-pipe: swagger_raw
# complex objects have schema definitions
definitions:
  ASCIIArtResponse:
    required:
      - art
    properties:
      art:
        type: string
The entry point of the Node.js app, the server.js file now looks like this…
'use strict';

var SwaggerExpress = require('swagger-express-mw');
var app = require('express')();
module.exports = app; // for testing
var config = {
  appRoot: __dirname // required config
};

SwaggerExpress.create(config, function(err, swaggerExpress) {
  if (err) { throw err; }
  // install middleware for swagger ui
  app.use(swaggerExpress.runner.swaggerTools.swaggerUi());
  // install middleware for swagger routing
  swaggerExpress.register(app);
  var port = process.env.PORT || 3000;
  app.listen(port);
});
Note: I changed the Node.js web server framework from hapi (used in my previous blog) to express. As I could not get the Swagger UI to integrate with hapi.
The code implementing the API has been moved to its asciiart.js file.
var figlet = require('figlet');

function asciiart(request, response) {
    // Call figlet to generate the ASCII Art and return it!
    const msg = request.body.message;
    figlet(msg, function(err, data) {
        response.json({ art: data});
    });
}

module.exports = {
    asciiart: asciiart
};
Note: There is no parameter validation code written here, the Swagger Node module dynamically implements parameter validation for you (based on what you define in the schema) before the request reaches your code! It also validates your responses.
To access the documentation simply use the path /docs. The documentation is generated automatically, no need to manage static HTML files. I have hosted my sample AsciiArt service in Heroku so you can try it by clicking the link below.
https://createasciiart.herokuapp.com/docs/

Consuming Swagger API’s with External Services
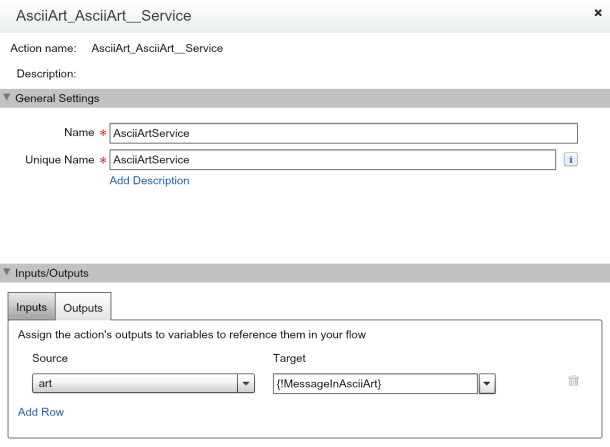
The process described in my earlier blog for using the above API via External Services has not changed. External Services automatically recognises Swagger API’s.
NOTE: There is a small bug that prevents the callout if the basePath is specified as root in the schema. Thus this has been commented out in the deployed version of the schema for now. Salesforce will likely have fixed this by the time you read this.
Swagger Tools
 Swagger Editor, the interactive editor shown in the first screenshot of this blog.
- Swagger Code Generator, creates server stubs and clients for implementing and calling Swagger enabled API’s.
- Swagger UI, the browser based UI for generating documentation. You can call this from the command line and upload the static HTML files or use frameworks like the one used in this blog to generated it on the fly.
Can we use Swagger to call or implement API’s authored in Apex?
Swagger Tools are available on a number of platforms, including recently added support for Apex clients. This gives you another option to consume API’s directly in Apex. Its not clear if this is going to a better route than consuming the classes generated by External Services, i suspect it might have some pros and cons tbh. Time will tell!
Meanwhile i did run the Swagger Code Generator for Apex and got this…
public class SwagDefaultApi {
    SwagClient client;

    public SwagDefaultApi(SwagClient client) {
        this.client = client;
    }

    public SwagDefaultApi() {
        this.client = new SwagClient();
    }

    public SwagClient getClient() {
        return this.client;
    }

    /**
     *
     * Returns ASCIIArt to the caller
     * @param body Message to convert to ASCIIArt (optional)
     * @return SwagASCIIArtResponse
     * @throws Swagger.ApiException if fails to make API call
     */
    public SwagASCIIArtResponse asciiart(Map<String, Object> params) {
        List<Swagger.Param> query = new List<Swagger.Param>();
        List<Swagger.Param> form = new List<Swagger.Param>();

        return (SwagASCIIArtResponse) client.invoke(
            'POST', '/asciiart',
            (SwagBody) params.get('body'),
            query, form,
            new Map<String, Object>(),
            new Map<String, Object>(),
            new List<String>{ 'application/json' },
            new List<String>{ 'application/json' },
            new List<String>(),
            SwagASCIIArtResponse.class
        );
    }
}
The code is also generated in a Salesforce DX compliant format, very cool!


 This was my first TrailheaDX and what an event it was! With my Field Guide in hand i set out into the wilderness! In this blog i’ll share some of my highlights, thoughts and links to the latest resources. Many of the newly announced things you can actually get your hands on