Andy in the Cloud

From BBC Basic to Force.com and beyond…


Leave a comment

Unit Testing with the Domain Layer

Writing true Apex unit tests that are quite granular can be hard in Apex, especially when the application gets more complex, as their is limited mocking support, meaning you have to create all your test data and move it through stages in its life cycle (by calling other methods) to get to the logic your unit test needs to test. Which of course is in itself a valid test approach of definitely needed, this blog is certainly not aiming to detract from those. But these are more of an integration or functional test. Wikipedia has this to say about unit tests…

In computer programmingunit testing is a method by which individual units of source code, sets of one or more computer program modules together with associated control data, usage procedures, and operating procedures are tested to determine if they are fit for use.[1] Intuitively, one can view a unit as the smallest testable part of an application. In procedural programming, a unit could be an entire module, but it is more commonly an individual function or procedure. In object-oriented programming, a unit is often an entire interface, such as a class, but could be an individual method.[2] Unit tests are short code fragments[3] created by programmers or occasionally by white box testers during the development process.

If as a developer you want to write these kind of low level unit tests around your domain classes (part of the Apex Enterprise Patterns), perhaps trying out a broader number of data input scenarios to your validation or defaulting code its hard using the conventional DML approach approach for the same reasons. Typically the result is you compromise on the tests you really want to write. The other downside is eventually your test class starts to take longer and longer to execute, as the DML overhead is expensive. Thus most developers I’ve spoken to, including myself, start to comment out test methods to speed things up while they work on a specific test method. Or perhaps you are a TDD fan, where incremental dev and unit test writing is important.

Stephen Willcock and I often discuss this balance, he is a big fan of DML’less testing and structuring code for testability, having presented a few times at Dreamforce on the topic. There is a framework thats been in the fflib_SObjectDomain base class for a while now that presents its own take on this in respect to Domain layer unit testing. This allows you to emulate DML statements and use the same base class trigger handler method to invoke your Domain methods in the correct sequence from tests. While also performing more granular assertions without actually doing any DML.

As most of you who are using the patterns know the Apex Trigger code is tiny, one line…

fflib_SObjectDomain.triggerHandler(Opportunities.class);

The mocking approach to DML statements used by the Domain layer here leverages this line of code directly in your tests (emulating the Apex Trigger invocation directly) without having to execute DML or setup any dependent database state information the record might not need for the given test scenario. But first you must setup your mock database with the records you want to test against.

fflib_SObjectDomain.Test.Database.onInsert(
   new Opportunity[] { new Opportunity ( Name = 'Test', Type = 'Existing Account' ) } );

The next thing you’ll want to do is use a slightly different convention when setting errors on your records or fields, this allows for you to assert what errors have been raised. This convention also improves from the less than ideal convention of try/catch and doing a .contains(‘The driods i’m looking for!’) in the exception text for the message you are looking for. So instead of doing this on your onValidate

opp.AccountId.addError(
   'You must provide an Account for Opportunities for existing Customers.');

You use the error method, this registers in a list of errors that can be asserted later in the test. Like the ApexPages.getMessages() method, it is request scope so contains all errors raised on all domain objects executed during the test incrementally.

opp.AccountId.addError(
   error('You must provide an Account for Opportunities for existing Customers.',
            opp, Opportunity.AccountId) );

The full test then looks like this…

@IsTest
private static void testInsertValidationFailedWithoutDML()
{
    // Insert data into mock database
    Opportunity opp = new Opportunity ( Name = 'Test', Type = 'Existing Account' );
    fflib_SObjectDomain.Test.Database.onInsert(new Opportunity[] { opp } );

    // Invoke Trigger handler and thus appropriate domain methods
    fflib_SObjectDomain.triggerHandler(Opportunities.class);

    // Assert results
    System.assertEquals(1,
        fflib_SObjectDomain.Errors.getAll().size());
    System.assertEquals('You must provide an Account for Opportunities for existing Customers.',
        fflib_SObjectDomain.Errors.getAll()[0].message);
    System.assertEquals(Opportunity.AccountId,
        ((fflib_SObjectDomain.FieldError)fflib_SObjectDomain.Errors.getAll()[0]).field);
}

NOTE:  The above error assertion approach still works when your using the classic DML and Apex Trigger approach to invoking your Domain class handlers, just make sure to utilise the error method convention as described above.

There are also methods on the fflib_SObjectDomain.Test.Database to emulate other DML operations such as onUpdate and onDelete. As I said at the start of this blog, this is really not ment as an alternative to your normal testing, but might help you get a little more granular on your testing, allowing for more diverse use cases and not to mention speeding up the test execution!


46 Comments

Going Native with the Apex UML Tool and Tooling API!

Screen Shot 2013-10-14 at 22.16.58 Over the last month or so, John M DanielsJames Loghry (a fellow MVP) and myself have been collaborating together in order to accomplish two things; firstly remove the need to utilise a Heroku backend for the Apex UML tool (i first launched for Dreamforce 2013). Secondly and importantly for the first objective, create an Apex wrapper around the Tooling API.

John and I first chatted about collaborating at Dreamforce 2013 to work on the Apex UML tool and move it forward. He later put forward the suggestion that we should consider utilising the Tooling API directly from Apex and do away with the Heroku code. We quickly spun up a branch to try this out, and quite quickly re-architected it to use Visualforce Remoting and started on the plumbing!

Meanwhile James and I had also started thinking about a Apex wrapper around the Tooling API, initially independently, but ultimately decided to join forces! The combination between these two initiatives and the three of us has thus far born excellent fruit, with an initial release of the Apex UML tool running totally native, powered by an early version of the Apex Tooling API…

Apex UML Tool

As before there is a managed package version of the tool for you to install, you can actually upgrade from v1.2 (the Heroku Canvas app based version) directly. Unfortunately if you have v1.2 installed, you will have to upgrade at this stage, as i inadvertently deleted the Connected App from my development org.

  1. Install the package from the install links section here.
  2. Ensure your Apex classes are compiled
  3. Assign the Apex UML permission set
  4. Go to Apex Classes page and click the Compile all classes link
  5. Navigate to the Apex UML page
  6. You will see a Remote Site setting message, follow it and then reload the page.
  7. From this point on the functionality and usage is currently, as per the introduction given here.

UPDATE: Step 6 is not required if you have My Domain enabled (since v1.7).

NativeApexUML

If your interested in ideas we have for future versions of the tool take a look here, ideas always welcome!

Powered by the Apex Tooling API

Initially both James and I had the same thought on building out an Apex wrapper around the Tooling API’s SOAP variant, using the WSDL2Apex tool. However while this approach works quite well for the Metadata API, the Tooling API’s makes extensive use of xsd:extension aka polymorphic XML, for example in the querying of its SObject’s and Symbol Table.

Unfortunately the fact is that the XML deserialiser does not know how to deserialise into different types or how to access base class members. So we reached for the more flexible JSON deserializer. James discovered a cunning combination of manual JSON parsing and typed de-serialisation to get things moving! I’ll leave him to go into more detail on this. You can also read a little more about the strategy decision on the GitHub repository here and current discussions here.

Please note the API is still work in progress,  while the Apex UML tool has given it quite a good shake down so far, keep in mind the API design is still forming. Here are a few examples, starting with code to create an Apex Class

// Create an Apex class in 5 lines!
ToolingAPI toolingAPI = new ToolingAPI();
ToolingAPI.ApexCLass newClass = new ToolingAPI.ApexClass();
newClass.Name = 'HelloWorld';
newClass.Body = 'public class HelloWorld { }';
toolingAPI.createSObject(newClass);

This code queries the Symbol Table for a class and dumps the methods to the debug log…

		ToolingApi toolingAPI = new ToolingApi();
		List apexClasses = (List)
			toolingAPI.query(
				'Select Name, SymbolTable ' +
				'From ApexClass ' +
				'Where Name = \'UmlService\'').records;
		ToolingApi.SymbolTable symbolTable = apexClasses[0].symbolTable;
        for(ToolingApi.Method method : symbolTable.methods)
            System.debug(method.name);

The following is an updated version of a very early version of the API, retrieving a list of Custom Objects and Fields.

		// Constructs the Tooling API wrapper (default constructor uses user session Id)
		ToolingAPI toolingAPI = new ToolingAPI();

		// Query CustomObject object by DeveloperName (note no __c suffix required)
		List customObjects = (List)
			toolingAPI.query('Select Id, DeveloperName, NamespacePrefix From CustomObject Where DeveloperName = \'Test\'').records;

		// Query CustomField object by TableEnumOrId (use CustomObject Id not name for Custom Objects)
		ToolingAPI.CustomObject customObject = customObjects[0];
		Id customObjectId = customObject.Id;
		List customFields = (List)
			toolingAPI.query('Select Id, DeveloperName, NamespacePrefix, TableEnumOrId From CustomField Where TableEnumOrId = \'' + customObjectId + '\'').records;

		// Dump field names (reapply the __c suffix) and their Id's
		System.debug(customObject.DeveloperName + '__c : ' + customObject.Id);
		for(ToolingAPI.CustomField customField : customFields)
			System.debug(
				customObject.DeveloperName + '__c.' +
				customField.DeveloperName + '__c : ' +
				customField.Id);

This code from the Apex UML tool starts a compilation of a given Apex class to later access external references from the ApexClassMember objects SymbolTable.

		// Delete any existing MetadataContainer?
		ToolingApi tooling = new ToolingApi();
		List containers = (List)
			tooling.query(
				'SELECT Id, Name FROM MetadataContainer WHERE Name = \'ApexNavigator\'').records;
		if(containers!=null &&  containers.size()>0)
			tooling.deleteSObject(ToolingAPI.SObjectType.MetadataContainer, containers[0].Id);

		// Create MetadataContainer
		ToolingAPI.MetadataContainer container = new ToolingAPI.MetadataContainer();
		container.name = 'ApexNavigator';
		ToolingAPI.SaveResult containerSaveResult = tooling.createSObject(container);
		if(!containerSaveResult.success)
			throw makeException(containerSaveResult);
		Id containerId = containerSaveResult.id;

		// Create ApexClassMember and associate them with the MetadataContainer
		ToolingAPI.ApexClassMember apexClassMember = new ToolingAPI.ApexClassMember();
		apexClassMember.Body = classes.get(className).Body;
		apexClassMember.ContentEntityId = classes.get(className).id;
		apexClassMember.MetadataContainerId = containerId;
		ToolingAPI.SaveResult apexClassMemberSaveResult = tooling.createSObject(apexClassMember);
		if(!apexClassMemberSaveResult.success)
			throw makeException(apexClassMemberSaveResult);

		// Create ContainerAysncRequest to deploy (check only) the Apex Classes and thus obtain the SymbolTable's
		ToolingAPI.ContainerAsyncRequest asyncRequest = new ToolingAPI.ContainerAsyncRequest();
		asyncRequest.metadataContainerId = containerId;
		asyncRequest.IsCheckOnly = true;
		ToolingAPI.SaveResult asyncRequestSaveResult = tooling.createSObject(asyncRequest);
		if(!asyncRequestSaveResult.success)
			throw makeException(asyncRequestSaveResult);
		asyncRequest = ((List)
			tooling.query(
				'SELECT Id, State, MetadataContainerId, CompilerErrors ' +
				'FROM ContainerAsyncRequest ' +
				'WHERE Id = \'' + asyncRequestSaveResult.Id + '\'').records)[0];

In later blogs between us, we will be extending the demo code and more cool stuff!

Next Steps

I’m looking forward to what happens next! Both initiatives have got off to a great start and we will keep incrementing. Certainly, its good to have the Apex UML tool to help drive the development and testing of the Apex Tooling API. Follow my fellow collaborators here @JohnDTheMaven and @dancinllama.


31 Comments

Spring’14 Visualforce Remote Objects Introduction

Salesforce have provided further support for JavaScript in the upcoming Spring’14 release. With a new flavour of the popular Visualforce Remoting facility. Visualforce Remote Objects is a pilot feature I have been trying out in a pre-release org. It’s aim is effectively to make performing database operations, like create, read, update and delete in JavaScript as easy as possible without the need for Apex, and without consuming the orgs daily API limits. This blog introduces the feature and contrasts it with its very much still relevant Visualforce Remoting brother.

Consider a master detail relationship between WorkOrder__c and WorkOrderLineItem__c. The first thing you need to do is declare your intent to access these objects via JavaScript on your Visualforce page with some new tags.

	<apex:remoteObjects >
	    <apex:remoteObjectModel name="WorkOrder__c" fields="Id,Name,AccountName__c,Cost__c"/>
	    <apex:remoteObjectModel name="WorkOrderLineItem__c" fields="Id,Name,Description__c,Hours__c,WorkOrder__c"/>
	</apex:remoteObjects>

The following JavaScript can now be used to access the JavaScript objects the above automatically injects into the page (note that while not shown there is further control over object and field naming, i used the defaults here).

It is an async API, so you provide a function call back to handle the result of the operations (create, update, delete and select are supported), it does not throw exceptions. In the example below if the insert of the Work Order master record is successful the child is then inserted. Note the event parameter actually contains the Id of the inserted record.

		function doSomethingJS(answer)
		{
			// Create work order
			var workOrder = new SObjectModel.WorkOrder__c();
			workOrder.set('AccountName__c','Hitchhikers.com');
			workOrder.set('Cost__c', answer * 100);
			workOrder.create(function(error, result, event)
				{
					// Success?
					if(error == null)
					{
						// Create work order line item
						var workOrderLineItem = new SObjectModel.WorkOrderLineItem__c();
						workOrderLineItem.set('Description__c', 'Answering the question');
						workOrderLineItem.set('Hours__c', answer);
						workOrderLineItem.set('WorkOrder__c', result[0]);
						workOrderLineItem.create(function(error, result, event)
							{
								// Errors?
								if(error!=null)
									alert(error);
								else
									alert('Success');
							} );
						return;
					}
					// Display error
					alert(error);
				} );
		}

As per the documentation, this means you no longer need an Apex controller to do this. You can also query using this object model as well, as per this the pre-release documentation querying a Wharehouse object. However before we cast aside our Apex thoughts, lets look at what the above would like implemented via a Remote Action.

		function doSomethingApex(answer)
		{
			// Create work order and line item via Apex
			Visualforce.remoting.Manager.invokeAction(
				'{!$RemoteAction.RemoteObjectDemoController.doSomething}',
				answer,
				function(result, event){
					alert(event.status ? 'Success' : event.message);
				});
		}

The following Apex code implements the remote action.

	@RemoteAction
	public static void doSomething(Integer answer)
	{
		WorkOrder__c workOrder = new WorkOrder__c();
		workOrder.AccountName__c = 'Hitchhikers.com';
		workOrder.Cost__c = answer * 100;
		insert workOrder;
		WorkOrderLineItem__c workOrderLineItem = new WorkOrderLineItem__c();
		workOrderLineItem.Description__c = 'Answering the question';
		workOrderLineItem.Hours__c = answer;
		workOrderLineItem.WorkOrder__c = workOrder.Id;
		insert workOrderLineItem;
	}

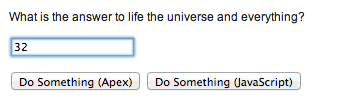
On the face of it, it may appear both accomplish the same thing, but there is a very important and critical architecture difference between them. To help illustrate this i created a page to invoke both of these options. Screen Shot 2014-01-22 at 08.48.56

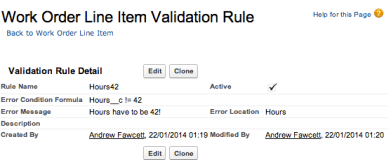
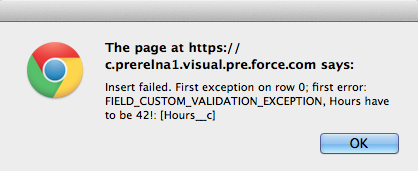
Screen Shot 2014-01-22 at 09.03.07While also creating a strategically placed  Validation Rule on the Work Order Line item, one which would fail the insert if anything other than 42 was entered in the UI.
So given the validation rule in place, lets perform a test.

  1. Ensure there are no Work Order records present
  2. Enter an invalid value, say 32, click the buttons, observe the expect error
  3. Correct the value to 42, click the button again and observe the outcome on the database.
  4. The expected result is one Work Order record with a single Work Order Line Item record.

Testing the ‘Do Something (Apex)’ Button

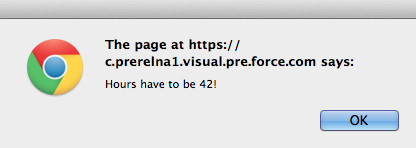
After going through the test above, the button initially gives the error as expected…

Screen Shot 2014-01-22 at 09.00.05

When the value is corrected and button pressed again, the result is this…

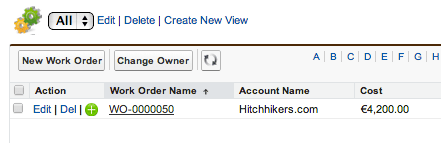
Screen Shot 2014-01-22 at 08.54.07

The test passed.

Testing the ‘Do Something (JavaScript)’ Button

Going through the tests again, this button initially gives the error as expected…

Screen Shot 2014-01-22 at 09.00.25

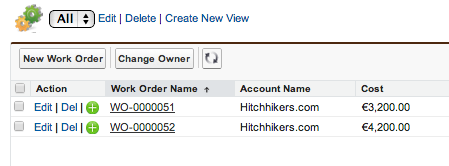
When the value is corrected and button pressed again, the result is this…

Screen Shot 2014-01-22 at 08.56.54
While Visualforce Remote Objects technically performed as I believe Salesforce intended, this functional tests expectation failed. Since we have two Work Order records, one with no Work Order Lines and one that is what we expected. So why did this additional rogue Work Order record get created, what did we do wrong?

The answer lies in the scope of the database transaction created…

  • In the Visualforce Remote @RemoteAction use case the platform automatically wraps a transaction around the whole of the Apex code and rolls back everything if an error occurs, you can read more about this here.
  • In the Visualforce Remote Objects use case the database transaction is only around the individual database operations not around the whole JavaScript function. Hence by the time the Work Order Line Item fails to insert the Work Order has already been committed to the database. The user then corrects their mistake and tries again, hence we end up with two Work Orders and not one as the user expected.

Since Apex transaction management is so transparent most of the time (by design), its likely that the same assumption might be made of Remote Objects, however as you can see its not a valid one. Those of you that know core thoughts on patterns will also be thinking something else at this point, that presents a potentially even more compelling reason to be watchful over what logic you implement this way…

Separation of Concerns

As you may have gathered by now if you’ve been reading my blog for the last year, my other passion is Apex Enterprise Patterns. A key foundation of this is Separation of Concerns or SOC for short. SOC sees us layer our code so that aspects such as business logic are located in the same place, easily accessible and reusable (not mention easily testable) from other existing and future parts of our applications, such as API’s, Batch Apex etc.

While the above example is not that complex it illustrates when code in your JavaScript layer might start to become business logic and if so something you should ideally (if not solely for the reason above) consider keeping in your Service Layer and accessing via JavaScript Remoting @RemoteAction.

Summary

Despite this new feature the use of Visualforce Remoting with @RemoteAction Apex should still very much factor in your decision making.  And nor despite the issue above should we necessarily let the lack of transaction management count against our use of Visualforce Remote Objects either.

For sure this will become the best and lightest way to perform rapid client side querying without impacting API limits, and I am sure the alias feature (see docs) will be welcome to those preferring more elegant AngularJS or other bindings. All very nice! Furthermore if you are developing client logic that is essentially doing simple record editing then by all means let your Apex Triggers (Domain Layer) do its job and enforce the validity of those records.

Just keep in mind when your starting to write more and more JavaScript code that is orchestrating the updating, inserting or deleting of a set of  related records, you really need to be sure be sure you and your testers understand the transaction scope differences between the two approaches described here or switch over to Apex and let the platform manage the transaction scope for you. Finally its worth keeping in mind if you don’t have a client side automated testing strategy your automatically adding manual testing overhead to your backlog.

The full source code for this blog can be found here.

UPDATE: Since publishing this blog, Salesforce documentation team have written up an excellent additional topic covering some best practices and outlining the transactional differences described above. Its really great to see this type of content appearing in the standard Salesforce developer documentation, thank you Salesforce!

Other Notes and Observations

Here are some final points of note, given this is still pilot hopefully of use to Salesforce as feedback.

  • It does buffer requests to the server like Visualforce Remoting, very cool!
  • It does not complain when you set the wrong field or get the name wrong, like SObject.put and SObject.get do, maybe to be expected, though since we gave it the field list might have been nice?
  • It differs slightly from Dynamic Apex, it uses SObject.put, here WorkOrder__c.set is used
  • Success is expressed in ‘error’ being null, not quite what i expected, and different from Visualforce Remoting.
  • It does not implement field defaulting
  • Errors need to be hanlded by callbacks (as per VF Remoting), though by default errors are not emitted to the JavaScript console like Visualforce Remoting
  • References to fields on via the apex:remoteObjectModel fields attribute do not seem to surface as dependencies on the fields, which would be good given how soft references within the JavaScript are.


87 Comments

Querying Custom Object and Field IDs via Tooling API

There are quite a few blogs describing a means to build Salesforce URL’s to standard pages for creating records, that can be applied to Custom Buttons in order to pre-populate field values when a user clicks a button. For example replacing the New button on a Related list.

IMPORTANT NOTE: The URL format Salesforce uses for the standard UI is not a supported API and thus subject to change. Though it has become quite common practice in order to improve the usability of the standard UI.

Making things a little more Robust

Other than URL format assumption, there is an area of further fragility shared amongst the solutions I’ve seen to-date. Which is how to obtain and manage the custom field Id’s needed on the URL’s (since they don’t take field API names). Either via discovering these manually or dynamically via using REGEX parsing of the HTML source code of the Salesforce standard pages. Although there is a Salesforce IdeaExchange submission to have Salesforce expose these Id’s via Apex Describe, it apparently has not been addressed… or so it would seem that is….

Tooling API support for Custom Object and Custom Fields

Probably the least obvious aspect of the Tooling API is its ability to actually query (via REST or SOAP) the CustomObject and CustomField objects (which are not accessible via Apex SOQL). As we know every object in Salesforce has an ID, this got me wondering if in this case its the same ID’s needed by the approaches used above. And thus if so, would serve as a more supported and less risky means to obtain the custom field Id’s. I have also wanted to start building out a Apex wrapper for the Tooling API for a while now. The following Apex code shows the library in action…

UPDATE: Please use the Apex code that wraps the REST version of the API in order to be compatible with the statements in this blog.

// Constructs the Tooling API wrapper (default constructor uses user session Id)
ToolingAPI toolingAPI = new ToolingAPI();

// Query CustomObject object by DeveloperName (note no __c suffix required)
List<ToolingAPI.CustomObject> customObjects = (List<ToolingAPI.CustomObject>)
     toolingAPI.query('Select Id, DeveloperName, NamespacePrefix From CustomObject Where DeveloperName = \'Test\'').records;

// Query CustomField object by TableEnumOrId (use CustomObject Id not name for Custom Objects)
ToolingAPI.CustomObject customObject = customObjects[0];
Id customObjectId = customObject.Id;
List<ToolingAPI.CustomField> customFields = (List<ToolingAPI.CustomField>)
     toolingAPI.query('Select Id, DeveloperName, NamespacePrefix, TableEnumOrId From CustomField Where TableEnumOrId = \'' + customObjectId + '\'').records;

// Dump field names (reapply the __c suffix) and their Id's
System.debug(customObject.DeveloperName + '__c : ' + customObject.Id);
for(ToolingAPI.CustomField customField : customFields)
     System.debug(
          customObject.DeveloperName + '__c.' +
          customField.DeveloperName + '__c : ' +
          customField.Id);

This results in the following list of fields and Id’s against my test custom object…

00:27:38.845 (845882069)|USER_DEBUG|[45]|DEBUG|Test__c : 01IG00000021cXoMAI
00:27:38.846 (846249350)|USER_DEBUG|[47]|DEBUG|Test__c.A_Number__c : 00NG0000009Y0I9MAK
00:27:38.846 (846305290)|USER_DEBUG|[47]|DEBUG|Test__c.Colours__c : 00NG0000009prwyMAA
00:27:38.846 (846328856)|USER_DEBUG|[47]|DEBUG|Test__c.Date__c : 00NG0000009BrnxMAC
00:27:38.846 (846513094)|USER_DEBUG|[47]|DEBUG|Test__c.Message__c : 00NG0000009Y0IOMA0
00:27:38.846 (846535746)|USER_DEBUG|[47]|DEBUG|Test__c.MultiPick__c : 00NG000000AcULrMAN
00:27:38.846 (846558753)|USER_DEBUG|[47]|DEBUG|Test__c.MyCheckbox__c : 00NG0000009Y5C8MAK
00:27:38.846 (846741056)|USER_DEBUG|[47]|DEBUG|Test__c.RichText__c : 00NG0000009XaRJMA0
00:27:38.846 (846816183)|USER_DEBUG|[47]|DEBUG|Test__c.Text__c : 00NG0000009prxwMAA

Summary

This blog serves as a means to demonstrate an initial starting point for a Apex wrapper around the Tooling API (the GitHub repo has the full code with tests to deploy direct via the usual link). Be sure to setup the appropriate Remote Site setting for the Tooling API end point (easiest way is to run the code and note the URL given in the exception). Finally a means for for the various authors of the solutions above to update their code. Enjoy!


6 Comments

Apex UML Canvas Tool : Dreamforce Release!

Screen Shot 2013-10-14 at 22.16.58

Update: Dreamforce is over for another year! Thanks to everyone who supported me and came along to the session. Salesforce have now uploaded a recording of the session here and can find the slides here.

As those following my blog will know one of the sessions I’ll be running at this years Dreamforce event is around the Tooling API and Canvas technologies. If you’ve not read about what I’m doing check out my previous blog here. I’ve now uploaded the code to the tool I’ve developed that will be show casing these technologies. I’ll be walking through key parts of it in the session, please do feel free to take a look and give me your thoughts ahead or at the session if your attending!

Installing the Tool

You now also install the tool as a managed package into your development org by following these steps.

  1. Install the package using the package install link from the GitHub repo README file.
  2. Installed is a tab which shows a Visualforce page which hosts the externally hosted (on Heroku) Canvas application.
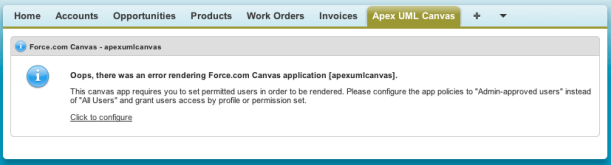
  3. You need to configure access to the Canvas application post installation, you can follow the Salesforce guidelines on screen and/or the ones here.Screen Shot 2013-11-12 at 17.52.55
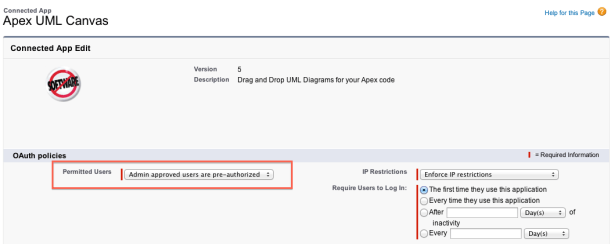
  4. Click the link to configure and edit the “Admin approved users are pre-authorised” option and save.Screen Shot 2013-11-12 at 17.53.54
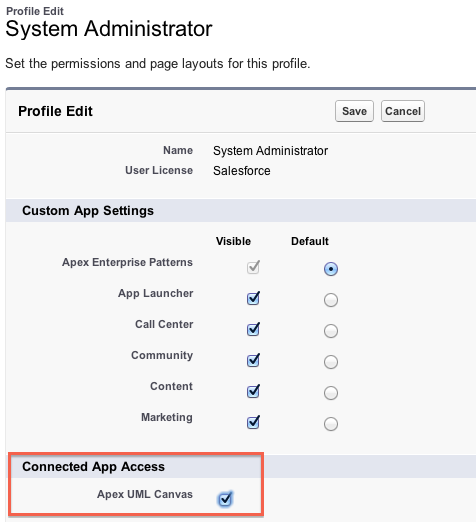
  5. Finally edit your Profile and enable the Connected App (and Tab if needed)Screen Shot 2013-11-12 at 17.57.08

Using the Tool

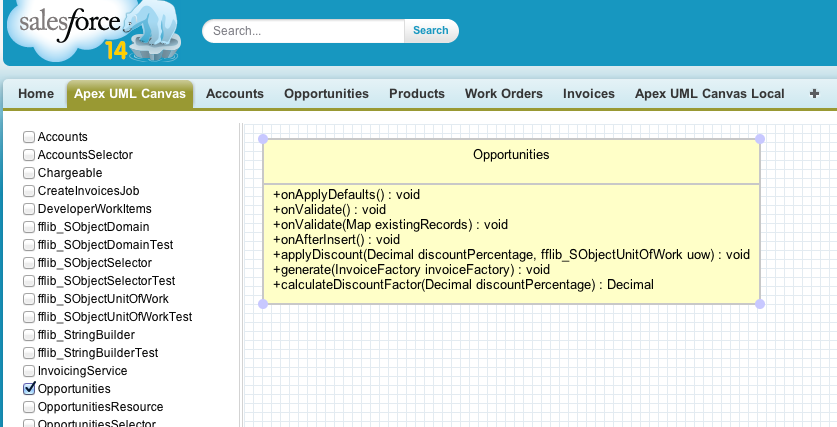
Screen Shot 2013-11-12 at 17.41.16

  • The tool displays a list of the Apex classes (unmanaged) in your org on the left hand side, tick a class to show it in the canvas.
  • Move the Apex class UML representation around with your mouse, if it or other classes reference each other lines will be drawn automatically.
  • There is some issues with dragging, if you get mixed up, just click the canvas to deselect everything then click what you want.

It is quite basic still, only showing methods, properties and ‘usage’ relationships and really needs some further community push behind it to progress a long line of cool features that could be added. Take a look at the comments and discussion on my last post for some more ideas on this. Look forward to see you all at Dreamforce 2013!


15 Comments

Preview: Apex UML Canvas with Tooling API

Regular readers of my blog will recall my last post charting my exploits with the Salesforce Tooling API for a session I’m running at Dreamforce 2013…

Dreamforce 2013 Session: Apex Code Analysis using the Tooling API and Canvas

The Tooling API provides powerful new ways to manage your code and get further insight into how its structured. This session will teach you how to use the Tooling API and its Symbol Table to analyse your code using an application integrated via Force.com Canvas directly into your Salesforce org — no command line or desktop install required! Join us and take your knowledge of how your Apex code is really structured to the next level!

Screen Shot 2013-10-14 at 22.16.58As I hinted at in the last blog I was not 100% happy with the Mind Map visualisation I initially used. It was fun to play with, but I wanted to illustrate the use of the Tooling API with something more functional. So I went searching for a new library. I wanted something that was HML5 based, that would dynamically render as the user selected Apex classes.

Inspired by the ObjectAid tool, as well as some feedback comments describing a very cool PlantUML based Apex tool, impressively written currently without the Tooling API called PlantUML4Force. While PlantUML is a great library, it was not dynamic enough and ultimately I wanted to be able to better illustrate the separation of concerns in the diagrams by having more granular control over the final diagram. I eventually found a bit of hidden gem called UMLCanvas

I’ll eventually share this as a package once I’ve had a chance to work on it a bit more (it’s currently showing only UML Dependency relationships). In the meantime please take a look at the new video below and join me in my Dreamforce Session to hear about how I built it!

Technologies involved so far…


8 Comments

Preview: Demo of Apex Code Analysis using the Tooling API and Canvas

This weekend I’ve been fleshing out the code for my second Dreamforce 2013 session. I’ve been having a lot of fun with various technologies to create the following demo which I’ve shared a short work in progress video below. The JQuery plugin doing the rendering is js-mindmap, it’s got some quirks I’ve discovered so far, but I’m sticky with it for now!

The session highlights the Tooling API via this tool which can be installed directly into your Salesforce environment via the wonderful Salesforce Canvas technology! This is proposed session abstract …

Dreamforce 2013 Session: Apex Code Analysis using the Tooling API and Canvas

The Tooling API provides powerful new ways to manage your code and get further insight into how its structured. This session will teach you how to use the Tooling API and its Symbol Table to analyse your code using an application integrated via Force.com Canvas directly into your Salesforce org — no command line or desktop install required! Join us and take your knowledge of how your Apex code is really structured to the next level!

Technologies involved so far…

I’ve also found the excellent ObjectAid Eclipse plugin (which is sadly a Java source code only tool) to explore the Tooling API data structures in much more detail than the Salesforce documentation currently offers, especially in respect to the SymbolTable structure. I’ll be sharing full code and discussing the following diagram in more detail in my session! In the meantime I’d love to know your thoughts and other ideas around the Tooling API!

Tooling API