
Salesforce are on a mission to make accessing off platform data and web services as easy as possible. This helps keep the user experience optimal and consistent for the user and also allows admins to continue to leverage the platforms tools such as Process Builder and Flow, even if the data or logic is not on the platform.
Starting with External Objects, they added the ability to see and also update data stored in external databases. Once setup, users can manipulate external records without leaving Salesforce, by staying within the familiar UI’s. With External Services, currently in Beta, they have extended this concept to external API services.
UPDATE: The ASCIIArt Service covered in this blog has since been updated to use the Swagger schema standard. However this blog is still a very useful introduction to External Services. Once you have read it, head on over to this blog!
In this blog lets first focus on the clicks-not-code steps you can repeat in your own org, to consume a live ASCII Art web service API i have exposed publicly. The API is simple, it takes a message and returns it in ASCII art format. The following steps result in a working UI to call the API and update a record.

After the clicks not code bit i will share how the API was built, whats required for compatibility with this feature and how insanely easy it is to develop Web Services in Heroku using Nodejs. So lets dive in to External Services!
Building an ASCII Art Converter in Lightning Experience and Flow
The above solution was built with the following configurations / components. All of which are accessible under the LEX Setup menu (required for External Services) and takes around 5 minutes maximum to get up and running.
- Named Credential for the URL of the Web Service
- External Service for the URL, referencing the Named Credential
- Visual Flow to present a UI, call the External Service and update a record
- Lightning Record Page customisation to embed the Flow in the UI
I created myself a Custom Object, called Message, but you can easily adapt the following to any object you want, you just need a Rich Text field to store the result in. The only other thing you need to know of course is the web service URL.
https://createasciiart.herokuapp.com
Can i use External Services with any Web Service then?
In order to build technologies that simplify what are normally things developers have to interpret and code manually. Web Service APIs must be documented in a way that External Services can understand. In this Beta release this is the Interagent schema standard (created by Heroku as it happens). Support for the more broadly adopted Swagger / OpenId will be added in the Winter release (Safe Harbour).
For my ASCII Art service above, i authored the Interagent schema based on a sample the Salesforce PM for this feature kindly shared, more on this later. When creating the External Service in moment we will provide a schema to this service.
https://createasciiart.herokuapp.com/schema
Creating a Named Credential
From the setup menu search for Named Credential and click New. This is a simple Web Service that requires no authentication. Basically provide only the part of the above URL that points to the Web Service endpoint.

Creating the External Service
Now for the magic! Under the Setup menu (only in Lightning Experience) search for Integrations and start the wizard. Its a pretty straight forward process, of selecting the above Named Credential, then telling it the URL for the schema. If thats not exposed by the service you want to use, you can paste a Schema in directly (which lets a developer define a schema yourself if one does not already exist).


Once you have created the External Service you can review the operations it has discovered. Salesforce uses the documentation embedded in the given schema to display a rather pleasing summary actually.

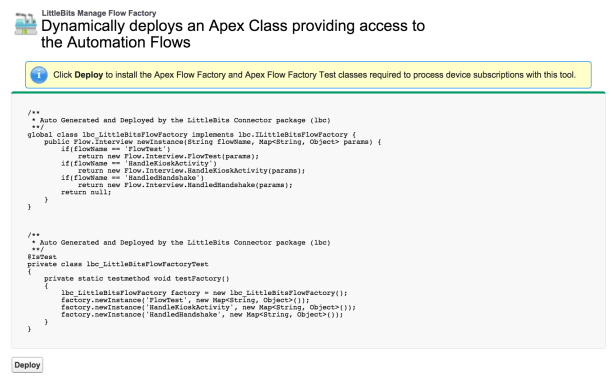
So what just happened? Well… internally the wizard wrote some Apex code on your behalf and implemented the Invocable Method annotations to enable that Apex code to appear in tools like Process Builder (not supported in Beta) and Flow. Pretty cool!
Whats more interesting for those wondering, is you cannot actually see this Apex code, its there but some how magically managed by the platform. Though i’ve not confirmed, i would assume it does not require code coverage.
Update: According to the PM, in Winter’18 it will be possible “see” the generated class from other Apex classes and thus reuse the generated code from Apex as well. Kind of like a Api Stub Generator.
Creating a UI to call the External Service via Flow
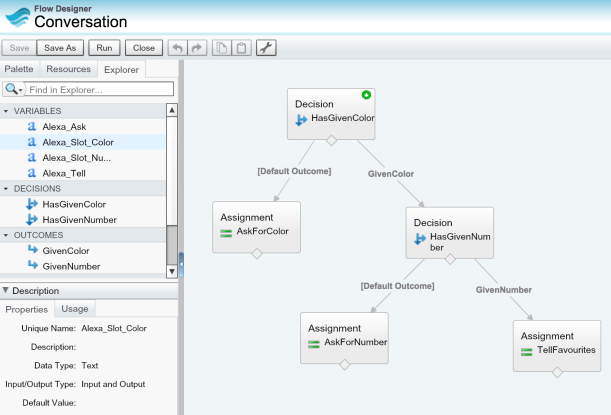
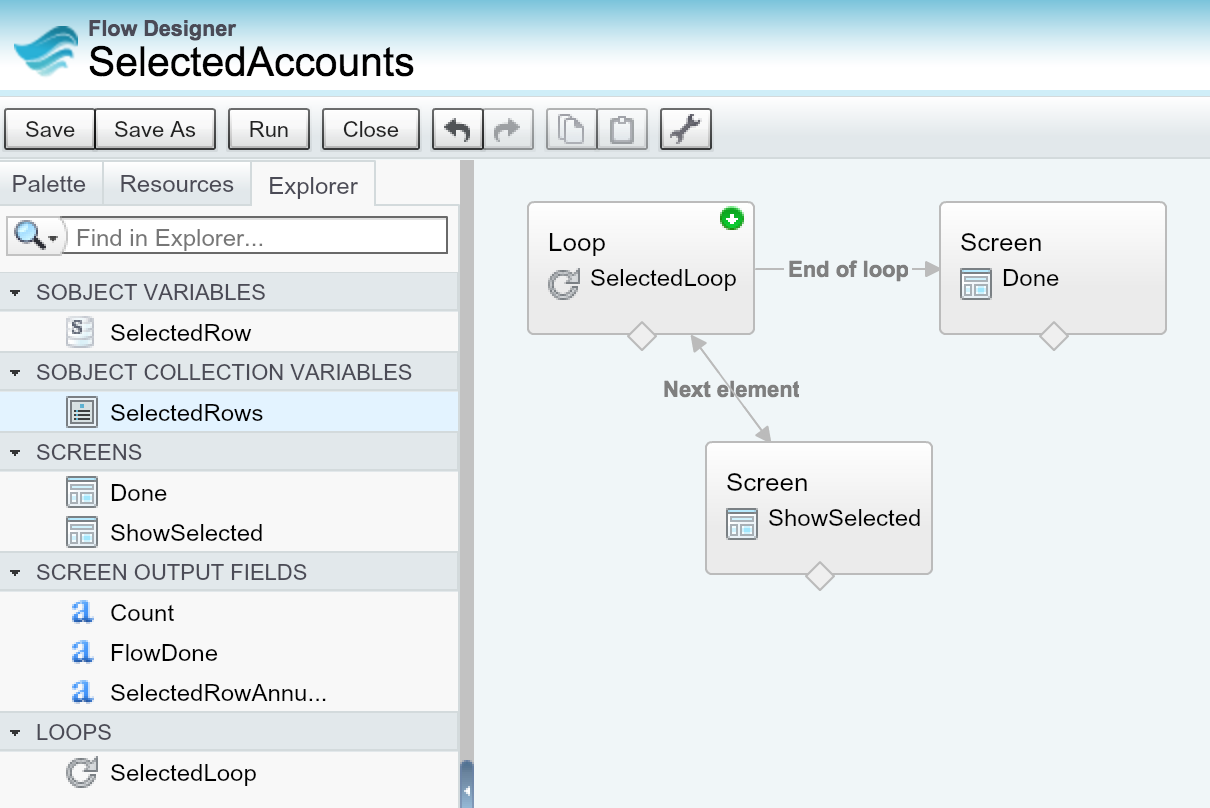
This simple Flow prompts the user for a message to convert, calls the External Service and updates a Rich Text field on the record with the response. You will see in the Flow sidebar the generated Apex class generated by the External Service appears.

The following screenshots show some of the key steps involved in setting up the Flow and its three steps, including making a Flow variable for the record Id. This is later used when embedding the Flow in Lightning Experience in the next step.

RecordId used by Flow Lightning Component

Assign the message service parameter
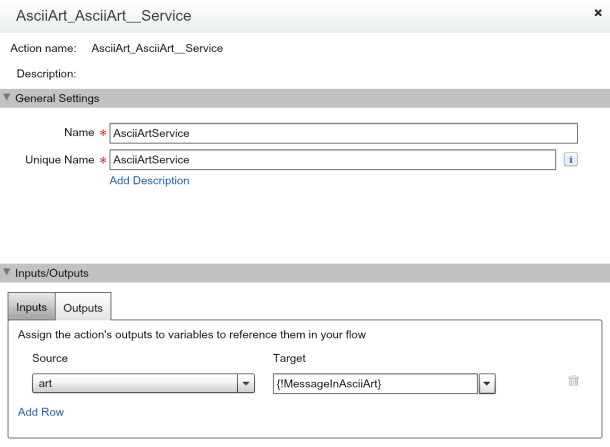
Assign the response to variable

Update the Rich Text field
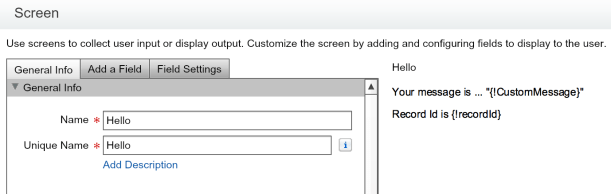
TIP: When setting the ASCII Art service response into the field, i wrapped the value in the HTML elements, pre and code to ensure the use of a monospaced font when the Rich Text field displayed the value.
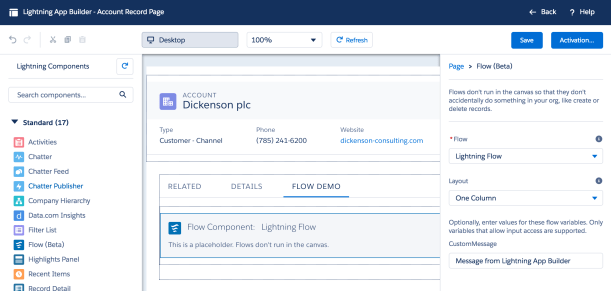
Embedding the Flow UI in Lightning Experience
Navigate to your desired objects record detail page and select Edit Page from the cog in the top right of the page to open the Lightning App Builder. Here you can drag the Flow component onto the page and configure it to call the above flow. Make sure to map the Flow variable for the record Id as shown in the screenshot, to ensure the current record is passed.

Thats it, your done! Enjoy your ASCII Art messages!
Creating your own API for use with External Services
Belinda, the PM for this feature was also kind enough to share the sample code for the example shown in TrailheaDX, from which the service in this blog is based. However i did wanted to build my own version to do something different from the credit example. Also extend my personal experience with Heroku and Nodejs more.
The NodeJS code for this solution is only 41 lines long. It runs up a web server (using the very easy to use hapi library), and registers a couple of handlers. One handler returns the statically defined schema.json file, the other implements the service itself. As side note, the joi library is an easy way add validation to the service parameters.
var Hapi = require('hapi');
var joi = require('joi');
var figlet = require('figlet');

// initialize http listener on a default port
var server = new Hapi.Server();
server.connection({ port: process.env.PORT || 3000 });

// establish route for serving up schema.json
server.route({
  method: 'GET',
  path: '/schema',
  handler: function(request, reply) {
    reply(require('./schema'));
  }
});

// establish route for the /asciiart resource, including some light validation
server.route({
  method: 'POST',
  path: '/asciiart',
  config: {
    validate: {
      payload: {
        message: joi.string().required()
      }
    }
  },
  handler: function(request, reply) {
    // Call figlet to generate the ASCII Art and return it!
    const msg = request.payload.message;
    figlet(msg, function(err, data) {
        reply(data);
    });
  }
});

// start the server
server.start(function() {
  console.log('Server started on ' + server.info.uri);
});
I decided i wanted to explore the diversity of whats available in the Nodejs space, through npm. To keep things light i chose to have a bit of fun and quickly found an ASCIIArt library, called figlet. Though i soon discovered that npm had a library for pretty much every other use case i came up with!
Finally the hand written Interagent schema is also shown below and is reasonably short and easy to understand for this example. Its not all that well documented in layman’s terms as far as i can see. See my thoughts on this and upcoming Swagger support below.
{
  "$schema": "http://interagent.github.io/interagent-hyper-schema",
  "title": "ASCII Art Service",
  "description": "External service example from AndyInTheCloud",
  "properties": {
    "asciiart": {
      "$ref": "#/definitions/asciiart"
    }
  },
  "definitions": {
    "asciiart": {
      "title": "ASCII Art Service",
      "description": "Returns the ASCII Art for the given message.",
      "type": [ "object" ],
      "properties": {
        "message": {
          "$ref": "#/definitions/asciiart/definitions/message"
        },
        "art": {
          "$ref": "#/definitions/asciiart/definitions/art"
        }
      },
      "definitions": {
        "message": {
          "description": "The message.",
          "example": "Hello World",
          "type": [ "string" ]
        },
        "art": {
          "description": "The ASCII Art.",
          "example": "",
          "type": [ "string" ]
        }
      },
      "links": [
        {
          "title": "AsciiArt",
          "description": "Converts the given message to ASCII Art.",
          "href": "/asciiart",
          "method": "POST",
          "schema": {
            "type": [ "object" ],
            "description": "Specifies input parameters to calculate payment term",
            "properties": {
              "message": {
                "$ref": "#/definitions/asciiart/definitions/message"
              }
            },
            "required": [ "message" ]
          },
          "targetSchema": {
            "$ref": "#/definitions/asciiart/definitions/art"
          }
        }
      ]
    }
  }
}
Finally here is the package.json file that brings the whole node app together!
{
  "name": "asciiartservice",
  "version": "1.0.0",
  "main": "server.js",
  "dependencies": {
    "figlet": "^1.2.0",
    "hapi": "~8.4.0",
    "joi": "^6.1.1"
  }
}
Other Observations and Thoughts…
- Error Handling.
You can handle errors from the service in the usual way by using the Fault path from the element. The error shown is not all that pretty, but then in fairness there is not really much of a standard to follow here.


- Can a Web Service called this way talk back to Salesforce?
Flow provides various system variables, one of which is the Session Id. Thus you could pass this as an argument to your Web Service. Be careful though as the running user may not have Salesforce API access and this will be a UI session and thus will be short lived. Thus you may want to explore another means to obtain an renewable oAuth token for more advanced uses. - Web Service Callbacks.
Currently in the Beta the Flow is blocked until the Web Service returns, so its good practice to make your service short and sweet. Salesforce are planning async support as part of the roadmap however. - Complex Parameters.
Its unclear at this stage how complex a web service can be supported given Flows limitations around Invocable Methods which this feature depends on. - The future is bright with Swagger support!
I am really glad Salesforce are adding support for Swagger/OpenID, as i really struggled to find good examples and tutorials around Interagent. Really what is needed here is for the schema and code to be tied more closely together, like this!UPDATE: See my other blog entry covering Swagger support
Summary
Both External Objects and External Services reflect the reality of the continued need for integration tools and making this process simpler and thus cheaper. Separate services and data repositories are for now here to stay. I’m really pleased to see Salesforce doing what it does best, making complex things easier for the masses. Or as Einstein would say…“Everything should be made as simple as possible, but no simpler“.
Finally you can read more about External Objects here and here through Agustina’s and laterally Alba’s excellent blogs.
 This was my first TrailheaDX and what an event it was! With my Field Guide in hand i set out into the wilderness! In this blog i’ll share some of my highlights, thoughts and links to the latest resources. Many of the newly announced things you can actually get your hands on
  With
With 

 The service introduces a few new terms to get your head round. Firstly a dataset is a named container for the types of images (labels) you want to recognise. The
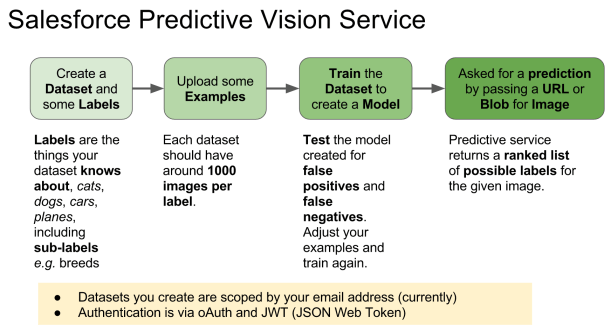
 As a self confessed API junkie, each time the new Salesforce platform release notes land. I tend to head straight to anything API related, such as sections on REST API, Metadata, Tooling, Streaming, Apex etc etc. This time
 One thing that simplifies the process is hosting your skill code through the
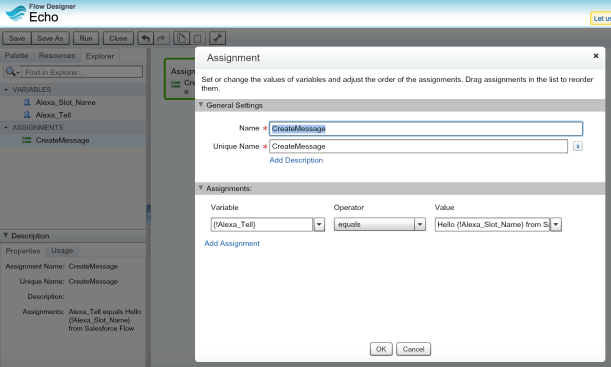
 To code my Skill I went with NodeJS, as i had not done a lot of coding in it and wanted to challenge myself. The other challenge i set myself was to integrate in a generic and extensible way with Salesforce. Thus i wanted to incorporate my old friend Flow!
 Flow makes its presence known in Lightning App Builder this release (in Beta) and with it some new possibilities for


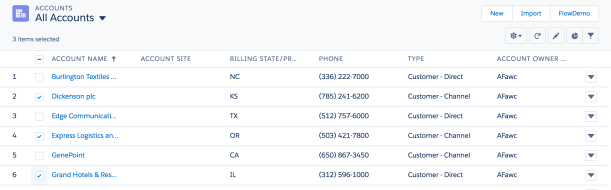
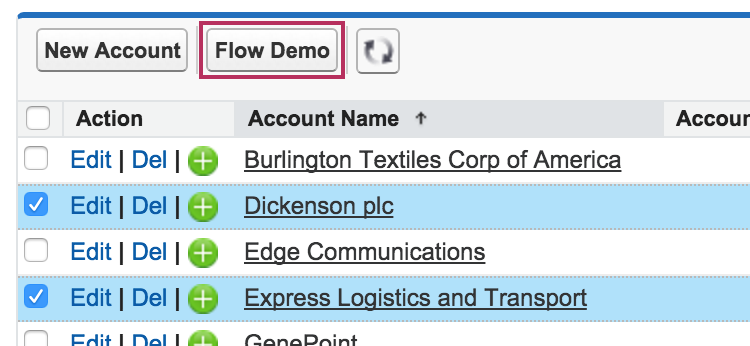
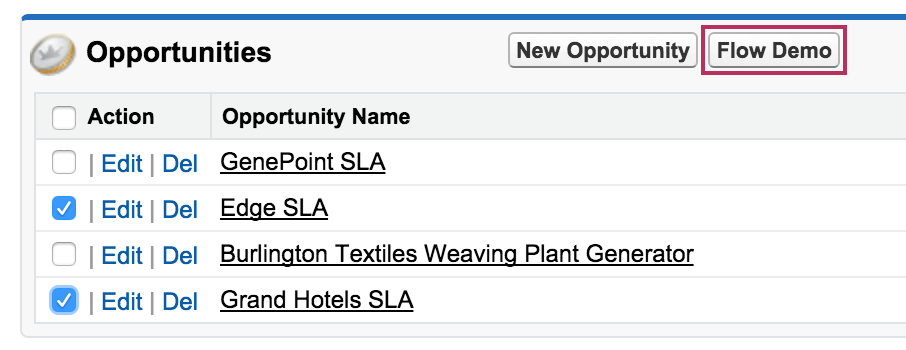
 This results in the flow from my previous blog showing the selected records. As you can see, sadly because we are using a Visualforce page the lovely new Flow styling we see when using Flow (Beta) support in Lightning App Builder does not apply. But hey being able to select the records is a good step forward for now! The setup of the Visualforce page and Custom Button is identical to that in my previous blog.
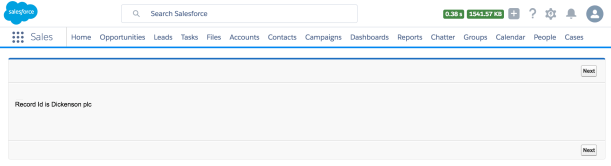


 Having just completed some improvements to the
 Doing this manually is a simple matter of dragging a

