Over the last month or so, John M Daniels, James Loghry (a fellow MVP) and myself have been collaborating together in order to accomplish two things; firstly remove the need to utilise a Heroku backend for the Apex UML tool (i first launched for Dreamforce 2013). Secondly and importantly for the first objective, create an Apex wrapper around the Tooling API.
John and I first chatted about collaborating at Dreamforce 2013 to work on the Apex UML tool and move it forward. He later put forward the suggestion that we should consider utilising the Tooling API directly from Apex and do away with the Heroku code. We quickly spun up a branch to try this out, and quite quickly re-architected it to use Visualforce Remoting and started on the plumbing!
Meanwhile James and I had also started thinking about a Apex wrapper around the Tooling API, initially independently, but ultimately decided to join forces! The combination between these two initiatives and the three of us has thus far born excellent fruit, with an initial release of the Apex UML tool running totally native, powered by an early version of the Apex Tooling API…
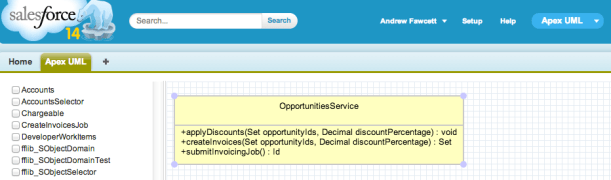
Apex UML Tool
As before there is a managed package version of the tool for you to install, you can actually upgrade from v1.2 (the Heroku Canvas app based version) directly. Unfortunately if you have v1.2 installed, you will have to upgrade at this stage, as i inadvertently deleted the Connected App from my development org.
- Install the package from the install links section here.
- Ensure your Apex classes are compiled
- Assign the Apex UML permission set
- Go to Apex Classes page and click the Compile all classes link
- Navigate to the Apex UML page
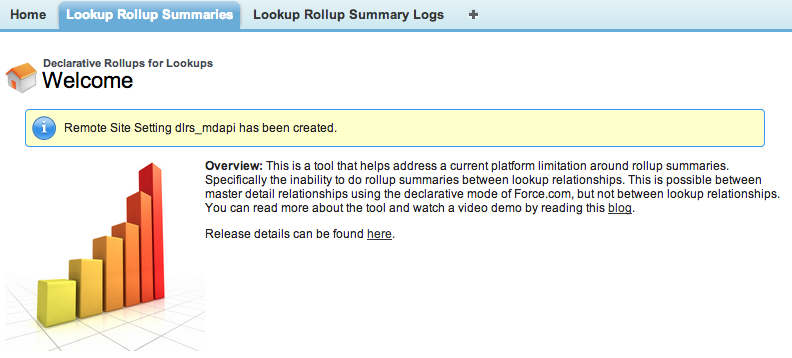
- You will see a Remote Site setting message, follow it and then reload the page.
- From this point on the functionality and usage is currently, as per the introduction given here.
UPDATE: Step 6 is not required if you have My Domain enabled (since v1.7).
If your interested in ideas we have for future versions of the tool take a look here, ideas always welcome!
Powered by the Apex Tooling API
Initially both James and I had the same thought on building out an Apex wrapper around the Tooling API’s SOAP variant, using the WSDL2Apex tool. However while this approach works quite well for the Metadata API, the Tooling API’s makes extensive use of xsd:extension aka polymorphic XML, for example in the querying of its SObject’s and Symbol Table.
Unfortunately the fact is that the XML deserialiser does not know how to deserialise into different types or how to access base class members. So we reached for the more flexible JSON deserializer. James discovered a cunning combination of manual JSON parsing and typed de-serialisation to get things moving! I’ll leave him to go into more detail on this. You can also read a little more about the strategy decision on the GitHub repository here and current discussions here.
Please note the API is still work in progress, while the Apex UML tool has given it quite a good shake down so far, keep in mind the API design is still forming. Here are a few examples, starting with code to create an Apex Class…
// Create an Apex class in 5 lines!
ToolingAPI toolingAPI = new ToolingAPI();
ToolingAPI.ApexCLass newClass = new ToolingAPI.ApexClass();
newClass.Name = 'HelloWorld';
newClass.Body = 'public class HelloWorld { }';
toolingAPI.createSObject(newClass);
This code queries the Symbol Table for a class and dumps the methods to the debug log…
		ToolingApi toolingAPI = new ToolingApi();
		List apexClasses = (List)
			toolingAPI.query(
				'Select Name, SymbolTable ' +
				'From ApexClass ' +
				'Where Name = \'UmlService\'').records;
		ToolingApi.SymbolTable symbolTable = apexClasses[0].symbolTable;
        for(ToolingApi.Method method : symbolTable.methods)
            System.debug(method.name);
The following is an updated version of a very early version of the API, retrieving a list of Custom Objects and Fields.
		// Constructs the Tooling API wrapper (default constructor uses user session Id)
		ToolingAPI toolingAPI = new ToolingAPI();

		// Query CustomObject object by DeveloperName (note no __c suffix required)
		List customObjects = (List)
			toolingAPI.query('Select Id, DeveloperName, NamespacePrefix From CustomObject Where DeveloperName = \'Test\'').records;

		// Query CustomField object by TableEnumOrId (use CustomObject Id not name for Custom Objects)
		ToolingAPI.CustomObject customObject = customObjects[0];
		Id customObjectId = customObject.Id;
		List customFields = (List)
			toolingAPI.query('Select Id, DeveloperName, NamespacePrefix, TableEnumOrId From CustomField Where TableEnumOrId = \'' + customObjectId + '\'').records;

		// Dump field names (reapply the __c suffix) and their Id's
		System.debug(customObject.DeveloperName + '__c : ' + customObject.Id);
		for(ToolingAPI.CustomField customField : customFields)
			System.debug(
				customObject.DeveloperName + '__c.' +
				customField.DeveloperName + '__c : ' +
				customField.Id);
This code from the Apex UML tool starts a compilation of a given Apex class to later access external references from the ApexClassMember objects SymbolTable.
		// Delete any existing MetadataContainer?
		ToolingApi tooling = new ToolingApi();
		List containers = (List)
			tooling.query(
				'SELECT Id, Name FROM MetadataContainer WHERE Name = \'ApexNavigator\'').records;
		if(containers!=null &&  containers.size()>0)
			tooling.deleteSObject(ToolingAPI.SObjectType.MetadataContainer, containers[0].Id);

		// Create MetadataContainer
		ToolingAPI.MetadataContainer container = new ToolingAPI.MetadataContainer();
		container.name = 'ApexNavigator';
		ToolingAPI.SaveResult containerSaveResult = tooling.createSObject(container);
		if(!containerSaveResult.success)
			throw makeException(containerSaveResult);
		Id containerId = containerSaveResult.id;

		// Create ApexClassMember and associate them with the MetadataContainer
		ToolingAPI.ApexClassMember apexClassMember = new ToolingAPI.ApexClassMember();
		apexClassMember.Body = classes.get(className).Body;
		apexClassMember.ContentEntityId = classes.get(className).id;
		apexClassMember.MetadataContainerId = containerId;
		ToolingAPI.SaveResult apexClassMemberSaveResult = tooling.createSObject(apexClassMember);
		if(!apexClassMemberSaveResult.success)
			throw makeException(apexClassMemberSaveResult);

		// Create ContainerAysncRequest to deploy (check only) the Apex Classes and thus obtain the SymbolTable's
		ToolingAPI.ContainerAsyncRequest asyncRequest = new ToolingAPI.ContainerAsyncRequest();
		asyncRequest.metadataContainerId = containerId;
		asyncRequest.IsCheckOnly = true;
		ToolingAPI.SaveResult asyncRequestSaveResult = tooling.createSObject(asyncRequest);
		if(!asyncRequestSaveResult.success)
			throw makeException(asyncRequestSaveResult);
		asyncRequest = ((List)
			tooling.query(
				'SELECT Id, State, MetadataContainerId, CompilerErrors ' +
				'FROM ContainerAsyncRequest ' +
				'WHERE Id = \'' + asyncRequestSaveResult.Id + '\'').records)[0];
In later blogs between us, we will be extending the demo code and more cool stuff!
Next Steps
I’m looking forward to what happens next! Both initiatives have got off to a great start and we will keep incrementing. Certainly, its good to have the Apex UML tool to help drive the development and testing of the Apex Tooling API. Follow my fellow collaborators here @JohnDTheMaven and @dancinllama.

 The GitHub Salesforce Deployment tool has been one of my most successful tools to date, i’m really pleased with it and how well it has been adopted. You can read more about the inspiration and background to the tool in my original blog post here.


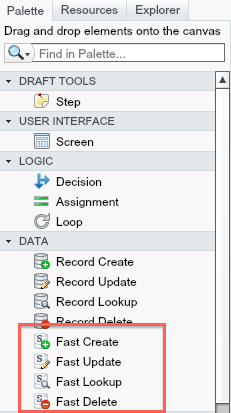
 To illustrate these new features i decide to implement in Flow something i have previously written using Apex code. The following use case is to Apply a user entered discount to selected Quote Line Items from the Related list. The flow will prompt the user for the Discount amount and they apply it, before returning the user back to the Quote detail page.


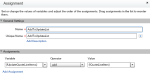
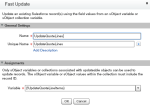


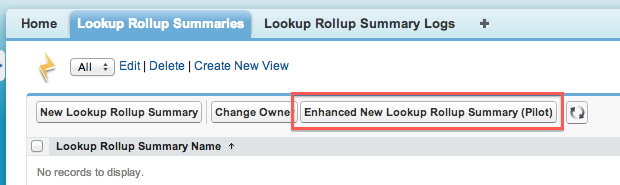
 What i found really cool about his design, is that he combined entering the Child Object and Relationship Field information into one operation, the Child Object (Field) drop down automatically shows all valid child relationships for the selected parent object you select.