Andy in the Cloud

From BBC Basic to Force.com and beyond…


31 Comments

Clicks not Code with Visual Flow Custom Buttons

officehoursI attended an MVP Office Hours event last Friday which has lead to this blog. If your not aware this a weekly event run by fellow MVP’s Jarrod Kingston and Joshua Hoskins, which is a kind of open hour for anybody to pose admin or developer related questions to the MVP community. Last weeks was a great learning event for all involved, i would recommend dropping by, even if its just to ease drop, though there is no reason to be shy!

One question that was raised, was as if a Workflow Rule defined on an Opportunity Product Line could be started via a Custom Button at the Opportunity level. When clicked would effectively update the lines to run the Workflow Rule, in this case an Email Workflow. Ideally without JavaScript or having to resort to Apex. So can record, create, read, update and delete be done in a code free way? Read on...

FlowUpdate
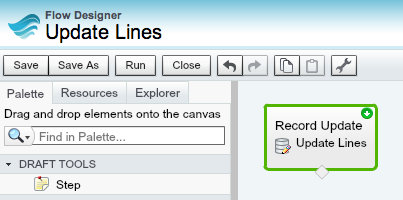
Being very excited about the possibility of invoking the hugely under stated Visual Flow rules from a Workflow Rule in Spring’14 (Pilot only). I pretty much have Flow on my mind at the moment! So started pondering if any of the Flow “elements” that are capable of reading and writing to custom object records would do the trick? Since i knew we already run a Flow from a Custom Button. I continued to ponder after the call and today managed to confirm that it is indeed possible accomplish the requirement with a astonishingly simple Flow, in fact so simple its one element!

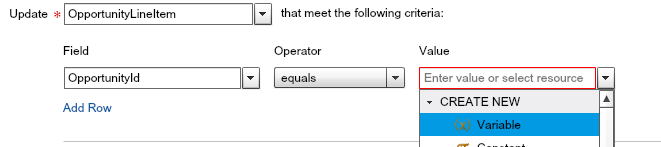
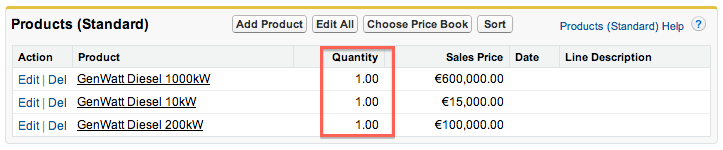
The Record Update flow element allows you to query a Standard or Custom object with some criteria and then update the results rows based on fixed or variable values you define (again via the point and click Flow Designer). My test was simple, could i set the Quantity to 1 for all the lines, though much more complex filtering and updates are possible. The configuration of the Update Lines element looks like this.

recordupdate

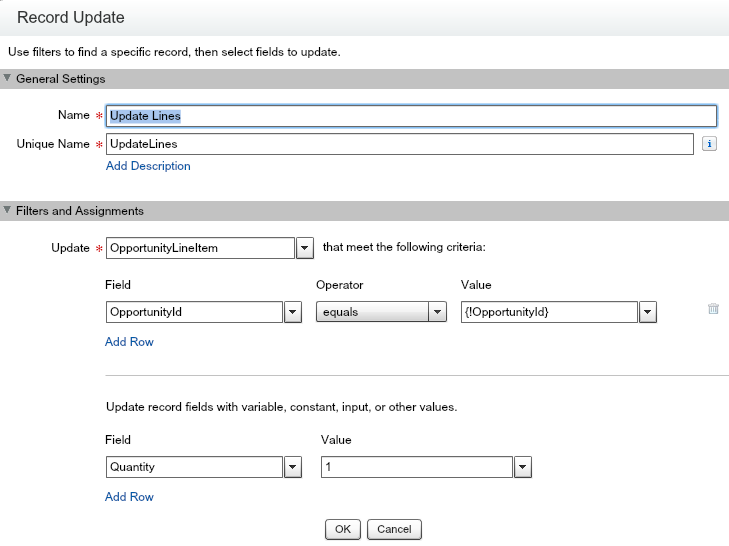
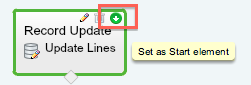
The {!OpportunityId} expression refers to a Flow variable, which i would later populate from my Custom Button. As you can see both the Filters and Assignments support addition rows, so this example is really a very basic one. Note that it has none of the Screen or Choice elements Flow supports, its just performing an update action, that’s all. Making sure i set it as the Start element by hovering over it and click the green icon. I then saved and started to figure out the best way to go about running it from a Custom Button.

The first option i looked at was the URL option, via a URL Custom Button, this was easy enough and i could pass the OpportunityId parameter via a a URL parameter. The issue with this, is when the Flow completes returning the user to the Opportunity page. The solution eventually was to wrap the Flow in a small Visualforce page (so ok i tiny bit of code i confess, but you really don’t have to touch this at all after you create it) then point the Custom Button to that instead.

<apex:page standardController="Opportunity">
    <flow:interview name="UpdateLines" finishLocation="/{!Opportunity.Id}">
        <apex:param name="OpportunityId" value="{!Opportunity.Id}"/>
    </flow:interview>
</apex:page>

updateflowcustomb

This allowed me to use the finishLocation attribute to define a URL that the Flow would navigate to after it completed. Since I have no “visual” aspects to my Flow, it simply executed the Update Records element and performed the redirect back to Opportunity detail page immediately. So once i defined my button and put it on the layout, i was ready to give it a go! 

It works great, really well in fact!

flowbutton

opplines

NOTE: If your concerned about security regarding CSRF, technically the recommendation above would be to present the user with a Flow Screen element asking them to confirm before proceeding. I’ve left this out here as i know its not always everyones preference visually to have what might be viewed as a annoying confirmation prompt following the button press.

Flow supports other data manipulation elements (in addition to many UI elements), such as Lookup, Create and Delete you can configure using its drag and drop editor. So if you fancy an alternative to hacking around with JavaScript Custom Buttons or want to avoid needing developers to write you Apex code for simple updates, i recommend you try this out (there is a great two part blog here and here and also workbook).

Certainly once Salesforce unleash (the both exciting and slightly scary) power of using these from Workflow Rules, you’ll be missing out on a significant new “Clicks Not Code” trick if you don’t! 

Detailed Steps to Recreate above Demo

  1. Under Setup menu, under Workflow and Approvals, click Flows.
  2. Create a new Flow and drag the Update Records element from the palette and give it a name (anything will do) and description.
  3. Complete the Update Record element configuration as shown above, when prompted for the Value to select by the OpportunityId, click the drop down menu and select CREATE NEW Variable.
    createvar
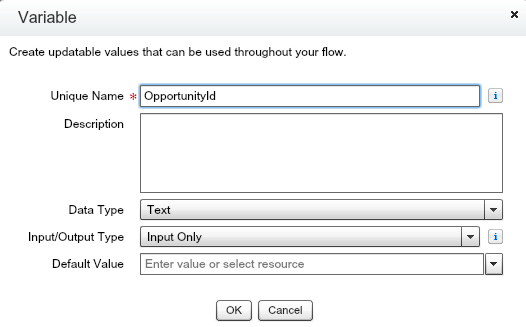
  4. Complete the Variable element configuration as shown below, take note to enter the variable name correctly, this will be referenced on the Visualforce page used to run the flow.
    varconfig
  5. Click to highlight the Update Records element on the Flow design canvas, then click the green icon in its top right corner to make this element the Start element.
    startelm
  6. Save the Flow and make it Active (clicking the Activate link next to it on the Flow detail page), take note of the Flow name used (defaults to the description with underscores for spaces).
  7. Create a Visualforce page via Setup, then Develop, then Pages, paste in the sample Visualforce page shown above, taking note to use correct Flow name and Flow parameter names.
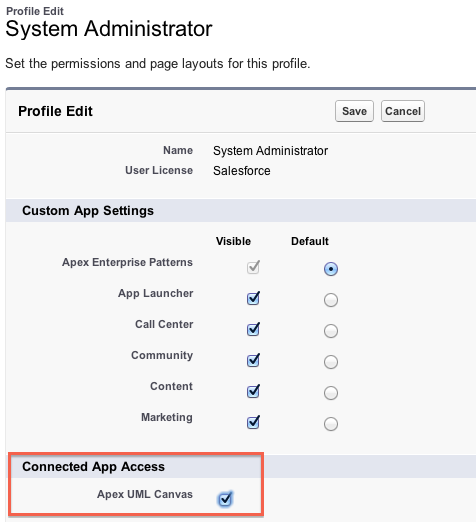
  8. Create a Custom Button as shown in the screenshot above and add it to the Layout
  9. Press the button and enjoy your code free creation!


118 Comments

New Release: Spring’14 Declarative Rollup Summary Tool

blog_chart1Well it has been under development for few weekends now, but I’m finally announcing the latest release of this tool. But before I go into the details of installing it and whats in it, i want to thank everyone who has shared feedback and encouragement with me via tweets, GitHub and comments on the original post, all of which has been a huge motivation for me!


This release completes the feature set i set out in my original post as well as some bug fixes.

  • New Feature: Scheduled calculation mode (alternative to the existing Realtime mode)
  • New Feature: Calculate button to run a full rollup calculation on existing data
  • New Feature: Developer API, for embedding calculations in existing Apex Triggers
  • Bug Fix: Realtime mode, improved optimisation to monitor rollup criteria fields and re-parenting

The tool now also has its own Application in the drop down containing the original tab and a new one.

RollupToolSpring14

New Feature : Scheduled Calculation Mode

For those that prefer to differ the lookup calculations, perhaps for performance or governor reasons (see below), you can now choose Scheduled from the Calculation Mode field. This requires a small Apex Trigger as per the previous release, it’s super easy, no developers required, just click the Manage Child Trigger button.  Then simply schedule the job using the standard Schedule Apex button under Setup then Apex Classes, the Apex Class is RollupJob.

Once this mode is enabled, you will see the new related list, Lookup Rollup Summary Schedule Items (as shown above) will fill up as child records are added, deleted or updated (only when lookup referenced fields are modified) with a list of parent records that are effectively queued up ready for the scheduled job to process. Once processed successfully they will be removed automatically.

If there are any errors (other triggers, validation rules etc preventing the master records being updated) you will see these in the new tab Lookup Rollup Summary Logs. Once you correct these you can remove the log entry or wait for the next scheduled execution and the log entry will automatically be removed for the effected parent record.

ScheduledErrors

Tip: Add a Workflow Email Action to this object if you want to monitor log entries against certain objects.

New Feature: Calculation of existing Records

If you implement this tool and there are existing records in your objects, you can now use the Calculate button to start a background job to retrospectively calculate the rollups (time this accordingly to your user activity). Its also useful if your changing the rollup criteria or have deactivated and are now reactivating your rollup for some reason.

RunCalculateThe button will start a job to select ALL of the records in the parent object (due to platform restrictions applying the child filter criteria), however the rollup criteria will still be applied as the rollups are calculated. If there are any issues during this process the above Lookup Rollup Summary Logs tab will list these errors, as with the scheduled mode, correct the errors and delete the log entries manually or rerun the calculate process.

New Feature: Developer API

RollupAPIIf you have developers writing Apex Triggers or other Apex processes where you would like the rollups recalculated, you can have them call the Developer API. Simply select Developer from the Calculation Mode field and any lookups that are related to the child records passed into the API will be calculated automatically (the developer does not need to know or ask you for the rollups themselves, meaning you can continue to declaratively add or update them afterwards).

The main API, is the rollup method as shown below. Though there is also API’s to invoke the Calculate and Schedule jobs. The triggerHandler method is really for use by the Apex Triggers generated by the Manage Child Triggers button. Though if your in a Apex Trigger context it will work equally well from your triggers also.

List<Opportunity> opportunities =
    [select AccountId from Opportunity where Id in :myOpportunityIds];
List<SObject> parents = (List<SObject>) dlrs.RollupService.rollup(opportunities);
update parents;

NOTE: As minimum the relationship fields must have been included in the query before passing the children to the API. Also keep in mind if you have multiple parent rollups the list of SObject’s returned will be a mix of SObject types.

Advanced Relationship Criteria Handling

CriteriaFieldsAs an optimisation the tool will only attempt to recalculate rollups if relevant fields (such as those in the Field to Aggregate or Relationship Field fields) have been modified by the user (or if a child record is added or deleted). In this new release if references to other fields are made in the Relationship Criteria field, such as the example shown here, you must also ensure to specify the field/s in the Relationship Criteria Fields field. So the tool can also monitor these fields as being changed by the user. In the example used in this blog it means that if the AccountId, Amount or the StageName fields are changed on the Opportunity by the user, the Account rollup will be recalculated (this applies to Realtime and Scheduled modes).

Installation and Upgrade

As before the full source code for the tool is open source and available via the GitHub project, however if you have installed via the previous managed package you can now upgrade to obtain the new features above. All installation links and release history can be found here. There are some post installation steps to enable some new components. If your installing for the first time you can skip these.

  1. Add the Calculate button to the layout
  2. Add the Relationship Criteria Fields and Calculate Job Id fields to the layout (as shown above)
  3. Add the Lookup Rollup Summary Schedule Items related list to the layout (as shown above, remove the New button and make Parent Id and Parent Record fields visible)
  4. Depending on the security options you took during install, you may need to enable the Declarative Lookup Rollup Summaries application and Lookup Rollup Summaries Logs tab on relevant profiles / permission sets.


Dealing with the 50k Aggregate Query Limit

If you hit this limit its likely due to the fact that you have a LOT of child records related to  some or an average most of your parent records your rolling up on. Another reason, especially if your hitting this in Realtime mode, it maybe because you have to many rollups defined to one parent (though the tool attempts to merge rollup calculations, its not always possible). In this case switching to Scheduled mode for those effected lookups is the next thing to try.

If your already running in Scheduled mode or having a governor issue with the Calculate facility, you can try reducing the number of parent records processed at a time by these jobs. For this you will find under Custom Settings, the Declarative Rollup Summary Tool settings, the default for both the scope size settings is 100 parent records, try adjusting it downwards, the jobs may take longer (more chunks to process) as a result but they will stand a better chance of completing within the current platform query governor.

Feedback and Issues

Feedback, ideas etc via comments below most welcome, please report any issues via the GitHub issues page.


87 Comments

Querying Custom Object and Field IDs via Tooling API

There are quite a few blogs describing a means to build Salesforce URL’s to standard pages for creating records, that can be applied to Custom Buttons in order to pre-populate field values when a user clicks a button. For example replacing the New button on a Related list.

IMPORTANT NOTE: The URL format Salesforce uses for the standard UI is not a supported API and thus subject to change. Though it has become quite common practice in order to improve the usability of the standard UI.

Making things a little more Robust

Other than URL format assumption, there is an area of further fragility shared amongst the solutions I’ve seen to-date. Which is how to obtain and manage the custom field Id’s needed on the URL’s (since they don’t take field API names). Either via discovering these manually or dynamically via using REGEX parsing of the HTML source code of the Salesforce standard pages. Although there is a Salesforce IdeaExchange submission to have Salesforce expose these Id’s via Apex Describe, it apparently has not been addressed… or so it would seem that is….

Tooling API support for Custom Object and Custom Fields

Probably the least obvious aspect of the Tooling API is its ability to actually query (via REST or SOAP) the CustomObject and CustomField objects (which are not accessible via Apex SOQL). As we know every object in Salesforce has an ID, this got me wondering if in this case its the same ID’s needed by the approaches used above. And thus if so, would serve as a more supported and less risky means to obtain the custom field Id’s. I have also wanted to start building out a Apex wrapper for the Tooling API for a while now. The following Apex code shows the library in action…

UPDATE: Please use the Apex code that wraps the REST version of the API in order to be compatible with the statements in this blog.

// Constructs the Tooling API wrapper (default constructor uses user session Id)
ToolingAPI toolingAPI = new ToolingAPI();

// Query CustomObject object by DeveloperName (note no __c suffix required)
List<ToolingAPI.CustomObject> customObjects = (List<ToolingAPI.CustomObject>)
     toolingAPI.query('Select Id, DeveloperName, NamespacePrefix From CustomObject Where DeveloperName = \'Test\'').records;

// Query CustomField object by TableEnumOrId (use CustomObject Id not name for Custom Objects)
ToolingAPI.CustomObject customObject = customObjects[0];
Id customObjectId = customObject.Id;
List<ToolingAPI.CustomField> customFields = (List<ToolingAPI.CustomField>)
     toolingAPI.query('Select Id, DeveloperName, NamespacePrefix, TableEnumOrId From CustomField Where TableEnumOrId = \'' + customObjectId + '\'').records;

// Dump field names (reapply the __c suffix) and their Id's
System.debug(customObject.DeveloperName + '__c : ' + customObject.Id);
for(ToolingAPI.CustomField customField : customFields)
     System.debug(
          customObject.DeveloperName + '__c.' +
          customField.DeveloperName + '__c : ' +
          customField.Id);

This results in the following list of fields and Id’s against my test custom object…

00:27:38.845 (845882069)|USER_DEBUG|[45]|DEBUG|Test__c : 01IG00000021cXoMAI
00:27:38.846 (846249350)|USER_DEBUG|[47]|DEBUG|Test__c.A_Number__c : 00NG0000009Y0I9MAK
00:27:38.846 (846305290)|USER_DEBUG|[47]|DEBUG|Test__c.Colours__c : 00NG0000009prwyMAA
00:27:38.846 (846328856)|USER_DEBUG|[47]|DEBUG|Test__c.Date__c : 00NG0000009BrnxMAC
00:27:38.846 (846513094)|USER_DEBUG|[47]|DEBUG|Test__c.Message__c : 00NG0000009Y0IOMA0
00:27:38.846 (846535746)|USER_DEBUG|[47]|DEBUG|Test__c.MultiPick__c : 00NG000000AcULrMAN
00:27:38.846 (846558753)|USER_DEBUG|[47]|DEBUG|Test__c.MyCheckbox__c : 00NG0000009Y5C8MAK
00:27:38.846 (846741056)|USER_DEBUG|[47]|DEBUG|Test__c.RichText__c : 00NG0000009XaRJMA0
00:27:38.846 (846816183)|USER_DEBUG|[47]|DEBUG|Test__c.Text__c : 00NG0000009prxwMAA

Summary

This blog serves as a means to demonstrate an initial starting point for a Apex wrapper around the Tooling API (the GitHub repo has the full code with tests to deploy direct via the usual link). Be sure to setup the appropriate Remote Site setting for the Tooling API end point (easiest way is to run the code and note the URL given in the exception). Finally a means for for the various authors of the solutions above to update their code. Enjoy!


6 Comments

Apex UML Canvas Tool : Dreamforce Release!

Screen Shot 2013-10-14 at 22.16.58

Update: Dreamforce is over for another year! Thanks to everyone who supported me and came along to the session. Salesforce have now uploaded a recording of the session here and can find the slides here.

As those following my blog will know one of the sessions I’ll be running at this years Dreamforce event is around the Tooling API and Canvas technologies. If you’ve not read about what I’m doing check out my previous blog here. I’ve now uploaded the code to the tool I’ve developed that will be show casing these technologies. I’ll be walking through key parts of it in the session, please do feel free to take a look and give me your thoughts ahead or at the session if your attending!

Installing the Tool

You now also install the tool as a managed package into your development org by following these steps.

  1. Install the package using the package install link from the GitHub repo README file.
  2. Installed is a tab which shows a Visualforce page which hosts the externally hosted (on Heroku) Canvas application.
  3. You need to configure access to the Canvas application post installation, you can follow the Salesforce guidelines on screen and/or the ones here.Screen Shot 2013-11-12 at 17.52.55
  4. Click the link to configure and edit the “Admin approved users are pre-authorised” option and save.Screen Shot 2013-11-12 at 17.53.54
  5. Finally edit your Profile and enable the Connected App (and Tab if needed)Screen Shot 2013-11-12 at 17.57.08

Using the Tool

Screen Shot 2013-11-12 at 17.41.16

  • The tool displays a list of the Apex classes (unmanaged) in your org on the left hand side, tick a class to show it in the canvas.
  • Move the Apex class UML representation around with your mouse, if it or other classes reference each other lines will be drawn automatically.
  • There is some issues with dragging, if you get mixed up, just click the canvas to deselect everything then click what you want.

It is quite basic still, only showing methods, properties and ‘usage’ relationships and really needs some further community push behind it to progress a long line of cool features that could be added. Take a look at the comments and discussion on my last post for some more ideas on this. Look forward to see you all at Dreamforce 2013!