I am proud to announce the publication of the second edition of my book Force.com Enterprise Architecture. In this blog we take a look at what the book covers for new readers and for those who have read the first edition, what’s in store for them in the second!
What is the book about?
“This book will teach you how to architect and support enduring applications for enterprise clients with Salesforce by exploring how to identify architecture needs and design solutions based on industry standard patterns. There are several ways to build solutions on Force.com, and this book will guide you through a logical path and show you the steps and considerations required to build packaged solutions from start to finish. It covers all aspects, from engineering to getting your application into the hands of your customers, and ensuring that they get the best value possible from your Force.com application. You will get acquainted with extending tools such as Lightning App Builder, Process Builder, and Flow with your own application logic. In addition to building your own application API, you will learn the techniques required to leverage the latest Lightning technologies on desktop and mobile platforms.” You can read more from the Amazon page here.
What is new in the second edition?
This second edition is 512 pages, of which over 100 pages are new, including 2 brand new chapters, covering Lightning and Testing. Plus numerous other updates to reflect the latest the platform currently has to offer, as well as thoughts on what’s upcoming. The following are some highlights:
Patterns, further worked examples of using the Application and Query factories and other features contributed by the community. The sample FormulaForce app is extended to support generic Lightning components that leverage factory principles.
Custom Metadata, is now integrated into various chapters throughout the book and the sample application FormulaForce. Showcasing various benefits relating to reducing configuration management overheads, through to managing extensibility.
Lightning Architecture and Components, builds from the ground up an appreciation of the Lightning framework fundamentals, including how SOC is applied. Builds from some simple components you can run standalone to more advanced integration approaches with Salesforce’s own app containers.
Lightning App Containers, continues to explore Lightning Experience and Salesforce1 mobile features with more complex components.
Advanced Unit Testing, the second of the two brand new chapters introduces a coded use case and contrasts the differences between integration testing and unit testing. Focusing mainly on the later, the chapter teaches the principles required to implement true unit testing, such as Dependency Injection and Mocking. The latest Apex Stub API and the FinancialForce ApexMocks framework is also covered.
I hope you enjoy the book and thanks for all your support!
The ability to create custom fields is a key feature when it comes to customising. Shortly followed by using features like Validation Rules, Workflow, Process Builder, Flow etc. Have you ever developed a solution that also offers the capability to consume user defined fields dynamically? If so you will have used a Custom Object or Custom Setting with a text field to store the field name/s to use.
The Problem:
Using text fields to capture field names has the following challenges and downsides:
Poor user experience. Unless you develop a Visualforce or Lightning UI users have to know the field API name and enter it correctly in the text field.
Validation code. While optional, its worth adding some validation to ensure the user enters the correct API name during configuration.
Changes to field definitions. Once configured there is no guarantee the admin or another user will not inadvertently rename or even delete a field your config references. Resulting in runtime problems when the user next runs your code.
Migrating configuration. If admins need to move configurations between sandbox and production or developers simply want to prepackage configurations they have to make sure they manually include any custom fields referenced.
Reading configuration. Reading your configuration requires using the Apex Describe API, which requires a good understanding of namespaces, something not always apparent. Basically its much more complex than things can first appear!
In contrast when using platform tools to reference fields and you attempt to delete a field you are prevented from doing so, if for example a Workflow currently references it. Its also possible to rename fields without breaking references to them. Change Sets and Packaging also automatically discover referenced fields for you.
The Solution:
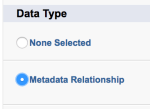
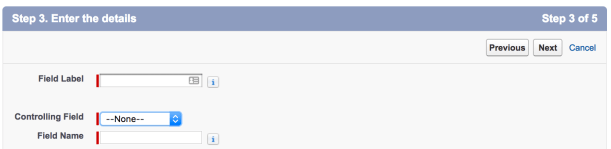
Using Field Relationships you can now reference custom fields in the same way platform tools do and resolve the above problems with zero code! First head on over to the Setup menu and create yourself a Custom Metadata Type. Next you need to create two Metadata Relationship fields to support your field reference.
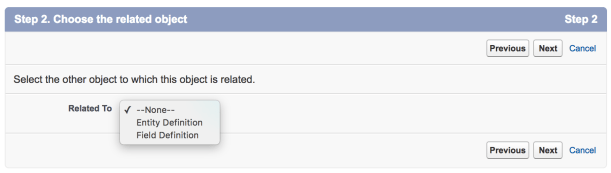
The next screen shows a list of either other Custom Metadata Types in the org plus Entity Definition and/or Field Definition. These latter two are two critical objects that have mostly been hiding in the background for several years. They first surfaced in the Tooling API documentation here and here, but are now (in part) accessible from Apex. These are essentially objects who’s records represent all objects (entities) and fields in the org.
You must create at least oneEntity Definition relationship field before creating a Field Definition relationship field (the option will not show in the drop down until you do). Creating your Entity Definition relationship field is much like creating lookup fields. When you create a FieldDefinition relationship field, you must state which Entity Definition relationship field controls it (a bit like related pick lists).
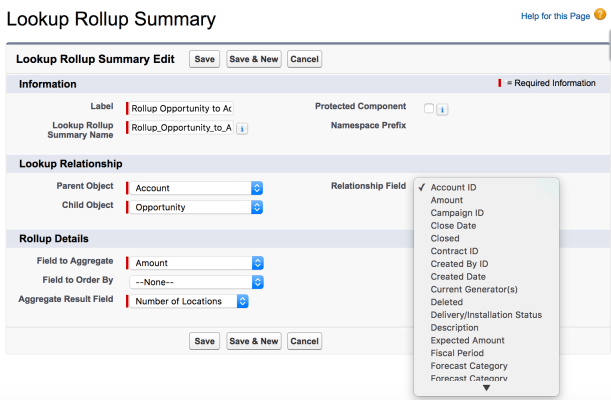
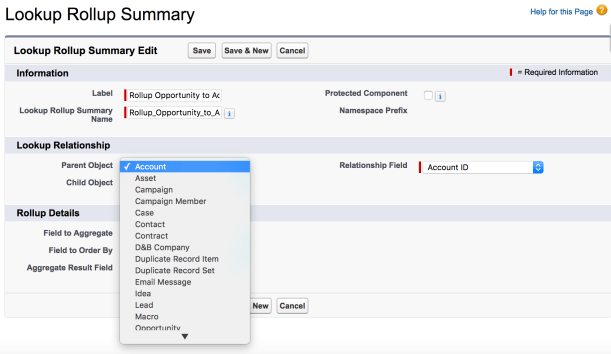
In order to explore this i recreated my Rollup Summary custom metadata type from the rollup tool. This currently uses text fields to let the admin user define the parent object and child objects used in the rollup and the related fields. And so i wanted to see what it would look like with this new feature. The resulting user experience is very pleasing! The following screenshot is the native UI, no custom Visualforce code at all!
Firstly when creating or editing custom metadata records object and field drop down lists are rendered for you. When you change a controlling Entity Definition (Object) relationship field (e.g. the Parent Object field) the related Field Definition relationship fields controlled by that field are dynamically updated (e.g. Aggregate Result Field and Relationship Field fields) to list the corresponding fields of the selected object.
Secondly when you save and view custom metadata records the relationships can be navigated via links, so the user can go direct to the object or field definition, very cool!
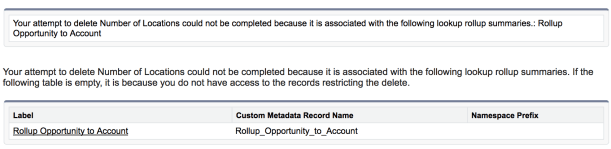
So far we have addressed issues 1 and 2 from our list above without writing any code! Next lets try to break things. Try to delete the Number of Locations custom field on the Account object and see what happens.
Also try to rename the API name of the Number of Locations field. Basically the platform allows this to happen and yet if you reload the custom metadata record referencing it, things still appear to be intact! This is due to the fact that the relationship is not using the API name, but the field ID, which of course does not change. So thats issue 3, solved!
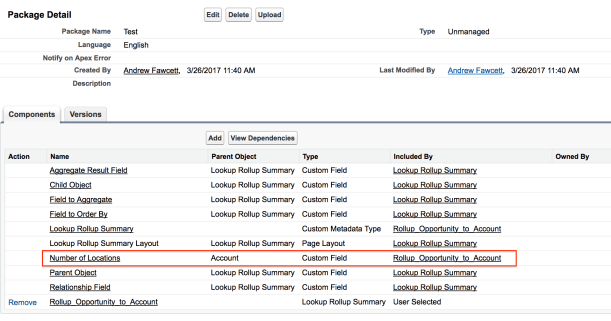
Next lets try to Package just our custom metadata record above and see what happens. Although i have not tested it i expect the same to be true when using Change Sets. As you can see the platform has figured out through the relationships that the package needs to include the referenced Number of Locations custom field as well. Nice!
So thats issue 4 solved, what about the coding challenge 5? Surely thats still business as usual right? Nope, basically by leveraging the QualifiedAPIName field on the EntityDefinition and FieldDefinition objects we can quickly resolve the fully qualified name (including namespace) of the objects and fields being referenced. Note that this will always be valid (since its not stored), so no need to revalidate this before using it!
If you are not yet familiar with Custom Metadata take a look at my earlier blog and related links below. You can also check out the second edition of my book out Friday 31st March, where i cover a number of Custom Metadata configuration use cases throughout. Enjoy!
AI services are becoming more and more accessible to developers than ever before. Salesforce acquired Metamind last year and made some big announcements at Dreamforce 2016. Like many developers, i was keen to find out about its API. The answer at the time was “check back with us next year!”.
True AI consists of recognition, be that visual or spoken, performing actions and the final most critical peace, learning. This blog explores the spoken and visual recognition peace further, with the added help of Flow for performing practically any action you can envision!
You may recall a blog from last year relating to integrating Salesforce with Amazon Echo. To explore the new Einstein API, I decided to leverage that work further. In order to trigger recognition of my pictures from Alexa. Also the Salesforce Flow usage enabled easy extensibility via custom Apex Actions. Thus the Einstein Apex Action was born! After a small bit of code and some configuration i had a working voice activated image recognition demo up and running.
The following diagram breaks down what just happened in the video above. Followed by a deeper walk through of the Predictive Vision Service and how to call it.
Using Salesforce1 Mobile app I uploaded an image using the Files feature.
Salesforce stores this in the ContentVersion object for later querying (step 6).
Using the Alexa skill, called Einstein, i was able to “Ask Einstein about my photo”
This NodeJS skill runs on Amazon and simply routes requests to Salesforce Flow
Spoken terms are passed through to a named Flow via the Flow API.
The Flow is simple in this case, it queries the ContentVersion for the latest upload.
The Flow then calls the Einstein Apex Action which in turn calls the Einstein REST API via Apex (more on this later). Finally a Flow assignment takes the resulting prediction of what the images is actually of, and uses it to build a spoken response.
How does theEinstein Predictive Vision Service API work?
The service introduces a few new terms to get your head round. Firstly a dataset is a named container for the types of images (labels) you want to recognise. The demo above uses a predefined dataset and model. A model is the output from the process of taking examples of each of your data sets labels and processing them (training). Initiating this process is pretty easy, you just make a REST API call with your dataset ID. All the recognition magic is behind the scenes, you just poll for when its done. All you have to do is test the model with other images. The service returns ranked predictions (using the datasets labels) on what it thinks your picture is of. When i ran the pictures above of my family dogs, for the first time i was pretty impressed that it detected the breeds.
Salesforce saved me the trouble of wrapping the REST API in Apex and have started an Apex wrapper here in this GitHub repo. When you signup you get private key file you have to upload into Salesforce to authenticate the calls. Currently the private key file the pilot gives you seems to be scoped by yourorg users associated email address.
public with sharing class EinsteinAction {

    public class Prediction {
        @InvocableVariable
        public String label;
        @InvocableVariable
        public Double probability;
    }

    @InvocableMethod(label='Classify the given files' description='Calls the Einsten API to classify the given ContentVersion files.')
    public static List<EinsteinAction.Prediction> classifyFiles(List<ID> contentVersionIds) {
        String access_token = new VisionController().getAccessToken();
        ContentVersion content = [SELECT Title,VersionData FROM ContentVersion where Id in :contentVersionIds LIMIT 1];
        List<EinsteinAction.Prediction> predictions = new List<EinsteinAction.Prediction>();
        for(Vision.Prediction vp : Vision.predictBlob(content.VersionData, access_token, 'GeneralImageClassifier')) {
            EinsteinAction.Prediction p = new EinsteinAction.Prediction();
            p.label = vp.label;
            p.probability = vp.probability;
            predictions.add(p);
            break; // Just take the most probable
        }
        return predictions;
    }
}
NOTE: The above method is only handling the first file passed in the parameter list, the minimum needed for this demo. To bulkify you can remove the limit in the SOQL and ideally put the file ID back in the response. It might also be useful to expose the other predictions and not just the first one.
The VisionController and Vision Apex classes from the GitHub repo are used in the above code. It looks like the repo is still very much WIP so i would expect the API to change a bit. They also assume that you have followed the standalone example tutorial here.
Summary
This initial API has made it pretty easy to access a key part of AI with what is essentially only a handful of simple REST API calls. I’m looking forward to seeing where this goes and where Salesforce goes next with future AI services.
Lightning Experience is not just a shiny new looking version of Salesforce Classic. Nor is it just some new cool technology for building device agnostic responsive rich clients. Its a single place where users access your application and of course others from Salesforce and those from AppExchange. Its essentially an application container a home for apps!
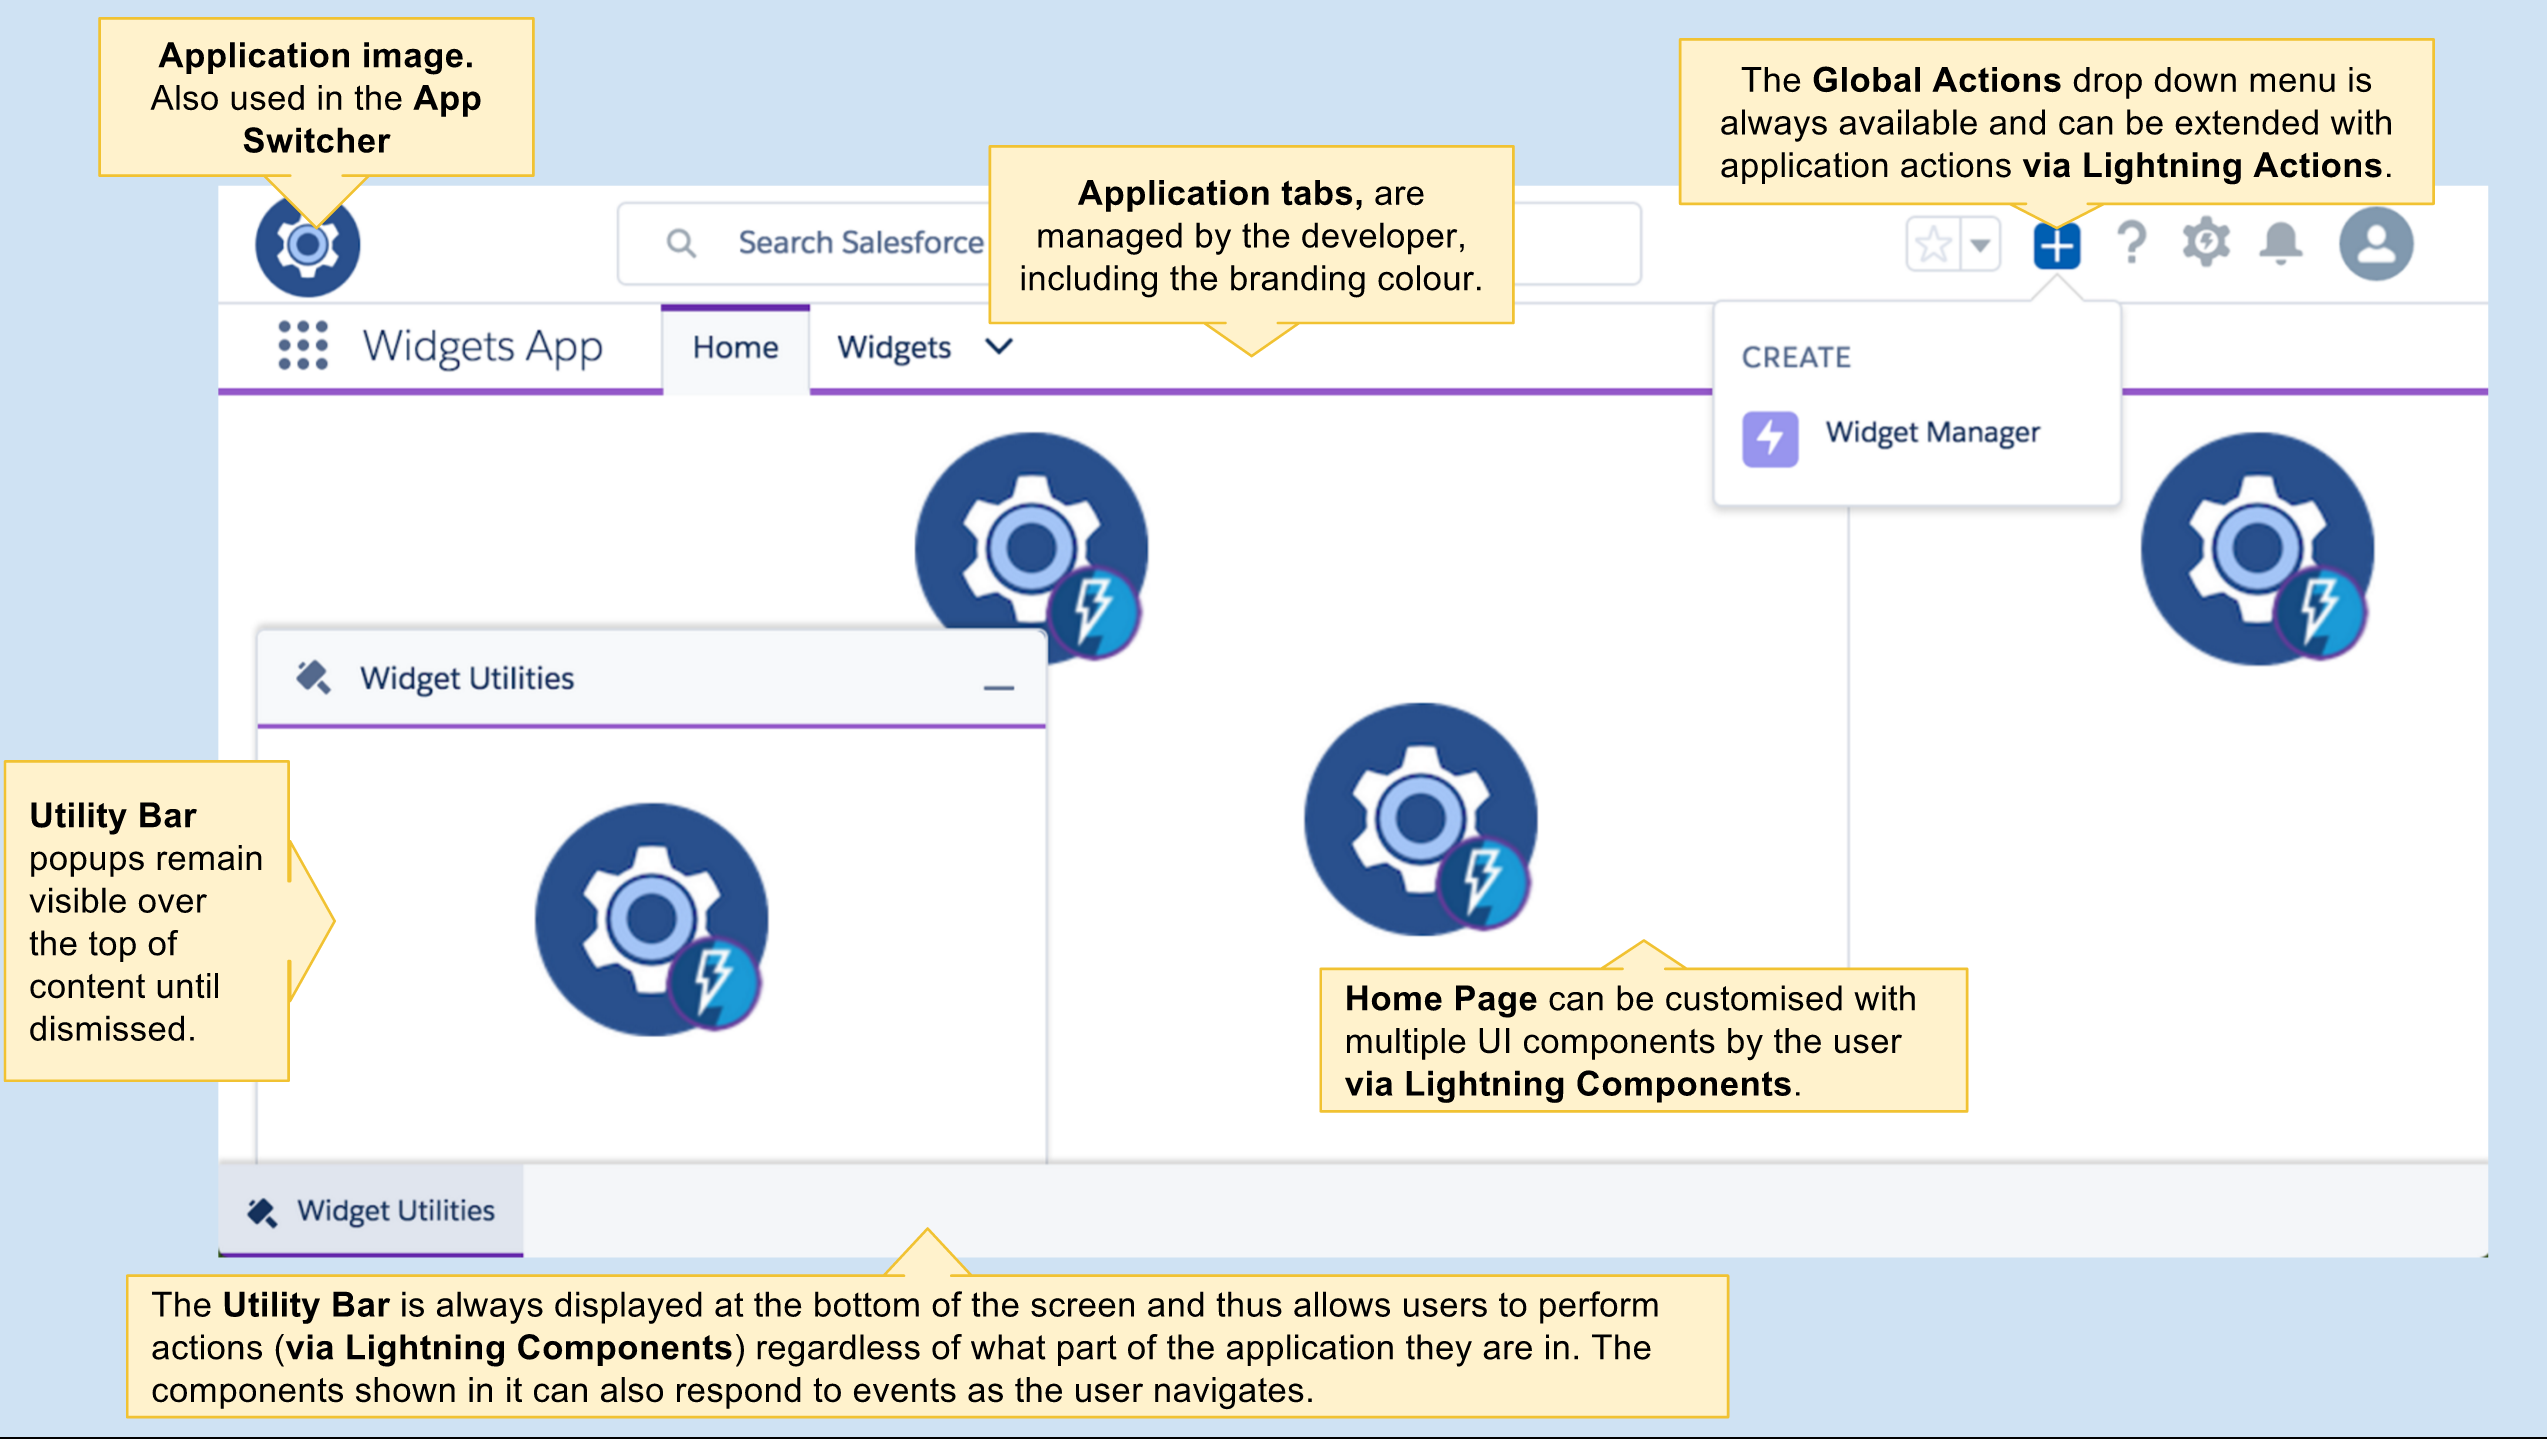
Like any home, its important to know how it works and how to maximise your experience in it. How do you make the occupants (your users) feel like its one place and not just bolted together. I decided to create the following graphics to summarise Lightning Experience container features. I have removed all the default actions, components you get from Salesforce, so we can easily see what it offers in a raw state.
Imagine the Widget App has several UIs to it…
Home page, customisable by the user using your components and others
Widgets tab that allows user to manage the widget records
Widget Manager organise your widgets, easy to access any time
Widget Utilities common information, contextual, easy to access any time
Widget Builder is a completly custom UI for constructing bigger widgets
Home Page, Utility Bar and Global Actions
The Home page is actually shared between all applications in Lightning Experience. You can choose to include it in your tabs or not. If you do, users can customise it with Lightning App Builder by dragging Lightning Components on it that you or others provide. New to Global Actions for Spring’17 is the ability to add Lightning Actions.
When you see the cog image with the Lightning logo in it, it means that that space can be anything you imagine! Because that space is driven by a Lightning Component!
Global Action Popup Management
When the user selects a Global Action, Lightning Experience automatically provides some useful features. The popup allows the user to close it, minimise or maximise it.
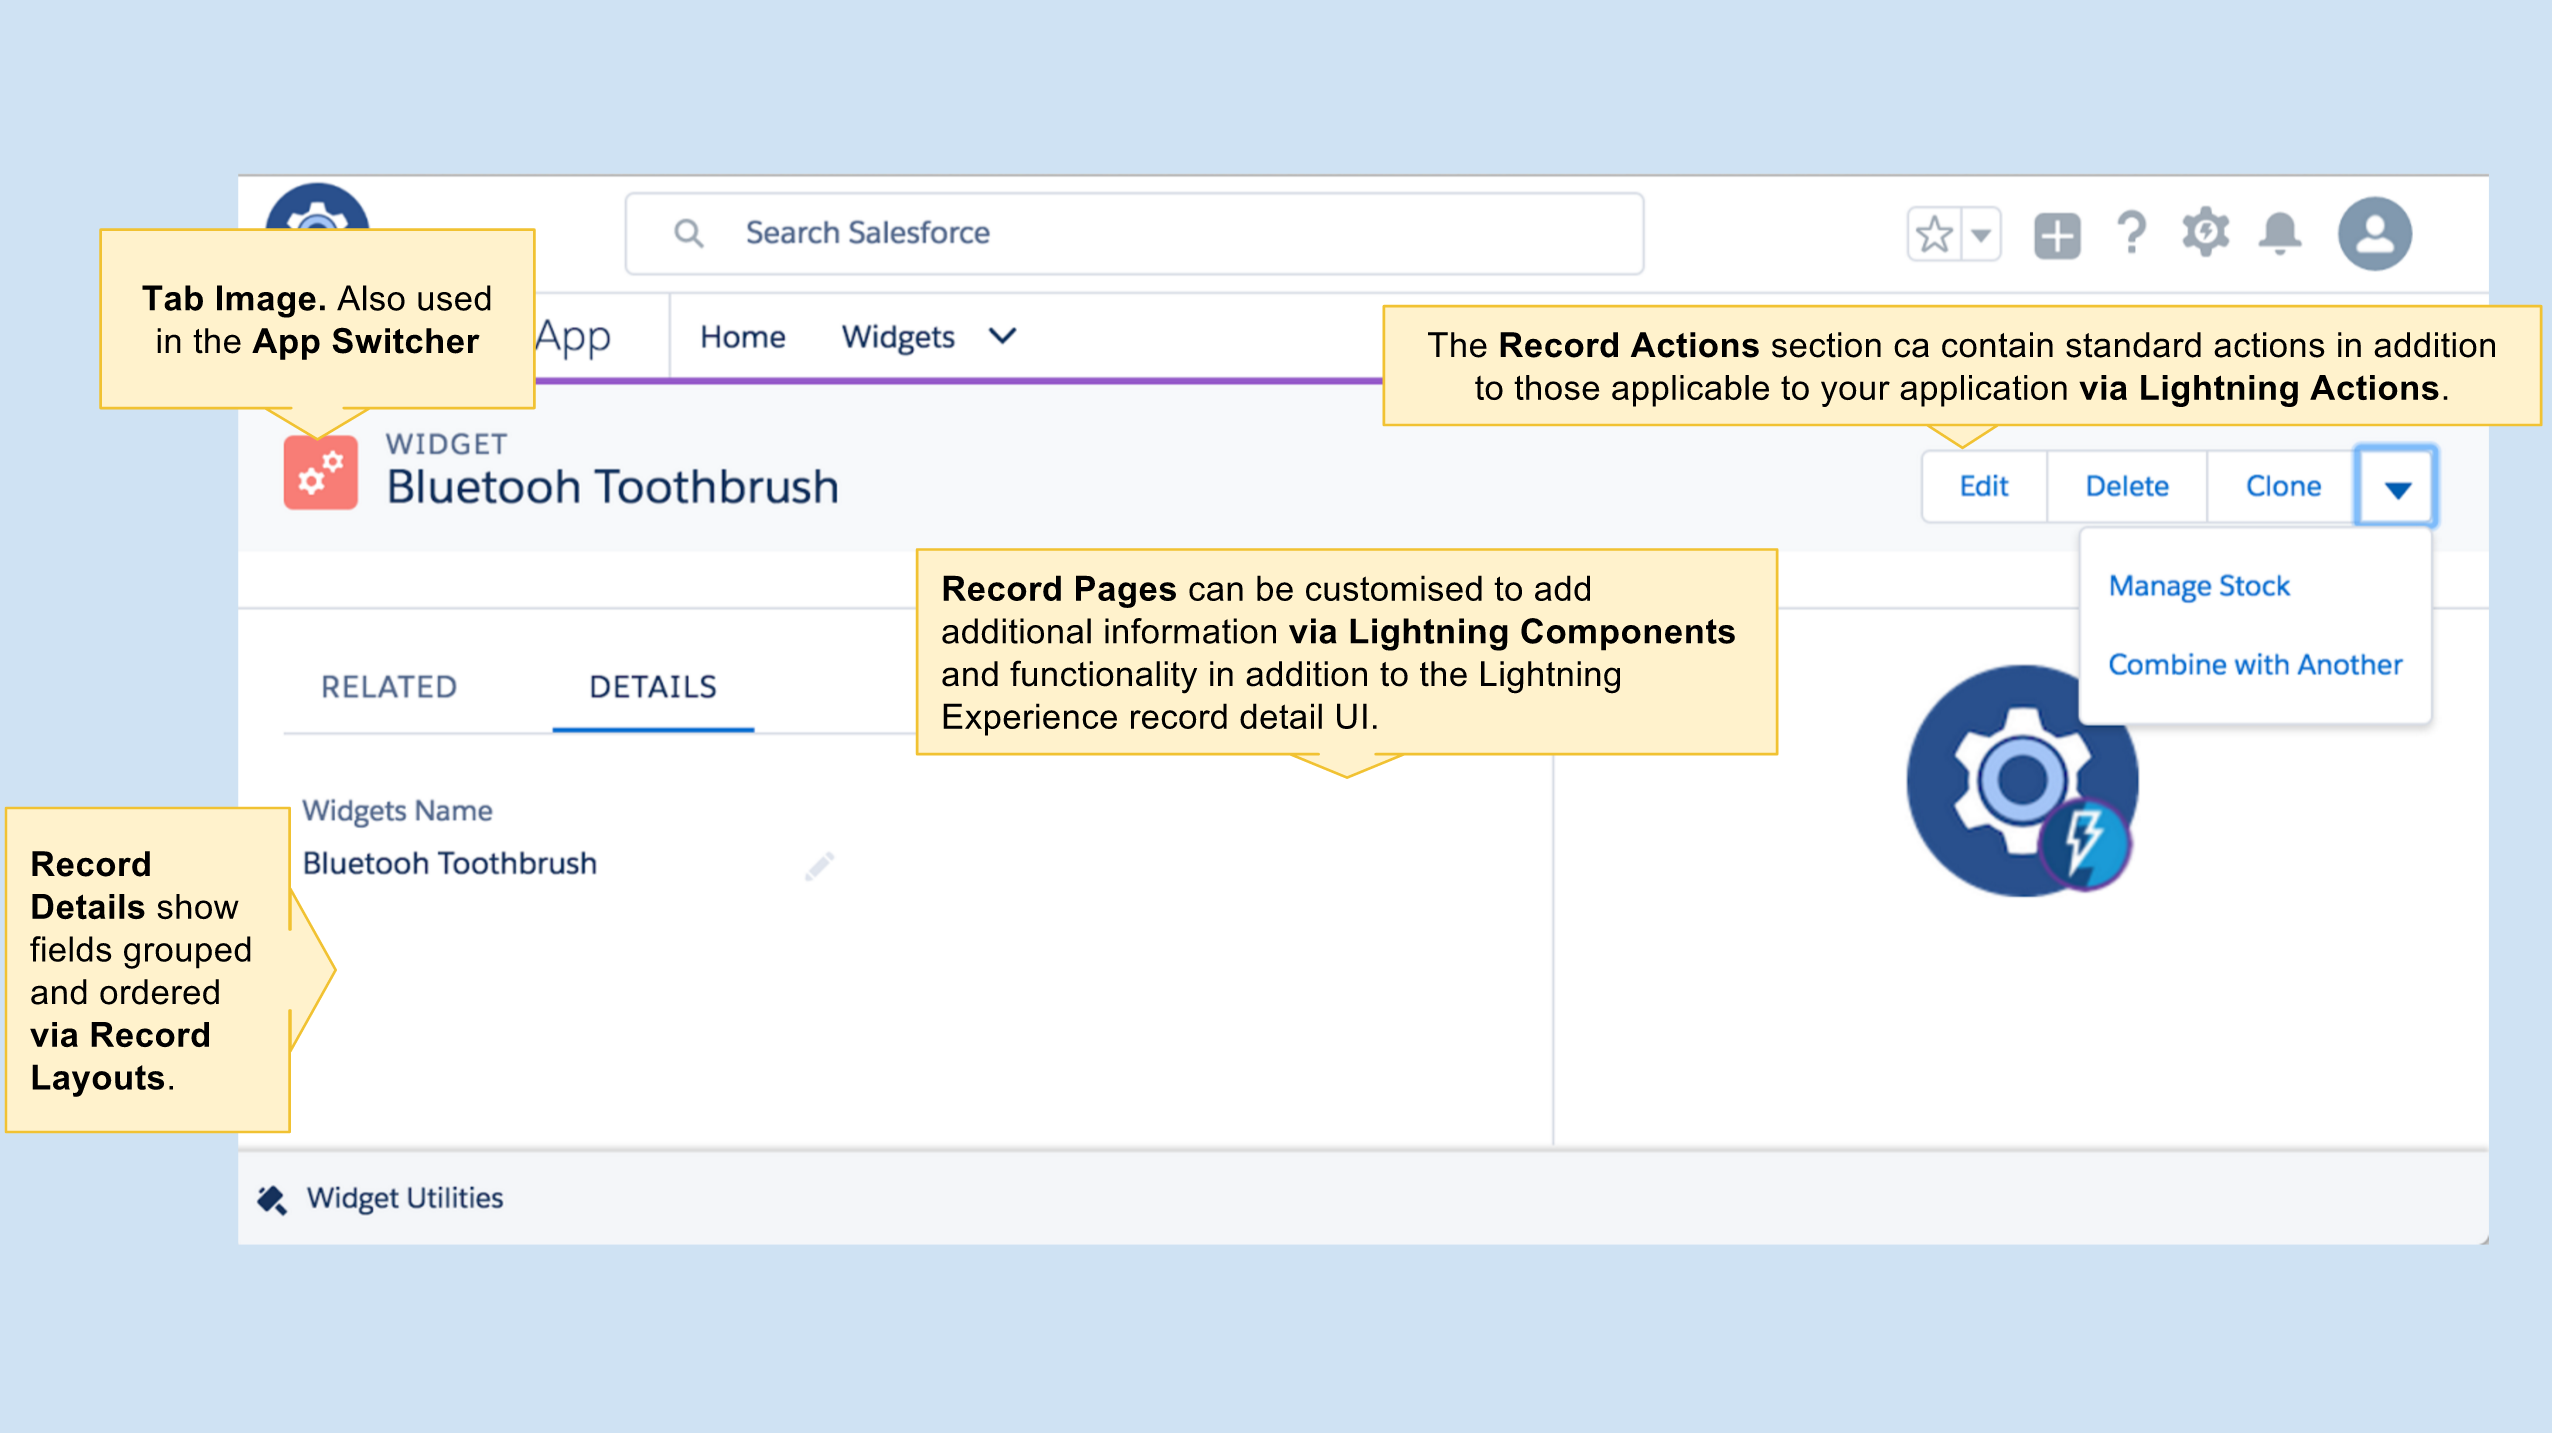
Record Page and Record Actions
Record page content is determined by a number of things, object Actions, object Record Layout and Lightning pages (created by Lighting App Builder) associated with the object. Lightning pages are scoped based on the active application, profile or record type.
Lightning Tabs
Provide the biggest real-estate for your entirely custom UI needs. The utility bar and global actions are however still available for your users to call on at any time!
Increasingly in each Salesforce release we are seeing more and more extensibility emerging. The above graphics are designed to get you thinking about how best to leverage Lightning Experience when designing your application. Read my other blogs relating to Utility Bar and Lightning Actions.
As a self confessed API junkie,each time the new Salesforce platform release notes land. I tend to head straight to anything API related, such as sections on REST API, Metadata, Tooling, Streaming, Apex etc etc. This time Spring’17 release seems more packed than ever with API potential for building apps on platform, off platform and combinations of the two! So i thought i would write a short blog highlight what i found and my thoughts on the following…
New or updated API’s in Spring’17…
Lightning API (Developer Preview)
External Services (Beta)
Einstein Predictive Vision Service (Selected Customers Pilot)
Apex Stub API (GA)
SObject.getPopulatedFieldsAsMap API (GA)
Reports and Dashboard REST API Enhancements (GA)
Composite Resource and SObject Tree REST APIs (GA)
Enterprise Messaging Platform Java API (GA)
Bulk API v2.0 (Pilot)
Tooling API (GA)
Metadata API (GA)
Lightning API (Developer Preview)
This REST API seems to be UI helper API that wraps a number of smaller already existing REST API’s on the platform. Providing a one stop shop (a single API call) for reading both record dataandrelated record metadata such as layout and theme information. In addition to that it will resolve security before returning the response. If your building your own replacement UI or integrating the platform into a custom UI. This API looks like it could be quite a saving on development costs, compared to the many API calls and client logic that would be required to figure all this out. Reading between the lines its likely its the byproduct of a previously internal API Salesforce themselves have been using for Salesforce1 Mobile already? But thats just a guess on my behalf! The good news if so, is that its likely pretty well battle tested from a stability and use case perspective. The API has its own dedicated Developer Guide if want to read more.
External Services (Beta)
If there is one major fly in the ointment of the #clicksnotcode story so far, it’s been calling API’s. By definition they require a developer to write code to use them, right? Well not anymore! A new feature of delivered via Flow (and likely Process Builder) allows the user to effectively teach Flow about REST API’s via JSON Hyper-Schema (an emerging and very interesting independent specification for describing API’s). Once the user points the new External Services Wizard to an API supporting JSON Hyper Schema it uses the information to generate Apex code for an Invocable Method that makes the HTTP callout. Generating Apex code, is a relatively new approach by Salesforce to a tricky requirement to bring more power to non-developers and one i am also a fan of. It is something they have done before for Transaction Security Policies plugins and of course Force.com Sites. At time of writing i could not find it in my pre-release org, but i am keen to dig in deeper! Read more here.
Einstein Predictive Vision Service (Selected Customers Pilot)
Following the big splash made at Dreamforce 2016 around the new AI capability known as Einstein. The immediate question on mine and many other partner and developers mind was “How do we make use of it from code?”. Spring provides an invite only pilot access to a new REST API around image processing and recognition. No mention yet of an APEX API though. You can read more about the API at in the release notes and in more detailed via the dedicated Metamind “A Salesforce Company” site here. There is also some clearer information on exactly where it popups up in Salesforce products.
So calling this an “API” is a bit of stretch i know. Since its basically a existing Apex method on the SObject class. The big news though is that a gap in its behaviour has been fixed / filled that makes it more useful. Basically prior to Spring this method would not recognise fields set by code after a record (SObject) was queried. Thus if for example your attempting to implement a generic FLS checking solution using the response from this method, you where left feeling a little disappointed. Thankfully the method now returns all populated fields, regardless if they are populated via the query or later set by code.
Reports and Dashboard REST API Enhancements (GA)
Its now possible to create and delete reports using the Analytics REST API (no mention of the Apex API equivalent and i suspect this wont be supported). Reports are a great way to provide a means for driving data selection for processes you develop. The Analytics API is available in REST and Apex contexts. As well as driving reports from your code, Report Notifications allow users to schedule reports and have actions performed if certain criteria is met. I recently covered the ability to invoke an Apex class and Flow in response to Report Notification in this blog, Supercharing Salesforce Report Subscriptions. In Spring, the Reports REST API can now create notifications.
Composite Resource and SObject Tree REST APIs (GA)
An often overlooked implication of using multiple REST API calls in response to a user action is that if those calls update the database, there is no over arching database transaction. Meaning if the user was to close the page before processing was done, or kill the mobile app or your client code just crashed. It is possible to leave the records in an an invalid state. This is bad for database integrity. Apart from this, making multiple consecutive REST API calls can eat into an orgs 24hr rolling quota.
To address these use cases Salesforce have now released in GA form the composite and tree APIs (which actually this was already GA, how did i miss that?!). The composite resource API does allow you to package multiple CRUD REST API calls into one call and optionally control transaction scope via the AllOrNothing header. Allowing the possibility of committing multiple records in one CRUD API requested. The tree API allows you to create an account with a related set of contacts (for example) in one transaction wrapped REST API call. Basically the REST API is now bulkified! You can read more in the release notes here and in the REST API developers guide here and here.
Salesforce is overhauling their long standing Bulk REST API. Chances are you have not used it much, as its mostly geared towards data loading tools and integration frameworks (its simply invoked by ticking a box in the Salesforce Data Loader). The first phase of v2.0 changes to this API allow it to support larger CSV files to be uploaded and automatically chunked by the platform without the developer having to split them. Also changing the way limits are imposed, making it more record centric. Read more here.
Tooling API (GA)
Tooling API appears to be taken on new REST API resources that expose more standard aspects of the platform, such as formula functions and operators. For those building alternative UI’s over these features its a welcome alternative to hard coding these lists and having to remember to check / update them each release. Read more here.
Metadata API (GA)
Ironically my favourite API, the Metadata API has undergone mainly typical changes relating to new features elsewhere in the release. So no new methods or general features. I guess given all the great stuff above, i can not feel to sad! Especially with the announcement recently from the Apex PM that the native Apex Metadata API is finally under development, of course safe harbour and no statement yet on dates… but progress!
The Amazon Echo device sits in your living room or office and listens to your verbal instructions, much like Siri. It performs various activities. Such as fetching and relaying information and/or performing actions on your behalf. It also serves as a large bluetooth speaker. Now, after a run in the US, it has finally been released in the UK!
Why am i writing about it here? Well it has an API of course! So lets roll up our sleeves with an example i built recently with my FinancialForce colleague and partner in crime for all things gadget and platform, Kevin Roberts.
Kevin reached out to me when he noticed that Amazon had built this device with a means to teach it to respond to new phrases. Developers can extend its phrases by creating new Skills.You can read and hear more about the results over on FinancialForceblogsite.
To create a Skill you need to be a developer, capable of implementing a REST API endpoint that Amazon calls out to when the Echo recognizes a phrase you have trained it with. You can do this in practically any programming language you like of course, providing you comply with the documented JSON definition and host it securely.
One thing that simplifies the process is hosting your skill code through the Amazon Lambda service. Lambda supports Java, Python and NodeJS, as well as setting up the security stack for you. Leaving all you have to do is provide the code! You can even just type your code in directly to developer console provided by Amazon.
Training your Skill
You cannot just say anything to Amazon Echo and expect it to understand, its clever but not that clever (yet!). Every Skill developer has to provide a set of phrases / sample utterances. From these Amazon does some clever stuff behind the scenes to compile these into a form its speech recognition algorithms can match a users spoken words to.
You are advised to provide as many utterances as you can, up 50,000 of them in fact! To cover as many varied ways in which we can say things differently but mean the same thing. The sample utterances must all start with an identifier, known as the Intent. You can see various sample utterances for the CreateLead and GetLatestLeads intents below.
CreateLead Lets create a new Lead
CreateLead Create me a new lead
CreateLead New lead
CreateLead Help me create a lead
GetLatestLeads Latest top leads?
GetLatestLeads What are our top leads?
Skills have names, which users can search for in the Skills Marketplace, much like an App does on your phone. For Skill called “Lead Helper” users would speak the following phrases to invoke any of its intents.
“Lead Helper, Create me a new lead”
“Lead Helper, Lets create a new lead”
“Lead Helper, Help me create a lead”
“Lead Helper, What are our top leads?”
Your sample utterances can also include parameters / slots.
DueTasks What tasks are due for {Date}?
DueTasks Any tasks that are due for {Date}?
Slots are essentially parameters to your Intents, Amazon supports various slot types. The date slot type is quite flexible in terms of how it handles relative dates.
“Task Helper, What tasks are due next thursday?”
“Task Helper, Any tasks that are due for today?”
Along with your sample utterances you need to provide an intent schema, this lists the names of your intents (as referenced in your sample utterances) and the slot names and types. Further information can be found in Defining the Voice Interface.
Mapping Skill Intents and Slots to Flows and Variables
As i mentioned above, Skill developers implement a REST API end point. Instead of receiving the spoken words as raw text, it receives the Intent name and name/value pair of Slot names and values. That method can then invoke the appropriate database query or action and generate a response (as a string) to response back to the user.
To map this to Salesforce Flows, we can consider the Intent name as the Flow Name and the Slot name/values as Flow Input Parameters. Flow Output Parameters can be used to generate the spoken response to the user. For the example above you would define a Flow called DueTasks with the following named input and output Flow parameters.
Flow Name: DueTasks
Flow Input ParameterName: Alexa_Slot_Date
Flow Output ParameterName: Alexa_Tell
You can then basically use the Flow Assignment element to adjust the variable values. As well as other elements to query and update records accordingly. By using an output variable named Alexa_Tell before your Flow ends, you end the conversation with a single response contained with the text variable.
For another example see the Echo sample here, this one simply repeats “echo’s” the name given by the user when they speak a phrase with their name in it.
The sample utterances and intent schema are shown below. These utterances also use a literal slot type, which is a kind of picklist with variable possibilities. Meaning that Andrew, Sarah, Kevin and Bob are just sample values, users can use other words in the Name slot, it is up to the developer to validate them if its important.
Echo My name is {Andrew|Name}
Echo My name is {Sarah|Name}
Echo My name is {Kevin|Name}
Echo My name is {Bob|Name}
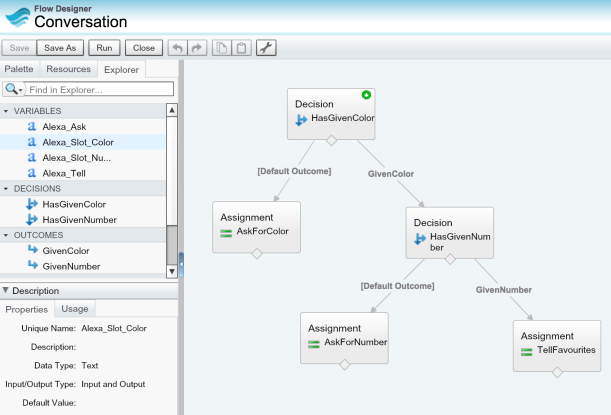
Alternatively if create and assign the Alexa_Ask variable in your Flow, this starts a conversation with your user. In this case any Input/Output Flow Parameters are retained between Flow calls. Finally if you suffix any slot name with Number, for example a slot named AmountNumber would be Alexa_Slot_AmountNumber, this will ensure that the value gets converted correctly to pass to a Flow Variable of type Number.
The following phrases are for the Conversation Flow included in the samples repository.
Conversation About favourite things
Conversation My favourite color is {Red|Color}
Conversation My favourite color is {Green|Color}
Conversation My favourite color is {Blue|Color}
Conversation My favourite number is {Number}
NodeJS Custom Skill
To code my Skill I went with NodeJS, as i had not done a lot of coding in it and wanted to challenge myself. The other challenge i set myself was to integrate in a generic and extensible way with Salesforce. Thus i wanted to incorporate my old friend Flow!
With its numerous elements for conditional logic, reading and updating the database. Flow is the perfect solution to integrating with Salesforce in the only way we know how on the Salesforce platform, with clicks not code! Now of course Amazon does not talk Flow natively, so we need some glue!
var AlexaSkill = require('./AlexaSkill');
var nforce = require('nforce');

/**
* SalesforceFlowSkill is a child of AlexaSkill.
* To read more about inheritance in JavaScript, see the link below.
*
* @see https://developer.mozilla.org/en-US/docs/Web/JavaScript/Introduction_to_Object-Oriented_JavaScript#Inheritance
*/
var SalesforceFlowSkill = function () {
    AlexaSkill.call(this, APP_ID);
};
The AlexaSkill base class exposes four methods you can override, onSessionStarted, onLaunch, onSessionEnded and onIntent. As you can see from the method names, requests to your skill code can be scoped in a session. This allows you to manage conversations users can have with the device. Asking questions and gathering answers within the session that build up to perform a specific action.
I implemented the onIntent method to call the Flow API.
SalesforceFlowSkill.prototype.eventHandlers.onIntent =
   function (intentRequest, session, response) {
       // Handle the spoken intent from the user
       // ...
   }
Calling the Salesforce Flow API from NodeJS
Within the onIntent method I used the nforce library to perform oAuthuser name and password authentication for simplicity. Though Alexa Skills do support the oAuth web flow by linking accounts. The following code performs the authentication with Salesforce.
SalesforceFlowSkill.prototype.eventHandlers.onIntent =
    // Configure a connection
    var org = nforce.createConnection({
        clientId: 'yourclientid',
        clientSecret: 'yoursecret',
        redirectUri: 'http://localhost:3000/oauth/_callback',
        mode: 'single'
    });
    // Call a Flow!
    org.authenticate({ username: USER_NAME, password: PASSWORD}).
        then(function() {
The following code, calls the Flow API, again via nforce. It maps the slot name/values to parameters and returning any Flow output variables back in the response. A session will be kept open when the response.ask method is called. In this case any Input/Output Flow Parameters are retained in the Session and passed back into the Flow again.
// Build Flow input parameters
var params = {};
// From Session...
for(var sessionAttr in session.attributes) {
    params[sessionAttr] = session.attributes[sessionAttr];
}
// From Slots...
for(var slot in intent.slots) {
    if(intent.slots[slot].value != null) {
        if(slot.endsWith('Number')) {
            params['Alexa_Slot_' + slot] = Number(intent.slots[slot].value);
        } else {
            params['Alexa_Slot_' + slot] = intent.slots[slot].value;
        }
    }
}
// Call the Flow API
var opts = org._getOpts(null, null);
opts.resource = '/actions/custom/flow/'+intentName;
opts.method = 'POST';
var flowRunBody = {};
flowRunBody.inputs  = [];
flowRunBody.inputs[0] = params;
opts.body = JSON.stringify(flowRunBody);
org._apiRequest(opts).then(function(resp) {
    // Ask or Tell?
    var ask = resp[0].outputValues['Alexa_Ask'];
    var tell = resp[0].outputValues['Alexa_Tell'];
    if(tell!=null) {
        // Tell the user something (closes the session)
        response.tell(tell);
    } else if (ask!=null) {
       // Store output variables in Session
       for(var outputVarName in resp[0].outputValues) {
           if(outputVarName == 'Alexa_Ask')
               continue;
           if(outputVarName == 'Alexa_Tell')
               continue;
           if(outputVarName == 'Flow__InterviewStatus')
               continue;
            session.attributes[outputVarName] =
               resp[0].outputValues[outputVarName];
       }
       // Ask another question (keeps session open)
       response.ask(ask, ask);
I would also like to call out that past Salesforce MVP, now Trailhead Developer Advocate Jeff Douglass started the ball rolling with his Salesforce CRM examples. Which is also worth checking out if you prefer to build something more explicitly in NodeJS.
Salesforce continues to add to the ever expanding places in which developers can extend Lightning Experience using standard or custom Lightning Components. In a recent blog i covered Lighting Component Actions. This blog focuses on the Utility Bar. While also showcasing the Base Lightning Components also new for Winter’17.
If enabled, this displays a rectangular region shown in the footer region of Lightning Experience (it does not apply to Salesforce1 mobile currently). Regardless of where the user navigates, it remains present and its contents always visible. Its display and content is dependent on the currently selected application (just like tabs are in classic). If your from a Windows background it will likely remind you of the status bar!
Salesforce have utilised this for their new Lightning Voice functionality. Providing you have the required license for it, you can enable it under the new Application Manager. There just one hitch. For now there is no general Setup UI to configure your own utility bar or for that matter, add components to it, at least not until Spring’17 anyway.
However worry not! There is Metadata API support available now (in pre-release orgs only as i write this blog). This is all we need to unlock the power of the utility bar! Which means it can also be packaged (as part of your CustomApplication metadata) and accessed via the Migration Toolkit. Eventually also within IDE’s once they catchup with API v38. I am told however that Tooling API support is planned for Spring’17.
Sample Utility Bar Application
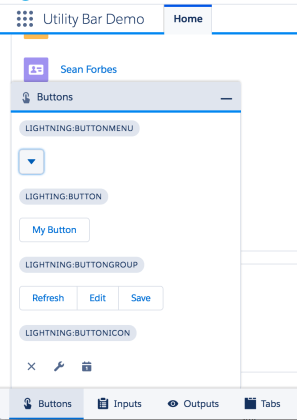
If you cannot wait to go try out the utility bar at this point, click the Deploy to Salesforce button below and it will deploy a sample application (make sure to use a Winter’17 org). Once deployed go to the App Manager under Setup and assign the Utility Bar Demo application to your profile.
Alternatively if you want to clone the repository and have Ant installed. You can edit the sample FlexiPage included and use the ant deploy command deploy your changes. Be sure to enter your org login details into the build.properites file. If you have managed to contain your excitement and want to know more, read on…
Updates to the FlexiPage Metadata Type
The utility bar content is driven by a Lightning Page or better known behind the scenes as a FlexiPage. FlexiPage’s have different types (see the type field in the docs). A page of type UtilityBar cannot be created with Lighting App Builder. So it must be expressed in its Metadata API form. This is what such as FlexiPage looks like…
    This page contains the Utility Bar components


                eager
                decorator
                true


                height
                decorator
                400


                icon
                decorator
                touch_action


                label
                decorator
                Buttons


                scrollable
                decorator
                false


                width
                decorator
                300

            buttons

        utilityItems
        Region

    AndyUtilBar
    one:utilityBarTemplateDesktop
    UtilityBar
This is pretty much what a standard FlexiPage looks like with a couple of differences. First the type is set to UtilityBar. Second component attribute values now support a new decoratortype. This means that the attribute value is used to configure a dynamically created UI around (wrapped) your component when the user opens it from the utility bar. Rather than being passed to the component itself.
You can mix the two attribute types, those passed to your component vs those used by the wrapper. The formal list of decarotor attributes for utility bar components has not yet been documented, those above can also be seen in the Voice Utility FlexiPage. I’ll be sure to update this blog when they are. Meanwhile this is what the API docs have to say…
If this field value is decorator, then the ComponentInstanceProperty values apply to the component decorator for the Lightning component. The component decorator is a wrapper around a Lightning component. The decorator can apply additional capabilities to the component when it renders on a specific page in Lightning Experience. For example, you can configure a component decorator around a component on the Lightning Experience utility bar to set the component’s height or width when opened. The UtilityBar is the only page type that supports component decorators.
Updates to the CustomApplication Metadata Type
Once you have defined your FlexiPage you need to reference it from your CustomApplication metadata. This is as simple as specifying it via the new <utilityBar> element (see docs). There are also quite a number of new elements for branding etc.
        #1589EE

    Large
    Utility Bar Demo
    Standard
    standard-home
    Lightning
    UtilityBarDemo
Lightning Component Requirements
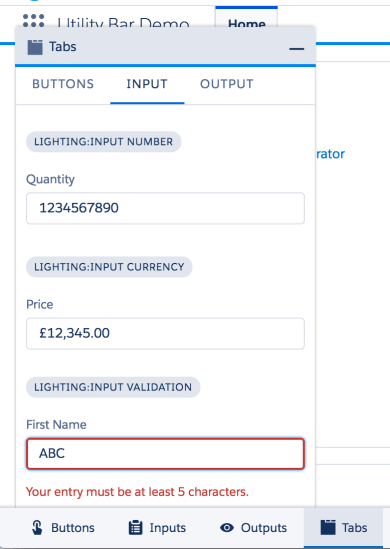
The above example uses some simple custom Lightning Components included in the accompanying repo for this blog. The only requirement for a component to appear on the utility bar is it has to implement the flexipage:availableForAllPageTypes interface. The follow shows the new Winter’17 lightning:tabset base component.
The components included in this demo showcase the Base Lightning Components examples from the current documentation. I have no doubt the community will be digging into these very soon. So far they look very solid and quite feature rich.
Summary
I am eager to see how this feature rolls out further, as there is so much potential for this feature in reducing navigation overheads and thus improving user productivity. I’ll certainly be exploring a bit further with this sample to see what events and interactions are possible, which i’ll surely follow up on in a future blog.
When i first heard about this feature in Winter’17 preview webinar i was very excited to try it out and not having a UI was of course not going to hold me back! Thanks to Eric Jacobson for helping with early pointers that helped me pull this together.
I think its a great move for Salesforce to deal with the juggling priorities vs development resources by deploying new features via API only if needed and as i have said before a true testament to their commitment to their API first strategy.
IMPORTANT NOTE:
As per the usual Salesforce Release Notes documentation warning. Until Winter’17 goes out to production, information in this blog and associated information should be considered subject to change. I will continue to monitor for updates in the documentation and update accordingly.
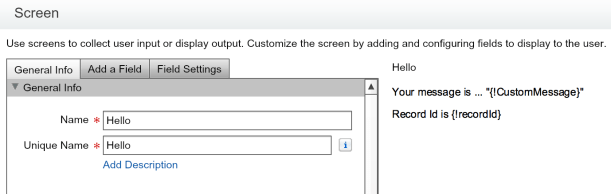
This is the Screen element showing the passed information from Lighting App Builder…
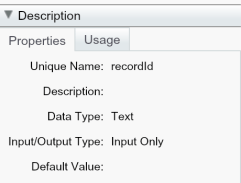
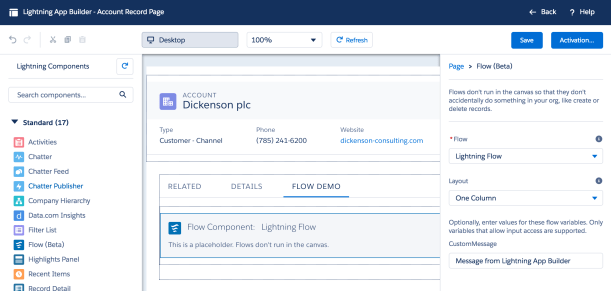
By creating an Input variable in your Flow called recordId of type Text (see docs). Lightning App Builder will automatically pass in the record Id. You can also expose other input parameters, e.g. CustomMessage so long as they are Input or Input/Output.
These will display in the properties pane in Lightning App Builder. Sadly you cannot bind other field values, but this does give some nice options for making the same Flow configurable for different uses on different pages!
Flow Custom Buttons with Selection List Views
Winter’17 brings with it the ability to select records in List Views. As with Salesforce Classic UI it will show checkboxes next to records in the List View, IF a Custom Button has been added to the List View layout that required multi-selection.
In my past blog Visual Flow with List View and Related List Buttons, prior to Winter’17. I was not able to replicate the very useful ability to pass user selected records to a Flow in Lightning Experience. I am now pleased to report that this works!
This results in the flow from my previous blog showing the selected records. As you can see, sadly because we are using a Visualforce page the lovely new Flow styling we see when using Flow (Beta) support in Lightning App Builder does not apply. But hey being able to select the records is a good step forward for now! The setup of the Visualforce page and Custom Button is identical to that in my previous blog.
Summary
Flow continues to get a good level of love and investment in Salesforce releases, which pleases me a lot. Its a great tool, the only downside is with more features comes more complexity and thus a great need to stay on top of its capabilities, a nice problem to have!
Back in 2013 i wrote a blog post with a very similar name, How To: Call Apex code from a Custom Button. It continues to gather a significant number of hits. Its a common task as its good to first consider extending the Salesforce UI’s before building your own. The Custom Button approach actually still works very well in Lightning Experience and still for now has some benefits. However Lightning Experience is increasingly offering more and more ways to be customised, Home Page, Record Detail and now Actions!
Visualforce and Standard Controllers have long since been the main stay for implementing Custom Buttons. However for any of those that have tried it, you’ll know that Visualforce pages need some work to adopt the new Lightning Design System style. So what if we could link a natively built and styled custom Lightning UI with a button?
Well in Winter’17 we can! Custom Buttons are out in the Lightning world, what are hip and trendy these days are Actions, as i mentioned in my Platform Action post, Actions are fast becoming the future! Or in this case Lightning Component Actions.
Force.com IDE and Lightning Components
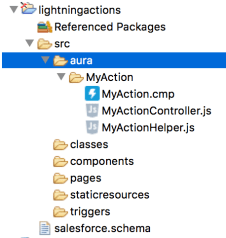
I have also used this as a chance to get familiar with the recently announce Force.com IDE Beta, which supports editing Lightning Components. It worked quite well, the wizard creates the basic files of a component include template controller and helper files.
The auto complete also worked quite well in the component editor. There is also quite a neat outline view. To create a design file (not actually needed here) i had to create this as a simple text file in Eclipse and be sure to name it after my component with .design on the end. After this the IDE seemed to pick it up just fine, though it found it does not save with the other component files as i would have expected.
Creating an Lightning Component Action
As with the Record, Tab and Home pages, a new interface, force:lightningQuickAction, has been added to the platform to indicate that your component supports Actions. I used the sample in the Salesforce documentation to get me started and it works quite well. The following is the component markup, i’ll cover the controller code later in this post.
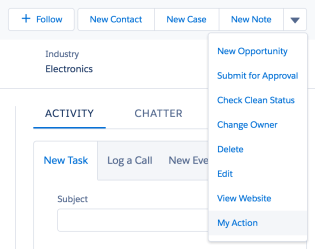
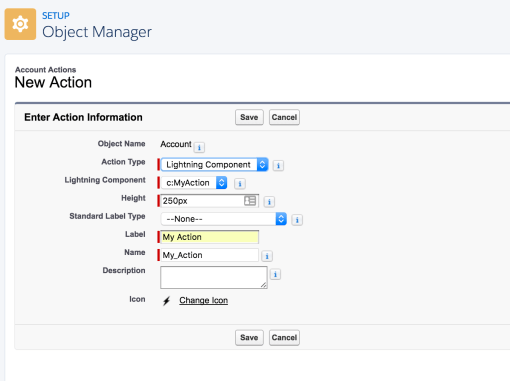
What was not immediately apparent to me once i had uploaded the code, was that i still needed to create an Action under Setup for object i wanted my action to be associated with. I chose Account for this, the following shows the New Action page i completed. It automatically detected my Lightning Component, nice!
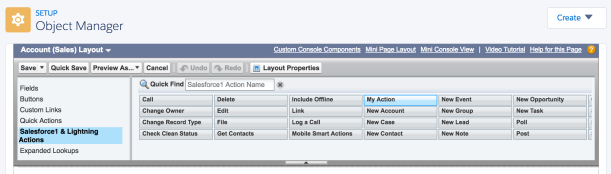
I then found My Action under the Layout Editor, which was also a little odd since i have become so used to finding my components in Lightning App Builder. I guess though the distinction is record level vs page level and hence the Layout Editor was chosen, plus existing actions are managed through layouts.
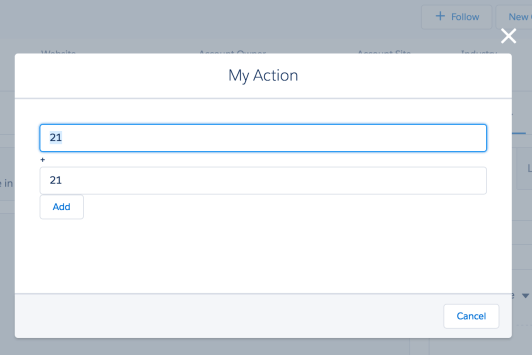
Once i updated the Layout, My Action then appeared under the actions drop down (as shown at the top of this blog). As you can see below the component is wrapped in a popup with a system provided Cancel button. I chose to use the force:lightningQuickAction interface as per the docs. The force:lightningQuickActionWithoutHeader hides the Header and Cancel button shown, though popup close X button is still shown.
The Component Controller code for the sample component shows how you can programatically close the popup and deliver a user message via the toast component. I enjoyed learning about this while I looked at this sample. Extra credit to the documentation author here!
({
clickAdd: function(component, event, helper) {

// Get the values from the form
var n1 = component.find("num1").get("v.value");
var n2 = component.find("num2").get("v.value");

// Display the total in a "toast" status message
var resultsToast = $A.get("e.force:showToast");
resultsToast.setParams({
"title": "Quick Add: " + n1 + " + " + n2,
"message": "The total is: " + (n1 + n2) + "."
});
resultsToast.fire();

// Close the action panel
var dismissActionPanel = $A.get("e.force:closeQuickAction");
dismissActionPanel.fire();
}
})
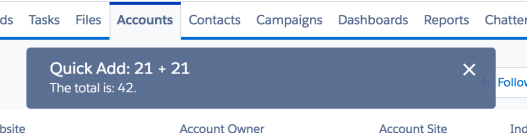
Firing the toast event created in the above sample looks like this…
Context is everything…
The force:hasRecordId interface can be used to determine which record the user is looking at. Simply add it to your component like so…
<aura:component
implements="force:lightningQuickAction,force:hasRecordId">
Record Id is {!v.recordId}
</aura:component>
Note: I have it on good authority, that contrary to some samples and articles the you do NOT need to define the recordId property via aura:attribute.
Summary
In short i am really getting quite excited by the amount of places Lightning Components are starting to popup in, not just more places within Lightning Experience, but Salesforce1 Mobile, Communities and even Lightning Outlook. Join me at my Dreamforce 2016 session where we will also be looking at Lightning Out: Components on any Platform, featuring Google App Addins.
If there is one mantra that Salesforce has been driving home, its that its good to listen to your customers. Not only does the platform provide us with some excellent tools to engage with our customers. Salesforce also make sure they are providing tools, communities and events to listen to us!
When you put forward an idea, how often do you stop to think about what your responsibilities are? The obvious one is stating clearly what the idea is. After that, surely your idea is so good it needs no further perspectives? Right? Wrong!
The key to making it an idea Salesforce Product Managers can understand and support is giving them the information to fight your corner when they are allocating development resources ahead of each release. Them agreeing it is a good idea is not always enough to make it through. Developers even in Salesforce are a finite resource. So priority calls have to be made, especially when some ideas are not cheap to develop.
So what can we do to help Product Managers help us?
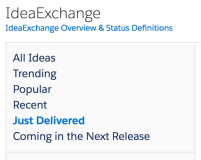
Idea Exchange is one such place where you can raise your ideas, socialise them and have others vote on them. You can read more about the Idea Exchange process and guidelines here. The sidebar shown on the Idea Exchange page allows you to review ideas implemented and those upcoming. Votes are of course important, but having a well formed idea is also equally important to getting it in front Product Managers and into internal discussions during planning. As per the Salesforce guidelines…
“The minimum point threshold is to help us manage communication expectations only and does not factor in how we prioritize our road map. Product Managers can and do deliver Ideas of all point values big and small, it’s just that we can only guarantee status updates on Ideas that have the most community backing.”
Preparation and Perspective
Take some time to understand what has lead you to your idea. If your a developer or admin, what is the business process or user experience your trying to achieve and could not? How has the lack of whatever feature or facility you need impacted your customers or client? Remember Salesforce are thinking about the customer, as should you. Think about the following and try to answer in as quantitative way as possible.
What is the impact on the users productivity?
What common use cases are effected by not having this idea?
What is the impact on the build cost (e.g. more code and less clicks)?
What is the ongoing cost of any workaround?
Ensure your idea title can relate to as many people as possible
Keep your idea focused. You might feel there is a larger problem or concept being missed, but try to avoid letting this creep into your idea. Don’t just state the area of the idea in the title, e.g. “Process Builder – Criteria”.
Relatable by others. If your a developer or admin, try to make your idea relate to more than just your fellow developers or admins, keep the technical terms to a minimum. Instead of “Add X method to class Y” state “Ability to perform A from Apex”. You can always include code samples or ideas in the body of your idea. Try bouncing the idea off others for feedback before submitting.
Focus on the idea, avoid being to prescriptive. Unless its pretty clear its the only option, try to avoid preempting the solution to your idea in the title and focus on the idea itself in the title. If your to prescriptive you risk detracting from the problem and what the idea is about. Instead offer details on your thoughts regarding how Salesforce should implement your idea in your description.
Your description is your shop front, sell your idea!
Take a moment to understand the toolbar and the tools on it. Prepare what your going to say separately as you cannot edit what you post and preparing in the posting window can be risky if you accidentally close the browser window!
Structure your description and prioritise.
Readers only have a limited amount of attention, so it is unlikely everyone will read your idea from top to bottom. So keep it short and try to tell a short story using your preparation above, bring the reader with you so they can better empathize with the problem being solved and thus your idea. Focus on the problem statement and qualification, then the idea, then additional thoughts or specifics that might help with further understanding or solving the idea.
A picture speaks a thousand words!
Understand what the most visual striking way of expressing your idea is. If its a new button or field you want, consider a screenshot with some annotations on it.
Format and pretty print your code.
Use the code toolbar button to include sample code. This highlights in a different way from your text. Make sure to get the spacing corrected, don’t force the reader to read through poorly formatted code.
Use hyperlinks to other resources.
Link to community posts or StackExchange threads where other users are talking about the problem your idea solves. As discussed above try to inline pictures or code in the description, don’t force people to click through to read more about your idea. That said you might want to include a blog reference that goes into more detail, especially if you have included thoughts on workarounds that might help Salesforce in determining the options for implementing a your idea.
Encourage comments that add maximum value to supporting the idea.
Finally in your description, encourage people to comment on the idea in ways that add value to your problem definition and impacts. Comments that say “+1” or “We urgently need this!” don’t really help. What you want is evidence from the community through brief testimonials or examples of how its impacting them or their users. This of course also applies if your reading this and comment on ideas as well. You can also comment on your own ideas to give updates or further thoughts.
Socializing and monitoring your idea
Use your social network for sure. I think its also fine to retweet to ask for more support every few months or so, just don’t over do it. Also if you happen to know who the Product Manager is for an area, say on Twitter for example. Then helping by drawing their attention to your idea is also something you can consider, just be polite and professional when you do!
If you have a blog and or write answers on Success Community or StackExchange provide a link to your idea as well. Try to do this at the top and bottom of what ever peace your writing, again not everyone reads till the end!
Don’t spam people with your idea, that can have a negative effect.
While adding a link to your idea to an existing blog or community post is also a good idea, do make sure it’s relevant.
You’ll get email notifications each time someone posts a comment on your idea. Consider reaching out to them if you think they can add more detail or further support your idea.
At the end of the day….
I’m aware there is sometimes skepticism about Idea Exchange and thus people either don’t post to it or when they do they don’t put in enough effort to frame their idea. At the end of the day its up to you if you feel its worth the effort vs the reward. I know many of the Salesforce Product Managers really value the type of information i am describing in this blog and thus has been one of the drivers behind writing it.
The other thing I do know, through working in an ISV myself. Is if someone has clearly put in the effort to frame and idea vs a short blast, the idea is much more likely to get considered than not. Especially if it contains information that makes the Product Managers job easier by providing use cases and impact analysis they can use internally during resourcing and priority discussions.

 The ability to create custom fields is a key feature when it comes to customising. Shortly followed by using features like Validation Rules, Workflow, Process Builder, Flow etc. Have you ever developed a solution that also offers the capability to consume user defined fields dynamically? If so you will have used a Custom Object or Custom Setting with a text field to store the field name/s to use.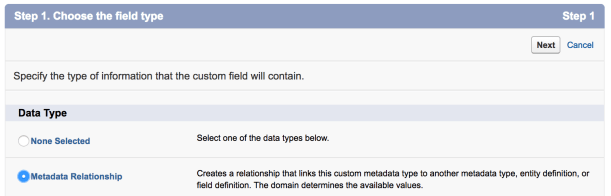

 With
With 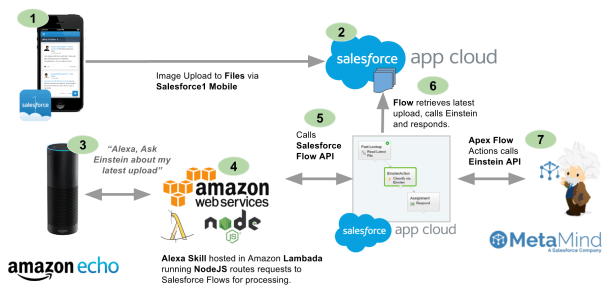

 The service introduces a few new terms to get your head round. Firstly a dataset is a named container for the types of images (labels) you want to recognise. The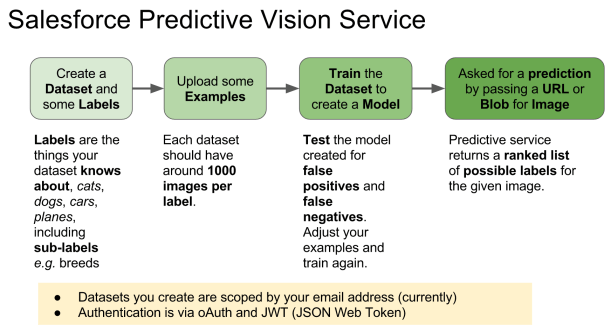
 When you see the cog image with the Lightning logo in it, it means that that space can be anything you imagine! Because that space is driven by a Lightning Component!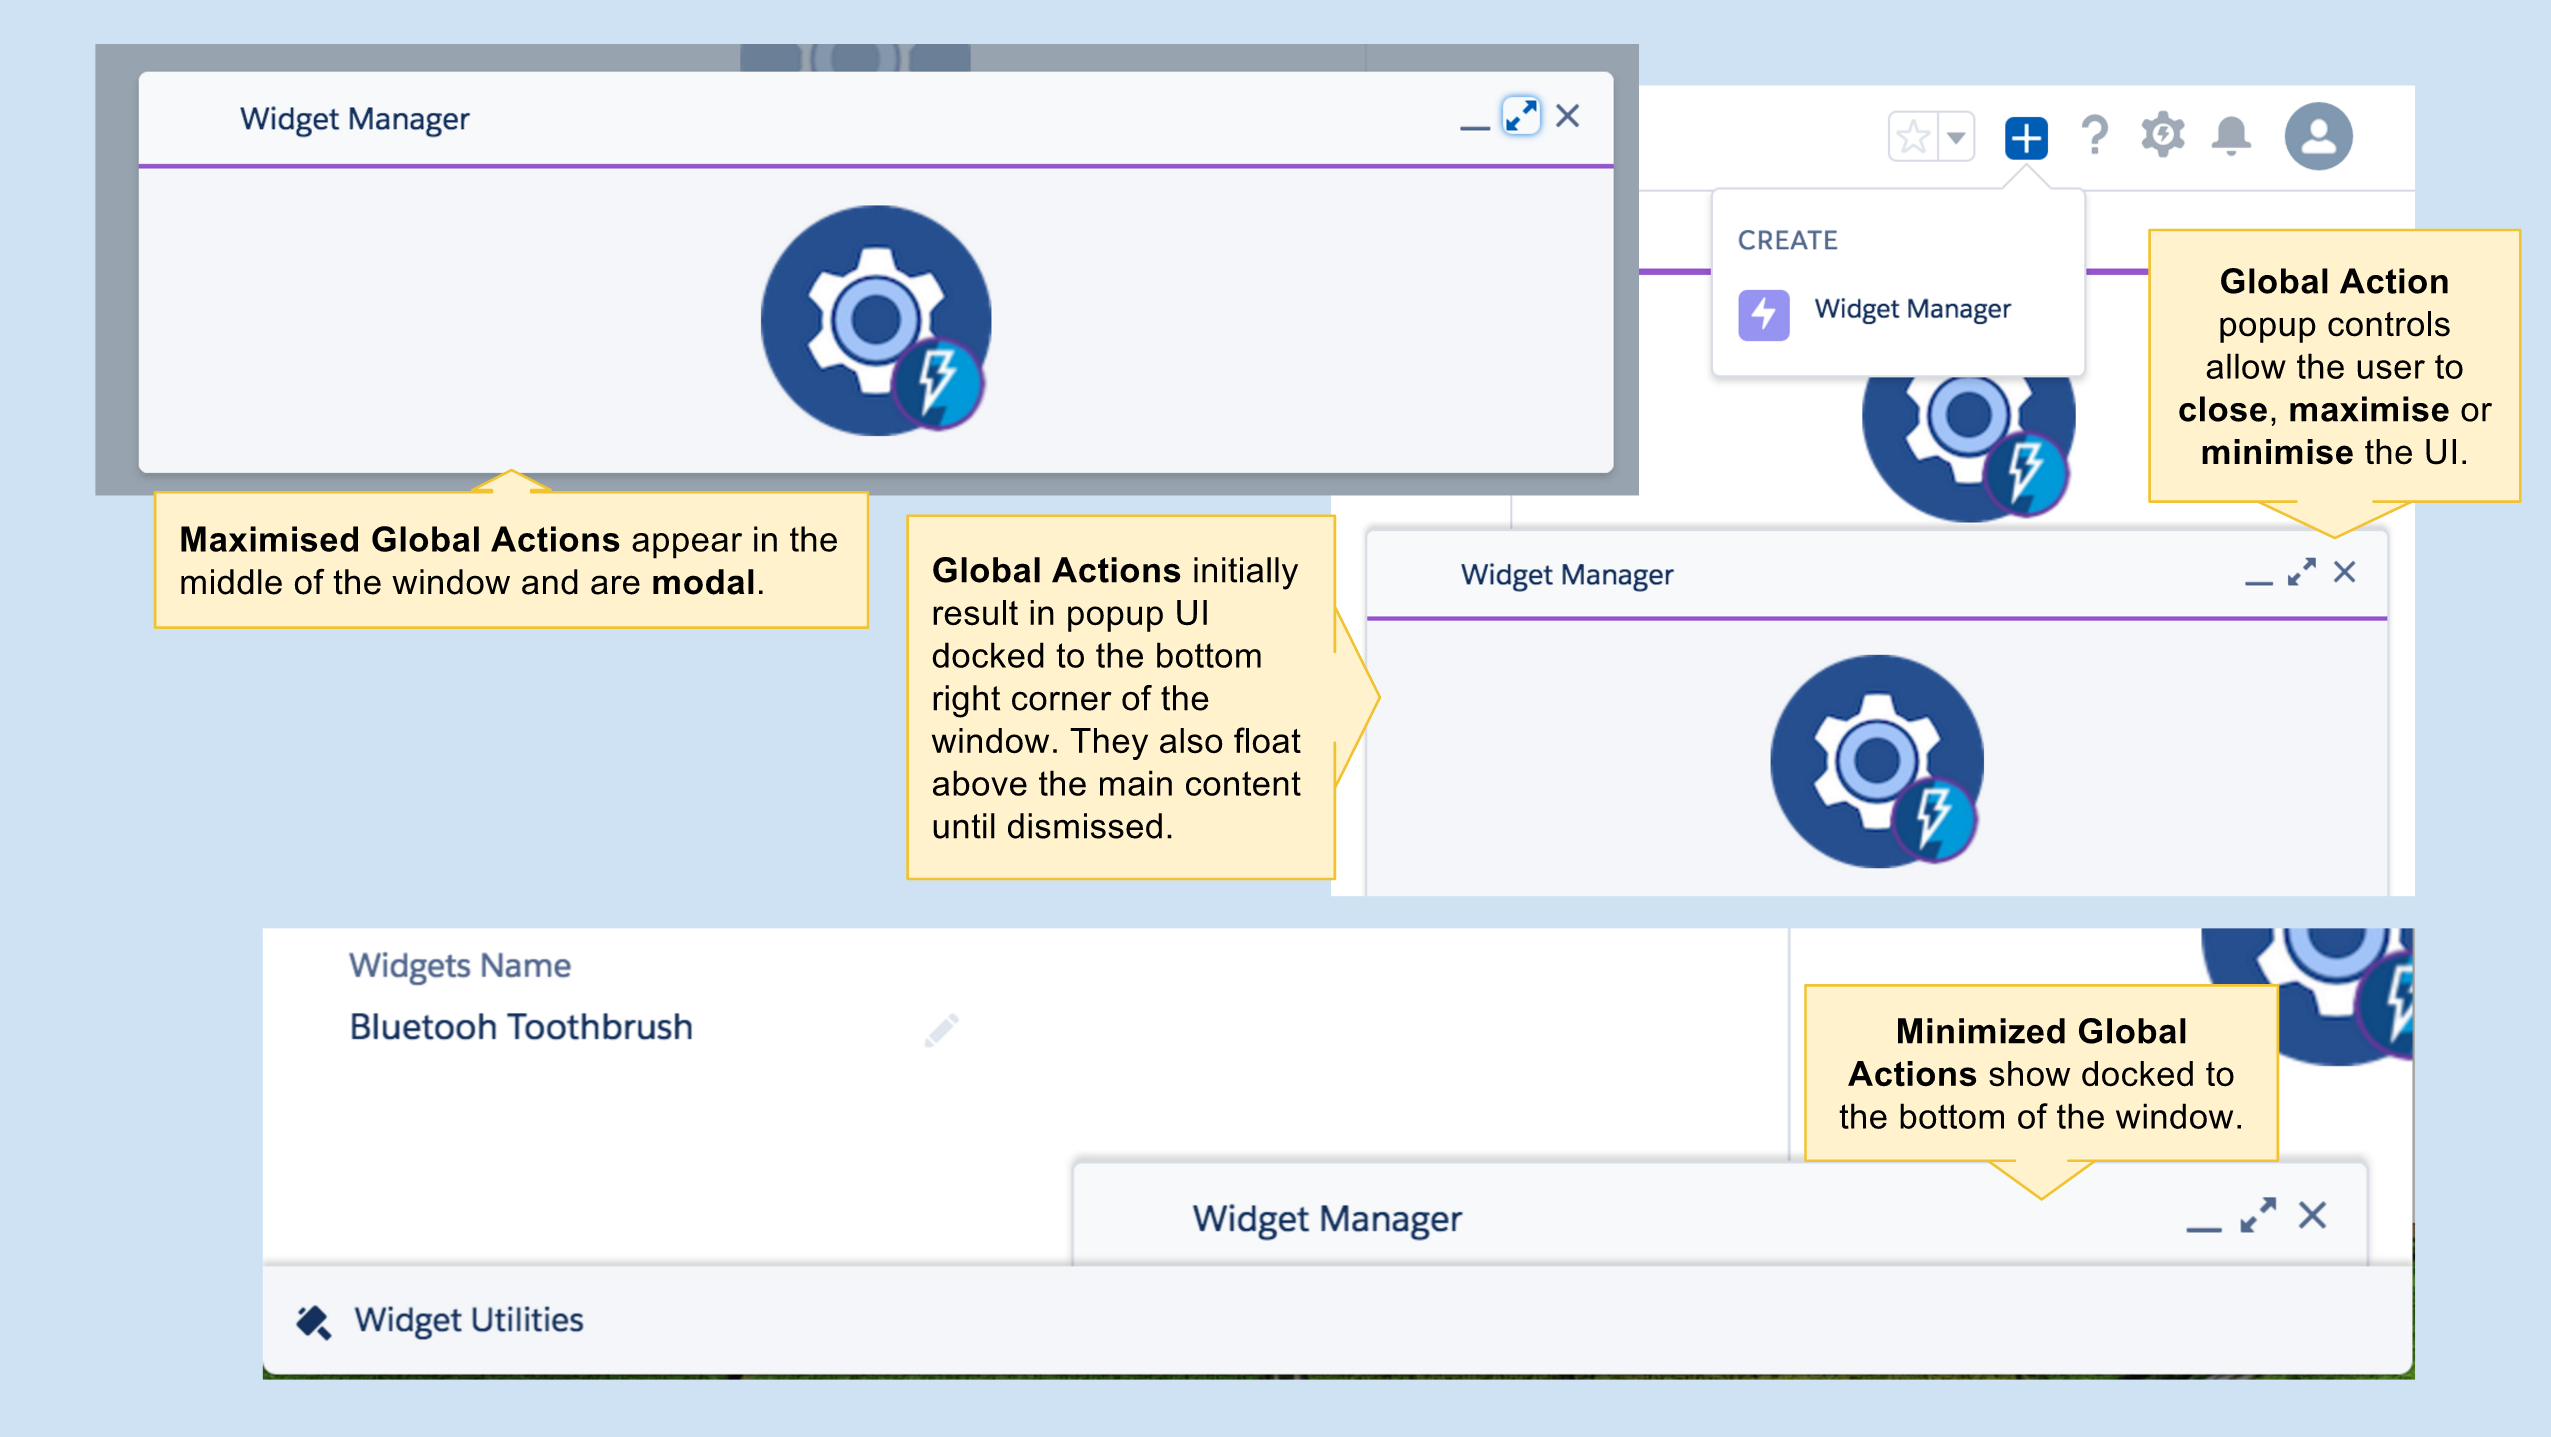

 As a self confessed API junkie, each time the new Salesforce platform release notes land. I tend to head straight to anything API related, such as sections on REST API, Metadata, Tooling, Streaming, Apex etc etc. This time
 One thing that simplifies the process is hosting your skill code through the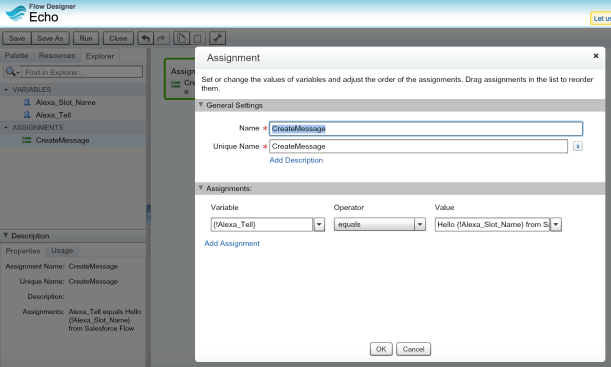
 To code my Skill I went with NodeJS, as i had not done a lot of coding in it and wanted to challenge myself. The other challenge i set myself was to integrate in a generic and extensible way with Salesforce. Thus i wanted to incorporate my old friend Flow!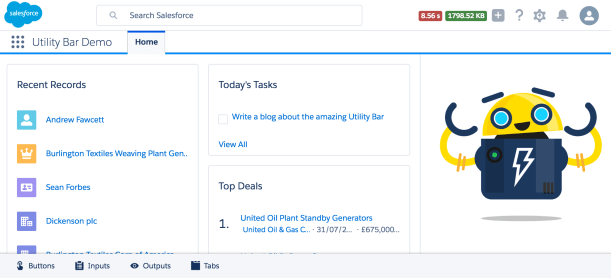
 If you cannot wait to go try out the utility bar at this point, click the Deploy to Salesforce button below and it will deploy a sample application (make sure to use a Winter’17 org). Once deployed go to the App Manager under Setup and assign the Utility Bar Demo application to your profile.

 Flow makes its presence known in Lightning App Builder this release (in Beta) and with it some new possibilities for

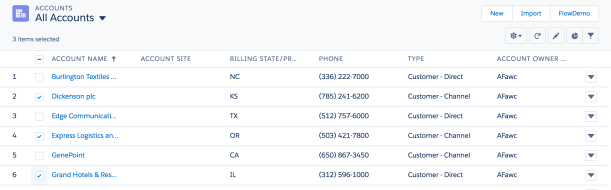
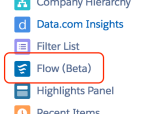
 This results in the flow from my previous blog showing the selected records. As you can see, sadly because we are using a Visualforce page the lovely new Flow styling we see when using Flow (Beta) support in Lightning App Builder does not apply. But hey being able to select the records is a good step forward for now! The setup of the Visualforce page and Custom Button is identical to that in my previous blog.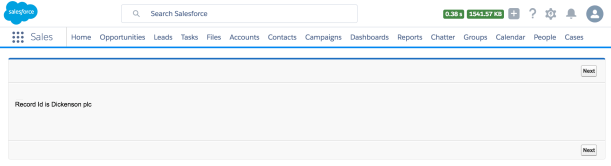
 Back in 2013 i wrote a blog post with a very similar name,
  I have also used this as a chance to get familiar with the recently announce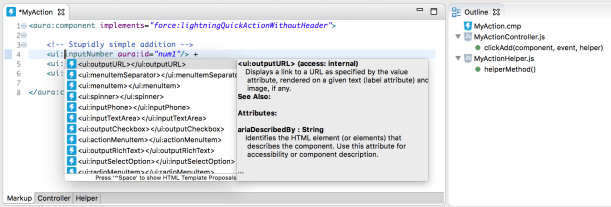
 If there is one mantra that Salesforce has been driving home, its that its good to listen to your customers. Not only does the platform provide us with some excellent tools to engage with our customers. Salesforce also make sure they are providing tools, communities and events to listen to us!
 Idea Exchange
 Andy in the Cloud