
 In this blog, I want to highlight a couple of great UI features provided by the Utility Bar in Lightning Experience. These are relatively new and accessed only via the Utility Bar API, so are not immediately accessible. This blog is based on code and material I prepared for Dreamforce 2017. However, I did not have time to dig into the code during that session so this blog provides that opportunity. My session also covered other cool features in Lightning Experience, such as the amazing App Console mode!
Enabling and Understanding the Utility Bar API
The utility bar API is enabled at a component level though it does have access to the whole utility bar. You can specify the lightning:utilityBarAPI component in any component, regardless if its in the utility bar or not. This component will not display anything but it does have a very useful selection of methods!
<lightning:utilityBarAPI aura:id="utilitybar"/>
In your component code you simple access it like any other component.
var utilityAPI = cmp.find("utilitybar");
Once you have access to an instance of the component you can call any of its methods. All methods take a utilityId parameter. Although if you call it within the context of a component running in the utility bar you can omit this parameter and the API will discover it for you. All the methods take a single JavaScript object with properties representing the parameters to the method.
utilityAPI.setPanelHeaderLabel({ label: "My Label" });
One interesting design aspect of these methods is they do not respond immediately, all responses are returned via a callback. To do this the API uses the JavaScript Promises pattern. Fortunately, its a pretty easy convention to pick up and use. It is worth taking the time to understand, it has fast become defacto callback approach.
Providing Notifications
There are many occasions that you want to notify the user of something that’s happened since they last logged in or during login as a result of some background process. The setUtilityHighlighted method is a good way to drive such notifications.
You can, of course, evaluate on initialize of your component, but it’s worth considering using Platform Events, it’s really easy to send them from your Apex code or Process Builder and you can easily integrate my Streaming API component to respond to the event. The code below is a very simple isolated example using browser timers, but it helps illustrate the API and give you a basis to build one.
<lightning:button
   class="slds-m-around_medium"
   label="{! v.readNotification ? 'Mark as Read' : 'Wait' }"
   onclick="{!c.demoNotifications}"/>
<aura:if isTrue="{!v.readNotification}">
   <ui:message title="Confirmation"severity="info">
      This is a confirmation message.</ui:message>
</aura:if>
    demoNotifications: function (cmp, event) {
		var utilityAPI = cmp.find("utilitybar");
        var readNotification = cmp.get('v.readNotification');
        if(readNotification == true) {
			utilityAPI.setUtilityHighlighted({ highlighted : false });
            cmp.set('v.readNotification', false);
        } else {
            utilityAPI.minimizeUtility();
            setTimeout($A.getCallback(function () {
                utilityAPI.setUtilityHighlighted({ highlighted : true });
				cmp.set('v.readNotification', true);
            }), 3000);
        }
    },
Providing Progress Updates
By using a combination of setUtilityLabel and setUtilityIcon you can create an eye-catching progress updating effect. This sample is a pretty simple browser timer based example. However, you could again use Platform Events to send events as part of a Batch Apex execution to update on progress or just poll the AsyncApexJob object.
 <lightning:button
    class="slds-m-around_medium"
    label="{! v.isProgressing ? 'Stop' : 'Start' }"
    onclick="{!c.demoProgressIndicator}"/>
 <lightning:progressBar
    value="{! v.progress }" size="large" />
demoProgressIndicator: function (cmp, event) {
    var utilityAPI = cmp.find("utilitybar");
    if (cmp.get('v.isProgressing')) {
        // stop
        cmp.set('v.isProgressing', false);
        cmp.set('v.progress', 0);
        cmp.set('v.progressToggleIcon', false);
        clearInterval(cmp._interval);
        utilityAPI.setUtilityLabel({ label : 'Utility Bar API Demo' });
        utilityAPI.setUtilityIcon({ icon : 'thunder' } );
    } else {
        // start
        cmp.set('v.isProgressing', true);
        utilityAPI.minimizeUtility();
        cmp._interval = setInterval($A.getCallback(function () {
            var progresToggleIcon =
               cmp.get('v.progressToggleIcon') == true ? false : true;
            var progress = cmp.get('v.progress');
            cmp.set('v.progress', progress === 100 ? 0 : progress + 1);
            cmp.set('v.progressToggleIcon', progresToggleIcon);
            utilityAPI.setUtilityLabel(
                { label : 'Utility Bar API Demo (' + progress + '%)' });
            utilityAPI.setUtilityIcon(
                { icon : progresToggleIcon == true ? 'thunder' : 'spinner' });
        }), 400);
    }
}
Summary
There is still plenty to dig into in the code samples from the session. You can also deploy the sample code into an org and try out some of the other interactive API demos. Enjoy!


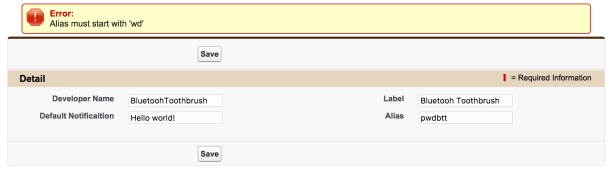
 Your customers may not want every user to have the ability to activate and deactivate features as shown above. The sample application associated with this blog includes a Manage Features
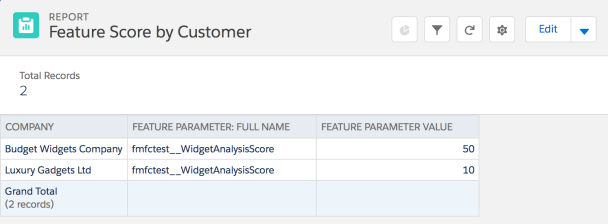

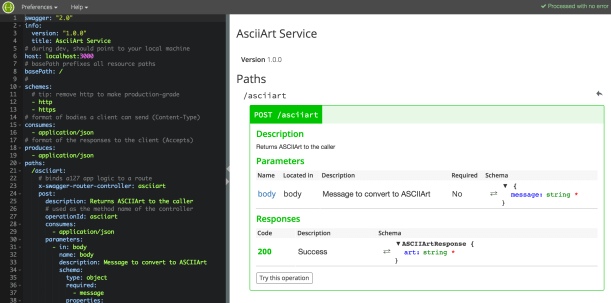


 Swagger Editor, the interactive editor shown in the first screenshot of this blog.
 When you have more complex custom metadata needs or multiple custom metadata types, the UI requirements for users to manage records may also need to be more sophisticated. For example if you wish to build a setup wizard or type of visual editor. Much like you see with the Flow or Process Builder tools. So if you find you want to build your own UI for custom metadata records what is involved?
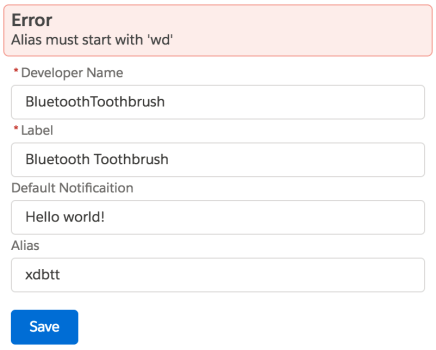


 This was my first TrailheaDX and what an event it was! With my Field Guide in hand i set out into the wilderness! In this blog i’ll share some of my highlights, thoughts and links to the latest resources. Many of the newly announced things you can actually get your hands on
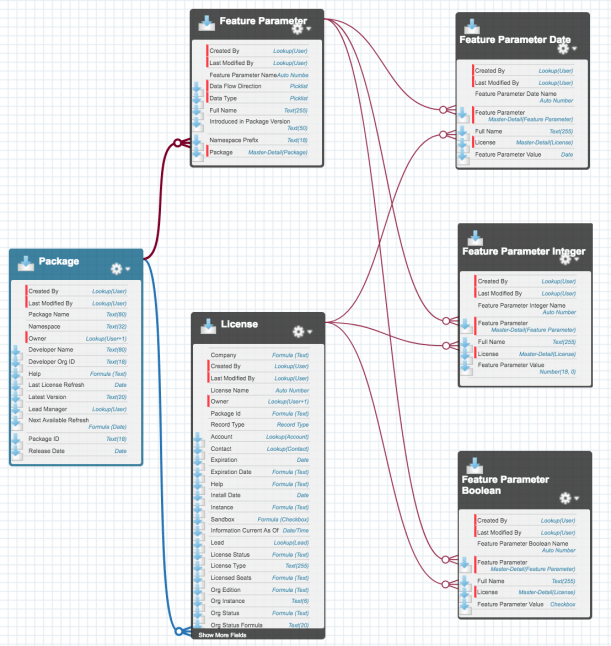
 The ability to create custom fields is a key feature when it comes to customising. Shortly followed by using features like Validation Rules, Workflow, Process Builder, Flow etc. Have you ever developed a solution that also offers the capability to consume user defined fields dynamically? If so you will have used a Custom Object or Custom Setting with a text field to store the field name/s to use.
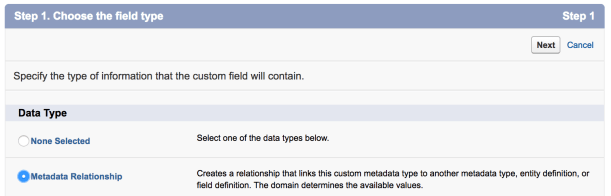

 As a self confessed API junkie, each time the new Salesforce platform release notes land. I tend to head straight to anything API related, such as sections on REST API, Metadata, Tooling, Streaming, Apex etc etc. This time