The Dynamic Flow Component (DFC) allows you to further extend your use of auto launch and screen Flows within Lightning Experience and is inspired by a conversation between SFDCWizard and myself at Dreamforce 2017.
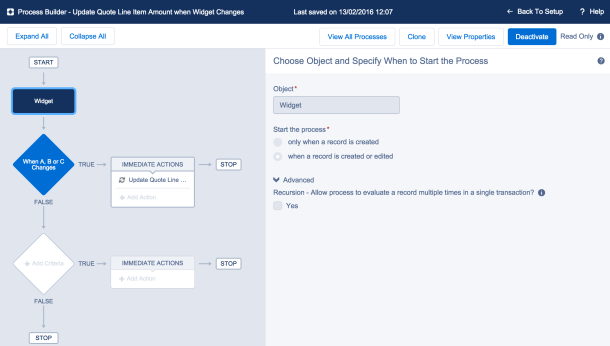
In this release you can use this Lightning Component on Record Pages and in the Utility Bar. It will monitor the users record navigation and edits and run a specific Flow based on rules you define. Additionally the component allows Flow logic to show toast messages, navigate to other records, tabs and interact dynamically with the Utility Bar.
Demonstration and setup videos
- Basic Setup
- Setting up Flows
- Record Update and Page Refresh
- Record Notifications
- Creating a Child Record and Navigating to it
What else can i do with this?
- Redirect or refresh the current page once a Flow completes
- Run Flow logic to determine another Flow to run based on field values
- Run Flow logic automatically as the user navigates or edit records
- Display toast messages to remind the user of a task or important fact
- Utilize the Utility Bar to implement a notification system
- Run Flows in the Utility Bar that refresh as the user navigates
- Run Flow logic to automatically open the Utility Bar if closed
- Much much more...
Getting Started
I decided to extend a package i started over a year ago, called Flow Toolbelt to contain this new component. I would recommend installing this package, unless your want to contribute to the code of this open source project. You can see the latest install link in the README file from the GitHub repo associated with Flow Toolbelt.
Preparing your Flows
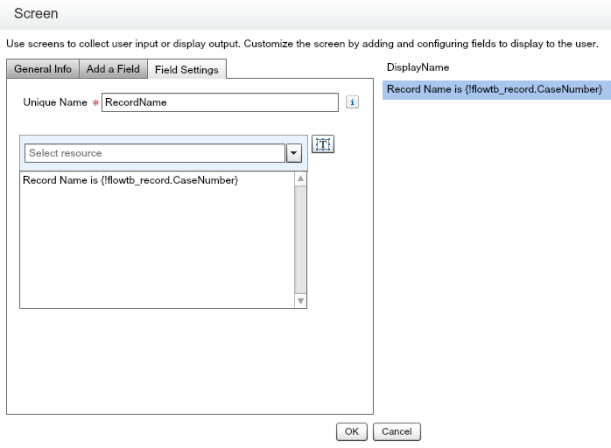
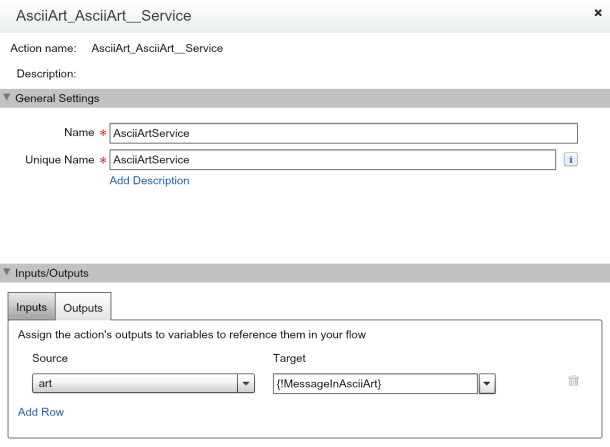
You can use both auto launch and screen Flows with DFC. For now lets focus on screen Flows. Create a simple Flow with an input SObject variable named flowtb_record and add a single Screen element. Configure the screen element to display information from the record passed in the flowtb_record SObject variable. The record fields populated are based on the record layout shown (using the Lightning Data Service). You can of course use the Flow lookup element to retrieve other fields or related records as needed.
Usage with the Utility Bar
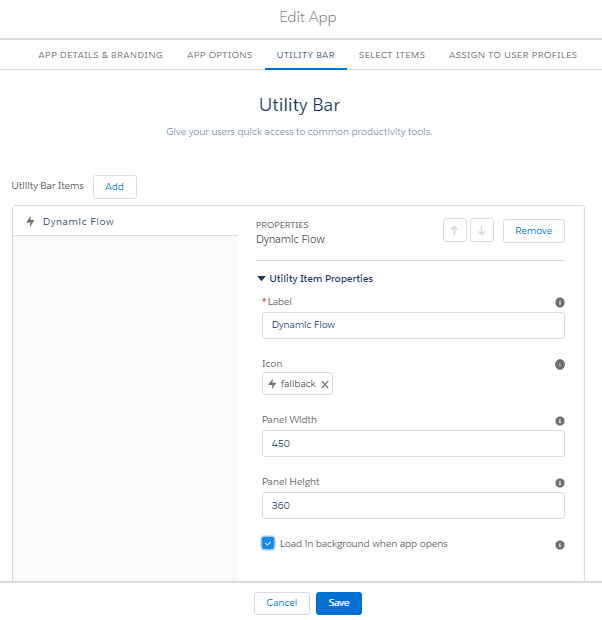
Use the App Manager under Setup to add the Dynamic Flow component per this Trailhead module here. There is no specific configuration, just decide on the label, icon and size of the panel that will popup when user opens the utility bar component.
Once configured, refresh your browser and navigate to any record of your choice. Click to open the utility bar component you just added and you should see the following.
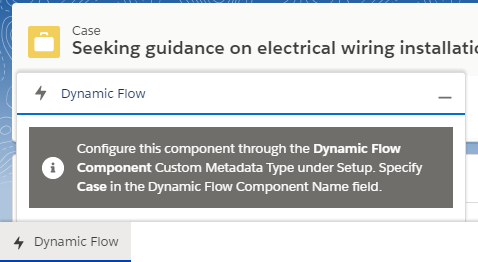
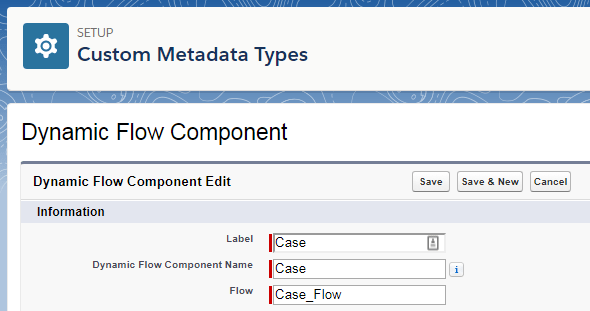
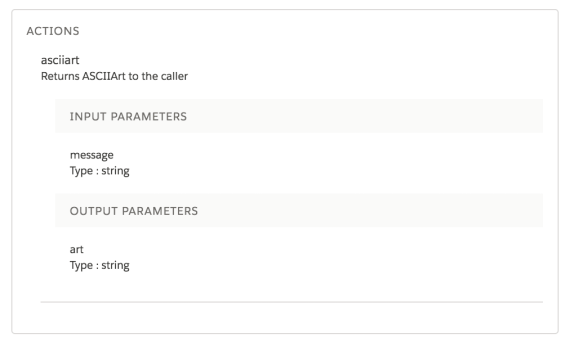
The guidance given by the component informs you what to do next and how to make the configuration specific to the object your currently viewing, Case in the example shown above. The Dynamic Flow Component custom metadata type allows you to associate a specific Flow to run when the user navigates to records associated with the given object.
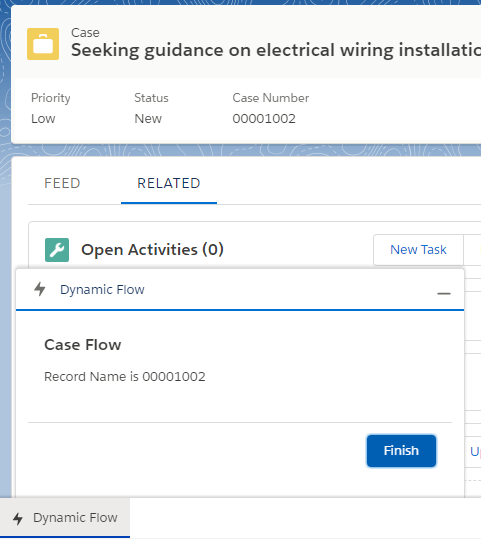
Next navigate back to the record you chose earlier and you will see it runs the Flow you configured and displays the case number! Next navigate to another record from the same object and the Flow is automatically re-run. You will also find that if you edit the record the Flow also re-runs and sees the latest record changes.
Performing Actions on Finish
When the user clicks Finish, the Flow will reset as normal. However you can also perform one or more of the following actions by assigning specific output variables in your Flow that DFC inspects to drive calls to applicable Lightning APIs and Utility Bar API. This approach is intended to be somewhat generic (or at least easily extensible by community developers) to allow for more flexibility in accessing a broad range of the navigation and notification features available in Lightning Experience.
Showing a Popup Message
Before your Flow ends use the Assignment element to assign a set of output variables as follows to show a popup / toast message as shown below. Assign the flowtb_event variable the value of e.force:showToast and set the variables flowtb_param_title and flowtb_param_message accordingly.
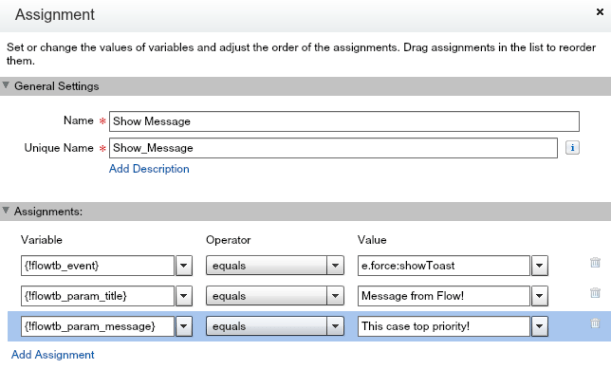

NOTE: Use variables defined as output, otherwise DFC will not see them. You can also set other parameter values to further customize the appearance and duration of the message, as described in the developers docs here.
Navigating to a Record
To automatically navigate the user to a given record, such as one the Flow just created. Assign flowtb_event variable the value of e.force:navigateToSObject and set the flowtb_param_recordId to the Id of your desired record.
Closing the Utility Bar
If you are running DFC within the Utility Bar, you can automatically close it on behalf of the user once your Flow completes. Assign the flowtb_minimize_utility variable any value you like. This can optionally be used in combination with flowtb_event as well.
Running Auto Launch Flows
Sometimes you might want run Flow logic in the background or before the user sees a screen based Flow. Auto launch Flows can be used by DFC to run automatically in the background as the user navigates or edits records. The output actions of these Flows can be any of the above and the following actions.
By setting the optional variable flowtb_flow to the name of a given Flow, the DFC will automatically run that flow when the current one completes. This allows you to dynamically control which screen Flow to run based on record details.
Utility Bar Notifications
The Utility Bar is a relatively new feature in Lightning Experience, but is well worth more of your time if you have not explored it, even for non developers. You may want to start with my Dreamforce 2017 session Lightning Experience as a Platform, past blogs and the official docs. One of the coolest features is the ability for components in the Utility Bar to be highlighted dynamically, this allows you to build a notification system.
Use auto launch Flows that use the flowtb_record variable to conditionally set the flowtb_utility_highlighted variable (any value is fine). You can then draw the users attention to the Flow you want them to run by clicking the Utility Bar to open it. DFC will automatically remove the highlight for you btw.
Opening the Utility Bar
You may want to go a bit further than just highlighting the utility bar, by automatically opening it under certain conditions. To do this set the flowtb_open_utility variable (value does not matter). If the user did not have the utility bar open before hand DFC will automatically close it when the user navigates away from the object.
Summary
There is quite a bit of potential with the design of DFC to do more actions than those described above. With a few more tweaks it could drive the default field values shown by Record Create Dialog, as well as implement Lightning Quick Actions, meanwhile i am keen to see what folks do with this initial version.
While researching an issue with auto launched Flows during development of this component i came across some blogs by Doug Ayers. He has been following the same train of thought as myself in respect to detecting record editing. Doug and I had a brief chat and we will hopefully be teaming up on further DFC work, thanks Doug!
Finally i created a Success Community Chatter Group for this component. Feel free to join and post any questions or ideas you have. You can also report bugs and enhancement ideas via the GitHub Issues tab. Enjoy!
 Its been nearly 9 years since i created my first Salesforce developer account. Back then I was leading a group of architects building on premise enterprise applications with Java J2EE and Microsoft .Net. It was fair to say my decision to refocus my career not only in building the


 Swagger Editor, the interactive editor shown in the first screenshot of this blog.


 This was my first TrailheaDX and what an event it was! With my Field Guide in hand i set out into the wilderness! In this blog i’ll share some of my highlights, thoughts and links to the latest resources. Many of the newly announced things you can actually get your hands on


 ‘m proud to host my first guest blogger!


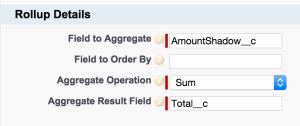
 Either way i knew i had to have some kind of physical field other than a Formula field on the Quote Line Item object to notify the rollup tool of a change that would trigger a recalculate of the Quote > Total. I called this field Amount (Shadow) in this case, i also left it off my layout.